DAVINCI RESOLVE SPEED EDITOR - Does it work on the EDIT PAGE?! Overview, Q&A and Demonstration
Jun 06, 2021This is Mr. Alex Tech and yes, we are finally going to take a look at the long-awaited Davinci Resolution Speed Editor keyboard panel. It's a small keyboard that is designed to help you cut faster within Davinci Resolves 17. Now there are two points there, I just want to reiterate first that it is primarily designed to be used with the cut
page
rather than theedit
page
; however, it willwork
within theedit
page with a few exceptions which we will cover later in the video and is designed exclusively fordavinci
.resolve
17 and notdavinci
resolve
60. Now thespeed
editor
itself costs £282 in the UK and $295 in the US.
However, there is currently an introductory offer which means that if you purchase a resolution studio license from davinci you will get davinci resolve
speed
editor
for free now, the license is exactly the same cost, so you can buy a license of davinci resolve studio and you get the davinci resolve speed limiter included, so if you have been been on the fence about upgrading to davinci resolve studio for a while, now is absolutely the time to do it because now you have this included. Blackmagic sent it to me directly. However, I think resellers have started distributing them worldwide, so I hope you can receive yours if you have ordered one in the next In a couple of weeks, in the box you get the speed editor, obviously, then you get a couple of small pamphlets.
More Interesting Facts About,
davinci resolve speed editor does it work on the edit page overview q a and demonstration...
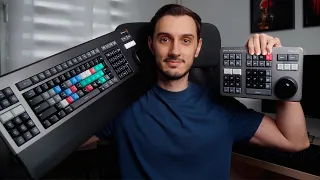
There is no full manual here, there is simply a link to download the PDF copy from the website and there is no SD card or software either. installer again, you do it all online, there's also a couple of Blackmagic stickers, which is always nice and then you get this USB type C to type C cable to connect your speed editor and here it is, this is the speed editor of davinci resolution itself and as You can see that it is relatively compact, measuring 156 millimeters high and 245 millimeters wide and weighing around 800 grams. Now it's a predominantly plastic build, but it feels very well put together, there's absolutely no flex in the chassis, now the keys.

They feel like mechanical keys, have a nice tactile feel, and provide a lot of information on top of the speed editor. We have the only port which is type C port which is used to connect the speed editor to your device. Now it's worth noting. Note that you can of course connect it using the Type C to Type C cable included in the box. However, my PC
does
n't have a type C port so I bought a type A to type C cable and itwork
s fine if cables aren't your thing, the speed editor also has a built-in battery and bluetooth connectivity so you can connect it to your PC or laptop or whatever you are using via bluetooth instead of cable.
Now connecting it is very easy, just open your bluetooth connectivity on your machine find the speed editor connect it like any other device it takes two seconds and the job is done. The selector wheel on the right side is a metal construction and has a really nice rubber texture around the outside to ensure you can get a good grip, it has a really nice weight to it and is really nice to use. Above we have three keys, we have scroll and scroll. Now these three keys control how the seek dial works so you can use it to make precise adjustments to your timeline or you can use it to scroll through your timeline very quickly.
Above we have our source and timeline buttons. Simply use these to jump between your source media and the timeline itself in between. We have our stop and play button here and then above, we have all these camera buttons. Now these camera buttons only work with the sync tray inside the cut page at this time, they do not work with traditional multiple cameras. the edit page, so it would be nice if that feature were available in the future. Above we have a selection of general keyboard functions, so we have escape transitions, split sync, audio wave removal and full view to the left of that. we have our smart edit modes, so we have a smart insert foreground on top, we append ripple override and font override underneath, we have our two big white keys here, which are in and out markers, then we have our seek dial, live trim, so use the wheel combined with trim in trim out roll swipe source swipe destination, then we can also adjust the length of any transition by holding down the transition duration button and then under there we have our transition type change, so when we edit an edit point I can choose to have it as a standard cut, a fade, or a soft cut using those three buttons, cold and out of the way.
I have a couple quick questions that I've been asked a lot since receiving the speed editor, so I'm going to go through them and try to get answers first. I've already covered it. Does it work on edit page? The answer is yes, but there are some features that are slightly limited and you can skip them. See all the way to the end of this video to see my actual
demonstration
of using it within the edit page. Does it work on any other page within davinci resolve? It actually has very limited functionality on the color page, the blend page or the fair light page are designed specifically for the cut page as mentioned, but then it will work on the edit page.Can it be used with anything other than davinci resolve? No, this is specifically designed to work in conjunction with davinci resolve and davinci resolve only once you have closed davinci resolve all the buttons it stops working, you can't use it on anything else, can you customize the keys to your liking at this time ? No, you are limited to using only the old results velocity editor as it is designed to be used again out of the box. Blackmagic may choose to include that in the future we will have to wait and see if it can be used in conjunction with a traditional keyboard or mouse.
Yes, you can still use the keyboard and mouse within Davinci Resolve in exactly the same way. Personally, I found it more useful. when I connect it to a laptop, I have it connected right now to a macbook air and it's really nice to have next to your laptop instead of a mouse, so I'll use the keyboard for certain things and the trackpad and then I'll just go through to Davinci's resolution speed editor to use the dial and a couple of other shortcuts there. How long
does
the battery last? Actually, I do not know. I haven't managed to spend it yet, but it certainly looks like it. so it lasts a considerably long time after a few hours of playing with it on bluetooth, I still have eighty to ninety percent of the battery left, so you can easily get a full day of editing out of the speed editor dimensions resolution how do you check battery level within davinci resolve 17 there is an area where you can go to check the battery level of the connected davinci resolve speed editor.Can the speed editor be updated? Yes, you can connect the speed editor via USB to your machine and then update the firmware as Blackmagic version. With all that out of the way, let's open up davinci resolve and take a look at the speed editor in action. First, you generally use two hands, so you place both hands in the speed editor, so that your right hand is on the selection wheel. and then you can use your left hand to jump between any shortcuts of course you can still have your hand on the keyboard or mouse and just do the shortcuts with your left hand but it works for you so the first thing we have is this line timeline and source buttons up here, so if we press the timeline we'll just make sure that we're on our timeline.
If we press source, this will open our source tape now as you can see it has opened all of our footage into a source tape now which includes the two separate containers that I set up so we have this one here which is some music and then we have this footage from file here if we just want the source tape to be for this general footage than just double click on the date to open the source tape just for this container and then from here we can use the jog wheel to scroll forward and then back Now the source tape combines all of your media into a single source tape, so if I have to click on each one, we can scroll through all the footage as if it were in one big timeline.
Now at this point my jogworld is set to run which means I have to rotate it and it will be proportional to the speed. I can go slow and do really slow moves or I can give it a big whip and it'll go a little bit faster if we switch it to shuttle it allows you to hold it forward a little bit to play in real time and then the more you spin that's four times the speed you can go eight times 18 times 64 whatever we want and return it to the vertical position it will stop if we go backwards that does exactly the same thing but backwards the movement is very similar to the jog, but it is much faster, so we can do really fast jumps around the timeline, so I'm going to change it back to jog and then from here we can use our source tape to try to find the bits of footage that we want. add to our timeline and then we'll use our in and out point as well as our insert markers at the top here, so let's say we want this section here.
I'm going to make one there. I'll scroll forward a little bit. A little bit, I'll do an output and then I'll just hit an add to put it right into my timeline. I'm still inside the source tapes, so I can keep scrolling forward, find the next clip I want and then we can choose to add it, put it on top, do a ripple or overwrite the source or a smart insert. I just want this to go to the end, so I'm going to press add if we back up a little bit and let's say there's a section here that I wanted as a cut, we can just mark an in and an out, so we'll go around like this, if I get to the line of time I can jump to the timeline, I'll put my playhead where I want to cut, so let's continue here and go back to the source.
I still have that in and out point marked, so I can hit the spot at the top and just place that in and out section on top of our other footage in the timeline, as you can see it can jump very quickly between your source tape and your timeline by marking your in and out markers and then using the enter buttons to very quickly build your timeline, so let's go through a few more sections here. I'm going to jump to my timeline, put my playhead at the end, we'll go back to the source, select this section here and do an in and then an out and we'll just add it to the end.
Let's go back a little bit on my timeline and we'll go here and do the source this time and instead we're going to find a new clip, do an in and out. I'm going to use a wavy override. We're simply going to overwrite the selected clip in the timeline with that new section we just chose. As you can see, you can build your timeline very, very quickly using the source tape. in and out and then the insert buttons, so let's jump to the timeline and then we can use our scroll wheel to scroll through our timeline like this.
Now if you look on the timeline, there are some little white markers and what that would do is Pick the point that you think you want to work with because it's pretty clever, it doesn't have to be right on the marker, it just has to be close. of it and then we can start using these two rows here for the trims and wheel, so on this slice here I want to trim it, I can hold down the trim, I'll select it green and then I can turn the selection wheel back and forth to trim that footage, so if I select trim, it will select the closest trim edit point and then we can pan it back and forth if it was the out point of this cut, I just need to pan to place it roughly where it needs to be, press crop and then I can do exactly the same thing. and then next to the trims, we have Roll, so we have this edit point here on my video track.
If it's in the wrong place, we can hold down Roll, it will select it and then we can go forward or back. on my timeline as needed below we have the swipe source and then the swipe destination so if we hold down the swipe we can just move it back and forth, if we press the swipe destination it will select the second clip after the edit point and we'll be able to just rotate it back and forth so we can slide it into place so ouredit points don't change, we're just changing the part of the clip we're using and that's really the main feature, meaning the part that's massively faster. davinci resolve instead of jumping into your media pool selecting your footage, choosing it in and out of your timeline, you can do it all with the speed editor, use your source tape to very quickly add all the bits you want to your timeline of time and then modify all your edit points, your cuts, all that kind of stuff just using your trims, your slides and your rolls.
We also have this close up button here on the top left, so if I put my player on my timeline and press close up it will do a quick cut that zooms in now it's not doing anything smart, it's not doing any tracking or smart zoom, but it's just going to zoom in quickly, so if we hold down the close-up button, this can adjust the y position, so I'm going to hold it down and then I'm going to use the jog wheel and I can change the y position of this clip to be able to move it up and down as far as I can see there is no way to adjust the x axis so you can only move it up and down and not left to right now here at this point on the timeline you can see that we have four clips stacked on top of each other and the first three are in exactly the same position, so if I had to try to trim what it does is select them all at once so I can trim them in and out as one piece, but what if we just wanted to trim one of the clips?
I can use the camera buttons, one, two, three and in my case four, so I pressed camera two, I'm going to select track number two, we can see the little highlight green there and then I can crop it in and out if I press three. It will select track three and then four to select track four which is limited to the cut page which does not do the same on the edit page. Next, let's move on to this middle section. We will return to the origin tray. at one point below here you have stop and play which of course just gives you the ability to stop and play your footage and then of course you can still use the jog wheel to go forward or rewind and at the top here you have got some really useful shortcuts, so the first one I'm going to look at is this split, so we can place the playhead wherever we want, we can press split and we can create an edit point to then move our playhead. any of the sections that we want to delete and then we have a fade out button, so if we press that, it will just delete that section from our timeline and move everything to fill the space up here, we have an escape, however, if we double-tap undo, so of course I just did a rolling delete.
If I double tap, we can undo that continuous delete to get that clip back, we have full view, so if I press that we can go in. In full screen we have transitions and titles, so again I don't need to place my playhead directly over the edit point. You'll be smart enough to select it with that white marker. If I hold down this button, it will appear. Of all the different transitions available to me, we can choose one. We're going to dissolve and release the blur and it's going to add that blur dissolve to the edit point, so if we put our playhead back roughly over it down here, there's the duration of the transitions. if we keep that, we can adjust the duration of that transition as needed again, if that was wrong, we didn't want to be able to just double tap undo and undo again to get rid of it, then we have an adjustment button. which allows you to adjust by turning it on and off and then if we double tap and hold the adjustment on the second tap, we can use the selection wheel to increase and decrease the size of our preview window, so now the split key also works like a movement key.
So if we hold it, the footage on our timeline turns red, so we can use the selection wheel to move it to different edit points, but it just jumps between edit points, so it's really useful just for Reorder the footage if you wish. To slide the footage, if we shoot back to this left section, here you have the scroll key, this also works as a slide, so if we double tap and hold, we now have the red marker again around the footage that we can wear. that selection wheel to just slide it around our timeline like this, now let's talk about the sync tray and the audio level, so I added some music to my timeline and if I need to adjust the volume, I can keep the level audio and then We can use that drug well to increase and decrease the volume as we need now.
If we press the sync tray, we can jump directly to the sync tray, so I've already synced this footage to the music track, so we have two. different angles and then we can use the camera buttons down here so that at any time I can press camera one, this is my camera, one point. Then I can modify the in and out points so I can choose the in and out points for camera one and then I can choose to overwrite source, extract or overwrite, so I'll hit overwrite source and then add that section to my timeline .
Then we can move to the next section wherever we want and then if we want to press camera 2, it will select camera 2. We can also use that in and out from there and then alternatively instead of clicking on the cameras marking in points and output and then insert it, we can actually just hold down the camera with two buttons to select our camera. angle and then we'll use our jog wheel to play and it'll just position the camera to track, so if we want to go back to camera one, we'll click and hold on camera one and do the same thing now, which is really cool about this. .
It's that if we go to full view, we can see all the different angles inside the sync container in full screen and just edit the footage in the multi-camera sync container as we go so we can hold the camera, we can go through and we can see the footage what we have. Then we'll press camera two and continue and you can quickly build this timeline, so of course, here you have options to select between video only and audio only if necessary and lastly, you have live. overwrite and that pretty much sums up the basic functionality of the speed editor within the cut tab, so how much of that actually carries over to the edit tab?
Let's jump to the editing tab and take a look, first of all, let's talk about the selection wheel. the jog wall works fundamentally the same way here as on the cut page, so I'm currently set to jog. I can move around my timeline so I have access to the shuttle and scroll to move around the timeline faster if I need to and then we have the source and timeline buttons. Now they work, but they're not as useful as they are on the cut page and that's mainly because we don't have access to the source tape, so if Press source.
I can jump to some source media, but it will only jump to the current media that I have selected so I can see it here. This clip is highlighted in red. This is the one we currently have. Then I can scroll. Through it, using the jog, mark the in and out points and then use all these different insert options if necessary to get everything working normally. I'm just going to hit Add to add that to my timeline and then if I go to the source, all we're going to do is go back to the exact same clip, so it's okay if you want multiple sections of the same clip, but obviously it's not so useful as the source tape to jump between different media, all I need. do in the media group with the mouse, just double click on the media I want.
I can then select the in and out points and add them to my timeline as I need, alternatively what I could do is select multiple media and add them to your timeline like this and then edit it or cut or trim it in place on the timeline and work that way instead, once in the timeline, these buttons here at the bottom left work the same way you would expect, so we have rolls and trim slides. If we just hold down the trim button, I can trim to this end point here and if you hold down the trim button, I can trim to the exit point.
If I get to this edit point here and hold down the scroll button, I can move this edit point. back and forth like this and then if we hold down the slide source, I can slide this source and the same for the destination, if we double tap and hold scroll to select the slide, I can slide this clip back and forth on my timeline, so we have Also then I got cut, dissolve and soft cut, so if I go to this edit point here and press soft cut, it will just add the soft cut instead, so in this middle section, the only thing that really works is the play and pause button. because all these camera buttons are linked to the sync tray which of course is not available within the edit page, only the cut page is moved to the top row of buttons, here we have the escape which also works as undo so if I double tap I can undo like this the transition button will add a transition and it will add the standard transition so if I just press it I will add the transition like this however if I hold that down button, I don't have access. to the transitions popup menu like I do on the cut page because it is not available within the edit page, the sync tray of course is limited to cutting so it is not available, neither is the level button Audio works so if I held it down, I could adjust the audio, however I currently don't have any audio for this track.
I have a separate music track here, so what I have to do is click on the music track, then hold down on audio and then I can adjust the audio levels for that. The full tracking view works normally, so I can go in and out of the full screen view, then we have snapping, which allows you to turn snapping on and off, and then we have this split and wave delete so I can move my head where I want it and then if I press split it will just add a cut below the timeline; however, as you can see, it is made of cutting across the entire timeline, so a cut was applied here to this video clip and to this separate video. audio and that's because we don't actually have a clip highlighted when we did the split so it just rotates along the timeline so the problem with that is if I moved my playhead over this clip here, let's say I don't want to do anything with the music track, I just want to delete this video.
If I press continuous delete, you can see that it will actually extract or delete a section of the audio as well, so to fix that, what you can do is go to the timeline. and make sure that selection after playhead is enabled and what that means is that wherever the playhead is, it will also automatically make a selection, so now you can see that the clip is highlighted in red, while before it wasn't, so now if I press a split, it will just split on the clip itself instead of along the timeline. If I then hit delete on continuous, we'll just delete the clip instead of modifying the audio as well.
Now that we have that in mind, there is nothing. There's an easy way to select which track you want to edit when you work on the edit page, so unlike the cut page, if I hover over this section here where we have several different tracks, I can't use one, two , three or four camera buttons to select the relevant track, it will just guess which one it thinks I want to work with by whichever one is closest to the playhead, but obviously that gets confused when there are multiple tracks all in the same position, so yes, as you can see, you can do it.
Work on the edit page, but you'll get more out of your speed editor if you stick to the cut page. Now it's always hard to adapt to a new hard red piece like this because you have all this muscle memory that you have. built from the use of a keyboard and a mouse, if you then get used to its speed editor in theedit page, it will be even more difficult to try to transition to the cut page, so my personal recommendation if you ordered a speed editor when it arrives just try the cut page use your speed editor on the cut page exclusively when less initially even if it's just for a short period and see if you like it and see if you can feel the benefits if you don't enjoy Cut the page with speed and this one is pretty good.
Skip to the edit page, but if you want to get the most out of your new purchase, I recommend you start testing it on the cut page, now that covers pretty much everything. wanted to cover in this video, I hope you found it useful if you have any other queries or questions about the speed editor, anything you would like me to cover please let me know in the comments section below and then if you enjoyed this video, don't Don't forget to give me a little thumbs up if you have any other comments or general comments, also write them in the comments section below and if you're new here, you enjoyed this video.
I want to see other davinci solve general tech stuff and the odd vlog here and there, maybe consider hitting the subscribe button for me. Thank you very much for looking, enjoy your speed editor, if you get one, take it easy, see you next time. your foreigner
If you have any copyright issue, please Contact
![Speed Editor Tutorial \u0026 In-Depth with the Cut Page [PART 1] for Beginners by a PRO.](https://i.ytimg.com/vi_webp/26OfvGXGezw/mqdefault.webp)