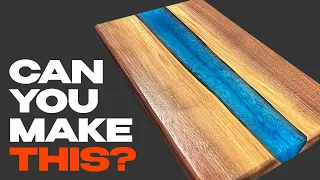
How to Make Epoxy Cutting Boards
May 29, 2021Hi, I'm Caleb, you can do this in this video. I'm going to
make
someepoxy
cutting
boards
and with Christmas coming up I have these and othercutting
boards
available for sale on my website and this month's patreon contest prize is the Rigid Octane Jigsaw , if you are interested in those things the information in the description, otherwise stay with me and I will show you how you can do this so my jointer was out of order when I started working on these and the wood I am The use has some twists, so I improvised a planer sled to flatten them out.
I just used a large flat board I had lying around and some hot glue sticks to balance the twist and secure the board before running it through the planer once up. came out of the plane of the planer. I could take everything off the sled and then run the other side through the planer, then cut off the ends that have some marks. I left it long in case I had any cuts on the planer. The next step is to remove it - leaving it on would be great, but I'm afraid the crust isn't attached enough and I don't want it to break in half, so I'm going to remove it.

More Interesting Facts About,
how to make epoxy cutting boards...
A knife
make
s the job pretty quick, but it doesn't. The only tool you can use, a chisel, works pretty well, you know, use what you have. I'm going to stick with the ripping knife, although now that if we mill these out, I can start dividing them into The sections that will become the boards will probably get three of this, maybe four of this. I measure and mark the boards at approximately equal lengths. Everything at this point are still approximate measurements. I use a square just so I can hit straight. lines to follow, but in reality there is nothing to be square; at this point i used the jigsaw to break up the boards, there is likely to be some tension on these and the jigsaw is the least likely to jam or kick back so it is the safest.
To mark the center of these boards, I like to lift my ruler to find the middle, then lay it down and mark it because my ruler is very wide, if I just lay it down, it plays tricks on my eyes and makes it really difficult to find the Center fairly accurately, a chain saw or cable saw jig are two ways to get a really clean split on these boards. I don't have them though, so I'm going to do another rough split and clean it up, there are a lot. of tool options for that, just do what works for you after cutting the first one.

I realize I should probably mark the board so I don't mix them all up, so I do that and then cut the rest in half and whatever method I want. When using it, it's unlikely to be flat as you can see mine aren't perfectly flat, so the next thing is to get a flat surface there, like milling anything. Now that one side is flat, it's much easier to see how unflattering manual planes are, so if you don't just come to your really weird 1890s jointer with an absurdly expensive, she licks the cutting head, sprays a little bit of glue, lay down your sandpaper because it's a nice flat surface PPE and fight that way now that I have a ruler to reference.
Everyone cut the ends of the boards square straight down the middle and lengthwise so off camera I set up this which looks like a lot but is actually pretty simple and if you've seen
epoxy
pores this is nothing new . I just got some plywood. I used a lot of duct tape. Any really good tape will work fine because epoxy doesn't stick and the idea is just a non-stick surface so you can get your pieces out. I made a compartment. for each board and I didn't do a good job of measuring, so I have this extra area here to make sure everything stays right.I had one of these. I think they are actually silicone soap making molds that I pour the excess epoxy into. and as you can see I cut it out and that gives me something to push on my clamp tube, but it's covered in silicone that the epoxy is not going to adhere to, so if there's anything to help me exert a little bit of pressure down to make sure my stock doesn't float but it doesn't stick to the epoxy either, so now it's time to mix it up and give the build of this a grade. You can see that I obviously taped all the surfaces for these types of pieces.
I glued the bottom and then glued a piece of the top, but after placing everything on the saucer, I made sure to glue all the seams as well to make it as tight as possible. The last thing I want is, you know, a half gallon of epoxy dripping everywhere. and for this I'm using a chunky total boat set, of course there's a sponsor for the video. I have a discount code in the description if you want to see it and this is a three to one this is how we're going to mix three parts of this - one part partner now we just stir forever and you should wear a respirator you should wear a respirator if does this - the nice thing about working with these thickeners before epoxies is that it's not a race against the clock it's normal two to one even in these larger batches if I was doing something normal two to one I'd be very worried that this started with me and you can see that I have already prepared it.
I'm going to do it. I mix this up, I'm not sure how much I'll need so I'm going to play it by ear. I could have done all the math but that would be Matt so instead I just have a bunch mixed up here and I'll pour it in mixing my colors as I go and if I run out I'll just mix some more we won't get back crazy with my pigment because I want it to be translucent, not opaque solid, yes, I like it. Those kids got away with a little less pigment, but it's pretty deep here once I pour it in, she would be a little more translucent, okay.
I'll start with the first one. I have about 10 ounces here. That's just a reference for when I do the others, how much to separate. I'll see how far it goes and these cups are really useful because they give you all the different measurements of proportions anyway, let's see how it goes and hopefully nothing leaks, okay? I'm about halfway to where I need it, so I'm going to mix another can and see how it goes, allow me another 10 ounces of pigment added and this time I used a little more pigment because it's a little more translucent than I .
I want to see how this goes, okay, getting closer to the top, so I might need a little more. Yes, I think I need a little more. I'm going to go ahead and finish this, but Memphis, I'm in Memphis and the colors of Memphis. They're blue and white, so I'm going to add a little bit of white to this and try to blend it together and see how it goes. Oh, here we go and this has just started to peak, so it's a perfect shape and yeah, I like it. Let the boys dip them, cool them down, okay, that's good, see this, this is not good.
I'm worried there will be some drips so it's time to add more tape quickly, so while thick coat epoxies have their advantages, they don't like being able to release. air bubbles that release gas and can be thick and not have to make a lot of fine pores, the other disadvantage is that if it has somewhere it can leak it will because it won't set up quickly so it will just find all those little ones. places and they just leak well the crises have hurt I think I stopped the drip. The bad news is that he used all of this and when I realized that the first one took 22 ounces of fish here it wasn't going to be enough, all I had left here.
It was 11. I'm missing two more, they're a little bigger, so I'm going to go ahead and mix up another batch, starting with 20. I'll make this one emerald green, yes, it's a nice deep color. I think it will go really well with the air dried walnut, this one will be a little easier. I'm not going to mix any colors no I think I want deeper add a little more pigment yeah it's hard to know how much pigment to add because it looks a lot darker in my container because it's deeper and when it comes in here and it's not so thin, you know, in itself it's not that vibrant.
I'm her, it seems like I'm just touching her. Hello, just a little more and. I think that's good and for the last one I tried to experiment with a mix, I have this deep navy diamond, which is a really nice deep blue. I used a lot so I have a little better idea of how much pigment to use. I'm going to add a little bit of this battleship gray diamond and I'm not going to blend this completely to make it like this, I want to keep it a little bit veined, so now the last poor one, yeah, and I can detect the gray. it shines there subtly it's so nice that you like it now I guess we'll be back in three days and I hope it's not all over my apartment and if you're wondering about this, this is a coffee table for the coffee table that falls apart, that's it a collaboration. with Richard from 42:5, who is an amazing metal fabricator who we're meeting up with soon for this, so if you want to check out that video and see what it looks like, make sure you subscribe and hit that notification bell and this is part of it. of my new living room, which will also include a cool couch and a console table, let me give you a sneak peek of that couch, here's where I am on that couch, these are the side pieces, we have this really cool orange hard stripe.
Moving on, you want to see how this comes together, you know what to do, the boards I've had a few days to cure so it's time to get them out of the mold using the epoxy pieces and the silicone worked great to hold the boards together. I can see how they didn't stick at all, so now after unscrewing and tapping this a lot, hopefully without ruining the board, the duct tape worked surprisingly well and none of the epoxy stuck to it to release the boards from the bottom It was a bit complicated, they formed a vacuum lock or something and were really stuck there.
I didn't want to directly hit the boards, so I tried hanging the plywood from the edge of the vents and then hitting the plywood to bend and break it. the seal and it worked very effectively I overfilled the epoxy to flatten the boards again I sent them through my drum sander. It's important to go slowly with very light passes because sanding generates a lot of heat and when the epoxy heats up it just turns into a rubbery mess that clogs and ruins, and changing this paper is a pain and in hindsight it would have been better to lightly fill the void and then even out the wood to love it with the epoxy instead of feeling too much sanding the epoxy because the wood sands faster and easier, but lessons learned, the sanding was so monotonous that I forgot to bring you guys along for the trip, so Same thing I was able to remove all the extra epoxy from the top and bottom and leave them nice and flat, but the molds were epoxy on all sides, so I used a table saw to remove everything, but they are still on the ends, so I'm going to go for an edge treatment on these.
I used a 45 degree angle. chamfer bit on my router table, this can also be done freehand or with a hand plane, the epoxy actually routes very well. I've had good luck avoiding corner popping by routing the long grain first and then doing it across the grain, but always be very careful routing in the grain off camera, I wet the boards to bring out the grain and once they dried , I sanded them with 220 on the random orbital sander, then switched to the micro mesh pad kit and ran all the grits into the epoxy. to polish it and as I go you can see how the epoxy becomes lighter.
The last step before oiling them is to mark them with my custom furniture brand, because you can do this too, it doesn't really sell, pay me to do it. for you and now the most satisfying part: the mineral oil bath, shut up and let yourself enjoy it and as a bonus for staying here are some whale shots of other cutting boards I made, don't forget I have them available for sale in my website and the holidays are approaching anyway. I hope you enjoyed it, learned something or at least we're entertained until next time, take some time to do something.
If you have any copyright issue, please Contact