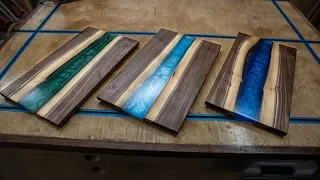
How to make easy ocean waves effect using epoxy resin - full tutorial
Jun 02, 2021Hey, so I'm going to do some really quick craft projects, so I'm going to
make
a quickocean
on top of this cutting board. I'm going tomake
anocean
on both cutting boards and Let's see how they go and I mean it's very quick and simple. I'm going to useepoxy
from www.formearriver.comusing
their craftepoxy
. It's a one to one ratio, very clear, it's incredible. They also use their pigments, they are liquid pigments, these things are absolutely amazing, so the less you use the more transparent it will be, the more transparent it will be, the more you use the more opaque it will be, so if you want a solid opaque color. you can use a lot if you want to use it transparent and I use it for all my oceans.
I use the blue and the white and the white is formulated so that you don't need to add anything to make the cells to look like
waves
andwaves
of the ocean broken with sea foam. This white will do it on its own without any other additives. It's pretty amazing, so I've mixed some, you know, my blue will be here because it's the. Mostly I have this for my white and I have this for my clear and I'll show you how I do it right now, we'll zoom in on all of these and I'll show you how I do a quick ocean, okay, on our blue here, I'm literally going to take like a drop.
More Interesting Facts About,
how to make easy ocean waves effect using epoxy resin full tutorial...
I like to drop it into this that already has a little bit of epoxy in it and we'll literally put a little drop in there like You can see it's not much, but look right away, it's already blue but it's clear so you want to mix it in really, really well, scrape the sides, get it all out of the sides, make sure you mix it all in there, very, very well. Okay, so that's going to be our glue now for our white again, now this one on the white, you don't want it to be as transparent as the blue, you want it to actually be white, so I'll probably use you.

I know, compared to what I used there, use a little more here, a good drop, I mean, you can see a beautiful white liquid, all ready to form cells, so I'll show you the secret of cells and it will probably work with more or less. any of the liquid pigments you're
using
, but especially the Formula River ones because we designed them that way so you don't have to add any additives to them. You know, I mean, it makes it a lot easier. come on this is supereasy
you have your clear you have your white and you have your blue so the first thing I'm going to do is pour my blue into my bottom wave so basically I'm just doing my bottom wave. over all of these and then I'll let it dry and harden and I'll come back the next day and do another wave on top of it which will give you that 3Deffect
which is pretty good it's nice and transparent look so we'll go ahead and do this and then just you're going to pour it in like you know, I want it to come right here because this is a matching set, so let's go ahead and do that first. let's do this one, okay, let's do this one, then, okay, you really want to get it around the edges, that's what goes together, great, get it right over those edges, all right, get it inside these little edges, all right, That's why you did a little. a little bit more of this so you can do that, give it a little bit of love here, a little bit here, okay, there's your blue, totallyeasy
, let's take a little bit of clarity, let's scratch right here where the wave is real. it would be hitting the ocean or hitting the sand breaking the wave well, so we're going to go right in the middle, okay, do it again here, okay, we'll do it one more time here, okay, sure, hit the blue stripe clear. light blue stripe the blue the blue is going to come out a lot from this because it is a darker wood, you know you can always come back here put a little more there very good, very good, great, now very simple, the white, so the first way I like to do it, I mean, I used to take the stick and do it, but now I just serve it.
I want a good amount because I want it to get up there, but I don't want you to know too much, so let's go. go ahead and let's pour it let's pour it right on the edge of that clearing, okay, pour right on the edge of that, if you get a little bit there, just wipe it off, you're fine, you can take it off later with a little bit of sand, it's okay, let's do this that seems good to me, okay for the next part, I'm just going to take a hair dryer, a normal hair dryer, no heat, just the air itself and I'm going to blow it like this. with the white it's fine so it doesn't look like ocean waves yet, but that's where I was going to tell you what the secret to ocean waves is the heat, so after you get this white like it is now, let me.
I'm going to take off my gloves, let me take the camera and show you where we are now, so if you do it like this, you're close, right, you're very, very close, it doesn't look like an ocean, there's not much. many cells, however, once you heat them up, there will be many, many cells, so you just take your torch and you want to heat it up pretty good, but don't overheat it, and you can instantly start to see the cells appear. The secret of the cells is all about your torch, you don't need any additives, as you can see now, they look like cells from an ocean, so that's what we're looking for from here.
I'll just leave it and wait for my second wave, which will hit right where the clear meets the blue, and then I'll do a third more on top of it to make it look like a complete set. They usually occur in groups of three, so you can see exactly how those cells start to form without me adding anything. All I'm using are the exact pigments from fourmearriver.com, so check it out, so I'll do my second coats. It's been about 12 hours, 13 hours and you can see there are some really interesting sales, never mind this, this is going to look like a hangover under my next wave, so on these I make them a little bit different than the tables um, I usually do it.
I'm going to do on my tables now I'm just going to use light, but because this blue is very, very faint, I think I want to darken it a little bit. I'm going to use blue next time with just white. and there's nothing clear in the middle so now it's just going to be the blue and the white to finish it off and then that should be enough so let's see what happens here just choose where you want your other wave to hit leave room for the white . like this, like this, okay taking your white, so always start with the pore of the board and move on to it, okay hair dryer, high air, no heat, I think I'm going to go ahead and put a little more white here same, here and I think I'm going to put another stripe on this one because of the long handle, so I'm going to put a little bit in there like I did before and have it come in another one right here, turn this off, so fill in any white that you want on the front of the wave I want it to be dominant right there so let's blow it up in perfect now remember the secret is the heat so as you can see there probably aren't many cells in this guy now let's hit it with the heat I don't want to burn it but I do want to take that heat there to where it begins to move like water, like this, like this, well, and you can see that it begins to sell itself only because of the heat, so only because of the heat you begin to create all those cold cells, this one had a darker wood and with these rounded edges like this the blue didn't come out as well as I would normally like but it's okay I'm going to give it to her Anyway my mom, moms love everything, these came out great, it seems like the ripple comes back down, It looks like the first wave that hits it, um, I'll look at this, uh, in about 15 minutes, make sure there are no bubbles that there shouldn't be because it was on top, it was on a layer of
resin
.One thing I want to point out is that when you use this plastic here, it's the three thousand plastic that they sell at Home Depot. and Lowe's, this was last night and just to show you how easy it all comes off, I mean, you know, we're only 12 hours in, so it's not completely hard, but even when it's completely hard, it still comes off right away , so yes. We'll leave this one here until it
full
y cures in another 12 hours and we'll see how easy it comes off as well and again I'm using the blue and white pigments of mine which are very messy. but the blue and white pigments from cormier.com, you can get them on their website, they make very good waves in the ocean.If you have any copyright issue, please Contact