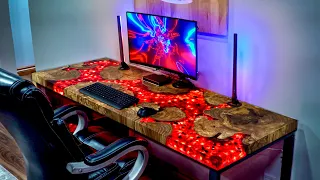
Fire & Waterfall Table
Mar 15, 2024Hello, this is a camera with Blacktail Studio. In this video I combine some things I've done before with several things I was too afraid to try in the past and I don't like weird or illegal things, it's mostly just woodworking guys, but I think. It ended up being great when I had this slab organizer made a couple of years ago. I thought about one step ahead, meaning I thought about how I store most slabs, I never really considered how I can efficiently remove those slabs from the shelves when I want to use them. them, is there any chance this says just dump?

I feel like there's a good chance if he's there, yeah, yeah, trying to get out. I didn't, I didn't think I'd get here. I don't know, uh, let's regroup the The piece of wood that I'm trying to remove from the least accessible slab rack in the world is a pretty good piece of white oak and you can see I had larger pieces of walnut in there, but I was about to tell you how incredibly heavy it is. Oak is and probably weighs twice as much as one of those walnut slabs that are the same size, but I decided I should check it out myself for once and apparently white oak is about 25% heavier than walnut, not a 100% heavier, but either way it will do.

More Interesting Facts About,
fire waterfall table...
Make a great
table
as long as you never want to move it. Now a non-carpenter who has never bought big rough slabs like this might look at this piece of wood and just not understand it and that's okay because they can look at this. and let's say there's a big low spot with a black streak, there's cracks everywhere, it just looks like a piece of wood and I don't really see the value there, whereas a professional carpenter, someone who has bought hundreds and hundreds of slabs, yes can. see the low point you can see all the cracks and you can be sure this is worthless because yes, this was a free slab of wood.
I bought it from my lumber supplier, Goby Walnut, it's all broken, it has terrible low spots on both sides. and it literally had no value to them, so they gave it to me, but a free slab is like that free puppy that says it doesn't end up being free in the end, so throughout this video I'll have a running total. Of all the expenses on this slab, starting with that first trip to creative woodworking, I'm going to reduce it to its final dimensions in a couple of stages because right now I'm basically ripping out the Live Edge keeping it as wide as possible. as I can with a good ruler and you might be wondering why I didn't do this before I brought it to the surface and that slab was too wavy and too crooked to get a nice clean cut so now I just give in. the maximum amount of room for improvement because I'm about to set this thing on
fire
and things get a little sporty when I do.
I've made a few of these Burntwood
table
s and what I found is that the most interesting part actually isn't. the Char and it's not the solid wood, it's that gradient, it's where the burn meets the wood and that's how I can control it. The first table I built I just burned the whole thing and it warped horribly and it was actually a pretty difficult project so what I'm doing here is just manually hollowing out and enlarging that natural void which I think was actually caused by a burn and I'm doing this with my angle grinder because this is going to be awaterfall
table so what I want is for that burn to really go up the leg to the side and then rotate the top a little bit and hopefully using my angle grinder will allow me completely control that process and exactly where it's burned and it still looks very natural originally my idea was to just have a big burned patch come up and turn that corner at the top but when I looked at it it just didn't look at all natural and looked like a a little bit unbalanced, so I added that streak there along the length, it's going to stay on top of the table and I'm also going to burn the cracks originally.I wasn't going to char them, but I think it's really going to help. Putting it all together While I was building this table, I realized it's been a while since I've done a spectator giveaway, unless you count the fundraiser we did to do AWI a couple of months ago, which I don't do because I do know to my audience. They would much rather have the chance to win some cool tools or materials than some sick kid they've never met just having a fun afternoon and okay, these are my people and I don't know if this is the greatest thing. giveaway we've ever done, but it's a pretty big one, we're giving away a couple of Wagner Moisture Meters that are like $550 each and if you've seen some of my previous videos where I've had disasters with trapped moisture in Wood, you know. why I like the Wagner Moisture Meter and never mind the fact that I'm now pouring water all over the slab and we're also giving away things like the Blacktail Studio Marking Knife, the N3 Nano kits, and a ton of epoxy from totalboat which is the epoxy that I've been using lately and entry is completely free, it's not like you have to buy a t-shirt to get an entry pass, everything is free and if you want more information about it there is a link in the video description.
After soaking that slab, I let it sit for about a week before moving on to this process, which is the penetrating epoxy and probably the most important part of all the burned wood and epoxy tables because you really need to seal those burned sections or you'll get a lot of bubbles, so I spent a little time with this penetrating epoxy and just sealed the entire slab while I was at it a couple months ago. I had some contractors at the house and one of them recognized me and he was very nice. He said: Hi, you do a fantastic job.
I love what you do and I thought, "Wow, you know?" I really appreciate that that means a lot to me and the next day I was caulking something near where they were working. and he looked at my caulking job and said, "Well, you sure aren't going to make a video on how to caulk anything" and I couldn't help but laugh because yeah, look at that, I'm terrible even though I've cocked linear miles, I still don't have idea of what I'm doing now. I bought these suction cup lifters probably about a year ago and I don't use them much, but when I do use them I really need them because this form, for example, was built right where I wasn't.
I don't know, maybe half of it is bigger than the slab so I had to just slide it in there and they made the perfect handle to get it down so I used it for about half a second but it was a pretty valuable half second besides sealing the section burnt With a very thin penetrating style epoxy, the next important step when it comes to building one of these tables is to use a really slow curing, deep pour epoxy for this part because no matter how well you seal it, it will still keep going. . to get bubbles like that Escape for the next 24 to 48 hours and it's just unavoidable so what I do is I use this deep pore even though it's only half an inch thick then I come back the next day this is still a little thin , you can see how much air has escaped and if I had used a thinner epoxy, all those bubbles would be trapped below the surface, so I blew them up again with a blowtorch and there was a section where there was kind of a constant tension.
A squirt of bubbles right there and those are actually going to be there forever, so I didn't seal that section well enough. I waited about 3 weeks before going back and trying to get this out of the mold and this one was actually coming out. separate very well, I always recommend using mold release, no matter what they say, use mold release, it will make your life so much easier and if you are wondering about more tips like that or why I wait 3 weeks to remove them from the mold, I have a free blog on my website where I break down basically every step of building an epoxy table.
I have other resources available on my website, if you're interested too, I'll leave links to everything in the video description and if you want, you're wondering what exactly I'm looking for here if you haven't quite figured it out. I basically have those carved bottom areas that I charred and then covered the whole thing with epoxy, so right now what I expect is happening. Do I remove just enough epoxy and wood and just leave those type of epoxy loading sections and we'll see how it turns out, although we can add another $150 to the running total of this no slab creative woodworking quote?
I think he charges $75 for a half hour. just for wood, but if it's wood and epoxy it's 150 bucks so add that 150 to the polishing total and this is where we are so far in my last video. I made a kind of denim table where I had a bunch of layers of denim. and I formed them into a Damascus pattern, ran them through the planer and then when I got them back at this stage it was all a bit blurry again and there were parts of this charred section that were a bit similar where that charred part just wasn't completely epoxy infused so what I'm doing here is getting a normal type of marine epoxy and just applying it with a brush to touch up that section and again I still don't really know what's going on but there's some way or something that's happening with that epoxy that doesn't fully infuse the denim doesn't fully infuse that loading section, so I just go back to fill it in and make sure it's as hard as the rest on the table, next problem.
I'm going to try to address one of those problems where my thinking is almost logical and I really wanted to believe that you look at it and say, yeah, it's nice and smooth and it's full of epoxy and no one thinks about it. Have you ever noticed that and if you look at it it actually looks good, it actually looks really terrible so think about it, logic was lost here and I'm actually going to fix this the right way and I guess the right way It would probably be with a CNC, but it's not that I'm too good for a CNC or too craftsman it's that one I don't have one and two I don't have room for one and three I would know how to use one if I had it So this is what I came up with: I made that really simple template that was basically cutting three straight lines, then I went back and restarted my Des step and now I'm literally going to hog this one strip at a time. a while and this was quite exhausting.
No, it didn't take me all day, but it probably took me about 20 minutes, so I did one pass after another. It's nice to have a router like this that you can remove completely. / in a single Fell Swoop, but I got there and now I just need to clean up the edges. My friend and fellow woodworking YouTuber, Jonathan Catz Moses, said he had introduced a new router plane and asked if he could send it to me and I answered one, what is a router plane and two, when can I get it and apparently he forgot to add the motor in this router because this is what he sent me, which apparently is like the equivalent of a lawnmower router, at least that's what I thought at first, but it stayed on my wall for a couple of months, but eventually I had to do a little cleaning up the edge here and it turns out that a router plane actually serves a purpose even though it doesn't have a motor in my In the last video I described how to assemble Ikea furniture the best and only way I know how, i.e. , with very strong language and unfortunately that strong language offended quite a few people in the comments who actually let me know and I know what you're doing.
Thinking you're thinking I'm just going to make fun of them, I minimize what they're saying without really listening to what they're trying to tell me, but that couldn't be further from the truth. One comment in particular left me with a really nice and well articulated question, he said, hello, this is your channel, you can create any type of content you want, however, I like watching your videos with my 5 year old daughter and I would just like to know if this language could be used. They will appear in the future and I thought it was an extremely fair and very well written question, so I did a little research and discovered on this channel that he had made 124 videos for a total of about 41 hours of viewing. and over the course of those 41 hours I did some more digging and discovered that he had said seven curse words, which is roughly equivalent to one curse word every 5.9 hours or so, so it's clearly not G-rated content, but a movie PG-13. a FW is allowed every 2 hours and a bunch more swear words, so mine is a lot less than that, so I would say in the future no, it's probably not safe for the average 5 year old, but it's not as bad as that PG. -13 filth now I'm going to cut this to its final dimensions in preparation for cutting the
waterfall
edge and if you don't know what a waterfall edge is, it's basically where this table will turn 90° towards the ground, but the grain will be It'll look like it goes on like a waterfall and I've always been notoriously bad at doing these waterfall joints so now I'm really stressed because this is by far the biggest one I've ever tried so I don't know how you're going to film this, but I'm going to physically crawl here to make the cut because I'm not long enough to reach it and we have to take drastic measures.Have you checked everything twice? the measurements all the angles everything is fine, I already checked everything hepto did,I think we're good, but I'm still this nervous, that's a lot, so the depth of cut on 45 is 2 and 8 on this one is 2. and e, but that doesn't include the track, oh, and I'd like to pretend that I didn't know it, but I knew it. I thought I held it there, it seemed like it was deep enough. I recently built a wood. frame style ladder for my workshop and I really had to struggle through much of the build, at least in part because I didn't have many proper tools for the job, so to avoid that in the future I just bought a handful of new tools from Shelter Institute They are kind of a high end wood framing company and the problem is I haven't had a project to use them on yet and I think Scott realized I was a little eager to turn one of them into a project, so? just looking for an excuse to use the big new saw?
How dare you only use the right tool for the job? Ah, there you have it, how bad will it look? It's a bit difficult, right, we have to cut it anyway. Yes, if you pay close attention, you might wonder why I'm using this smaller fesal saw to make this 45° cut compared to the larger Mel saw I was using earlier in the video, which would be able to do all of this in one single pass and maybe it's just the saw I have or maybe it's just that I don't know how to use it, but my Mel Timber frame saw has pretty terrible accuracy compared to the fesal anyway, it's pretty decent, I mean, it's probably better than that of the average craftsman.
Sierra, but it's just not capable of getting a perfect 45° joint, which it also wasn't that capable of at the beginning of this build because there were a lot of adaptations that were made and it didn't really go as planned. It's been about 2 or 3 hours fighting to get this miter perfect and I went to the store, bought some better squares, clamped all of this in there just to make sure we had that absolutely perfect fit and it finally looks complete and I don't. Now I know what to do. We've actually been working on this for about 3 hours.
I don't know if you know how difficult it is to make a miter that only touches two points, but we did it. I ended up having to call my friend. John mlei who is another guy here on YouTube who has done a ton of these waterfall boards and gave me some really simple but absolutely invaluable tips. He said you need to pass 45° first, don't try to stop right there. he at the gauge he then he said that he shouldn't have made that 45° cut all in one pass. He should have cut 90 and then come back and cut the 45, so it took a few more cuts, but we adjusted it and it's done. pretty perfect now it's pretty safe to say that I couldn't do this without a domino or at least I couldn't make this look good without a domino.
I would probably use my framing nailer or something and that might compromise the look a bit. a little bit, but luckily for me I have the Domino and you can see it fits quite well. These dominoes are in there very, very tightly, so I had to break the old mallet and the wooden block, but I was extremely pleased with how it turned out. fitting in now because when I didn't fit in before you could see my desperation and how discouraged I was, but right now I feel very safe. I still don't feel qualified enough to teach people how to build these waterfall joins. but I can give you some tips that helped me along the way and the first tip is to use that painter's tape there that will save you a lot of work trying to remove that glue or epoxy from that joint and the second is to put everything together, think carefully I glued everything together , which I never do, but for once I did it this time so you can see.
I have my long pipe clamps placed under the piece beforehand. I have all my dominoes organized. I have that type of 45° clamp piece already glued to everything. it's where it should be for the first time in the history of my waterfall joints and we did the test fit to make sure they fit 90° and there's still a lot of pressure when this happens because you're kind of The clock is ticking with that epoxy, you have about 5 minutes and at this point everything looks pretty good. Anything else you want to do to him, I think we should leave it at that.
There's an expression in sales that says sometimes you have to take yes for an answer. and that goes for carpentry too, so instead of fussing with her any further, I took a yes for an answer, she looked perfect, so I left her alone while she took that joint away. I can start building the other leg for this desk and I went through quite a bit. A few different design ideas finally ended up in something I really like and Scott, my video guide, made a 3D rendering and agreed that it looked really cool, however what I don't realize at the moment is that Scott has no faith in my engineering because what's coming. later he thinks he's going to completely collapse and won't support this table and I might be being a little dramatic, but we'll talk about that a little more later anyway, but right now I'm ignorantly happy that Scott actually respects my writing skills. engineering while that glue.
His leg is healing. I started singing on this piece and this is going to be work because I've never tried to finish a piece like this before because what I'm doing is sanding and polishing everything. of the epoxy sections burned to the shine of a high mirror grand piano, leaving all the wood extremely matte and I had never done that before. I think it's going to be an absolutely terrible process, but at this point I have no idea how terrible it is. So I'm just kind of roughing it up by removing all that glue, all that extra adhesive, making sure my joint looks good and it actually looks really good.
Big thanks to Miky for helping me score that joint. The design I'm going for here is actually a pretty similar look to the design I use on my personal dining room table, only one was made of 38 in thick steel plate, there were two legs and a stretcher connecting them both. it's just going to be a floating wooden leg which again is probably where Scotts is coming from and the certainty and why he's filming this right now without telling me his concerns and again, I don't know yet so I'm just getting it right. and flat because what I'm going to do I'm going to end up gluing both of them together at about a 5° angle, which I think will leave a really interesting look.
I'm usually not a big fan of these digital angle meters. I don't find them very accurate, I think even from the factory they say they are only good to within 0 2 degrees, but for what I'm doing here it won't matter at all because I needed it to be that way. around 52° and H L, it wouldn't matter if it was off by a hole like 2°, which won't be that inaccurate, as long as it's within a degree or so, it's perfectly fine for Woodworkers and Workers who don't work with Woodworkers are always debating furniture quality and oh, what did we do before we had these fancy new Domino tools?
The furniture of that time was much better than that of today and someone told me that they worked in There was a museum and there was furniture from the 17th century that was still and in perfect condition, which showed that the craftsmanship of that time was much better than the current one and I had to explain to him what a self-selected sample size was because yes, any piece of furniture. that has lasted 500 years was obviously built very, very well, it does not mean that everything that was built in the 1600s was built well. I'm sure there was trash back then, just like there is trash today, what modern tools, chemicals, and adhesives have done.
For us mediocre carpenters like me, we can make furniture that will probably last at least 100 years. I think it's a pretty good thing. One of my favorite ads of all time is an old magazine ad that says your Harvey Prober chair wobbles, straightens the floor, and I love it because there's a little bit of time but also a lot of confidence to just say that we build pretty things, probably better than your house and this desk will also be straighter than your floor, however there is a little wobble on your floor. I'm adding these leg levelers, they can be recessed so you can hide them completely or straighten out any of those bulges.
Scott was editing below and came back here and said, "Oh wow, you added a lot to this, did you get anything out of it?" Good pictures of it and I thought I didn't get any pictures of this, I should have anyway. I think Scott was a little disappointed because he wanted to show how I built those braces to get out of that angle, but those braces are to help a little bit. a little bit of that side to side stability and these are just some pretty simple little mounting tabs. I was going to use metal, but I thought oak would work just as well and look pretty clean if you're a new woodworker or even an old one. that doesn't use router bushings.
I highly recommend working them into your rotation. I'm using them here with just a piece of MDF to get a loose fit for my table base, but you can use these router bushings to get a tight fit of the inlay. I think Matt Caron has a good video. I think Wood Whisperer has some videos. There are so many things you can do and a set of router bushings can cost you like 25 bucks and they don't just make them for the really expensive RS. You can get a set of bushings for the cheapest routers out there. If there is one tool that I continue to misuse and infuriate a small cross section of my audience, it is using this point drill bit here to mark my points for my threaded inserts instead of using a transfer punch and for the life of me I really can't figure it out.
What's wrong with using a Brad Point bit. I think it comes from metal workers, where using that on metal would break the bit, which makes sense, but it seems to still work so I'll probably keep doing it. I don't know what it was about this particular project that got so many other woodworking YouTubers involved, but I was talking to another one who I haven't yet mentioned the design of this table base and its stability and he ended up being completely wrong and I didn't want to embarrass him, so no. I'll mention his name, but his channel is called Four Eyes Furniture anyway.
I asked him about adding these braces and I told him I really thought that would increase the stability and he probably won't listen to it but I don't think it really does anything for you since it's so high up and he's really good at designing furniture so I really I was starting to doubt myself and apparently Scott shared a similar sentiment. 30 Faces You Once Made Pretty Close, You Still Don't Trust It. I'm wary of those watching if we put this on the video that Scott said. Me off camera like I don't want to sit at this desk and I've never been more confident in anything in my life so maybe we have to do some kind of sketchy weight competition at the end of this desk you can you can. speaks freely now it feels tougher than I thought but then you were wrong I was wrong I'm not at the top yet I'll be fine in the competition and I think it looks really cool holy come move it keep one YOU.
SK, you keep rolling, okay, no camera tricks here, move it, come on, move it, that's pretty solid J, that's the most solid desk I've ever built. I like the scale of 1 to 10, how wrong were you? I was completely wrong, are you convinced now that I am? you're just saying no, it's a lot more solid than I thought it would be now that we've confirmed that the construction of this desk is good enough for some hipster working in a museum in 500 years to condescendingly explain to an uninterested party that No one builds Furniture like the YouTube Woodworkers of the 2020s.
I'm going to try to do the same quality of finish work I mentioned above. I am going to try to polish the epoxy leaving the wood completely matte and although I have never done it. I've tried this before, I've seen it a few times and there are some companies in Europe that I've seen on social media that seem to do this successfully and sometimes it looks fantastic but other times they show it in an unflattering light. You can see it doesn't really look that good, but there's someone here in the stats. It's in Hawaii, which is barely a state, but its name is Modern Habitats Hawaii and it does a fantastic job, showing it in every light, every time.
It looks amazing so I contacted him quite a while ago but he basically gave me his whole process so what I'm doing here is basically sanding this from 120 up to 3000 and I'm not trying to sand the wood but I'm not trying to sand the wood either. avoiding, so he told me it was okay to wet the wood for the wet sanding part because we'll come back and fix that part later, some of those Europeans. It seems like companies are putting polishing compound directly on the wood they have like a car polish and they are just grinding it directly into the epoxy with the wood right there and I have no idea how they do it and that doesn't compromise the wood, the modern habitats of Hawaii, he told me that the 3M compound thatI'm using it will stain the wood, so if I'm going to do that, I need to tape it around, said Meguiar's compound, which I've never used. and it doesn't affect the wood as much so maybe in my next one I could try it or if you have done this and know of a compound you can put directly on the wood I would love to know.
Because this tape removal process was quite a job, what I found pretty quickly is that this burnt weathered epoxy offered a few more challenges than normal boards like the ones I saw made at Modern Habits Hawaii because there is no beginning and end epoxy specific. There's kind of a gradient there and when I taped it the first time, I tried to get all the way to the epoxy line and it left this really jagged, unnatural looking line, so I'm going to do it another way. A little bit wider tape with that stripe tape polished everything again and then I'm going to try to fix it.
Then with sandpaper you can see that that section doesn't look quite perfect. I think the polish looks great, but smoothing out that edge is going to take a lot of hand work and I think I can do it and before I can get to that, I'm going to have a ton of masking tape and some people love this. I'm not one of those people, I'm much more Jeremy Clarkson than James May, if you get the reference, but sometimes we have to do things we don't want to do. Personally, I'd rather drop a large log on a table like I did.
I did a couple of years and then I did this, however when we build custom furniture sometimes we have to do things we don't want to do so we basically just set up some time lapses and went to town recording this and each section probably It took me at least an hour, if not more. I firmly believe that everyone needs someone in their life to challenge them because you are doing yourself a disservice by surrounding yourself with a group of yes men who confirm everything you think and say. and I don't mean this just for people in creative spaces, but probably especially for people in creative spaces because I have so many bad ideas that you don't have to see them come true because I have people in my life who challenge me.
I have friends I have colleagues I have wives I have a wife I have a wife who challenges me and helps me decide if an idea is good or not and I really think this is what happens with athletes who come out and say the world is flat because I have lost people who challenge them. Everyone around them is too afraid to say, Hey, you're an idiot. The world isn't flat, and luckily for me, I have Scott, and Scott passively challenges me, which is what happened here, so even though he's recording this now, Scott doesn't know what I'm going to talk about and It's just that he has a bigger impact on these projects than he realizes because I finished the first part of this and I thought it looked good and I could tell Scott was disappointed and he didn't say anything and I finally said you don't like it and he looked over. down very closely and said it wasn't perfect and he was just disappointed, he wasn't disappointed.
For me, he was disappointed with the project and I thought he had been thinking about it for about a day, so while Scott was editing, I built this with a pencil, a small piece of sandpaper and let me show you what I did. I'm doing what I realized was that with my little electric sander I couldn't reach these fine contours around the pencil and there was really no way around it other than to sit here in the very fine sand with the pencil and it's slow, slow. but in the end it works and allows me to achieve that precision sanding on all of this and I hope Scott is impressed now.
I know it's your thinking, you're thinking that there is no way the ends justify the means and that's not the case. I'm actually going to go over every little corner with a pencil and a little piece of sandpaper which would take forever and it's actually a lot worse than you think because each piece of sandpaper only lasted me about 2 or 3 inches so that every couple of inches I had to cut a new piece of sandpaper and continue going through every little nook and cranny and yes, I actually hit every bit since my little pencil sander only took me away maybe 1/4 to 1 /inch of polished epoxy I needed something a little smoother than my orbital sander.
My orbital sander tends to wobble and it would have killed me if it wobbled directly on the polished epoxy, so I used this little oscillating sander with a soft pad and that gave me a ton of Control to get down to that pencil line from there. I sanded the rest of the top and bottom, as well as the sides, with 180 grit on my regular oral sander, so anything you see that looks oak will be sanded with 180 grit, whatever. The black will be polished now. I'm ready for the finishing process, which won't be as bad as sanding, but will also take quite a bit of time.
The oil I'm using is a matte to satin type, so I don't want any of this to get on the polished epoxy. If I get a little bit on, I can wipe it off with a little alcohol on a microfiber, but for the most part I want to keep it away as much as possible. what I'm doing using a little brush to take it to the edge and I cut a bunch of these microfiber towels, what I'm going to do is I'm going to wipe it down and so while I'm Walking away, I'm not dragging any of that type of mat into the satin oil on the epoxy and it should be fine.
In my last video I built a white oak table base and used a finish I had never used before and it looked absolutely gorgeous. Fantastic, it was called invisible oil and it basically makes it look like this oak doesn't have any finish on it, it's just a really clean light look and I tried some samples in a kind of tester, a burnt test piece that I had and What's up with the invisible oil is that it's not really invisible, it has a lot of white pigments that make the oak look like it had nothing on it, however, those white pigments just got embedded in that black charcoal and it looked terrible, so if you're wondering why I didn't use the invisible oil because it didn't look very good.
I always forget about this part and it's too late for the video to have any impact, but I'll do it anyway and that is, if you're 33 1/2 minutes into this video and you're enjoying it. I would really appreciate it if you hit the subscribe button, it means a lot to my page and if you are already subscribed and want to support my channel, I would probably be surprised at the impact sharing this video has on my channel, so if you would like to share it on Facebook or Instagram or maybe you're a billboard executive and you want to launch a series of Blacktail billboards on the 405 in Los Angeles, that would be fantastic.
The finish I'm using is called LED oil and people always get mad at me when I say that, but actually that's the name of the product, it's called LED Vesting oil, that's what's on the label, but yeah, it's not cured. of any LED is cured with UVS, which you can also use the sun, it usually takes two trainers, but I was hoping to get away with one here, are you happy with how it looks? I think it looks pretty good, machine coat, I think it's The cool problem is that you can't see it on camera, it doesn't feel right and more than anything, I don't want to redo all that brushing we just did.
Yes, that's fair. I also have to sand it and risk scratching it. but here, especially as an aquatic pop, it feels right, which is not unusual. I was just hoping that for some reason this would be different, but I guess I have to repeat everything we just did, ooh, okay, when I was in high school, my friend's uncle. He had a really nice shop and he was cool enough to let us work on our shitty cars there and occasionally we would watch him work on his really nice cars and one day he was getting ready to start his new engine and he had put a new engine in his Camaro and something wasn't right and he just casually said oh I guess we have to take the engine out and I remember being impressed by how well he took it because he didn't scream, he didn't scream, he didn't scream.
Don't swear, it's just part of the process and when it comes to things like this, when I had to do a whole second code and it took me a couple more hours, it's just part of the process, even though it's not natural, even though I want to do it . be upset, I'm trying to be more like him now that I'm finally almost done here is the overall total cost of all the consumables and even the hours of work that went into this quote, free wood slab, however, people always You are doubting my accounting. folks in the IRS comments, so here's the grand total of absolutely everything that was included in this quote, free slab of wood.
When people ask me what I do now, I usually just say I'm a woodworking YouTuber and leave it at that, but I still consider myself a furniture maker first and foremost, which means that everything that comes out of my store must be able to be used in the real world and to use a car metaphor, there are no trailers leaving my store and in fact that term is offensive. The car conversation made me think anyway, let me know if I need to edit that part, but to ensure this desktop can be used in the real world, I'm adding N3 Nano.
N3 Nano is a two part kit, this is the hard one. coat which I'll put two coats on, then I'll put two coats of the top coat and if you get the Wood Pro kit, which is what I was opening, it has everything you need, there's a prep spray that will make sure the surface is perfectly clean. and contaminant free, there is even a maintenance spray that you can give to your clients or your wife to help maintain it and if you would like more information on the N3 wood Pro kit there is a link in the description below.
Alright this piece is on sale right now there is a link in the description if you want to check it out and you can see that Char is hard to see in some lights and easy to see in other lights and on the front it's not hard to see but It's very difficult to video, both miters ended up fantastic again. Big thanks to John mlei for helping me mark that and I also found a nail on each side or maybe it's just a long nail going all the way through, I can't be sure but either way I'd love to know what you think of this project if you want to see me try more charred projects, more of these kind of polished and matte hybrid pieces.
This has been extremely fun and I like to give people a little credit. who make it to the end of the video, so this week start your question or comment with just a thumbs up or thumbs down to let me know what you think, as always, thank you very much, have a great week. I made a mistake. stable is super stable
If you have any copyright issue, please Contact