No Epoxy Required.
Apr 07, 2024In this video, I am going to make a dining table completely out of wood, without
epoxy
. I have these walnut slabs and originally bought them to build my Wormhole table, but I couldn't help but think they would make a nice dining room. table and it would be a shame to cut them into a bunch of small pieces and now a year later I found a nice design for the dining room table and I'm ready to start doing it and to do it I prepared a quick flattening template. If you're interested in this design, it's basically a simplified version of Mario's Hornburg design.
I would put a link in the description here to make sure the slab is already as flat as possible so I don't have to remove it as well. lots of material and using some shims to make sure it doesn't rock back and forth, this is the sled where the router will be mounted and as you can see if we push in the middle it works fine but if you need to operate it from the side It gets stuck a little and I'm going to have to flatten it out a lot for this project, so to make it work better and be more comfortable to use, I quickly put together a jig with some py on the LA and some pieces. of string here you can see how it works, but I was worried that the vibration of the machine would simply unwind the strings, so I added this little ratchet wheel.

More Interesting Facts About,
no epoxy required...
I used a large, heavy-duty tamper bit and set up some dust collection, even though it wasn't there. I expected it to capture a lot of dust, so I still had to use the mask. The first path didn't remove the material completely, so I reset the template and made another one. I think I ended up doing three passes on each side of each board. I added some tape on the sides to help contain the chip inside the sled and hopefully improve dust collection a little better. It helped a little. I made the first side on the two boards and actually inserted the third and proceeded the same way. and I'll tell you later why I ended up flattening three boards and here adding some plexiglass to further improve dust collection and this really helped.

Now that one side is ready I put the slabs back on The Jig and set my cutting depth so each stab is the same thickness, this left a big mess but I'm a wood turner so I'm used to having a lot shavings on the workshop floor. I flattened three slabs because I couldn't decide which one I wanted to use and now that they are flat I spend quite a bit of time trying to figure out which combination would work best, the decision was a bit difficult to make and you'll see why later in the video I removed the Mark tool with the sender B and I lightly sanded the live edges, but at this point I was sure I liked the look and you'll see later in the video that I actually went back and sanded the live edges a lot more.

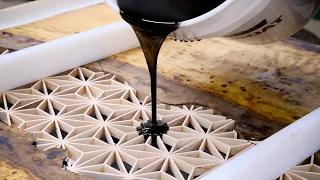
One of the reasons this project took so long is because it didn't work from any physical blueprint. I had a basic idea for the design, but all the dimensions and placement I figured out as I went along and let the wood speak to me, if that makes sense, my idea was to sew. The two slabs together and after marking everything I drilled the start and end of each thread to transfer the pattern to the other side I used the wood turning L again for about 5 seconds and it's funny because according to some of the videos I see on YouTube that are labeled as woodworking where the person works almost entirely with
epoxy
resin or other materials, so if I follow the same idea, I could have called this video wood turning after the first slot.I checked to see if there were any tears and they were. I was pleasantly surprised to see that the cut was actually super clean. I started with the bottom of the table and made all the slots the same length to make it simpler and faster and also this will ensure that the two slabs are completely secured to each other. For this build I had to turn this big, heavy table over a few times but luckily I used to work for a semi-industrial carpentry shop where I made windows and doors much larger than this and even though I had co-workers you don't want to bother them by asking for help every five minutes because they have their own things to do, so you quickly learn techniques for handling large jobs on your own for the top, each connecting piece will be different lengths and I was going to just stop my slots at the pencil marks, but I realized I just of cutting 25 slots where I had a physical stop and the chances of my muscle memory just pushing that router until it hit a stop that wasn't there and breaking was too high so I took my time and set a stop for each slot .
That's when I decided to send the edges live a lot more and you can see the difference in the next shot and at that time I wasn't sure about my decision. but I didn't have the option to send them all the same way, but overall, in the end I'm super happy I did it because the end result seemed perfect. The reason it took me so long to decide which lab to use is because one of them were probably badly damaged by a forklift, but I chose this one anyway because the grain was too pretty and the defect was mainly on the underside of the table. .
I was able to easily make a patch that wasn't too visible. I did such a good job evening out the grain. If I hadn't shown you this, you probably would never have known it was there, just maybe a kid sitting at the table would notice because it's more on his level and kids never pay attention to what they're doing. You're supposed to be doing it now anyway, if you were paying attention you probably would have noticed that there are a few spots on the slabs where the worst creature on the planet left a bunch of little holes in the gallery.
Now this Lum was cut a long time ago and I had This slab stayed in the same place for over a year and I have never seen wood dust next to them nor any increase in the number of exit holes. So from my experience I was about 90% sure that they were no longer infested, but just to be sure, I treated the wood with a product that kills all remaining larvae and actually protects the wood from any future infestation. . Now I'm sure some of you tofu readers are sitting like this in front of your screen, ready to yell at me for using some chemicals and all, but when it comes to getting rid of something that can literally destroy houses, I trust this more that in essential oils and wind chimes while I was explaining all this, I was cutting all the strips I need.
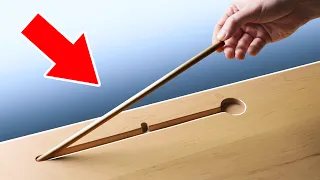
To make the connecting pieces I needed to round off the ends of the connecting pieces and you could use a belt sander and do it by hand but I had over a hundred to make so I made another jig to do it if I couldn't say I love making templates and templates. It's probably my favorite thing about woodworking and creating things in general. That's why I refer to myself as a craftsman or craftsman instead of an artist, because for me what I do is more about problem solving and the whole process of how can I design something to make this task faster, better and easier or to face a technical challenge that prevents me from building this thing that is in my head, which is what everything is.
When it comes to why I build things, it all comes down to getting it out of my head because as long as I'm not there it just won't go away and believe me, it started to get really crowded in there. They call me an artist. often and I have a hard time accepting it as a compliment. I know that's what people mean, but it's become such an overused term that some now consider being an artist to be taping a banana to a wall or defacing a historical monument and I just don't think so. I want to be associated with these people, art should just be about making beautiful, harmonious things that require some talent or skills and not just throwing a giant curtain over the Arc de Triomphe and going on about how it symbolizes recycling or something, but anyway.
Sorry I got a little carried away, let's get back to woodworking where I'm sanding and prepping the connecting pieces as well as the inside edges to apply the finish, now that I have easy access to it I'll talk about the finishing product I use. Later in the video, if you have a loved one who likes to work with wood, I would recommend that you don't give them tools or machinery without talking to them because they probably know what they want and it's pretty specific that you can give them clamps. because as a carpenter you can never have too many clamps and even if you buy them, shitty clamps, they will always find a good use for them.
In one of his recent videos, Chris from Forze Furniture talks about his inability to visualize things in his head and how he needs to completely draw out the things he does beforehand. This sounded very strange to me because I'm the complete opposite and I always think that everyone can imagine things in his head, but apparently it's something called aphantasia, which is the inability to mentally form. images of objects that are not present, that was the first time I heard of this and Chris says he also just found out when I say that I am the complete opposite because, unlike Chris, I have a hard time planning things and making drawings or sketches, I make large scale technical drawings when I need them, but it's mainly to calculate dimensions and the position of the carpenter, so when it comes to designing and working out the aesthetics of a piece of furniture, it mostly happens in my head, so I have Although I wouldn't change my way of thinking, I am very jealous of Chris's ability to plan everything because working from plans can be a lot of fun and end up making the time you spend in the workshop much more efficient anyway.
I thought that was it. Pretty interesting depending on when you're watching this video. I'm not sure what the title is because YouTubers often change titles and thumbnails after posting a video to try to get better engagement, but it's probably some kind of anti-epoxy phrase that doesn't necessarily hate epoxy, some people make beautiful furniture with it. A good example would be the Blacktail Studio camera, but I think we've seen enough River table builds on YouTube for now, this is where many dining table videos would be almost finished. The guy would apply the finish and put on a prefabricated or custom metal base and call it done.
There's nothing wrong with that, sometimes the marriage between wood and metal looks amazing, but I knew it wasn't the move for this and I wanted to do it. something really unique, so I designed a wooden base that matched the ID of the table. I used extra slabs that I had flattened to cut the legs that barely fit, so I had to cut them in a funky way. I also needed some additional pieces for the base and I used the rest of the slabs I had, by the way, all the wood for this table comes from the same walnut, except of course the connecting pieces which are made from syore maple, here it is where I use my joint planer combo and it's a type of machine that I rarely see in North American stores, especially in the DIY community, and I don't know why it's not more popular there because it's cheaper than buying two separate machines and It takes up less space than most of us ever seem to have.
In our workshop I made another template for the legs to accurately shape them and ensure that all four are exactly the same size and shape. To do this, I used another machine that you don't often see on YouTube. It's called The Shaper. and it's basically a larger version of a router table, but instead of drill bits it uses much larger tools that allow you to remove material much faster and create all kinds of profiles and even Tenon, as you'll see me do later in this video. What I do is cut a notch for the bottom rail and a slot for the floating tenant that will join the two legs together.
The idea for the base was to add some connecting pieces to attach the legs to match the table. It's basically the same process. like before, so we can skip this part quickly because I don't want this video to be too long, but I'll just show you here. I had to cheat a little and reshape the natural edges so the two legs meet perfectly. in the middle, like on the table, I apply the finish to the inside edges before gluing everything. If you're new to my channel, you may not know that I don't normally narrate my videos.
I don't know if that's something I want to do. do every time and I'm not sure what people prefer so for the next few minutes I'm just going to let you relax and enjoy the sound of the tools and the footage is pretty self explanatory so I don't need to explain it to you. what I'm doing, I'll talk to you again near the end of the video, but remember, I'll know if you skip ahead, that's it, okay, let me know in the comments what you prefer with narration, without narration or a little bit. Of both I needed to weigh the table for shipping and for the base it is quite easy, the normal scale works, but here for the table I had to place something to wait for the finish.
I used a hard wax oil called Rubio monocoat and unlike the name suggests I apply two coats because on Walnut a second coat really makes it lookbetter and adds much more shine. I learned this from the Blacktail studio camera and I won't go into the specifics of this finishing process, but if you're interested. cam has a video that explains everything and it's the exact same process I use for this table. I'll leave a link to your video in the description. This table is for sale and it is important to me that the customer and everyone else know that this finish or any type of antique finish is not 100% bullet proof and what I mean by this is that it is water resistant and Not waterproof, so if you spill something you have enough time to clean it and it will be fine, but if you leave a drink cold. for too long it can leave a ring which is a problem that a varnish finish could solve, but a varnish doesn't even come close to looking as good as what I did here.
Here's an example and that's because an oil finish penetrates and adheres to the wood and really makes the grain stand out, whereas varnish just leaves a film-like layer on top of the wood and can often look like plastic, this It is a wipe clean finish so after applying and buffing it I waited 5 minutes and removed all the excess with a Terry cotton towel if you don't know anyone named Terry you can also use a Larry or Gary towel. I think it's time to address the elephant in the room, which is the fact that this table is full of holes in the middle, but hear me out, this is a dining room table and what do you usually put on it? in the middle hot pots and pans and you would never put them directly on a table without trivets underneath and I spaced the connecting pieces so that any normal sized trivet always rests on at least two of them.
I also designed this table to be made entirely of wood, but adding a thin glass top to the center portion is something the homeowner can easily do if they want to make this table a little more tabletop practical. I added an extra layer of protection. is a ceramic coating used in the automotive industry and is an extremely good water repellent. This whole finishing process took 15 days, but now that everything is finally nice and dry, I can glue the legs and put the table together. This is when YouTubers would ask you to subscribe and leave a like but honestly I don't even know if it makes a difference so do what feels right to you, what matters is the watch time because YouTube is a business and what They want you to stay on their platform as long as possible. as much as possible, so if I can keep you there for 30 minutes, then it's a win for them and a win for me.
I managed to do everything on my own up to this point, but right there I needed some extra hands to set the table, he's kind. It's tricky to convey the size of this table on video, so here are some examples of how many people can sit at this table and I think it can easily seat up to eight people, but before I leave you with the final reveal, I'll still give you the dimensions of The table is 75 cm high, 94 cm wide and 2.08 m long. Now about 20% of my viewers are from the United States, so I'll also measure them in Freedom units.
The table measures 3 feet 9 inches wide and has the wingspan of a. Bal Eagle is almost as tall as a washing machine and the table is exactly the thickness of a Big Mac. Okay shenanigans, here's the finished table, thanks for looking.
If you have any copyright issue, please Contact