Making a Burning LAVA GAMING DESK
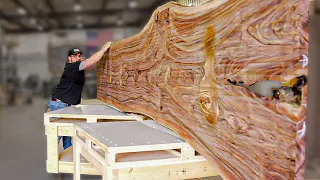
Apr 06, 2024About a month ago I found these cool shaped Elm slabs that I knew I needed for a project that didn't exist yet. These cookie slabs are full of waves, knots and character and I knew I couldn't leave them behind once I saw them at Backwoods Timber and Listowel not knowing what I was going to do with these but I still knew I was going to have to clean them for any project I decided on, so I started removing the remaining bark and dirt with a chisel and a wire wheel on my grinder and a wire brush with my two clean slabs.

I headed home to do some research and figure out what I really want to build here after scrolling through the DIY section of YouTube for a while. Oh, that would be great, I found it. this really cool Russian video where this guy puts LED lights on an epoxy table to basically make it look like
lava
is flowing through the table and 25 million views on this video are enough for me to completely copy this idea in my own style, so I have a half inch sheet of melamine that I'm going to use to shape the epoxy, so using my Kreg chain saw jig I cut these pieces to size with two larger base pieces and then a bunch of these strips of three inches I'm going to use it for the walls, if you are a regular viewer of my channel you will also notice that I move the store spaces and that is because my dad bought too many old cars and I had no space to work with and I have some.
More Interesting Facts About,
making a burning lava gaming desk...
There are some pretty big projects coming up, so I decided to rent my own shop. It's a big step considering I'm now 28 and still living in my parents' basement, so I cut out all the side wall pieces and now I'm going to screw them together. on the base pieces and I'm going to do it using some pocket holes, so I'm using my Kreg pocket hole jig so I can drive a screw into these walls every two feet or so before I screw these walls in. I'm going to add a bead of silicone putty to the bottom edge and this is just to make sure the epoxy stays inside the mold and doesn't leak all over my new workshop, so I just screwed these walls together using some pocket hole screws from a inch. and I'm building two shapes because I'm going to make this a
desk
with a waterfall edge, so basically one leg of thedesk
is going to look pretty much the same as the desk, so it's going to be built exactly the same way. smaller once all the shapes were screwed together I added another bead of silicone along the inside edge and used my finger to smooth it out before I started cutting out these really cool slabs andmaking
a mistake I went into Photoshop and moved the design until I found something I liked and then had it on my phone so I could market the slabs and start cutting them using my tracks.
These slabs are two and a quarter inches thick so after passing with the track saw I had to remove the track and then do another quick pass with just the sauce that would cut through the remaining slab once I had the large slab pieces instead. I used some of these spare cuts and filled in some of the Dead Space, so first I'm going to pour any epoxy. I'm going to take some of this West system epoxy and just go around all the corners and edges of my slabs, this helps seal them so they don't release air bubbles once I do the deep pour. which will save me a lot of work in the long run and produce a better overall result with less air bubbles.

Thanks the next day because the epoxy hardens so I'm just taking some 120 grit sandpaper and roughing up the edges a little bit. a little bit so that the new epoxy that I pour forms a mechanical bond with this epoxy, so now I'm going to take the two Farms to this handy little room that has this work so I can keep as much dust out of it as possible and then Dedicate a Take a good amount of time to level this table in all directions as much as possible before putting the wood back in place. I used this epoxy release agent to give the entire shape a good general spray which is not necessary. overboard with this and you definitely don't need to put it on.
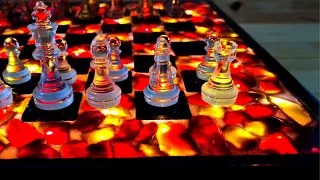
I just give it a good light spray from about a foot away and make sure everything is covered and then the table, once it's fully cured, should come out of this mold pretty easily compared to if I didn't have any release agent for me. deep epoxy. I'm using Q Slow Cast Epoxy from Rusty Design in Burlington Ontario, but you can really use any epoxy designed for casting. I only use this one because it's cheap and I know it. it works so I mixed this according to the manufacturer's instructions and then I just mix it by hand because I find that it introduces less air bubbles than a mixer so I'll just put on some music and make sure I mix like two full songs. at least this is the same epoxy I'm going to use for this entire table, but for now I'm just going to pour about a quarter of an inch into the bottom so my
lava
rock and LED lights don't stick out from the bottom. of the epoxy in the final product thanks once I poured approximately the correct amount.I used the bar with a quarter inch line to measure the depth of the epoxy across the form and make any necessary level adjustments. I also have this extra for my quick shake and then I poured about a half inch of pure epoxy and you'll see why in a minute, but for now we'll let it sit for a few days, a few days later it will be fully cured. So I'm scraping off that fresh epoxy with some 120 grit again and then I have these outdoor LED strip lights from Govi. The entire strip is encased in this silicone casing that is completely waterproof, so I hope it's good enough to cast. the LEDs into the epoxy and I don't have any leaks until the epoxy hardens in a couple of days, so I'm drilling a hole in the bottom of the shape of both pieces so I can insert an individual LED strip into each and then only temporarily.
He attached the strip to the wall and closed the hole with silicone. You really want to take your time on this part because if there are any leaks, the epoxy will find its way. Also make sure you use silicone caulk because as everyone knows not just any will do now let's go back to that extra form of epoxy that I poured first, I unmolded it and now I really only have this half inch thick sheet of epoxy so the I sanded it and then cut it into about two inches. strips and then I'm going to use these strips to cover the edges of the form for basically the same reason I poured that first quarter inch layer, this will back off the interior components of the epoxy and give me some room to cut.
For the final product that way I don't have to cut out the lava stone, fire glass and LED lights I'm about to add. Also, I know they look very frosted and look like they will stand out in the final product, but as soon as the fresh epoxy hits this, it will make them completely invisible, so I just worked on gluing the LED strips around the edges of all of them. the tiles, when there wasn't any tile to stick to, I just glued them right into that quarter inch base layer. of epoxy that I poured for the smaller piece, the 30 foot light strip was too long so I just cut it to size and you can cut these LED strips wherever you want, then I made sure to close the end very thoroughly with a little bit of silicone and then put the silicone cap on top that originally came on the end of the strip so this is a tempered glass that's usually used on fire tables and that sort of thing but I'm hoping to be able to use this and then the led light. shining through it to make it look like a perfect substitute for lava.
The nice thing about these LED strips also is that they are completely programmable on my phone and I can change the pattern or even develop my own pattern at any time to make it look more fluid and natural, once I had all the glass in place I just I used the leftover piece of wood to go around and make sure all the stones were sitting a good three quarters of an inch below the top of the wood to give me some room to plan. the top, once it's done, about four days later, will be fully assembled and hard as a rock, so I'm going to unmold this, so I just took the screws out of the walls and then knocked them free with a mallet.
Now I basically want to plan these pieces. They have a perfectly flat and smooth top that I can then finish with some wood finish as it is filled with tempered glass and LED lights. I figured no professional planer would touch this so here I am just setting up a fast rotor sled rig using some The MDF door jambs were the straightest I could find at the hardware store and I want the top to be perfectly flat, so once I got the first slab in place I just took some measurements of the gap to make sure they were all within about an inch and a half of 30 seconds of each other and then make any adjustments as needed so I'm using this bit inch and a half surface area on my two and a half horsepower rotor.
You'll need a router with some good horsepower just a small handheld isn't going to cut it for this job, so I basically worked my way through the slab taking about an inch of bytes at a time. I made two or three passes over the slab in total, removing maybe a sixteenth of an inch on each pass. This was enough to get through that top layer of epoxy and back into the raw wood. It also wasn't deep enough to hit the glass that's encased inside the epoxy, which is a pretty important part of the eyes and after a while. day of doing one of the most complicated jobs I've ever done, the end result looks pretty good, it just needs a good belt sanding first.
I'm going to remove the mold backing plate that's still attached to the piece, so I used my multi-oscillator. tool to cut around the light entry and then the backing sheet comes off pretty easily thanks to that release agent, then I just carefully cut towards that original hole trying not to cut the light and ruin the piece and it worked much better than I thought which was going to be like this because there really is no information on how to cast LED lights in epoxy. Oh, I just lifted this table that weighs about the same as me to the floor and I'm going to cut all the end edges around the piece, so I just used my Kreg jigsaw again along with a regular old circular saw and cut the pieces out As straight as possible once again, the slab was still too thick for the track, so I simply removed the track and made a quick second pass with just the circular saw, the cut was already 95 percent of the way through, so I didn't really have to pay too much attention, it was automatically guided along the path of least resistance, so now I have this old belt sander that I bought when it was probably like 15 for 30 or 40 dollars and it's still foreign today, so I gave everything a good belt sanding with 80 grit and then switched to my oscillating sander and went from 80 to about 120 just to get an idea. of where this piece is placed and after sanding for a while it looks so good that I decided to completely finish one spot as a test finish just to see if this piece will look the way I want, so the worst is over. and I wasn't paying attention and I tripped over the wire and broke it and literally the worst place it could have broken Moment of Truth, damn, I spent over two hours trying to re-solder the connections with no luck, so I'm I had no choice but to come in from below and try to turn off these lights and put in some new ones.
I have no idea if this will work because I'm trying to get through tempered glass and that's pretty notorious for being hard and difficult to cut, my motto the whole time was not to break the cable because I didn't have a backup plan prepared, so which part came off pretty easily and I didn't have to go through too much glass, but when did it really eat the bits like it was nothing after almost a full day and other messy work and
burning
about 200 in rotor bits? I finally got it out and I'm ready to add some new LEDs so it actually worked out pretty Well, considering for a while I was pretty sure this video would never see the light of day so I went back to my sanding process and sanded everything down to 120 grit, it was time to fill in the small spaces or cracks left by the surface. with the router so I have this CA glue and accelerator so this is basically super glue that I used to fill the gaps spray it with this accelerator and it hardens completely in less than 30 seconds and it's ready to work and sand again. so I spent a good amount of time doing thismaking
sure I got rid of every little gap and crack and then I'll use this backhoe hand planer to remove the CA glue as much as possible and then I'll sand over it.Use that hand planer to remove most of the CA glue and then let the sander do it.finish mainly because if you sanded everything it would take a lot longer and would be a much more inconsistent finish because you would be sanding the wood at the same time you are trying to get rid of that higher CA glue part and would ultimately cause some distortion and non-flatness Now with everything filled and sanded again to 120 grit. I'm going to do it. something about this hard square edge. I want it to remain fairly square so I am using a small 1 16 inch round bit on my trim router which is enough to remove this sharp point but it still looks like a square edge from a distance, you have to sand again to the finish I'm using.
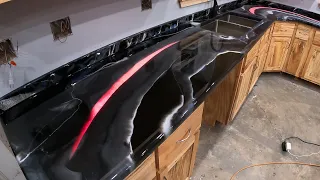
I'm sanding everything up to 220 grit and I'm really taking my time on this to make sure I get a consistent sanding pattern on each grip before moving on to the next, I just use a little mineral spirits on a kitchen towel to clean up most of it. as much powder as you can and then once it's completely dry it's time to finish these pieces so I was considering applying a top coat of epoxy but To be honest this piece is for me and I'm not a big fan of the super shiny epoxy look so I'm going to use a finish that I use a lot called Blonde.
Single coat, it's a really easy finish to use, just mix the two parts in a three to one ratio and then just spray a little bit onto the table surface and then I use a white applicator to apply it to every square inch of the piece. I'll let it sit for a minute or two and then come back with a Terry towel and try to wipe off as much of the finish as possible. This requires some effort and quite a few Terry towels, but the end goal is to have no blonde left on the surface and that will leave you with a very nice and protected medium shine finish.
Now it's time to put this all together, so I turned it upside down and put the leg piece in place and I'm going to need a lot of trash talk from The Woodworking Community for this, but I'm just going to use these eight inch brackets to keep them together that you can get at Home Depot or wherever, so I marked them and then pre-drilled them. the holes and notice that I put a little flag on my drill bit so it doesn't accidentally come out the top and then I'm just going to use these quarter inch lag screws to secure this in place for some reason the woodworking community on YouTube hates absolutely use any standard hardware or lag screws, so do the worst.
I have a pretty thick skin and this will work well with all tempered glass and epoxy. I couldn't drill it so I just left it. These are open, but I still have most of the screws in. In an ideal world, I would have made the other leg the same as the one I already made, but I didn't have enough wood to make that possible, so I'm simply making a leg in the same dimensions out of this one-by-two-inch steel pipe. Then I have this cheap flux core welder. I bought a Canadian tire for about $200 10 years ago and cut the entire tube at a 45 degree angle. using my circular saw, so now I'm going to weld them together, that's probably the best weld I've ever done and then I'm just going to use my angle grinder to remove the not so pretty welds because the one I showed you was by far the best foreign, then I changed the grinding disc to a 120 grit sanding disc and gave everything a nice sanding finish and removed the grinding marks and rust.
Now I'm going to place this on the table before I take it to paint. so I just marked three holes and then drilled them with the hole a little bigger than the bolts and then put this back in place and used the same drill bit to just barely touch the wood so I could mark the center point where I need to drill the wood , then I used some quarter inch lag screws a little longer this time and some washers to secure that leg in place. Who needs ramp inserts anyway? Since everything fits perfectly, I removed the lag bolt and took it to get a couple coats of semi-gloss spray paint, this should have had some primer underneath as well, but it was in my shop and I had to leave shortly after, so I I put the normal cape on, it's just for me anyway so Hey, who cares?
The next day I drilled some holes for these adjustable feet so I could level the desk perfectly. Now the desk itself is pretty much finished, but one last thing I'm doing is having this three-quarter inch maple leaf. plywood and I just cut this strip up a little bit and I'm going to make some pocket holes along it with some Maple Edge bands and then after giving it a good sand up to 180, I stained it with a stain. that makes it look somewhat similar in color to the elm that's inside the desk, so I'm just going to use some pocket hole screws to screw this in about six inches from the back edge of the desk and then I'm going to put some power into it.
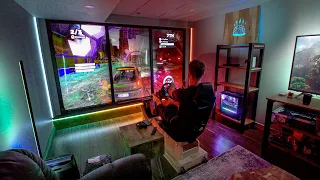
Bars and stuff back here and it's going to be a hidden place to hide all these cables for the desk and the computer and that's the whole build. I'm surprised it's still in operation. One last thing I'm going to add is this Govi AI
gaming
sync box as well, so basically you just take the HDMI cable from the computer and plug it into this box and then another HDMI cable feeds from the box to the monitor and then this reads the video signal and sends that information to some LED backlights that are mounted on the back of the monitor, as well as these two desk lights, so essentially the colors that are on the edge of the screen they extend through these lights on the back wall and create this really cool immersive experience.You're a foreigner so this was a cool build and honestly even without the lights on the table it still looks cool but with all the lights on it takes it to another level so my original lava effect obviously looks better , but I was pleasantly surprised. To see that many of the pre-programmed scenes in the Gobi app still look pretty good even through the red fire glass, you could even sync this to the desk lights and have them play the same colors or sync it to some music. and sound effects, so that's it for this video, thank you so much for watching and if you haven't already hit the Subscribe button because I have some pretty great builds up next.
I also made a couple of these t-shirt mockups with a logo from a family content website and I'm giving away two of these to my viewers. All you have to do is follow me on Instagram and I'll pick two random people a week from today. I also just released this design in my merch. website and a link in the description below. I'm also giving away this Govi AI Sync Box Light that I used in this video. This will be my work computer and it will be set up in a different room and I don't really need these lights so I'd rather give them to someone who can actually use them, just like the t-shirts.
Follow me on Instagram and I'll pick someone at random a week from today and these kits are only $400. FYI, thanks again so much for looking and I'm excited to get rid of my old desk and do some work on this sweet thing or maybe I'll sell it, make me an offer.
If you have any copyright issue, please Contact