Upgrading a laptop
May 04, 2020Hello, my name is Carrie Holzman and today I'm going to show you how you can easily upgrade your
laptop
's old, slow mechanical hard drive to a faster and much more reliable solid state drive, and transfer all your data and data to your operating system. everything else. that you don't need to reinstall anything, it will look and act exactly like before except it will be much faster and it's so easy that anyone can do it, let's get started. I was contacted by a customer who wanted to determine if theirlaptop
could be upgraded or upgraded they said it was running slow they bought this Lenovo brand laptop around 2013 now it's 2018 and it's actually pretty well decorated it has a Core i7 processor but for some reason it has a mechanical hard drive although in 2013 I can understand why solid state drives were still quite expensive back then but the disconcerting thing is that it only has four gigs of RAM now that you upgraded from Windows 7 to Windows 10 and the question that I had is whether it is worth updating them or should I do it.
I bought a new laptop long after I discovered it was low on RAM and had that mechanical drive. My response to the client was that it really depends on you. Solid State Drive 500 gigabyte solid state drive is available. I will say around $200 somewhere and the 4 gigs of ddr3 laptop memory this requires costs around 40 to 50 bucks and then there's the work so when you add all that up it's worth putting it in an older laptop Or it would be better to buy a new one. It really depends on who you are and what your needs are for this customer, they said absolutely, let's do it, so we have a Samsung 500 gig solid state drive.

More Interesting Facts About,
upgrading a laptop...
Well, there are other solid state drives that can be purchased for less money when I have heard of people who have had solid state drives fail. They generally have one of the cheapest ones. I only use Samsung and SanDisk brand solid state drives primarily for the warranty and reliability. I don't mind paying a couple extra dollars if it means peace. Please note that in the unlikely event that you do have a problem, there are other brands that are more known for having faults. I won't mention their names, but suffice it to say that if you don't follow the steps exactly as I describe them in After watching this video, you shouldn't expect the same results that I get with my clients, so there's a reason I chose these brands and If you choose to adopt them as your own, it would certainly be welcomed if you chose to use a different brand. to save money, it may or may not work well, but that's your bet, if you follow my steps once again, there is not much risk here, that's why I use Samsung or SanDisk SSD only because Samsung is my main. choice and Sandesh is the budget option and then as far as RAM goes I have 4 gigs of ddr3 RAM which should be compatible, this is made by Samsung and you might be wondering how they knew you could upgrade the hard drive. hard drive and how did you know you could upgrade the RAM?

So let's cover that right now, the first thing I do when I get a customer's laptop is clean it and that means running utilities like C cleaner or bleach bit, which means removing all the temp. Files that look cleaner and whiter, but may not have emptied all system restore files, become this nice and clean. Empty this software distribution folder in which all your Windows updates went. It's all covered in a different video, so I won't repeat it. which here I also make sure all Windows updates are in place. I make sure the computer's BIOS has been updated to the latest version to avoid any potential problems that a newer BIOS fixes.

I'll also use something like the quick driver installer and update the drivers that need to be updated. I stay away from peripheral controllers, like printers, mice, webcams. I don't update those drivers and then the only one I avoid would be the USB drivers, generally speaking there will be a driver update for your chipset. maybe a driver update for your video card, sound card, network card. I go ahead and do those updates once everything is done and the computer is clean. I've gone through it, you know, run malwarebytes through it, run ncsoft and make sure there's no malware in there, make sure it's clean, uninstall any unnecessary programs, that means remove java, remove flash, remove toolbars , remove McAfee security screen or whatever security is, people include it with other downloads, remove it from there and if there are things I'm not sure about.
I will often contact the client and ask if they know what it is. If the client doesn't know it at the time, it's a matter of judgment to decide whether to leave it or delete it or not. What I'm trying to do is get the computer clean and as thin as possible to see how it runs, so I've already done that with this computer and let's see how fast it boots up, let's cover that first and then talk about how I can determine which hard drive put in and what Ram to put in so here I have my watch, my stopwatch and I'm going to press the power button and press the stopwatch now one of the things you'll notice Here let's see if you can see that since I have the power adapter plugged in and that's because the vast majority of my clients, many of them are only in Arizona during the winter months and many of them have laptops so they can move them around. easily from their winter house to their summer house back and forth, they rarely use the laptop on battery power, they almost always have it plugged in, and as a result, after the laptop is 2 or 3 years old, these batteries become run out and customers rarely care Because they never run it on battery, I will now get a login screen that will interfere with our time assessment and I will delete the customer's email address that is on the login screen and then I'll enter your password so we can continue with the boot process and then I'll switch back to an HDMI cable right here and switch to the screenshot with the HDMI cable, unfortunately a lot of these modern laptops don't have video outputs.
Working in Windows loads, so if I have to boot outside of Windows then I'll have to point a camera at the screen so you guys can see what's going on. Okay, you'll have seen the clock it was on. I'm going to step up and enter the client password and there we go now that we have the desktop up and running. I haven't been paying attention to the timing that's your job, if you want to see it you can get an idea of how long it takes for the machine to boot up, I don't really care right now because I know a solid state drive will be four to five times faster than whatever this thing is doing at best right now.
To be fair, the machine works very well most of the time, when people bring me laptops, they bring me a laptop that is this age, about five or six years old, but the problem is that they bought a laptop last generation recently. a basic laptop when new was cheap five years later, they want to know how they can make it faster and if it is a core i3 laptop, as many are, or an AMD laptop, I wouldn't recommend investing money in it, but because this is a Core i7 processor, it is a really good processor, the laptop is in excellent condition and I advise it, it is my recommendation that if it were mine, I would do the upgrades that I am about to show you.
I think it will be added easily. Three to four years of life on this laptop, if not more, as long as it isn't dropped, stolen, or spilled on it, and anyway, the question is: how do you know what's in the laptop? ? How do you know what? the BIOS version is how do you know that information? I use a utility called CPU Z and I actually have it here on the desktop, but to show you, let's plug in the video and then delete it. of this and let me give you a video of the screen, okay, here we have the desktop and you will see that I have cpu-z here, but I'm going to delete this and we're going to go take I'm going to show you how I do it, so let's get rid of that and let's empty the recycle bin, we're good, so what I'm going to do is open my browser that has this client.
Internet Explorer connected here and what you post is fine and we're going to go to Google and I'll just type cpu-z and press enter and the first link that appears here is cpuid dot-com, that's what I want and we scroll down where it says download and I want to remove the English zip version which includes 32 and 64 bit version. They should all be using 64-bit right now, so I click on that and then it says the file is ready. to download I click on download now and we are going to save that is a very small download we can click on view downloads and then go to cpu-z 183 that is the current version of course this video will be available for a long time and I'm sure the version number will continue to increase as time goes on.
These are the contents of the zip file. Let's extract all that content. Just press Extract, it will put it in our downloads folder and we can take it out. from there if we want and we'll just close these other windows, so here we are with cpu-z, there's the 32-bit, there's the 64, we'll double click on 64 and click YES on this and then we can close. that window and now it's analyzing all the information on this laptop so we can see what CPU has its code name, you only know the speed at which it is running at its current speed, it slows down to stay cool when you don't.
I don't use any real processing power, the caches tab I usually ignore, it doesn't matter, it's whatever is built into the CPU so there is no information that is useful to me, the motherboard tells us our version of BIOS right here, it says that the brand is the Lenovo version. 2.0 for here and then the date that BIOS came out and that's how I know what to compare to the Lenovo support website for this laptop model to determine if I have the latest version in memory. You will see that it has four gigabyte ddr3. It is in single channel mode which tells me there is only one chip installed and gives me the frequency in clocks but this is the information I really want, the information I really want is the serial presence device or SPD information of the RAM and you Look it shows up blank well that's because the default is memory slot 1 and this laptop has two memory slots so we'll go down to memory slot two and that tells me everything What I need to know to buy a compatible memory module is four gigabytes.
The module uses its 12800 speed and that's the only other thing I wouldn't want to know is the Kaz latency which in this case is 11 and if I buy another four gig ddr3 module it will have the same Kaz speed and latency. 11 the speed of 12 800 and I'm not sure why cpu-z shows that at 800 it should be 1600, but maybe it's a technical issue. I'm sure someone in the comments will explain to me why it doubles, but there are usually two ways to say this: it can be set to 12,800 or 1,600. I've never seen it half before, so again I'm not sure. why the CPU says it does that, but anyway that's how I know what to buy.
We also go to a website like Kingston or Crucial, so we go up here and Kingston creates memory, so we go to Kingston dot-com, not a good memory that is compatible with your laptop to find out how much total memory your computer can see laptop and this is very specific just for laptops it will go below let's say if it is below memory up here and then we will go to desktop laptop memory and then you can do a search here or we can do something called system specific and that's where you can enter the make and model of the laptop that you have, so in this case we have a Lenovo, so here's okay memory by system, it's all sorted alphabetically, we want Lenovo, this is a laptop G 500, so there is no G 500 on the list, there is a G 570, so how about just a G series laptop?
This shows a maximum available module of 8 and then there is a four gig module, so it looks like you can use the two memory slots to go to 16 gigs or the two memory slots to go to eight gigs or you can mix four and eight and get 12, those are your options and that's it. In other words, once you've put in two eights, that's the most memory you could have right now for this laptop with only four gigs. I don't think the client will see a benefit in going to 16, so we'll only do four shows. Now you don't have to order it from Kingston, you can order it from Crucial or you can go to eBay or I mean, no.
I don't recommend buying computer parts on eBay just because of warranty and return issues, but alsoyou'll notice that they list the speed at 1600, not 800. You'll see that the kaz latency is 11 CL 11, but as long as we have these. specs ddr3 1690 ECC CL 11 with the correct amount of memory 4 or 8 then it should be compatible with what we already have so if you want to order it again on Amazon or Newegg don't do it you are not obligated just because if you use the tool from Kingston here, you have to order it from Kingston, so our prices tend to be a little higher than the competition, since you noticed the memory I bought is from Samsung and I got it with Amazon Prime, so I had it up to date following. after I ordered it, it's a very useful utility, the cpu-z is completely free, you always see, I use the portable version, I don't install anything and that's how you know what memory to put in now when it comes to looking at the hard drive there is a couple of different ways we can do it.
I'm going to close this, let's open Google again, we'll go back to Google and I like to use a utility called Crystal Disk.information, so I'm going to type it right here, in fact, I don't even have to finish typing it, you'll see it pop up automatically and here it is crystal disc information from crystal do world. I click on that link, okay? We'll scroll down and ignore these other edits of this Shizuku and create Curie Kai. I'm not sure how to pronounce it. This is a matter of Japanese culture. You can search for Shizuku. It's a whole.
There is an entire Wikipedia on Shizuku. Just add this. anime girl to the program. I don't know why anyone would find it necessary, so it ignores the ones we want in the standard edition, so we'll hit the download button here in the middle and it'll ask us which one we want, of course we do. I want standard and I want the zip file and then we will save it when you offer us it will say you want to open it or save it we want to save it there we go and it only takes a moment to download it it's a small portable program you don't have to install anything now let's open it up and extract everything and then let's extract well, that's extract.
I can close that window and close that window and it will open the folder that it just extracted as soon as it completes. Here in a moment, then we go and then we want disk information, 64-bit editing, so we'll double click on that. Oops, double click there, come on, where are we sure we want to run it? Yeah, and then I'll close it. window and what it tells us is the hard drive that is installed here well, I thought it was a terabyte, it's just a 500 gigabyte Toshiba hard drive, it's sad, a 300 and it has a rotation speed of 5400 rpm, which is quite slow, although 7200 would be preferable.
In a laptop it generates more heat and consumes more battery power, so another benefit of solid state drives is that they have been turned on nineteen fifty-four times during their lifespan and have been in operation a total of 1261 hours, which is not much. It looks like when they turn this on, they have it on for less than an hour for at least a third of the time, which is interesting and that represents drive letter C and drive letter D, all on this hard drive, the health status It is good and it is running at 33 degree centigrade now, if the health condition is not good, you should replace the hard drive there, you should not try to repair a hard drive, they really cannot be repaired, there are programs like spinrite that can cover the damage and it may give you a little more life but it will still fail it is still in a failed state it is only whether or not you choose to close your eyes like you don't know an ostrich burying its head in the sand I do not recommend it and we are changing this hard drive strictly for performance reasons, there's nothing wrong with it, it's just very, very slow compared to everything else on this laptop, so slow, let me show you what we've done with this program, so let's close it. and let's go back to Google and we're going to download a program called Crystal Disk Mark, you're just typing that in the wrong space, let's not go to Google and here we'll write Crystal Disk Mark, it's already the third option down again.
It's the same company, this Crystal world is fine, so here we are with Crystal Disk Mark once again, they have a standard edition and a Shizuku edition that just adds Shizuku, the anime grid, for whenever we don't want to the enemy girl we want. the pro version here so we'll hit download and it'll pop up crystal drive information for some reason so we'll scroll down and there yeah okay so all the downloads are on this page so could you grab both at the same time time? Here is Crystal Disk Mark, currently version 6.0 point 0 and we are going to download the zip file and save that small file once again, it should be relatively quick to download even with a slow internet connection.
Let's open that zip file. above and then I extract everything in it into a folder and I just use all the defaults and I can close that window now and close this window, there we go, now we have the 64-bit and 32-bit disk brand that I want. in 64 bit I'll double click and then press all and what that will do is test the reads. These are all reads to the left and then different writes. These are all right writes if you have multiple hard drives. your system, which I doubt a laptop has, but you can choose which drive you want to test right here, but since we only have one, I didn't have to adjust anything other than pressing the All button and then just leaving the computer alone for a few minutes and we will let this run and see our speeds of this mechanical drive and after we have upgraded to the solid state drive we will run the same test again to compare how much faster and how valuable it is to upgrade your mechanical drive to a solid state drive and Honestly, for the reliability alone, it's worth doing now.
I just skipped to the end so you don't have to sit there watching this to finish, but you can see our The correct speed is fourteen point eight megabytes, not megabits, megabytes, it's a capital B, megabytes per second and then our correct speed, which is usually always less than the reading speed, it's 108 point six, don't care about the rest of the numbers, just pay attention to those. two top numbers and now we can go ahead and close this, this is how I get all the information I need to know before offering any solution to the customer and with that I went to Amazon, as I mentioned, I ordered the memory module and I ordered the hard drive, which happens to be the same size as him now, this is just a solid state version, not only are our solid state drives much more reliable than mechanical hard drives, they use less power which is good in a long run of laptop battery, they don't generate as much heat and are much faster and read and write like you are about to witness now.
I like to use a program called Cronus and Cronus creates a program called True Image and what I do is buy the cheapest version of a Cronus model that Ajay can find. I never spend more than $30 on it because there is always a new version every year so I currently have a Cronus egde 2018 model on this flash drive and what I do is I buy the product again. I usually buy from Amazon and there will be a link in the video description below this video and I usually order the retail version so they send me a box and in the box is the software and not using that software the only thing I want from the inside of that box is my product key, go to a Cronus communication to create an account and register the product key that was included in the Cronus cut edge box that you bought on Amazon or wherever you bought it and make sure remember your username and password that you created for a Cronus communication like any other software, whatever is included in the box you receive is probably outdated.
Acronis 2018 is the name of the software, but it doesn't really tell you the version; There may be four to eight versions of Acronis 2018 before Cronus 2019 comes out and what you want to do when you register that product key with Cronus comm is it gives you the ability to download the latest version. and one of the options to download is a rescue ISO image download which rescues the ISO image which here is called bootable media, that is what we will use to make our bootable flash drive and as you can see here it has about six hundred forty-five.
Meg, I'm speeding up the download here so we can hurry up and get to the end now, once this download is complete, the next thing you need to do is download Rufus Rufus is a free utility, we'll just type Rufus, right? here at the top of the search bar and the default is my Google search engine, which Rufus offers is the first option to choose and here on the Rufus site, if we scroll down, we want to download the portable version of Rufus, which is the correct one. here, so click once to start downloading. It's a very small program, as you can see, it already downloaded very quickly.
Now, using these two files that we just downloaded, we can create a bootable USB flash drive with the Acronis True Image software, so the next thing we need to do is find a USB flash drive to use now, you really need a USB flash drive. one gigabyte at least and it doesn't matter what size you use, but keep in mind that you won't be able to use the flash drive. flash drive or any other space on the flash drive for anything other than a Cronus, so if you use a 16 gig flash drive for this 658 megabyte file, we download the other 15 gigs, they will be completely unusable unless you delete the flash drive and therefore delete the rescued us that we just did, so I'm going to use a two gigabyte flash drive because that's what I have and we're going to go ahead and plug it in now to a USB port on the computer next.
We'll go ahead and just click here on the Rufus executable file that we just downloaded and then this screen looks like it wants a lot of information, but there's really only three things you need to check, one of them being making sure you've selected the correct flash. drive to the correct destination if you have numerous flash drives installed, for example, you definitely want to make sure you have selected the correct flash drive because this is irreversible. Next we need to provide it with an image, so down here it says create a bootable disk. By clicking this icon, go to your downloads directory, which is where it defaults to and there is our ISO image that we just downloaded.
This file here is the same as this file. They're the exact same file, so we'll double-click on that. now the default is to use an ISO image which in most cases works fine, but I also found some images that don't boot correctly when using the ISO image format, so I found that using a DD image is much more reliable when I use it to create. the Acronis boot media, so I'm going to go ahead and select that and then press start. Now we will get a warning here saying that all data currently on that flash drive will be erased. it will be destroyed and if you click OK it will approve it, so again make sure you are on the correct destination drive and then click OK.
This only takes a moment and we will fast forward to get straight to The next step is all there was to do with the flash drive created, go ahead and click close and we can also close this window and eject the flash drive and now you will have an Acronis of bootable media that you can use countless times on any number of PCs that will always work for you and that's how easy it is to do. Now I'm going to go ahead and turn this laptop off, so let's go over here and turn it off. I just need a regular Phillips screwdriver.
Comes in a computer tool kit. These are small tool kits that contain a couple of screwdrivers and a couple of common tools used with PCs. I'll link to one of these typical tool kits, which also cost about ten to fifteen dollars. the notes below this video this video will have many links. I'm going to set the timer aside and unplug the HDMI cable here and unplug the power and then turn this on This is done and we're going to remove the battery. Here we go. It originally comes with Windows 8. You'll see there's a Windows 8 sticker right there, but let me show you how incredibly simple this is to work with.
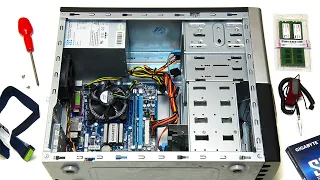
There are only three. screws here there's one here and there's one here and finally this one here and don't lose them they're small this whole piece will slide forward and lift up and what that reveals underneath the memory hard drive look at that look at everything you could ever want having to they're only three screws away I jumped forward a little bit what I'm going to do is I'm just going to put this back on I'm not going to I'm not going to secure it I'm just going to I'm going to set it back up there mm-hmm and what I have to do now it's clone this hard drive to take this new Samsung 850 Evo, so here's our drive and this is just SATA on one end, USB on the other, many manufacturers make these, they usually cost around $10 to buy one.
Let me go ahead and grab the rescue diskAcronis here, plug it in and plug it back in. In fact, let me put the battery back in. Like I said, I got a little ahead of myself. For my part, now for some reason I'm having difficulty booting from the USB flash drive into the USB slot closest to the front of the computer, so I moved it to the USB spot; This is the one right behind, there are two here. so i plugged it into this one and it just refuses to boot from that one so i moved it now to this one.
Sometimes it can be a challenge as simple as getting something to boot from the flash drive, perhaps the hardest part of this. update complete and you will see that it started option one of the x64 UEFI loader is an actual 64 bit Cronus image so we will choose option number one and it will load a Cronus and what I'm going to do is set up This other camera up here so you can see the screen, okay, now you'll see that everything's dimmed a little bit and that's because this acts as a light source and the cameras are set for it and what I'm going to do is grab. the Samsung drive we are going to upgrade to and we will connect it to a USB port, so I am actually using the three USB ports, one for the wireless mouse, one for the Bibble Acronis boot disk and finally Let's connect the drive which we are going to update and then we must give it just a minute to be recognized, just as any USB device requires a few moments of the operating system to recognize it, so the first thing I will do What I do is choose tools and utilities and I want to choose clone disk and it will ask me what cloning mode I want.
I leave it on.auto and click Next, what is the source drive? The source drive will be Toshiba. This is the rescue disk that we plugged into the rescue flash drive, so obviously we're not going to use that one and not the Samsung one. It doesn't show up because it's a new drive that's not even partitioned and therefore there's nothing to clone and Acronis is smart enough not to offer you that option as a source, so we'll choose disk one and here it gives us the layout of the unit. and we will click Next, now it will search for possible destination drives and that is when it should locate us and offer us the option of the Samsung drive that we have connected to the USB port.
This process may take a few minutes, so be patient, here we go, you will see that disk 2 is still the USB rescue disk that we booted and it has the Acronis software on it. We will never choose that option. These three say that it is not initialized. That's our new solid state drive. which is connected to the USB, we press next and what it's going to do is give you a layout of this is what the drive looks like now and this is what the drives will look like when it's ready these are little partitions here here and here and this is not It's reversible, you're going to erase everything on your destination drive, there's no going back, you can't undo this so you sure want to do it, of course this is a new drive so we don't have to worry about overwriting it, right?
You know? any critical information here because the new drive is completely empty, so we can safely continue and we will click continue and it is often running now. Cronus's time estimator is notoriously horrible and inaccurate depending on how fast your USB port is. Your processor is how much memory it has and the amount of data you are transferring will determine how long this process takes. Cronus always likes to say 16 minutes, which usually means about an hour and 16 minutes in my experience, but we're going to let this run and then I'm going to fast forward this point to the end so you don't have to sit here and staring at it, it's like watching grass grow, okay, so here we are at the end, you'll see it says that. the disk was cloned successfully and of course the next steps we need to follow, we're going to go ahead and click OK here and then we'll close this and then we'll turn off the computer by holding down the power button.
Press the button for up to 10 seconds until the laptop turns off. Now, once this is done, I can go ahead and remove the Acronis Rescue USB Drive. We saved it in case we need to use it in the future, I'm going to go ahead and unplug it. the solid state drive and we're going to go ahead and remove the adapter here that's ready to be installed now so I can go ahead and remove the power and we're going to remove the Bela bat or eat next and then I'm going to grab this cover here we go and make decisions about where We want to start, we can get a memory and it's quite easy.
I have the memory here. I always want to bend the plastic to get the memory out and hold it. Avoid touching any of the chips or any of the little gold fingers on the end. Remember that you do not want to bend the memory module to remove it from the package. You want to fold the package to separate it from the memory module. there is a slot in it. so it can only go one direction and you'll line it up at an angle like you see me doing here so I don't know how well you can see here it is here you'll see it's on the track and it's sitting so that the gold fingers are completely in the track or in the slot where you can't see them, then I'm going to push this down very slightly, it takes a little bit of force, not a lot, and then it just snaps into place and if that memory is supported we shouldn't have any problems and I'll show how we can prove that in a minute.
I want to remove this hard drive, which will require removing this screw here on this screw here oh and There are also two screws, one here and one here, so let me do that right now again. This is the perfect screwdriver for the job. These are tiny screws. It's helpful to have a magnetized screwdriver when you do this so you don't. loosen the screws, they can become very hard to find if you drop one on the floor, so you remove the four screws and then this whole unit has to slide, so there is a gap here, it has to slide into that gap and so it did , and then lift it up to take it out there.
It's the mechanical drive, there are four screws holding this little metal hard drive caddy on that we need to remove, so I'm going to take the two out on this side one more time. These are very small screws so it's important that you use a magnetized screwdriver and have a nice clean work area so you don't misplace them, you don't want them to fall out, it's very hard to find replacements and you need to pay attention to the direction they go. the unit is installed to place the replacement. drive exactly the same which part is the front which part is the back obviously knowing one will lead you to knowing the other properly so what I'm going to do is place this hard drive right next to it with the connectors facing each other . each other so I see how they're both facing the same direction and I can pick this up and place it here and that makes sure I keep the address of the hard drive installed correctly the first time so I don't have to take it Take it apart again and do it again when I figure it out that it won't come back in, and of course, these mounting screw holes will line up perfectly when you've installed the unit in the correct direction.
I emphasize this because I've done it several times and I'm tired of having to make the same mistake, so I hope you learn from my experience and follow that procedure so you don't have to wonder how this turned out, it's not the end. in the world is very inefficient, so here we go, here's the last screw, put it back in and see how that magnetized screwdriver really helps me keep that screw in the proper position. Now we're going to put it right there if you find the hole there that's fine and that just tightens to the point where the screw doesn't turn anymore you don't have to tighten it too much because all it does is secure the hard drive in this caddy then we're going to place the hard drive exactly as we took it out, which are the connectors that go into the socket and we'll place it here on the edge and seat it and then slide it forward, it should just automatically align itself, that's what the caddy does, it keeps the hard drive in the correct position and it locks itself into position there and now we're going to use those four screws that we just took out, secure it back into position, there's one one more time, don't do it.
Don't overtighten them, they're just there to secure them in place, they won't be airtight or anything. Worst case scenario is if you tighten them too much and then you have to get in here for whatever reason you can. It removes the screw or potentially breaks the screw trying to get out because you tightened it too much, so I always think about the next time you have to open it you won't be missing a screw because you didn't tighten it or you have a screw that you can't get out because you tightened it too much , so it's usually just a matter of turning the screw until it stops and that's it, okay, this is the third screw here that's going to go right there and we've got our final one right now, normally I would go ahead and turn it on before coming back Let's put it all together, but to give Oh confidence, at least I'll put the bottom back on and we'll put the battery in.
Plug it back in and plug it back in now, the first boot may take a little longer because it will detect some new hardware, but let's press the power button and press the home button and see how long it takes to boot this time. Now I did it. alter the boot order in the BIOS so that it was verifying the boot. I think from a USB device you might have to go back there and change that appearance, how quickly it already appeared, uh, you have a recovery here, exit and reboot it. I'm not sure why that came up.
It's just that Windows 8 BIOS protection is enabled here, so let's see what happens. What I mean is secure boot. I don't know what I just called it. I don't know what I called it. I'm thinking yes so for some reason it keeps going into this restore area of this one key recovery and if this happens to you don't panic all your data is on the drive but for some reason I think it's safe . The boots have been tricked into thinking you might have a virus, so I turned it off. I'm going to turn it back on, let me stop this, right, let's do F, I didn't hit it fast enough, turn it off again, let's make sure that our boot utility is designed to boot into Windows first, so we'll open it up and then we'll exit and we'll save to see if I have more luck.
There may still be a secure boot, but we'll find out about that here in a minute. Better now, yeah, okay, so we're going to do the timer again, so let me turn it off and let me set the timer so you can see it. Okay, I've already run out the timer, let's go ahead and restart it and see how long. it's going to take here, come on, eight seconds, we're already on the desktop, let me log in because this client we're logged in, so to verify that we have eight gigs of RAM instead of four, I just right click on the my computer or this PC icon and I go to properties and here it says that we have 8 gigs of RAM installed.
I know how well you can see that, if anything, but it's there and then of course we can run memory test 86, which is a free bootable flash drive, it can make it take about an hour and a half to run the 10 tests and if it appears with no errors you will know that the member you purchased is functional and compatible with any pre-existing memory, although it is not a perfect test it is better than nothing and if it appears errors you will need to address that you may have a defective memory module, buy a new one, what happens or an incompatible memory module, even if all the specifications line up sometimes. you may still have an incompatibility and I have a different video on Ram's diagnosis so I won't go into that now.
We're going to go ahead and check the hard drive speed now, so let me go back to the Downloads folder here and pull up the crystal disk mark, there it is and we'll run the disk mark 64, press everything, look at these two numbers up here , remember what these numbers were before, right, I don't need this timer to be running anymore, let's go ahead, shoot that so you can already. Let's see if I can expand this a little bit for you, let's bring it in in much larger numbers. There we are at a no it was a hundred and something hundred and 116 something like that now we're at 537 and let's go ahead and let it be this complete and there you have it, these are our final numbers that you can compare with the mechanical transmission, it's obviously much, much more real quick, let me zoom this out and I'll finish by saying the last thing I'm going to do What I need to do now is put the little screws back on the bottom cover here and I'm going to download and install the Samsung Magician software which anyone who has a Samsung SSD should install.
They will tell you how much life the disk has. Make sure and verify that you have a genuine and authentic Samsung Drive and not an imitation somewhere and most importantly it allows you to update the firmware from a newer firmware version available and I recommend you do so if you see that you have an older version of the firmware if you are Currently running the Samsung Magicians software, you should always make sure you are running the latest version of the Samsung Magicians software while making this video. TheVersion 5.2 is the current version and this is not something that happens automatically if you don't update it.
It won't happen, so fast mode may also be an option that you may want to activate in general, if you have more than 8 GB of RAM, you can use some of that RAM for caching and it is available on some Samsung SSDs, It will be an option. available in the Samsung Magicians software if it is grayed out that means it is not available for the Samsung unit, no big deal, if it is available for you you may want to experiment by turning it on and seeing if you notice a difference in speed, most That's the benefit of caching and there you have it, it's that easy to upgrade your own hard drive, you don't need to pay anyone to do it, it's very simple and of course you can use a Cronus to do it. image backups to use as backups as well and you would simply follow the same procedure with an external hard drive that you have lying around that will create an image of your system so that if your hard drive ever fails you will have everything and By everything I mean every temporary file. and every virus, if you don't clean it before creating the image, literally takes all the data with impunity, so I hope you found the video useful and educational and hit the like button if you enjoyed it and would like to see more. videos like this until next time my name is Carrie Holzman and see you soon, bye for now, as soon as I fixed that laptop, the next one arrived and this is more like what I'm used to receiving. to repair this is a cheap laptop where it was in 2013 when bought new.
Let me show you a little close up of this so you can see that when you pay less for a laptop you get less and just take a look for example. Here this looks like it would be an optical drive, doesn't it? But it's not, it's a solid piece of plastic that covers the hole where a $15 optical drive would go. Manufacturers will take and cut out every corner they can. To lower the price of the laptop, you'll also notice where the battery is, not There are buttons to eject the battery, instead there are two screws that need to be removed to remove this battery, which creates a completely different set of problems if you have ever used the laptop with a bad battery before and seen the effects it can. have.
The actual motherboard doesn't even have a battery to retain the time and date. If you ever remove this battery, you lose the time and date in your BIOS settings. It says goodbye, we have to restart it again, okay, that's the end of this video. I hope you found it educational and informative and as always, see you next time, bye for now.
If you have any copyright issue, please Contact