The SECRET to a Bubble Free Epoxy Finish
May 30, 2021Hi everyone, I'm Mike from Northern Ridge Designs and welcome back to the channel, sometimes it can be difficult to get a
bubble
free
epoxy
finish
especially on wood slabs but in this video I will share some tips with you that will increase your chances. to get a perfectepoxy
finish
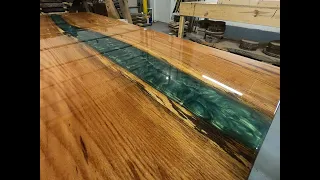
on any wood slab project, so let's get started. What you're looking at here is an 11-foot long L-shaped walnut bar with great character, as you see in this knot with a crack. We also need to address some issues, such as sanding these oil stains. This bar top was in place for a while unfinished, also when it was put together.
I don't know who did it, but the seam here is a little big. A large piece of bark is also missing from the space. We will have to touch up both things before applying the epoxy. Pour this particular knot hole with a crack or not. It's a little soft, but the epoxy should. harden that, it will be perfectly fine, the most interesting feature of this whole slab is the conclusion of this bar, it is just huge and will be amazing, filled with ocean blue metallic epoxy, I have to get all the soft loose crust out of there. but it will definitely be worth it in the final product, moving down you will see a couple more, we have a couple of little indentations and holes and things that we will have to remove some of the bark and some of the loose materials. so that we don't have anything loose and we can fill all the gaps with an ocean blue metal.

More Interesting Facts About,
the secret to a bubble free epoxy finish...
We can finish everything with an epoxy finish that just looks like glass. Here we go, step one, you need to remove everything loose. material and I'm going to start by including large bark and as you go along here, you want to go slow and slow at first, things are going to come out in big chunks, as you can see here, these really came out. easy without much effort and I'm going to go through first and make sure I have everything that's loose and easy and then from there I'm going to start picking and trying to find things that are a little harder to get out, maybe just kind. to go through, I don't want to remove any type of wood, I don't want to mark the wood around it and mess up that beautiful grain, but I definitely want to take anything that's soft or loose out of this void because Again we're going to fill this with ocean blue metallic and I just don't want anything to move over time, so even though the video speed is sped up here, I'm going pretty slow and just poking around and checking. with my little selection here and it's a long process, it takes a little time but it will be worth it in the end, so here we have the final product, clean and you see a lot of little rough edges. okay, the epoxy will fill this void and just pop along with that amazing grain from the bark inclusion, since you're probably noticing that the bark inclusion went through that edge of the slab, so it had to be that way.

Be careful not to break that piece of wood, it doesn't really need to be repaired, but the epoxy will have to come up through that void from the top to the side, so here are a couple more spots that will be filled with the blue and I have to remove and remove everything that's loose, so what we're going to do is just jump to the blue instead and all these voids that I've removed, the loose material and stuff. It really brings out that ocean blue metallic, uh, as you can see, I overfilled all the gaps that way, we can sand them flush and there won't be any gouges or low spots, although you do have a little bit of wiggle room with that with the epoxy finish that I tried to maintain. a lot of blue from the crack because we're going to fill it in with a more natural look with sawdust and glue to help fill it in but not make it stand out so much that there's a big crack there and like you.

I'm seeing along the edge here that this material is a little loose to work with, so I used a piece of mdf I had lying around with some Tyvek tape to help hold the epoxy in place while it cured. This is a 15 minute quick coat epoxy so it's pretty loose but you have about 15 minutes of work time and you really have to move around so once I took it off what you're seeing is kind of an edge sharpened along there it will be sanded flush and that is. In the end it will look really good, so here's a look once things are sanded.
As you can see, it is a little white, but that is due to sanding. Once we put a coat of epoxy on it, it will fill in any real scratches that are left. in the epoxy and you won't be able to tell it, also look here, the crack was filled with some wood glue and sawdust. I also took a piece of walnut bark and tidied up that corner, sanded it to match up a little better so there's just a couple little blue spots here and there, that smooth knot hole we're also going to fill with epoxy and harden it and there's the inclusion of bark, so it ended up looking pretty clean the whole time there and once we get the epoxy on that grain around the blue it's going to be really amazing, this is where it becomes pretty obvious that you took your time and you filled in all these little voids to make sure you didn't have places where the epoxy would sit. let's filter we're going to start with our first sealing coat and sealing coats are what make the difference between a glass like epoxy finish on wood and one that has a lot of dimples and
bubble
s.What I am going to do? here on the first coat of sealing, I'm just going to move this product around the wood and let it soak in to fill in all the little holes and natural grains of the walnut. Each seal coat will have approximately one ounce of epoxy per square foot. It's not a ton of material, but it's very important that you do this. Each sealing coat will look better than the last because you are eliminating some of those areas where the epoxy will leak and bubble. Some people like it for whatever reason. just pour a layer of epoxy on top, sit there with a blowtorch for hours and you'll still end up with some bubbles and indentations in the final product.
The difference between that and having a glass-like epoxy finish is the sealing layers. In this particular project, because it's for a client and I want a perfect design, I'm going to apply three coats of sealant to make sure I fill all those little gaps with the epoxy, plus we're dealing with the live edge that has bark on it. on one side, so I want to make sure I take my time and get the epoxy into all those little nooks and crannies along the edge of the bark. I am using a squeegee to move the material. Now I'm going around the front with a with a short two inch paint brush to rub the epoxy in and what's going to happen when this epoxy starts to self level, it's not going to level perfectly because I'm using enough material to spread it and it seals all the grain, but it's going to move a little bit. little and it will go over the edges so you will have to keep going back and forth constantly and rubbing the drips with the brush on both the bark side and the smooth side you are probably noticing here I am using my hand on the smooth side of the slash that's perfectly fine I'm just trying to smooth out those little drops I just don't want a super uneven edge but it's going to be a little uneven, that's exactly what the seal coat is.
I'm going to burn it again. I'm probably going to do three or four passes with the torch in total. This will be the deepest sealing layer I have found. I show you that I repeat this process two more times before making a final flood layer. Now the difference between a seal coat and a flood coat is that the flood coat has a lot more material, actually three times the material I use three ounces per square foot and that will get a self leveling agent okay, but after a seal, this is what's left from a distance, it looks pretty good, but when you get a little closer, you'll notice all the little imperfections, like All these little bubbles now, if I just poured one coat with a blowtorch, I'd still end up with these because they are the bubbles caused by the epoxy soaking into the wood grain and it will be a constant thing until the epoxy dries so this is what it is and I'm going to sand it using 220 and that's all you need to do, just sand it lightly.
I'm going to pop all these little bubbles with the sandpaper and it's going to look pretty ugly, luckily the epoxy. This is the beautiful thing about epoxy, it will fill in those little scratches. Here you're looking at some pretty big little voids that will continue to draw that epoxy in, if you didn't apply the seal coats you'd never get those. full, so this is after the first coat of sealing and it's a little ugly at the moment, when you get to it, switch to a top view here, look a little better at my sanding process. I only have 220 grit sandpaper in a five inch orbital. sander in the description you can see the link to the sandpaper and the tools I'm using, but I'm just going over it slightly.
I just want to see all the imperfections. I'm not trying to sand that smoothly by any means. or sand it flush. I'm just trying to make sure I get good adhesion with the next coat of epoxy. If you pour the epoxy directly onto a smooth, hardened epoxy surface, it does not have the necessary mechanical bond. So when sanding with just 220 grit there are small scratches caused by the sandpaper that the next coat of epoxy can grab, so here's a better look that puts it into perspective of how uneven and ugly it is for lack A better term for that sealing coat is that the crust actually absorbs that epoxy in the first sealing coat, after that less and less material will be soaked in, but it helps smooth out the naturally rough crust, there you can see that it is kind of a low spot where there was that soft knot around the bark inclusion, there's a really big indentation there that showed up a little bit before, it stood out even when everything wasn't sanded and between coats of sealant, after sanding it down it just I'm going to clean everything with blue towels, I'm also going to clean it with a compressed air gun.
Here, looking down at the table, you can see all the imperfections. This is the second layer of sealing. I'll just use a squeegee to move. the material around and there like magic, all those little scratches disappear the first time you do an epoxy project and sand those sealing layers, you feel like you're ruining it, but actually that epoxy needs those little scratches from the 220 grit to join mechanically. it goes back to its previous layer and you can't see the scratches at all just looking here, even without burning it, it has a crystal clear finish and that blue really comes out of that dark walnut, just like the first layer of seal that I'm going to move. an amount of material that was one ounce per square foot going around and around trying to fill those voids and I keep it moving so it keeps sinking into those little dips and nooks and crannies that I'm going to start pushing in.
I'm going to run it over the edge and then I'll go over it with my brush, cinching it into the bark and smoothing it out on the back. As I go along, you can see a little bit of cloudiness there and that's just the epoxy having some. bubbles from the mixture, so the second layer of seal has dried at this point, you know it very closely and you can see that it looks much better than the first layer of seal. Heck, some people might even be happy with this in their own home bar, but this is For a client, I'm going for a glass-like finish without any ripples, I guess when you look at the epoxy here, I'm just pointing out a couple of points that are rigorous that they really won't film with. with the epoxy and what I'll probably have to do in those spots is use a burn stick, now that's another product for another video, but with the sealing coats you're going to eliminate 98 of those burns. the bar is just kind of a hard wax that melts in place and fills that little void and then you can just put epoxy over its color that matches the nuts so you can't even tell it's there, here we've sanded the second one.
The seal coat looks much better than the first, most of the little bubbles at this point are gone, there are just a few low spots and a few high spots, but the final flood coat you are seeing here will take care of the The final flood coat is self-leveling, it's one-eighth of an inch thick when you pour it over the material and it will level out immediately, so I'm going to go down and you can see that there are no dips, indentations or bubbles of any kind. I went ahead and did a third coat of sealing.
I saved it in this video because it's pretty redundant. They are exactly the same steps that I followed in the first and second layers of sealing. If you are curious to know what the final flood layer entails. I have a couple of videos that show that process but they involve an eighth inch square notch trowel and again you will get a perfect finish by following these steps of the seal coat you just can't find any imperfections the bark took that epoxy beautifully and smoothed everything out. so people don't get their clothes caught on any kind of sharp edge or anything like that and looking down at the bar I mean you couldn't be happier with the way it's placed there you have the final product if you take the Es Time to apply some coats of sealant on wood slabs.
It will really help youPrepare yourself to obtain an excellent final result. I hope you found this video helpful and if you have any questions or suggestions please leave them in the comments below, make sure you like, share and hit the subscribe button, thanks for watching.
If you have any copyright issue, please Contact