Making an Epoxy & Concrete Coffee Table
Jun 02, 2021Hello everyone in this episode. I'm so excited to share with you how I created this arctic weathering
coffee
table
from whiteconcrete
andepoxy
. This project feels like the culmination of many of the processes and materials I've been learning about. Over the last three or four years as a manufacturer, we have sprayed and pouredconcrete
, pouredepoxy
, done wood work for the base, have digital fabrication to create the foam form, and even some metal work. There's a lot going on, let's get right into it. I started by cleaning the melamine I previously used to make my TV.
Raise the countertop so you can use it again. I often feel guilty about the amount of waste I generate when
making
concrete. work, so reusing melamine is a small way to reduce your ecological footprint. Michael, I'd be lying if I said I planned thistable
, it's some kind of artistic statement about climate change, honestly, I was just designing something that I thought looked really cool and well, I'm going to throw away about three gallons of plastic in that shape. concrete, but since it looks a bit like a melting frozen landscape, I'll let you read in as much symbolism as you want and a quick PSA to always adjust your miter sled every time the blade angle or cutting side changes on your miter slide because this happens.
More Interesting Facts About,
making an epoxy concrete coffee table...
I know this is secondary so I have all the melamine pieces for the shape cut to size and the melamine itself is actually quite simple it's just a box of here we have what really makes this project unique and are these cutouts of foam that will be placed inside the mold now, since we are pouring the table upside down, pouring the concrete over the foam will create a cavity or recession. into the concrete which we can then go back and fill with clear blue epoxy. Now you can cut these pieces of foam with a band saw or jigsaw if you want, but it's definitely a little easier if you use a CNC. files below that allow you to do it either way for now.

I'm going to show you how I cut mine with my inventables. Excellent. I started by using Affinity Designer to create a 2D sketch of what I wanted the layers to look like. Then I imported. the designer SVG file in inventable free easel and easel software. I separated it into each layer so I could cut the layers individually. The foam cuts very well with a compression offering in the X carving and is fast. I made passes about a quarter inch deep. At about sixty inches per minute I used a one hundred and fifty grit sanding pad to quickly remove the tabs that would hold the piece in place when it was done.

I then attached one side of the form to the base, as you will see. Why in a minute? But I'm going to attach the other three sides after I've glued the foam to the inside of the form to secure the foam. I just used some general purpose spray adhesive. First I glued the bottom piece to the form. and then I glued the layers one by one to build the shape of the 3D foam die, since the foam die is bigger than the base of the x-carve, I decided to make it in two halves and as a result there is a seat that I decided to try. to fill this seam and smooth it out using a bondo putty and we'll just call this a learning experience oh well that experiment there with that bondo putty yeah it's a mess and yeah we're going to remove it we're just going to use a little bit of silicone to filling those gaps this is going from bad to worse so I think the putty is actually like part of the foam has disintegrated the amount of materials I'm putting on this table I think I have no choice but to break them at least most of them Cut out foam layers and remake them.
I don't know if he can recover and look decent. I think it will be faster to trim them. Yes, there we go. Fortunately, this foam cuts very quickly, so I was able to redo the foam in a few hours. After gluing the new foam in place, it was time to seal the partially assembled form. I've gone through this process of sealing a melamine shape probably a dozen times in my previous videos, so check out some of those, if you want more details for now, let's have a little fun with this and see how quickly I get through it.
I apply a Blair page to the fusion, then in a generous layer of 100 silicon carbon per year, it will finance it so much to complete the so-called Klein metal. It's fun to play with the ball, pushes excess putty to the sides, leaves a clean line over the seam and rhythm of the layer. Wrexham, it's easy to appeal, the putty exercise to remove one ensures that they have been a perfect decision, Klein and that's it for this episode of Kult Junk. I applied polyacrylic to the foam. I thought the polycrylic would make the foam easier to remove from the concrete later, once the foam sealant had cured it was time to assemble the rest of the formwork and I'm just using drywall screws to do this , you might be wondering why I didn't just disassemble and caulk the entire box for the format once after all it's just a box it would have made it much harder to access the foam it made it much harder to caulk and seal it this time I'll try something that has never been done in the world of concrete, a Jackman style caulking removal, one, two, three, now it's time for a concrete project, tradition here, dextrafication of the shop with plastic on everything, as always.
I am using a mixture of fiberglass reinforced concrete and fish stone. It's a white mix naturally, but this time I'm going to add some white concrete pigment to make it ultra white. One thing when you mix GF RC is quite important is to put in the water and first about 80% of the water, then add the concrete mix, then mix and then add the rest of the water slowly until you get the right consistency of thick pancake batter, Too much water will weaken the concrete, so if the recommended amount of water is not enough. It had a plasticizer instead of more water to get to the consistency of pancake batter.
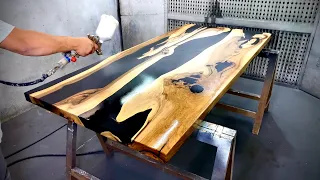
Okay, it's a really good consistency. Yes, it falls off and leaves a little thin layer there, which means it will stick. sides of the form but make them very thin, which is exactly what we want and that's perfect. I then loaded my hopper spray gun to spray the fine coat of beauty. I started spraying with the form oriented vertically to make it easier to cover the stepped foam. knockout, then we placed the formwork horizontally on the ground so that we could more easily spray the rest of the formwork. Some of the concrete professionals on Instagram recommended me to spray in a U shape pointing towards the part of the form that is already covered with concrete to prevent sand particles from coming into contact with the unsprayed surface.
I'll leave the links to those Instagram accounts in the description. You should definitely check them out for inspiration and more concrete knowledge. After spraying, we brushed the face coat with the chip brush just to be safe. By the way, there were no trapped air bubbles. The other guy you've been seeing is the one and only Shawn Boyd. This project overlapped with another one he and I collaborated on and I wanted to try mixing some concrete. You should definitely check it out. On Shawn's YouTube channel, he makes some pretty amazing modern furniture here. Shawn tried mixing the GF RC backcoat and adding glass fibers to it.
We used the same mix as the front layer but with less water and no plasticizers, so it would be a thicker consistency similar to plasticine, this allowed us to hand pack the concrete into the formwork and move it up the vertical walls without any later formwork to support it. Once the first layer was hand-packed against the face layer, we added a mesh made of the same alkali-resistant glass fibers. This AR mesh adds reinforcement and also helps keep sagging on vertical surfaces to a minimum. Packing this table by hand was an exhausting task that took a few hours in total.
We made four thin layers of backing that were slowly built up until the concrete was 3/4 inches thick on the verticals. Shaun commented that this felt a little like being a sculptor with clay and we had seen discovering that there was more to the sculptor analogy. than we thought. I usually try to scrape excess concrete off the top edges. About six to nine hours after pouring it, when it's semi-hard, but time didn't permit this time, I started trying wet grinding with an angle grinder, but quickly realized that the dust storm would blind us long before we could We couldn't finish, so he grabbed a couple of chisels and we started chiseling for over an hour as we worked, we felt a bit like Michelangelo's assistants doing some of the hard work so he could go back and shape certain important parts. of the David later, once most of the edge was chiseled. use an angle grinder to polish the edges perfectly level with the shape to get a clean, crisp bottom edge on the table and then we evacuated the workshop while the air filter did its job on the dust cloud before removing it from the melamine, it is Time to address how we are going to attach the hollow table to the base, since I plan to insert it from the edges of the table, the solution we came up with was to make cross support pieces out of one inch steel tubing, so I cut these two lengths using my angle.
Grinder because we don't have a flat surface to work on here, we've had to get a little creative and since I had Shawn and he's an excellent carpenter, what do we do here? This is one of our best works. Think about a bunch of two by fours and some use liquid nails, fuse it together, basically we're going to make some bridges that we can then put a wooden base on top of that will support all of this, it's not pretty here. but hopefully the outside will make up for it. We used a drill to create quarter-inch holes in the bottom sides of the tubes and to drill larger holes in the tops of the tines.
The larger hole at the top allows for the entire quarter-inch bolt to be accommodated, including half. inch head to insert into the pipe so it can be screwed into the wood seen from the smaller quarter inch holes on the other side of the pipe, having someone else in the shop we had fun doing slough removal races while the equipment was the best for the record I would have won if I didn't have more screws in my side, I swear, after removing the melamine we used some chisels to remove the foam die and then we were able to take a first look at this survey deposit that we have created for the next epoxy pour, however before the epoxy we have a little more work to make some of the foams adhere to the concrete a little more than expected.
I think I should have put on another coat or two of polycrylic and probably used some embossing spray. However, in the end it was no big deal as I discovered that a scouring pad and chisel could be used to remove the excess shape. It probably took about 30 minutes, so I have a little area right here where something happened. to the surface and I got a little rough patch, but it's not a big deal, we can just quickly fix it with a coat of grout that is the exact same GF RC mix that we used for the face coat.
I let the grout dry overnight and then wet sanded again with 400 grit sanding pads, then rinsed the table well and applied an acrylic sealer to the concrete and while sanding and sealing again after pre-sealing with epoxy, Now I will help prevent the overflowing epoxy from sticking to the concrete. and let me chisel that epoxy easier. I then use silicone and a piece of melamine to seal the reservoir for the epoxy pour. I put some painter's tape on to protect the concrete from the epoxy. I later discovered that this was totally unnecessary because the cured epoxy came right off the concrete sealer and wax I had applied for this project.
I was excited to try the new thick epoxy from Total Boats. I talked to my friends at Total Boat and they tested the pores up to two inches thick, but I wanted to try taking it a little further. I started by mixing the entire 1 and 1/3 gallon kit in a set set, this is by far the most epoxy I have ever mixed once and as I was mixing and realized the bucket I had was the big enough for a gallon point three, but that meant I couldn't mix it without dumping some, so I quickly grabbed a larger bucket, said a quick prayer and that ruled it all out.
Those unmixed components worked. I added a transparent blue pigment to the epoxy mixture thoroughly and then poured most of the epoxy into a smaller bucket that fits in my vacuum container. Using the vacuum container will remove most of the bubbles from the epoxy and reduce the chances of having bubbles trapped in it. I was told this is not necessary with a thick set, but I wanted to do my best to get a clear epoxy for this project and now it's time to get the great epoxy result.pool, after letting the epoxy sit for a few minutes, I came back with a blowtorch to pop the few bubbles that weren't removed by the vacuum.
Wow, that epoxy is curing. I'm going to take a moment to answer a question that I know I'm going to get a lot of and that is how much epoxy is on this table. I went ahead and modeled this in fusion and I can pull that body out here and the fusion will actually tell me how much is there, there's a little bit more. 4 cubic feet and about 28.8 pounds, which is equivalent to a little more than 3 gallons or 11.5 liters, so that's a lot of epoxy. When I returned 12 hours later, the deep parts that were about two and a half inches thick had completely hardened, while the shallow parts were still very soft and sticky because they cured more slowly.
I scraped off the hardened part so the next layer of epoxy would have something to adhere to. I finally did two more pours to fill it, letting the epoxy cure for 12 hours in between. the last layer is poured to the top of the table, the thick setting epoxy is very thin compared to other epoxies I have used in the past, being thinner means less surface tension which made it much easier to pour the epoxy close to level with the top of concrete, as I mentioned the tape turned out to be unnecessary, some epoxy still stuck to the concrete and was I was pleasantly surprised that because I previously sealed and waxed the concrete, the cured epoxy came off very easily with a chisel without any noticeable effect on the concrete surface.
When I removed the melamine, I got another surprise, but this one wasn't as pleasant. I'm sure exactly what happened, but since the melamine only stuck to the deeper section that gets hotter during curing, I think the epoxy actually melted the melamine and got into its MDF core, it wasn't being chiseled until that I discovered I could use the heat gun. trick to soften the epoxy so that the melamine can be removed since this video is already long. I'm not going to go into too much detail about the sanding and polishing process and some I dry sanded to 240 grit, wet sanded the concrete with a 400 grit epoxy. sanded with a random orbital sander, wet sanded the epoxy to 2000 grit by hand and then used plastic polish on the epoxy.
I have a story pinned on Instagram if you're interested in more details on the polishing process, the bass is a fairly simple plywood box with a couple of dividers that add strength and create storage nooks under the table. I made the base significantly smaller than the table size. I hope this inset design makes the bass almost disappear so that the concrete and poxy top appears. to float over the floor assembly with wood glue and my new Metabo HPT cordless finishing nailer was very fast. I took the base outside and spray painted it white and with that we finally finished building this table, so we have a few bumps in the road, but Overall, I'm delighted with how this table turned out.
I hope you like it too and if you do make sure to hit the like button and subscribe and leave if you haven't already and if you like this project make sure to check out my Other Concrete Project Videos and Videos of epoxy, but I think you'll enjoy them, that's all for this time and I'll see you next time.
If you have any copyright issue, please Contact