How to Speed Up Your WordPress Website (Simple Guide)
Jun 05, 2021So my friend Zach messages me and says, “Hey, can I hire you to
speed
up my WordPresswebsite
?” And I was like, "Dude... Just do A, B, and C, and I'm pretty sure you'll see a huge increase in performance." A few days went by and he told me, "Thespeed
tips you gave me worked perfectly." So today I'm going to show you how to speed upyour
WordPress site in three easy steps and how to takeyour
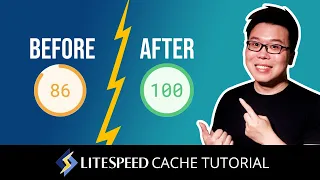
site speed from something like this... to this. Stay tuned. Google has used site speed as a ranking signal for desktop searches since 2010.
And starting in 2018, page speed also became a ranking factor for mobile searches. And while speed improvements will only affect a small percentage of slow
website
s, faster page load times lead to a better user experience and, ultimately, more revenue. In fact, a Google study shows that as page load time increases, bounce rate also increases. Now, there are numerous reasons why your website may load slowly. But the most common reasons I've seen are due to slow connectivity, caching, page size, and sometimes more technical reasons like JS blocking rendering. But if you're like Zach, who's not exactly the most technical person, then the three steps I'm going to show you will help you get better performance from your site.
More Interesting Facts About,
how to speed up your wordpress website simple guide...
Now before we begin, it's important to note that what I did for this site won't necessarily translate perfectly to your site. There are many things to consider when it comes to WordPress site speed, such as your theme code, specific plugins you might be using, server settings, image file sizes, and more. So, as we move through the tutorial, I'll try to explain the more technical reasons behind the poor performance, so that you can hopefully diagnose other problems yourself. Alright, let me give you some information about the website we will be optimizing and start with some baseline speeds.

This is a new affiliate site built on WordPress using the free WP Astra theme. You have activated seven plugins, many of which will contribute to your page load time in big and small ways. Now, to keep things
simple
, I published a single post, which has text, images, and a video across three page speed tools. PageSpeed Insights shows a mobile score of 45 and a desktop score of 79. Pingdom shows a load time of 1.72 seconds, a page size of 1.7 MB, and 63 requests. And GTMetrix, fully loaded in 4.3 seconds with a page size of 1.55 megabytes and 61 requests. Now, since these tools only allow you to view one page at a time, I performed a full crawl using the Ahrefs site audit tool.
And if we look in Page Explorer, you'll see that there were a total of 23 pages with a load time of 1 second or more, which is basically all the pages on the site. So there is definitely room for improvement. So the first thing we did was switch DNS providers to Cloudflare's free DNS service. Now, to understand why we use Cloudflare, you need to understand how the web works, at least at an elementary level. Websites are just files on a computer that can be accessed over the Internet. Now, every device that is connected to the Internet has an IP address, including the server that hosts your website.
So if your server is located in Los Angeles, California, and your visitor is in Las Vegas, these two IP addresses must create a connection to download the file content to the device. Now, IP addresses are hard to memorize and I doubt many people will enter an address like this to visit your site. That's where DNS comes into play. DNS stands for Domain Name System. And it is often referred to as the "phone book of the Internet." In short, DNS maps domain names to IP addresses so people can type a domain name to visit a website. But the problem with this is that when someone types the domain name into their browser, a DNS lookup occurs to find the server's IP address.
That takes time. And your domain registrar's free DNS providers are typically slow to respond, resulting in slower page load times. Cloudflare DNS, on the other hand, is pretty fast, considering it's free. But again, your mileage may vary depending on which DNS provider you are currently using. So to set this up, sign up for a Cloudflare account and then click Add a Site. Enter your domain name, select and confirm your plan, and after a few seconds, Cloudflare will give you the opportunity to review your DNS records. Click Continue and you will be prompted to change your nameservers, which is something you will need to do with your domain registrar.
Boom! The first step is done. The next thing we did was purchase and install the WP Rocket plugin. WP Rocket is an all-in-one site speed optimization plugin for WordPress. And they make it very easy to make technical optimizations even if you have no idea what you're doing. The plugin handles common page speed optimizations such as image caching, preloading, compression, and lazy loading, to name a few. After activating the plugin, you can access WP Rocket settings from the top navigation bar. Alright, let's go over some of the important settings starting with caching. If you're not familiar with caching, it's basically a way to temporarily store copies of files, so they can be delivered to visitors in a more efficient way.
And since this site is a basic responsive blog, I enabled mobile caching. Next is file optimization, which is where we will spend most of our time. For the basic setup, I chose to minimize HTML and optimize Google Fonts. Minification simply removes whitespace and comments from the code, which will reduce the file size. And smaller files load faster than larger ones. I also chose to optimize Google Fonts since the theme uses them. The next section is about optimizing CSS files. Again, I minified the CSS files and also chose to combine them. You already understand the benefits of minification, so let's touch on file merging.
WordPress sites typically include multiple CSS files. Some will be for themes, some for plugins, and you may have added some custom ones as well. Now, whether you choose to activate this option or not will mainly depend on how your server delivers the files. Generally speaking, your files will be uploaded using HTTP 1.1 or HTTP 2. With 1.1, your files will be uploaded consecutively, that is, one file must be fully uploaded before the next file begins to upload. Therefore, combining your CSS scripts can help reduce loading time because fewer CSS files will need to be loaded. Now, with HTTP 2, files can be uploaded simultaneously.
That is, if you have multiple CSS files, they may start loading at the same time, so combining them won't necessarily be as impactful. To see if your site uses HTTP 2, you can use the Key CDN tester and enter your URL. The last option we enable is to optimize CSS delivery. Basically, this option will generate the CSS needed for the above-the-fold content and asynchronously load other CSS files so that they don't block the rendering process. Now, these concepts can be quite technical, so I won't expand on them, but in general, these are page speed optimization best practices.
Alright, scroll down to the JavaScript files section. First, I removed jQuery Migrate, which is a file that was added to WordPress since version 3.6. Now, since there was no problem with jQuery for this theme or any plugin, I chose to disable it as there is no point in loading an extra script without a purpose. Again, we chose to minify the JS files like we did with HTML and CSS and merged our JS files as there were no conflicts or issues. And the last option we enable is to defer the loading of JavaScript. Basically, this option will delay the loading of JavaScript files so that the most important content, such as HTML and CSS, can be delivered to your visitors first.
And then the JS will be loaded. And this will, in most cases, fix the “remove JS blocking rendering” issue you may have seen in PageSpeed Insights. Now, it's important to note that if you choose to minify, merge, and/or defer your JavaScript files, some things may break on your site. Therefore, it is important to test your site's features before leaving it up permanently. Alright, let's move on to the Media category. Here, I chose to lazy load all media files. LazyLoad improves page speed by deferring the loading of images and videos until they are visible on the screen.
In fact, WordPress 5.5 will lazy load images by default, so you won't necessarily need a plugin if you just want this feature. The next step is preloading. Preloading allows you to define essential resources so that browsers know the priority of which files should be loaded first. For example, let's say your HTML code looks like this: Based on this code, the JavaScript file should be loaded first simply because of the hierarchy. Of course, you can edit the code, but that can be complicated and confusing if you don't have coding knowledge. But if we add another link tag to preload the stylesheet, this would tell browsers to load the CSS file with a higher priority than the JS file.
And that's exactly what this option in WP Rocket does for you. Now, the last thing I want to talk about here is using a CDN. And it's easier to understand how they work if we look at our first example of how devices connect to web servers. Again, if the server is in Los Angeles and a visitor is in Las Vegas, it probably won't take long for the two devices to connect since they are relatively close. But what happens when someone from Germany, India, Australia or Singapore tries to connect to the web server? It's going to take more time.
And that's where CDNs can help. CDN stands for Content Delivery Network. And that's exactly what it is. A network of servers located around the world that delivers content to visitors as quickly as possible. By using a CDN, you are basically caching files on multiple servers globally. Then, when a visitor tries to access your site, it will connect them to the closest one, creating a faster connection between the user and the content. So if your site attracts a global audience, then it might be worth signing up for a CDN service, enabling the option in WP Rocket, and adding the appropriate CNAME.
Now, there are other free caching plugins that have many of these features, such as Autoptimize and W3 Total Cache, but I personally prefer to pay a small fee for WP Rocket as I have had the best results with them. And the last step of this site speed optimization tutorial is to optimize your images. Now, since we already added LazyLoad to the images, this will solve many problems. But if you are using featured images that are above the fold during loading, then lazy loading won't help you. Plus, smaller images will save you storage space. So the
simple
solution is to compress your images using lossy or lossless compression.And there are some great plugins that will do this for you, like ShortPixel and Imagify. Now, to give you an idea of how much image compression can help, take a look at the WordPress Media Library here. You will see that ShortPixel has reduced the size of the images quite a bit, which will help improve page speed. ShortPixel also has a feature that allows you to serve images in WebP format, which basically allows you to compress images even further without compromising much on quality. Simply go to Settings and choose ShortPixel. Then click on the Advanced tab. From here, you'll want to make sure you've checked this box so that ShortPixel will create a WebP version of your images.
Now that we've made the top three optimizations for WordPress site speed, let's run the PageSpeed tools and compare them to our original benchmarks. On PageSpeed Insights, the page previously scored 45 on mobile and now has a score of 95. It had a score of 79 on desktop and now has a near-perfect desktop score. On Pingdom, the page previously loaded in 1.72 seconds with a page size of 1.7 MB and 63 requests. With the new speed test, you will see that there was a significant decrease in all three metrics. The page size isof just over 900 kilobytes, the loading time was 200 milliseconds and the number of requests has been reduced almost 3 times.
And you'll see the same pattern for GTMetrix and improvements across the board. Finally, I ran a new site crawl with Ahrefs' Site Audit and as you can see, each page loaded in less than a second. These are the steps that worked for Zach's site and I have used them successfully on other sites. But remember, every WordPress setup will be different, as you may be using a more complicated theme, more resource-intensive plugins, have inferior hosting, or have tons of third-party tracking scripts. So if you're still not happy with your site's speed after making these optimizations, you probably need more custom work done.
Therefore, you may want to consider removing plugins and scripts, changing themes, or hiring a developer to make the appropriate fixes. So give it a try and if you liked this tutorial, be sure to like, share and subscribe for more practical SEO and marketing tutorials. And let me know in the comments if these tips helped you increase the speed of your WordPress site. See you in the next tutorial.
If you have any copyright issue, please Contact