How to Put Vinyl on Mugs + Vinyl Test & Cute Designs!
May 31, 2021Hello everyone, my name is Jennifer Maker, welcome to the great creator, so today at Tao we are going to put
on
. a cup, first you need to know what type of cups work best, then you need to know what
vinyl
on mugs
. I got a lot of requests for this tutorial and it's so easy to see why it's fun to have personalizedmugs
and give them as gifts. They are very trendy at the moment and it is also quite easy to add a name or saying to one of these mugs, but I also understand why I received so many requests for tutorials, despite their simple appearance, there are many options for applyingvinyl
. a cup, first you need to know what type of cups work best, then you need to know what designs
are best for months, especially if you are going to put it in a curved cup, and if you come up with a cup, how do you put the vial in it? without a wrinkle right and probably the biggest choice what type of I know you used to stay on your mug and I can help you with all of this we will go over the types and shapes of mugs that work best for vinyl decals we will talk about thedesigns
that look best on mugs and then we'll do atest
of all the different types of what I know one can put on a mug, from adhesive vinyl to heat transfer vinyl, you know what you iron on and no, I'm not kidding, we're going to do it. make and to top it all off I'm going to put the mugs in my dishwasher so you can see what is and isn't dishwasher safe because this question comes up a lot so for this project you're I'm going to need some vinyl and I'll tell you which one I think it works best, plus some transfer tape and a little alcohol.
Oh, and you also need some designs. I made some super
cute
designs that you can download on my blog. These are Kauai faces and are very easy to apply on mugs, great for beginners, they look adorable and have a variety of faces and expressions including a unicorn, kitten and puppy. Let's talk about cups first, so I have three standard lengths. here the first one has very straight sides the second one has a gentle curve that was so rectangular that it is still pretty flat more or less now the third one has a lot of curves and goes down, that's why even the top is curved both vertically and horizontally. these three cups the easiest will be the pink one here on the left because it has straight sides it has curves that go in one direction only the hardness will be green and went to the right because it has many curves Okay, now let's talk about the types of designs that you can put in cups.
More Interesting Facts About,
how to put vinyl on mugs vinyl test cute designs...
I mean, technically you can put anything in a mug, but will it look good? So what do you want to look for when you think about putting it on? I already had the final design. A mug has arms, it has the ability to extend and curve around a surface seamlessly Now, if you choose a mug like the rose one with straight sides, you can usually use any type of decal, so if you're just starting to look for that type of mug, but if you have a mug that has a lot of curves, you want a design that also has the ability to bend and curve with your mug.

Now let's look at two different designs so you can see how it works. works so here I have my monogram the one on the left has a circle around it and the one on the right doesn't and there's a big difference here so first let me show you how to cut the vinyl. Now you'll notice I have four. different types of vinyl on my mat here four four different types so if you're curious about what I'm doing here this is a trick that I use to trim things faster and I talked about it in my floating ornaments video so you can come back and check that once you've cut the vinyl you want to remove it, which means to remove all the extra bits that you don't want to transfer to your mug, you may be able to do this with your fingernail, but you can also do that.

I want to use a weeding tool that I have shown here. Here we have our two designs. We also need a piece of transfer tape to transfer them to our mugs, so you just want to cut a piece of transfer tape that is about the same size. or at least the same size as your design and then you peel off the backing of the transfer tape and place it on the front of your vinyl decal, starting in the corner and working your way out so no wrinkles or bubbles form. your transfer tape is very nice, flat and straight and we will do this for both because I will put them on the mug so you can see the difference and how they will apply and this will make a difference in what type of decal you choose so we remove the backing of the vinyl and when you place it on your mat, do not place it sticky side down because that will only alter the vinyl's ability to stick to a mug. so let's take these two older white mugs that I have here and we're just going to wipe the surface of both of them down with isopropyl alcohol so I'm using 91% isopropyl alcohol and we're just going to wipe down the surface of these so any oil or dirt. or whatever is on them is removed and our surface is as clean as possible, we're going to put the decal on and this is going to make a difference in the adhesion ability, you know, we want our decals to stick as well as possible. as best as possible, right, it's not fun to put something in so it comes out right away and by the way, these are both just dollar store mugs, these are very inexpensive mugs, so here's our, let's make our two first Cal with the circle. around the monogram so center it on your mug where you want to start in the center press down and then press out okay so always start from the center and then press out now because this is the design it's all connected and has nowhere to go.
You'll see that it folds and when it goes around the corners when it goes around the curves because it can't, it can't conform to the surface because it's restricted, but because of that circle around it everything is connected in this design and we can't, we can't change it now, you could take a scraper, which you should always do anyway, and see if you can remove any of those folds. I couldn't, so you can see here, there's a crease right there and when. Up here, this is the type of layout you want to avoid as much as possible.
You simply won't be able to remove those creases without luck or a lot of work. This one under your hand will work and what we're going to do is we're going to make small cuts around the edges of this design and these cuts will allow the transfer tape to bend with the curve of the mug and allow you to apply it to that curve without any creases, so let's Center it like before that, so allow the end to move where it wants to go naturally, don't force it into one position, just smooth it all out and, because you cut the transfer tape, It will soften and move into place evenly.
Even though we have creases and our transfer tape, we don't have creases on our vinyl and that's the secret to doing it. This is the secret to putting vinyl around a curved surface like this, so you have to pay attention to your design and you have to pay attention, you already know the way you cut the decal to go around the curved surfaces, so let's remove all the tape of transfer and let's see how it looks, lift the light, there we go perfectly smooth and clear, without wrinkles or anything like that. that and that's not, we're moving that center circle makes all the difference in the ability to have a nice smooth decal on your mug, so let's talk about vinyl now.
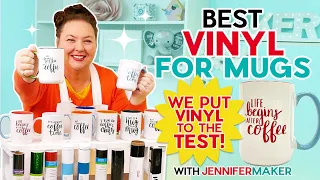
I went through my entire vinyl collection and pulled out each one. type of vinyl I had and let's try them. I created these little dots so we can put them on a cup and see how well they work. I made the dots like this because for a couple of reasons, one we have a thin circle and we have a large area so we can see both types of things with each of these types of vinyl and I also wanted you to see that although I couldn't put that circle more big in my cup, yes I can.
Put these little smaller circles on the surface, so here are our first four vinyls and we're also going to put glitter and a couple of glitter and I'll tell you and we'll be done, I'll tell you exactly which one. The vinyl I used and which one worked best. Well, what about heat transfer vinyl? Several of you asked about this technique, so some people have had some success with iron on vinyl in a mug and your money has to be pretty porous for the vitamin. to melt and first I tried ironing on the UM heat transfer vinyl with your little craft iron and I did but I decided it wasn't getting hot enough and was taking too long but we'll just give this a try and see how it works now .
Please note that I am holding the mug with a towel because it can get very hot, we don't want to burn ourselves and I had to switch to my normal iron just to get this far because it just wouldn't stick, this process took a while because I had my iron up to temperature maximum and I had to apply a good amount of pressure to get the heat transfer vinyl to stick, so again I am using a variety of different vinyls. I have different brands and I have different finishes so I did a little bit of gloss and regular so there we go and then you can see that when applying the heat transfer vinyl I messed up some of the adhesive vinyl on the other side so I'll tell you which one was: all the decals applied pretty well without any problems, one of them started to come off when, I mean, I got agitated from having turned around and done the heat transfer once the heat transfer vinyls on the On the other hand , it was difficult to stick to the mug and it took a long time to get it to stick and even then I didn't feel completely sure that I was actually melting and that the heat transfer vinyl maybe my iron isn't getting hot enough. but I have a pretty good iron and you know I can't use my easy press for this so I'm not sure if I have any options so let's put this in the dishwasher so I put this mug in the dishwasher and I put it five times .
Sometimes I wanted to see what would happen, so this one on the bottom of the adhesive vinyl started to come off, the rest looked pretty good, the vinyl, the ring came off the glitter and the glitter also looks a little faded, It looks weird. It's not shiny at all anymore, I see it as if it had simply been washed. The holographic one looks a little strange. The heat transfer one is basically a failure. The first two came off completely. The garbage ones stayed but they are missing the wings, like this. Yes, I'm not playing, it's a vinyl transfer in the future, maybe I did it wrong.
I don't know what I would have done wrong. The only thing you think is that maybe I should have let the vinyl cure for more than a day. I let it sit, so maybe I should have waited a few days. Generally speaking, it's good advice before washing something in the dishwasher. However, I needed to finish this tutorial, so I didn't have three days to wait. I'm sure you'll do. I'm wondering what vinyls worked best here, so the black circle is Oracle 651 and that's the vinyl I recommend you use for your mugs and it's also what most people recommend - it's a quality permanent outdoor vinyl and will last longer .
The second vinyl you see here, which also did a good job, is premium permanent glossy cricket vinyl. I didn't have any problems, I think it's great. The third vinyl, the blue one where the ring comes off, is easy to make and is. Also 651, so it's permanent vinyl too, but clearly had some issues with that on Amazon last year. The fourth item you see here is a foil sticker from Cricket that did a great job. It looks and is really pretty. I love that it's copper. one of my favorites, the shiny adhesive vinyl that came off, it was a cricket glitter, Eddy, you know, the vinyl didn't work so well and the holographic is a cricket brand too, I mean it stayed on it, it just got bent a bit.
For the heat transfer vinyls, the first was Cricket Stronghold iron-on vinyl and the second was Scizor Easyweed vinyl, you know, also heat transfer vinyl. Those two went straight into the dishwasher, so I would avoid them completely. The other two, both with bold highlights. one is a Cricut vinyl and the black one is a glossy black scissor heat transfer vinyl, so those two lasted longer in the dishwasher, but honestly, I don't feel like they won't last a long time, the day I have the. I have a feeling that after a few washes they will go away so I personally will stick with the adhesive vinyl which I specifically prefer and recommend Oracle 651 which is a permanent outdoor vinyl so there you have it.
My
test
results now, again, you know iron on vinyl may need more time to cure and I will do another wireless test for three days before putting it in the dishwasher and if my results change I will update my blog post so You know it, but it's true. Now I'm not recommending heat transfer vinyl, maybe you have the wrong type of mug, maybe you have the wrong type of vinyl, maybe you have the wrong type of iron on, but you could do it too, and I'd hate to take you down the road wrong recommending heat. transfer vinyl I think the auricle stick 51 worksokay so I made somecute
designs like I told you so I made these cute faces and they are both layered designs so I thought I would show you how to make them so this The first one is just a very simple face so first you need to remove your project, of course, and clean your mug with alcohol, transfer the top layer to a transfer sheet, which is the black layer, and then you'll want to put your hearts on.In I found it easier to do them one at a time, so that's it, and then you do it, you cut around the edges to make sure that your vinyl has the ability to go where it wants and then you put it on. and you just smooth it from the outside forward and polish it with the transfer tape while you have a super cute mug, isn't it so adorable? Okay, the unicorn mug, so the unicorn mug actually uses four different types and the last one of them, one of which is main vinyl, which is for the little flower crown that I used.
I made a printable design. and I cut it out of main vinyl so we could have multiple colors and instead of having to layer a lot of little colors at the end because that didn't seem like any fun to me, so this is the beginning of the vinyl and I left it. It's on the back so you can see it, so again we're going to need a piece of transfer tape and you want it to be big enough for the face and the speaker, so even if you can't, the speaker is not facing the right way.
Now when you put the transfer tape on, make sure you set it up so there is enough room at the top for the horn to come on, and then polish it with the scraper and remove the backing and transfer tape. Now I think the next layer probably won't be the horn, it will be yes, it will be the pink layer. I cut all these pieces off here and we just put them in place in hindsight, it piloted better if I hadn't. I didn't cut those hearts in half because they were like that, you know, but whatever it was, I could look at it, but you might want to keep them in place and then the little ear on the sides and, if possible, try to make the vinyl don't stick to anything. because it just makes it less sticky for your mug and then we do the flower crown and that's centered between the two ears and then we do the gold glitter horn.
By the way, glitter vinyl is very not really difficult to transfer to your transfer tape, you may want to use a strong hold transfer tape and do it separately. I was able to get it off the backing and onto my transfer tape, but just with patience I had to get out my weeding tool and go one by one and it just doesn't work the glitter doesn't want to stick to the regular hold down transfer tape. I did this because I wanted to show you the layering process, but if you use glitter you'll probably want to use strength. but only use it for good or part if you use strong hold transfer tape for your normal vinyl it will be very difficult to remove and place on your mug so in that case you will want to do two different applications but I wanted to show you what it looked like with just one because you might not use glitter so here we go here's our layered vinyl decal that we're going to put on the white mug yeah so don't forget to wash your mug with alcohol.
First, and this is this mug, of course, it's not shaped like a glass, so of course now you're wondering, what about glasses? Could I put this on my Yeti so the surface of other tumblers like this is ceramic so it's nice and shiny? soft, but if there is a layer of dust on the glass, you may find it very difficult to get the vinyl to stick. I did a little research when I was putting this video together and some people had great results with vinyl and some didn't. I thought I would do a little more research on my own and make a different video for you in the future on how to make tumblers and the various ways people successfully make them and here is my sweet little unicorn face, isn't it cute?
I love this unicorn and these files are on my blog and you can use them. Personalize them. You can certainly put a name on the mug there and it would make an amazing gift for someone else or for yourself, which is why vinyl mugs are fun and easy. If you know which way to go now, even though I did the dishwasher test, I still tend to wash my vinyl mugs by hand, it's your choice, so go ahead and put your mugs in the dishwasher, but with the understanding that after maybe that tenth or hundredth time, it may not look very good, but hey, you can always redo it right, so tomorrow we'll change the subject a little and I'll show you how to paint furniture.
Yes, you heard me right and then we are going to stencil the furniture with vinyl cut into a cricket, it is a great way to reuse pieces you already have. Be sure to send your project ideas to the jennifer maker comm slash show and tell them they have the best ideas. I love you and remember if you can. Tell me what you want to do, I can show you how to do it until tomorrow.
If you have any copyright issue, please Contact