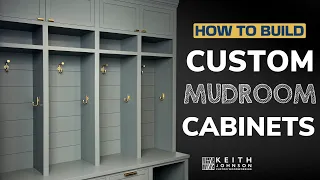
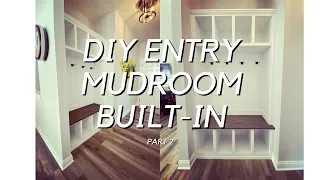
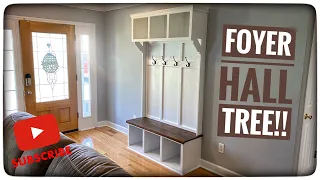
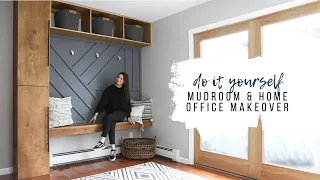
How to Make an Entry Mudroom Built-In Part:1
Jun 06, 2021Hi guys, Nick Stoy with Stoy Wood Design. I want to thank you for tuning in to another episode of this episode. I'm going to show you how I
built
this handmadeentry
way tree. I broke it into twopart
s in the first episode. I'm going to show you how Ibuilt
the bottompart
with the second part, how I built the top part, so if you haven't already,make
sure you subscribe to our YouTube channel tomake
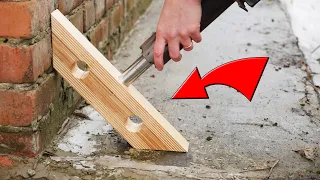
sure you don't miss that video. once it's posted, as always, let me know if you have any questions in the comments section below and I hope you enjoy this video, so I started this project by tearing off some extra three-quarter inch plywood that I had on hand to three and three quarters. inches wide, this was going to act as the base of the built-in doorway and would be covered by the front frame, so it doesn't really matter what material you use on the bottom, you could go with two by fours, but I went ahead. and I opted for three-quarter inch plywood to make sure I could have a level base with my base strips ripped off.
I went ahead and took them to my miter saw station and used my Craig stop block to cut them to their final length. Then I pulled out I Called Craig's Foreman and set it up for three-quarter inch material and started punching my pocket holes with the prep work complete. The time for assembly has arrived. I went ahead and placed all my strips on a flat piece of material so I could make sure. It was glued as square as possible because I knew this would be the base for the entire built-in system with the full frame. I went back to the top of the saw and ripped off a three-quarter inch piece of plywood that would act as the base of the built-in entrance for this project specifically I decided to sand everything while I assembled it just for all the corners that we are going to form on the top and bottom of
entry
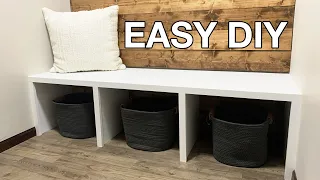
way built in with bottom deck When I was done, I moved on to using the rest of my three-quarter inch plywood to build the base of the entryway tree, as you can see here.
More Interesting Facts About,
how to make an entry mudroom built in part 1...
I had enough for the vertical seat supports and then used my offcuts for the horizontal runners. I just ordered it and with those pieces cut to their final dimension I went back to Craig's foreman for more pocket holes and as you could probably see I was singing a bit of draco in there, this was also the first time I was able to use my festool ets. 125 5-inch random orbital sander partnered with your entry-level hepa vacuum. These are the first Festool products I purchased and I can't say enough good things about them. I know its price may be high, but in terms of reducing the fine. dust, I don't think you'll find anything better before gluing and screwing my vertical supports.

You can see here that I decided to place where each panel would sit, this really helped me during assembly and made sure I had everything spaced out. With the layout and prep work properly completed, it was time to build the bottom of this built-in with the secure frame. I turned the piece over and used some 18 gauge nails to secure the vertical panels in place before countersinking them about 2 inches. drywall screws, then I returned to the miter saw station with the horizontal supports that I had cut with my scraps, as you can see here, my Craig stop block doesn't fit close enough to my miter saw, so I What I did was use it as a Reference to make sure I had a flat edge before I plotted my only precise measurement on all of my pieces.

A quick tip I wanted to share here for your horizontal supports. This will be the same for this built-in entry and for cabinets in general. I want to make sure to offset the pocket holes so that when I screw them into the material, the screws don't rub against each other. You'll actually see how I space them out when I go to assemble the integrated bottom here in the next scene. With construction complete, it was time to move on to assembling the front frame. As you can see here, it's the same miter saw station, but yes, it's in a new location, so my wife and I decided to sell our house in the process.
In the midst of coronavirus as I took on this project and I was lucky enough that a good friend let me use his 40x50 pole barn to set up my workstation while we built our dream home on five acres, so I'll talk about this future. I'll build more here in the next few videos and I think I'll try to document it along with how I set up my store for the future, so if you have any questions or might be interested in that, be sure to leave a comment below. Another quick tip while attaching the face frame is to think about the location of the pocket holes and when they need to be made, so I drilled my pocket holes to accept the face frame at the beginning of the project when I had the craig forming.
I took it out after I had torn off my blades and that really helps speed up the process during assembly. Now, if you forget, you can definitely go back to the portable kreg jig to make those holes, but thinking about that location ahead of time will really help speed things up. I started the process one camera after sanding the face frame, it was time to move on to painting. I recently purchased my first hvlp spray station from earlx and I am very happy with the results and at this point I have to admit that I don't really enjoy painting but the quality that this brings to all my pieces has been truly exceptional, plus it is It reduces excess paint in the shop when I have to paint indoors and it seems like my paint goes a lot further too so if you have ever been interested in the HVLP sprayer I would say definitely give it a try and that concludes Part one of our two-part series on how to build your DIY built-in entryway.
If you haven't done it yet, do it. Be sure to like and subscribe, as well as ring the bell icon to be notified when part two of this video drops. In part 2, we'll assemble the top portion of this embedded video and provide some additional photos once it's ready. at the customer's house again my name is nick stoya with stoya wood design and thanks for looking
If you have any copyright issue, please Contact