Building a Hall Tree!
Mar 09, 2024Then my friend asked me if I would build this for his wife, which is a birthday present. I told him absolutely: I love making other people's wives' dreams come true. That sounded funny. I'm Brad, welcome to DIY, right in this video? to build this
hall
waytree
now i have never built ahall
waytree
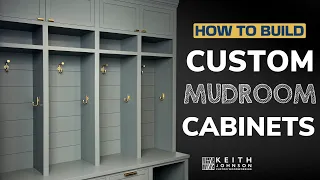
before but my friends have faith in me for some reason anyway let's get into the construction this is the image of the hallway tree for reference it won't look exactly like this but the one The one we'rebuilding
is going to be four feet wide, three cubbies up and down, four coat hooks here and then we're going to make the board and the cane look similar to this, it's going to be painted white and the bench is going to be dark walnut and done I'm going to cut the baseboard flush with the wall and then I'm going to trim it a quarter round around so it looks really recessed and it's going to look really crispy so here's our materials list two sheets of half inch plywood or 15 30 seconds three pieces of pre-primed one by four by eight one piece of pre-primed 1 by 3 by 8 six pieces of pre-primed 1 by 2 by 8 one piece of two and one casing of primed quarter-inch pine, one piece of an eight-foot long primed quarter round and a piece of edge-glued pine shelving board one inch by 16 inches by six feet and then the paint and stain, the first part of this we're What we're going to do build are the front frames for the Lower Cubbies and the Upper Cubbies.
These will be pre-primed one by two and one by three so that the top cubby lowers it below the bottom of the top edge. all right, here's the bottom frame, here's the top frame for apps like this. I really recommend using a pocket hole jig, you can get nice tight joints and you don't see the screws from the outside, makes it nice and clean. I bought this one on Amazon. is a general pool brand, this is not an endorsement, however, I will put the link to this pocket hole template in the description below the video, so first I will cut the bottom which will be 14 inches deep to get a 16 inches total depth of this bench and 47 just a little over 47 inches wide thank you, thank you foreigner.

More Interesting Facts About,
building a hall tree...
Next I putty the bottom of this cubby where it meets the face frame, that way it's a smooth transition, I glued on a shelf board which I like to use. these for these tops because they're a bunch of pieces of pine glued together next to each other and then they give it a really cool look on top. This piece is actually 16 inches deep, which is what it will end up with, so I just need to cut the width and then cut a small piece to stick here to get kind of a rounded look, so I'm going to cut this to 50 inches so you have a one inch overhang on each side.

Now this video is like all our other videos up to this point it is not sponsored by anyone so if you like what you are seeing please give it a like, subscribe to the channel if you don't mind. I would love for you to join us and drop it too. Leave a comment and tell us what you like about this project and go check out some of our other projects too. I have a lot of fun projects filmed and upcoming in the future, so I hope you'll join me. Anyway, back to the foreign topic. I want the total height of this hallway tree to be 84 inches tall or seven feet, so I'm going to cut this back panel 68 inches tall because my seat height is 16 inches, so 16 plus 68 is equal to 84 or 7 feet to avoid showing the same assembly process over and over again.

I'll just explain that I'm
building
this upper cubby assembly the same way I built the lower one using wood glue and finishing nails. I make sure to place the bottom one. panel flush with the opening at the bottom so anything you put in or take out of these Cubbies won't get caught on the front frame. Thanks as the back is plywood and this will go against the wall. I want the sides. so they look nice and with the edges like they should so I'm going to use this veneer glue on the edge bands so the way this works is you have glue on the back and then you cut the strip to the measure, you pass it along the edge and use it. your iron, yes, your clothes iron and a piece of parchment paper, and you actually iron the veneer on the edge of the wood and then trim off the excess.The next step is to add the cut stiffeners on the back, around here. What I'm going to do is take two pieces of 1x4 and add them here on both sides, then I'm going to add 1 by 2s vertically and trim them 1 by 4 side to side to hold the hooks and then a little knee pad of this one four at a time until Cummins to provide support and to now show off the top edge around the top of Cubbies. I cut them at 45 on the front edges to get a nice clean edge and then cut it flush. from the back to where it's going to push against the wall, then I set up my x2d1 laser engraver to etch my logo on the bottom of this bench as a subtle stopper and while that was working, I put caulk in each nail hole, which was a lot. of fun and I know you don't mind seeing that, so you can watch the etching process for a moment, man, it looks good, okay, seal it to finish it.
I'm going to use water oil. Furniture butter, continue. It's a little thick, like cutting board wax, and it's going to soak into the wood and give it a little toughness and just protect it. It says to apply a thin coat and then let it sit for 24 hours and then buff off the excess. Then I sanded all the putty and hammered all the edges. It took me a while to put a coat of Kiehl's number two on all of this and then just trim off the white paint made for cabinets and it has a nice smooth finish that fills in any little imperfections.
This is a DIY channel. I don't like to paint and I know that if I don't like to paint, you guys don't want to see me paint and now move on. I jumped forward a little. I have this. All painted, I put two coats on it, so now, uh, the next step before we install this is to put our coat hooks here and then put the bench top on the bench. Now these coat hooks that I chose, the screws are one inch and one. half long I didn't want them to go through this half inch plywood on the back.
I went to my local Ace Hardware and bought some three quarter inch screws that way, they just go in here, they look good, they're going to need some Bond star and some activator spray and the way I'm going to do this is that I'm going to put the Bond star here all the way around and then I'm going to spray the activator on the bottom of the top if that makes sense. It's when I put the top on here that the activator will activate that super glue and this will set up in about 20-25 seconds, something like that, then I'm going to shoot some finishing nails in here if you've seen. our videos before you know we are not professionals I am not a professional however I love building things.
I love using my creativity to make people happy, that's why our motto for DIY Wooden You is we want to inspire and educate, we want to make projects. entertain you and encourage you to try something fun, learn something new and impress yourself and your friends. We want to remind you that just because you haven't done something doesn't mean you can't, so keep learning, keep building, keep DIYing like this for For example, this is the first hallway tree I've built, but I think it's turning out pretty good. Now let's install it and see what the customer thinks.
There you have it, my goodness, thank you, so now I'm going to finish the. molding around the bottom, caulk some touch up paint, touch up the screw holes and I think I'll call that foreign good. I found the screw holes there and down here you can still see them, but they don't stand out and then I Put All Around The Edge there might change, so here's the finished product. He was able to catch his wife's reaction on video, so here's Mom's birthday. She was right. Whoa, oh, you're recording. I hope you enjoyed this video, if you did. like if you want to see more fun projects we are working on subscribe to the channel we would love to see you back if you want to be the first to know when we post another video hit the notification Bell I.
I'm Brad this is wood DIY, thanks for looking, see you next time, it gives a really cool look on top and I don't have to glue them to do it, so if you want to see more, I'm Brad, welcome to DIY, right?
If you have any copyright issue, please Contact