How to Contour the Mature Face | Contouring & Highlighting Tutorial
May 02, 2020Hello everyone, I'm Angie and welcome to sexy and eye-catching. In today's video, I'm going to show you how to highlight and
contour
yourmature
face
. I'm sure you've seen all the videos on YouTube about this and I'm sure you've also seen all the Kardashianshighlighting
andcontour
ing their performances. Many people have asked me if older people can do the same and if so, how well, of course, you know I don't like to impose rules or restrictions. people my age or people of any age so I say let's move on people anything that can work for younger people can work for us we just have to do it a little different so if you ever wanted to put on makeup so it can help your jawline look lifted, make your cheeks look fuller, make your nasal labial folds look less pronounced, so stay tuned because that's what we're going to go over in this video, so This is a cream contour video where we apply the cream.
First it contours and highlights, then we put base on it so it's subtle and blended, which is how I like my makeup to look. The product I use for today's video is the NYX Cream Contour Kit if you don't have a Cream Contour Kit. you can use three shades of foundation, then you need some brushes and a blending sponge to apply it. I used my new Beauty Junkies pro contour and highlight kit. This is a fantastic little kit that beauty junkies have just told me, but it has everything we needed. for the video, this is their new blending sponge and then the kit comes with four
contouring
brushes and I love that it has a little detailing brush, it also has a nice blending brush and a couple of nice powder brushes in different sizes .
More Interesting Facts About,
how to contour the mature face contouring highlighting tutorial...
The products I'm showing today will be linked in the info box below the video, so if you're curious about my lipstick or my eye shadow or anything else, you can open the box by clicking the Show More button below. down there and you'll be able to see everything that I'm using today, so let's start with the
tutorial
, so let's start with thehighlighting
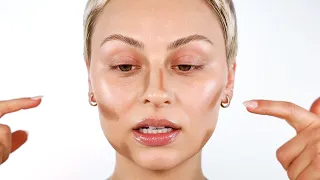
. This would be for areas that are in shadow because the skin folds over us or areas that we want. Make it look fuller and more prominent using my Beauty Junkies Pro Detail Brush. I'm going to choose this pretty pale color, it's about three shades lighter than my natural skin tone.
Now you usually see younger people making a big triangle covering their entire cheek and painting. This whole area, this product and most contour products are too heavy to do on older eyes because it makes our eye wrinkles and crow's feet look worse, it sits in our wrinkles so basically What you're going to do is simply highlight the kind of dark side of the eye bag by starting on the inside of the eye and working down to the outside of the bag. I bring mine towards the side of the nose like this because I'm going to outline the shape of my nose, but I'm going to make it darker there, so I want a light right on the other side so it really pops, so I'm going to lower it until my eye bags stop and my cheeks start to look good or the nasolabial fold can cast a shadow and you want to brighten it and make it not look so deep so I bring this right up my nose to the crease and then I just follow the line of the nasal labial fold and that will bring light. that shadow and make it look like it's not as deep and dark, continuing from there if you're someone who pulls the corner of their mouth down and you have that little shadow down there, you're also going to put a little bit in there just to brighten that up. okay, just to make our chin look a little bit fuller, I'm just going to do a little bit right in the center of the chin, now for the other side of the eye, I just like to do it from the outside, just a little bit in here. just to brighten the outer corner of the eye, without going all the way down here to help lift the cheekbone a little bit, I make a little outer V here because a lot of times when people get older, they tend to sag a little bit and it looks a little bit hollow and one One of the places we go hollow is right here in the temple, so where the younger people will give a dark outline to their temple, here the older people need to outline this on the opposite, lighter side, now I'm going to to do above my cheekbone and bring it back so that it has a heart shape, so by basically accentuating this shape we are going to bring more light to the
face
, so I always like to have a highlight above my forehead and fill in the eyebrows and refine them and lengthen them. the end helps with that too, which I already did here and then on the forehead right in the center and of course then in the center of the nose, so let's repeat all of that on the other side and I'll stop talking and We can speed this up so that, for older people, your face tends to go in one of two directions, or it becomes thinner and paler, in which case your cheekbones may be fine and you may not need to chisel them or Other people gain weight and their face is rounder, so the cheekbones almost universally need to be chiseled, the jawline needs to be corrected because we all have some sagging here and you may or may not have problems with the nose if you have a thin nose.
You don't have to contour your nose, if you have a short forehead you don't want to contour your forehead, so it all depends on the shape of your face, but remember it's that hard shape we're trying to do. Let's start with the cheekbones, basically I don't really like making that fish face because look what happens there, I don't want that, so I basically put the brush on the top of my ear, bring it up to my mouth and then roll it . until I find where my cheekbone is and it's practically there, you can feel it, so that's the line you're going to want to make.
I don't like to break it too far forward and I don't like it either. To draw like an apple, I just like to make a nice short straight line from the ear to under the cheekbone and go out to the middle of the cheek and then come back well now to the line of the jaw, where there is sagging, which on me is like right here you don't want to just go where the shadow is where the sagging is, you want to go up a little bit higher, so you're trying to correct the look of that, so start on the sagging and just draw a kind of straight line.
Line through it so it delivers a little bit higher, then you can send it back and follow your natural jaw line where it's not sagging and go under it and you can wipe it up your neck a little bit, so look. how that came about and eliminated that little roll of meat right there, that's what you're looking for. Some people apply a little shadow under their lip to make their lower lip look fuller. Now I have a high and wide forehead so I like to try to make It looks a little bit narrower so I tend to make the outline up here so for mine but I don't want it to look too square and then I like a little on the hairline, as if trying to simulate a bit of a widow's peak.
I also have a sort of Neanderthal double forehead bump, so this goes out, then this goes in, and then this goes out and in. That's why I put this here to be introduced. I have a strange shaped nose. It has a flat spot right here so it sticks out, that's where I got hit by a field hockey ball when I was in high school, so for the nose it's the same idea, this is where you don't want to follow the outline that you're trying to disguise you want to go over the contour so that my nose is pretty long and straight, but I like to make that little bump on my nose disappear, so I'm going to go a little bit higher on that part and then a little bit lower. towards the end and then if you want, I didn't know if you guys knew this, but his nose is still growing, and so are his earlobes, so you can contour just the tip of his nose if you want it to look a little shorter and a little shorter. more buttoned up, so now I'm going to do the other side now that we have everything drawn where we want it to be, the next step is to blend this out a little bit since we're going to cover it with a base that we don't have. to blend it in too much, I'm going to use the Beauty Junkies Pro Sculpting Brush.
I'm going to start blending the highlights first and then I'm going to blend the outline so I don't muddy them all together. so I'm going to start here on the cheek and I'm just going to blend it out so there aren't any harsh edges, blend it into the hairline because you don't want the color to suddenly stop before. it gets to your hairline, you just want to use small circular motions, you blend it in a little bit, you don't want it to go all the way so you can still see through the foundation, you just want to smooth everything out and now.
I'm going to go in and blend the contour now if you want to define a rounder cheek, this is where I would just take what's here and bring it forward and round it up now if that highlight is in the middle of your nose or anywhere . Otherwise it's blended too much, you can go ahead and reapply, so I'm just going to put a little bit more highlight in the center. You can try to make it look like a little button II by leaving a space there and then making a little button on it. finish and then just blend that nice and straight up and down because you don't want it going down the sides to your contour to shape your nose.
Now I'm just going to apply my foundation using a blending sponge so you don't move everything from where it is, this is the beauty junkie's blending sponge and today I'm using my Chanel Perfection Lumiere velvet foundation, this is my favorite and I'm going to work it in with a sponge and this flat area is really great to get to these corners of the nasal labial crease and now that the foundation is on, you can see that you can still see where the highlights and the contour are, but it's not obvious, no. It's like you drew a mask on your face as it looked. before, the next step is to use powder to really make this pop using highlighting powder and mattifying powder.
Now matting and lighting work very similarly for highlighting and
contouring
. I'm going to use it cosmetics bye pore professional HD powder highlighting brush from beauty addicts brush kit and then I placed it under my eyes where I want to set my makeup and to help it stay matte. I do it right in the nasal lip crease for my blush. Today I'm going to use baked NYX. blush in wanderlust and to apply it I have my favorite crown kabuki brush. I feel like with older cheeks you want to have your blush and it all starts more or less at the back, like in the middle of the eye, here it's too problematic an area between my eyes. the bag comes down to meet my nasal labial crease and my cheek isn't as plump as it was, so I start back here high on my temple and bring the brush halfway under my eye, then I twist it and feather it . down on my contour and this already has a little bit of shimmer to it, so if you don't want to add more shimmer you can apply the blush on its own now if your contour is too subtle once you've put your foundation on it.I can darken it using a bronzer. I'm going to use the Too Faced chocolate Soleil bronzer today and again I'm going to use that pearl highlighting brush, so if you really need to amp that up, if you like that, you can add a little bit more just as an option in case it was too subtle. I actually really like the way it looks with just the foundation on top. I feel like it makes you not realize you are contouring but you can still see it, the eye detects it but it's not obvious and if your jawline needs a little more you can do it down there too so let me know if you want to see a powder contour video, that would be one where we apply the Contour on top of our foundation and I can do that easily, so like the video if you want to see a separate demo of the powder contour.
Okay, now I'm going to add the final step, which is lighting, and for this. I'm going to use the last brush that comes in the kit, this is the Pro Duo Fiber Brush and Vivid Baked Highlighter from Makeup Revolution London. They had a whole new rack of Makeup Revolution stuff at my Ulta, so I decided to pick up something I never start something right in front. I don't want anything there like I said on the problem area, so I start right here at the highest point of my cheekbone and I just apply it in circular motions going towards the temple and I might put a fly a little bit to the right. above the eyebrow, this will lift the eye, lift the cheek, so here's the final look.
My jaw looks firm. The cheeks look round, full and plump. The outer corners of the eyes are raised and we have decreased our shadow areas, such as tears through the nasolabial folds and small expression lines, so that's it for today's video. I hope you found it useful and informative as always. I appreciate your time. Thank you so much for watching and I'll see you in the next video, so take care everyone. a great day goodbye
If you have any copyright issue, please Contact