HOW TO CONTOUR ROUND FACE
May 05, 2020Hey guys, welcome back today. I'm going to go over how to highlight with cream and powder and
contour
yourface
to get a roundface
shape. I feel like everyonecontour
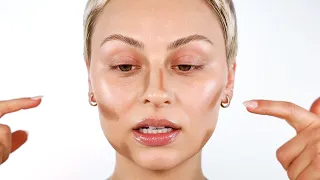
s and highlights the same way and that's not how it should be because everyone has a different face, everyone's face is very different and my face borders between oval and round when I get slimmer I feel like I could contour the shape in that everyone does it, but when I gained weight my face definitely got rounder, I had a lot of curves. my face, this image you see here is very popular.
I'm sure you've seen it everywhere and it's the most common way people contour and highlight and there's nothing wrong with contouring and highlighting this way if you want to. To contour this way and you like the way it is and you have a round face shape and you want to do it that way, do it, there is nothing wrong, there are no makeup rules and you can do whatever you want, do it now. The way I'm going to do it today is to sculpt the cheeks and make them look like someone told me that this is how you contour a man's face shape and that it looks very masculine and that may be the case, but It's also the way you can contour your face shape so I hope this video is helpful and my tips and tricks are helpful.

More Interesting Facts About,
how to contour round face...
Subscribe and let's get into it. Let's do it. Now before we start, I want to tell you that whatever your face shape is, you don't have to follow a set of rules. Yes, there are guidelines, but say "Contour" in a completely different way other than your face shape. That's ok. It's what makes you happiest. First I'm going to start with a primer. I have normal to oily skin. I'm going to use Smashbox Photo Finish Lightweight Primer. This is amazing because it really helps control oil and throughout the day I notice that I don't get as oily and I don't have to touch up as much.

So far it is the best I have tried. Okay, so once it's on, I'll use the foundation. I've been playing around a lot with a few different foundations but today I'm going to stick with something that I know I love and that is my absolute favorite and if you've watched me for a while you'll know that Too Faced was born this way, this is my favorite foundation from all times, but it looks empty there, so we'll see how it goes. I'm in the shade nude and I'm going to start by just putting this on the face, you want to do a light layer or you don't even have to use foundation because you're going to be using a lot of other products as well, but today I'm going to go all out. show you full coverage everything I do I like to use a beauty blending sponge to blend my foundation you can use a sponge you can use your fingers you can use you know what you want to use you can use that so I'm just going to Next I put this on my face .

I'm going to use some concealer. This is the Tarte shaped tape concealer. This is a very, very, very full coverage concealer, so I'm going to wipe some of the product off and then I'm going to put it on. I'm going to put it under my eyes and now, as you can see, it's a lot lighter because the foundation was a little too dark. I'm going to balance it on the high points of the face, a little bit down on the nose and on the tip. of the nose, the tip of the chin and just a little bit here on the forehead, this is just to balance the color.
If you had a concealer that matched your skin or was just one shade lighter, you wouldn't have to do this and honestly, I didn't want to do this today because I wanted to show you other ways to highlight. I will still do it, but since my concealer is too light, this is what I have to do to make it not show. It looks like I have white under my eyes and that's it, so I'm going to press this lightly into the skin. I'm not going to move this because I don't want my chin to look super big because anything you highlight pushes forward, anything you contour pushes back and once I push a lot of product in and I still have some product left , I wear it a little bit under the lateral side of the nose because it kind of helps contour the nose, so one of my favorite cream highlighting products is this product right here.
This is the L'Oreal magic Lumi highlighting pencil. It's in tone number one. It's a lighter tone. I think they have three different ones. shadows, this is seriously a dupe for the YSL toui claw, so I'm going to roll this up and just show you the areas that I'm going to highlight. I'm going to go right by the nose. I'm going to make a V on the chin at the top of the lip just because it makes it look bigger and now we're going to make it here on the forehead and then I'm going to make a vertical line and then one. going right into the bone like this, you don't want to take it too much towards the cheek and then again vertical and then up here and it's going to go right on top of the bone, if you want to help even more, you could even bring this here just to help you with all that illusion, the whole shape we're basically trying to do with a round face shape, we have roundness and a lot of curves in the face and we want to create angles and more similar faces.
So that's the general idea around this, so I'm going to start tapping this and I'm not going to blend this, I'm literally just shoving this in your face, okay? once you've actually blended it into the skin. You can go over with the other end of the beauty blender and make sure it's really pushed in and there's no edges and now I'm going to apply Contour cream. I'm going to use Bobbi Brown. I found the foundation stick at Almond last week. I've tried a lot of different products and this is still my favorite so far. Maybe you could go for a little bit more of an ashy tone, but it's usually fine when you see people contour and you see them bring. this here and below and almost like taking the cheek and making it look that way, but I feel like my cheeks are already big enough, I don't need to do that, I'm actually going to go in the opposite direction, so I'm going to find the line that I want, I'm looking down in my mirror so I can create the angle that I'm trying to achieve, so I'm going to start at the top of the ear here and I'm just going to use a little bit of product because I've already done this before front to the camera and I used too much product and it was like this is too much, so they are very creamy, very blendable, always use less than you think. because if you use too much, it can be a little tricky trying to blend it out, so I'm just going to put a dot on this, place it here and then here and usually this is the angle you want. but now we want to curve it down and go vertically here and now I'm also going to outline the jaw line because I want it to look very sharp and that makes it look slimmer, so I'm going to put a dot in this area here, you want get right there, that's an important line because that kind of vertical cut there and makes that little type and then here we're doing the top of the ear like this and then down, okay? now for the forehead, let's say Contour here, it's just going to flatten it out even more with a round face shape, our face can feel very uniform on all sides, so if we're contouring the sides and contouring the top, it's actually not So.
When doing anything the shape stays the same so instead I try not to contour the top of my forehead because that will only make it lower more if you have a very large forehead that you want to contour, okay do it, but I think I have a fairly normal sized forehead. I don't think it's too big. I don't think it's too small, so I just do the sides here, so I'm going to take this here and just put points on it and then. I'm going to bring this lower here, but not too much in the center.
My favorite brush for blending my cream Contour product is the Crown Pro c517 brush. It's so perfect for this. It's a fluffy domed brush, it's very nice to This then, what you're going to do is start blending in that line and instead of blending up on the cheek, I'm actually blending it down in this area. I'll go back and cleanse this area with some brightening product as well. but that's how you want to start. I think if you blend it up in that area here it tends to make my cheek look too round and too big and it's not doing exactly what I want it to do.
I'm lifting my chin up in the air so I can really get there and with this I'm blending it down a little bit so it blends down into my neck for the forehead area. I'm just blending in on the edge and bringing in but I'm not going to go past this here I'm just going to keep it here on the edge so I'm outlining the temples and the sides of the forehead leaving the center blank if you ever want to outline like your lip . that look a little bit bigger, put a little bit under the lip like this and I just use my fingers for the small areas and just blend it out, you could use a brush, but then I'm quickly going to do my nose.
I'm not going to go too deep just because it could be a video in itself, do that and then I use my finger for this as well, okay this is what we have so far, you can leave it at that, but I'm going to show you the steps you can take to emphasize it even more and make it really pop, so I'm going to go back to using that L'Oreal Lumi magic highlighter and just crop it out so I'm going to go right below where we did those lines just to emphasize that area. Here you can go with your foundation to do this too if you want, and now I'm just going to take that beauty blender and push it into the skin it doesn't really blend, I'm just pushing it in, I also go in this brush and I have that kind of it helps to blend the edges so now I'm going to get into the powder part of the video where I want to set my Full face because I get oily for one but two it helps any of the other products that I put on like Glide , and doesn't like to stick to some areas and not others.
I'm going to use this Charlotte powder. Tilbury is the airbrush flawless finishing powder. I'm on shade two and I love using it with the IT Cosmetics number seven brush. I'm just setting this entire area with the powder and then under the eyes. I love this powder from Mac. You can buy the emphasized shaping powder online. I'm just going to use this brush from Real Techniques to apply it. It's a setting brush. It's a really great under eye powder because it doesn't crease anything but also brightens the eye. It has a slight shimmer to it but it's not shiny or anything, it's a really great powder so next I'm going to go in and tan my face.
Tanning and contouring are two different things. Tanning is more of an overall color, almost like a wash. so you look like you've been out in the sun, where contouring is where you create shadows and makes you look chiseled and sculpted. I like to apply the bronzer first because when you layer products like that, it just helps with Dimension. to look really natural instead of just applying the contour powder directly like it's too heavy, this type of shade gives you that medium tone so it's a little bit easier. I'm going to use Too Faced's dark chocolate CET.
My favorite brush for this is the Real Techniques Blush Brush. I'm going to go right over the cheek area still in that shape that we did, but in a broader area up here I have four different contour powders that I use. I really love it, the first one is the Makeup Geek Contour powders, they are really great and really affordable, super pigmented, and then also the Kat funy shadow and highlight palette. This is a really great contour kit. I love this Center it's old but Well this is the Anastasia contour kit it's amazing and last but not least we have the Nyx contour kit which has a lot of really great colors and this one has the most colors of all and today I'm going to be blending the Bottom Three Shades from the Anastasia contour kit.
I'm going to use my Nars EA brush and this is where making that angle is really helpful, so I'm going to go right to where we outline, which is right here. it's going to soften that and bring it down seems crazy right just wait I'm going to do the jawline back here and you want to make sure that you really work it into your hairline because you don't want there to be a Parting line in between and when you have blonde hair, luckily I have my roots, but when it's like freshly blonde it's a pain because then I end up dying my hair.
I'm going to keep it here on this side of the front without bringing it too close and also connect it down here, now I'm going to go ahead and clean it up. I'm going to bake a little. I'm actually not a big fan of baking. I feel like it's a lot, but with this new technique I've been doing it's really helped me clean it up and make it more defined and closer to the shape I want, so I'm going to use the Laura Mercier translucent one. powder and my beauty blender pretty much just highlight this area underneath, here it's going to go right on the edge and then they're going to go here.
I'm doing kind of a trapeze like that shape and then I'm also going to touch a little bit on the chin right in the center. I'm going to go ahead and finish the under eye area and let it stay there while I do that. Say you did your makeup before you did your hair, you can go and do your hair, you know, whatever you have. To do this, let it sit for about 10 minutes, it will help brighten that area. I'm going to go get my eyes done and I'll be right back, so I went ahead and finished the under eye area.
I'm going. with my Real Techniques setting brush and I'm going to dust off this productso as you can see, it's extremely bright down there, now you can go back with a brush and you know, just blend The Edge out. so there's no white line either, you don't want a hard line either, well, too hard. I'm going to use Mac peaches for my blush and I like to use this Mac 168 brush because it's angled. I don't like to go too high on my cheeks because I feel like I don't want my cheeks to look too big, so I keep them at a really high angle and lift them up like this and then I'm just going to grab my Estee Lauder Heatwave Highlighter.
I'm going to highlight right on the cheekbone very angled and I think that's it. I think it's okay guys. I hope this video has been of great help. Thank you so much for watching if you have any questions at In any case, please let me know below and I will get back to you right away if you have any questions about the products I used. I always link them below in the video description box and there's usually more information there too. Yes, I hope you like this video. Let me know your recommendations below and I'll see you next time.
If you have any copyright issue, please Contact