Eyeshadow Do's and Don'ts
May 29, 2021let's start the class today Hello guys, welcome back to my channel, so today I'm going to show you some
eyeshadow
do's and don'ts. I have everything not to do on this side, obviously, and everything to do on this side, can you tell me? I hope so, if you have problems with blending or just witheyeshadow
in general and brushes, don't worry, I've got you if you do any of these things that I say are wrong, don't worry if you're happy with it and keep doing it . I'm just giving you suggestions, don't forget to subscribe to my channel if you haven't already and hit the notification arc so you can be part of the pod family and if you want to learn some things to do and Don't wear eye shadow then Keep watching.
The first thing I'm going to talk about is preparing your eyes. No don't prepare your eyes, so this will be my eye, the one I won't prepare. He'll be naked if I let him. This way there may be some oils on my skin that will mix with the eyeshadow and make it very difficult to blend the eyeshadow, it won't look as vibrant and it probably won't last as long on the make up side. I personally prefer to use a concealer than a foundation, but if you want to use a foundation, I have some suggestions for you.

More Interesting Facts About,
eyeshadow do s and don ts...
Pro Longwear Paint Pot in Mac Soft Ocher or Too Faced Shade Insurance is also Well, I prefer to use concealer over shade foundations just because concealers are a little more hydrating, you already have dry skin, it can intensify peeling, dryness and the lines on your face, but the ones I suggested are pretty good. They're a little drying for my skin type, but I always use a concealer to prep my eyes and if I use a concealer, it's usually going to be the one I use under my eyes, something that doesn't crease, so I use either the tape with form of Tarte or NARS radiant cream.

I go back and forth between them. If you are looking for a good drugstore, I would suggest Maybelline Master Concealer. This is actually very good for concealing and also priming your eyes. I'm going to To use some of the Tarte shaped tape, just use a small dot and then just blend it and I'm working it with a Beauty Blender and using these bouncing motions will make sure it's flawless and smooth. and your eyeshadow will look like a nice, even canvas, and if you need to clean your eyebrows, you can also clean them afterwards. I like to grab a face powder or eyeshadow that is similar to my natural skin tone and what this will do.

What you need to do is place the shadow in place and also fill in any lines so that it lies on a smooth surface. This will help the brush glide over your eyelid super smoothly. The next thing you shouldn't do is not start with a dark shadow. In the crease, applying the darker color will make it very difficult to blend and will also look very harsh. Also, I'm using this dense brush and bringing it into the eyeshadow which will only make it much harder to blend if you already have blending issues, this will only make things worse.
This guy has no turning back. Start with a transition shade that's in the range of shades you're using. I'm going to tap. Take off the excess because you don't want too much product on your brush or on any hair, so I'm going to remove that hair in just a second, so I'm going to go ahead and use this tapered brush right here and I'm going to To use a light hand, I'm going to keep my hand facing the back of the brush and I'll use back and forth motions, literally just the tip of the brush gliding over the skin.
I'm using this conical brush. It will make it much easier to find the crease and blend it out and you just need to use it a little at a time, starting with a light shade and then gradually going darker to get that nice gradient. you want it to look nice and airy, like airbrushed and your crease is right above the lid so stay there, but I really like to use more than one transition shade to get that ombre look. I suggest you use two or three eyeshadows in your crease, I know it might be a lot for you, but if you really want that nice soft look, this is something that always works for me, start with this very light shade right here and The next shade I'm taking is in love.
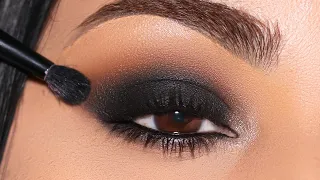
I'm going to use the same brush because I'm not going to go back to this one, tap on the excess and then I'm going to go into my crease right under the other shade and with very light pressure I'm going to go back and forth. or windshield wipers, whatever works best for you and slowly build that up around town, the next thing we're going to talk about is adding dimension to your crease, we're still in the crease, there's a lot of things we need to know about the crease, so when you add dimension, you want to use a darker shade, something that's matte, so I'm going to go ahead and use the darker one.
I'm going to go ahead and use the darkest brown in the palette, which is sweet, so don't do it. On the other hand, I'm going to use this big fluffy brush to add dimension to our eye, which is obviously the ultimate thing. Don't want to wear something that's too big and fluffy? It will simply make the product reach everywhere. Instead of getting that precise area, so don't apply too much product at once with the wrong brush, use a small precision brush that is tapered towards the end to give you that precision. I like this one for morphe.
M 507 I also like to use this on my lower lash line so I just tap my brush on the shadow and then tap on the excess too so I start with just a small amount at a time and I'm holding my brush a little longer close to the bristles because I want to add a little bit more pressure in a precise area, so I'm just going to use these circular motions and follow my outer V, remember the shadow is buried. down directly onto the brush so you always have enough shadow to work with once you feel like you have absolutely nothing else on your brush then you can add a little more at a time it's still removing the excess you want to add slowly.
It applies and doesn't pack everything at once, so the next thing we're going to talk about is blending your eyeshadows, so after all of this is said and done, you're still going to want to go over it again with a clean blending brush. , so here you have two brushes, this one is densely packed in a dome shape, this one the bristles are a little freer towards the top. You want your blending brushes to always be fluffy and clean, so on the side I'm not going to try to blend this as best as you can. I can, so don't hold the brush too close to the handle, this will make it very difficult to blend and the result may look very difficult, but if you want to use a fluffy brush, hold the brush towards the back of the handle.
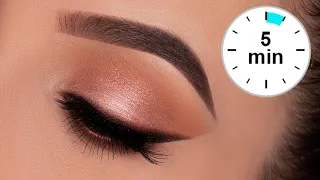
It will help your brush glide lightly over your shadow, giving it that airbrush effect to make your eyeshadow pop and blend for the lid. I'm going to use a really pretty color, this one is from Makeup Geek, it's called in the spotlight, don't do it. use a fluffy brush to apply the lid color because it will get everywhere, especially if you want a shimmer on the lid. use a shadow brush density pack like this one so you can apply the shadow in the precise area you want without it fluffing up and flying all over your face, so now we're going to highlight the brow bone and on the On the other hand, I'm not going to use a shiny compact powder, this is from morphe, it's mimosa. sunday shadow I'm using the right brush, but it's too shiny and too much, in fact, some shimmers on the brow bone look great if you use them just below the side of the arch.
I'm going to use a matte bone. color and I'm going to blend it with the other colors so it has a nice transition and the whole look is really smooth and if you turned up the dark crease color too much you can always wipe it away so now let's talk about bouncing your eyeshadow and Add something to your lower lash line to redefine that lower lash line. Don't use a super dark shadow on your lower lash line and keep going lower and lower because it will literally look like you. You're dragging your view down and like you haven't slept in about 10 years, use the transition tone just like we did with the crease we layered.
We started with a light shadow that got a little darker and darker until you got the intensity you wanted, you basically want to do the same thing with a lower lash line, just redefining and balancing your eyeshadow. Another thing you should not do is not put makeup on your face before applying eyeshadow because if you have any mess. -oops or you want to clean something, it will be very difficult to clean after having dust and cream. Powder on top of a cream basically locks it in place and if you move it around, it's a messy sight, scary to look at.
It's not easy to deal with and it's just not fun at all. Thank you all for watching. I hope you enjoyed this video. If you did, pass and also if you do any of the things you shouldn't do, let me know below because I know I did it. all of them also my other videos will be on the side if you want to watch them and subscribe if you haven't subscribed yet and if no one has told you today I love you it's me and that's it I love you guys a lot and see you in my next video bye bye honey .
If you have any copyright issue, please Contact