DIY Epoxy Table - How To Resin and Wood Table - How To Woodworking
May 05, 2020Hi, I'm Cam with Black Tail Studio and this week we're going to show you how to make an
and you may have seen some of my other videos where I've walked you through this process before and every time. At one of these
s I learned a little more than the previous table so I feel like people watching my first video may be a little short compared to people watching my last video and this week I'm really going to focus on the
epoxy
andwood
table
and you may have seen some of my other videos where I've walked you through this process before and every time. At one of these table
s I learned a little more than the previous table so I feel like people watching my first video may be a little short compared to people watching my last video and this week I'm really going to focus on the epoxy
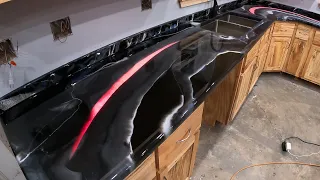
. I'm using a brand new epoxy, at least a brand new epoxy for me, and at the end I'll tell you what I thought and if it might be the best epoxy I know.
I've used it, but stay tuned anyway, back to the build, as you can see, it started a little rough when taking it down. You can see what my neighbors see all the time. It's me knocking things over and seeing if anyone saw, but I'm going. Through the usual steps that I've taken on my pass through tables and that's just removing all the soft
wood
, I'll get every piece of soft wood out of there and then I'll also get all the bark off and really strand the stuff that's sticking to the side. . I'm going to remove everything with this chisel to get most of it and then I'm going to switch to a wire wheel on my angle grinder and this works great, it leaves some marks so I'm going to do black epoxy like you saw at the beginning so you don't see those brands, but if you're making a clear epoxy, it might be a little less aggressive than this wire wheel on the angle grinder.
More Interesting Facts About,
diy epoxy table how to resin and wood table how to woodworking...
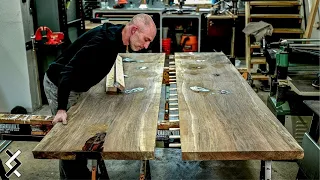
Many people have asked me if you can leave the crust on for one of these epoxy tables and if you want a firm answer, I would say no, not to say there isn't anyone out there who could have done it. I've heard some bad stories. of people trying it, I've never tried it personally, it doesn't seem like a very good idea to get a solid link, so I'd say no, but you can prove me wrong. This template is one of my favorite tools for making one of these epoxy boards because it really helps you visualize if you're really good at fusion 360, you might be able to get away without using this template, but for me I'm kind of simple and works great for me and If you were paying close attention you noticed that I made two marks, I made an inside mark and an outside mark and the inside mark will be the final size of my table and the outside mark was about a one inch cushion on all the sides, so I put the track is in the middle of that because I wanted to have at least an inch gap in the length and width to make sure that when I cut it to my final size it will be the exact size my client expects .

I always give my clients the option that I design the table or they can co-design it with me and almost 100 of them accept the opportunity to design it with me and I think it's great because I think two minds is better than one and two is what they get exactly what you expect, in the end there are no surprises and in fact, you can see there on the right, I broke off a piece and took it down at my client's request, which I would have done. I never did it myself, but in the end it really improved the design of the table.

This is not the new epoxy I was talking about at the beginning of the video. This is a West system epoxy. It's a really good epoxy. It is very difficult. It's just not a deep pore epoxy and what I'm doing here is sealing all the edges. This will do a couple of things, one it will really prevent bubbles from sticking to the sides and two, it will prevent any stains. and it's pretty much the same thing that shellac does: we're just providing a barrier between the black epoxy that we're going to pour and the wood itself because that black epoxy will basically stain the wood and stain anything so the shellac will provide the barrier. on the top and the epoxy on the sides, but we have to go back and scrape it off like I'm doing here because epoxy doesn't like to stick to anything slippery and that's why we just basically rough it out so we get a good bond when we pour the main part of our epoxy.
If you want more information on how I build my molds for these epoxy tables, I'll add a link to a video from a previous build in the Video Description Let's go a little deeper, but what I'm doing here is adding mold release, which is why I covered my pieces with that drop cloth to make sure none of that mold would actually settle on the wood. because that would definitely compromise the bond between the wood and the epoxy if any of that mold actually sat on it and this is something I haven't done in most of my previous builds.
As you saw I added a little bit of air space and that will provide airflow that will keep the epoxy cooler which means I can pour more epoxy and that's one of the big problems with making these tables is the epoxy overheating when you pour it, you know, over that inch and three quarters and two inches and This will be about two and a quarter inches, so I wanted to make sure I kept it cold enough for this kind of new experimental epoxy that I'm using and talking about that epoxy, the epoxy I'm going to use for this.
The construction is liquid glass epoxy with fiberglass coatings and these types have been around for a long time. I just haven't used them before they claim this epoxy can reach two to six inches privately. I'm very skeptical about it, but we'll do it in At least try it in this two and a quarter inch pour that we're going to do here. In fact, I made an entire video and blog post just about calculating epoxy, so I'll include links to both in the video description below. epoxy we are using liquid glass epoxy with fiberglass coatings and again this is the two inch pour privately they said two to six inches which is great if it's possible I'm not so sure it is , but they say they can. made six-inch pores in his laboratory.
One complaint I have is that the containers are pretty small for this type of large pore because I don't like having so much junk and I end up using quite a few of these jars, so I'm going to beg you to start making larger containers if you're going to be a player in this epoxy table market because no one likes having so much junk. The die I'm using is going to be this trans black dye and you can see it works really well because you can't even read the label anymore but what I'm doing is counting my drops and the black isn't that important but if you have to go back and touch it up, it is good to know the ratio between black and epoxy used. that way you can get the same shade because you will see sort of seams between the pores if you have to touch up a small area.
One tip I would really give to people trying out the first board is that I can't stress how much you need. mix this epoxy and it's not just about an amount of time, it's about scraping the sides, scraping the bottom, making sure you have everything mixed a lot more than you think, it's definitely overkill in the mixing, another good tip is to just let it The bucket will sit for about 15 or 20 minutes and this will allow a lot of those bubbles to rise. You can blow them again with the blowtorch and that will eliminate some of your bubbles in your finished product.
If this is the first time you visit my page, I welcome you. I appreciate you seeing me and one thing you should know is that I'm very good at answering almost each and every comment you'll leave below, so if I'm not clear on something, if I'm rushing something or if you're just not sure, Feel free to ask me in the comments below. I also really appreciate it if you like what you see to go ahead and hit that subscribe button in the corner. It really helps me continue to create more content like this and for those of you who have been to my page before you are probably wondering how I got these amazing Michael Bay style aerial views when I'm normally on a static tripod and that's because my wife wasn't at work for once and I was able to get her to come with me to the garage and take some amazing shots that actually worked out pretty well because she has an amazing steady hand, although I gave her one job and that was to keep her car out of the way. take, so it didn't look like Blacktail Garage, it looked like Blacktail Studios, so he dropped the ball there, but overall he does an amazing job.
If you're wondering if I could tell the difference between the new epoxy and the old epoxies I've used. However, not really, I can't tell any difference, they have about the same viscosity which really fluctuates with the temperature of your tent so no big changes but it is raining very well. I like my usual transitional tints, they give it a really nice black. using my usual gelatin injectors to fill in all these little pits and low spots, so overall no impressions one way or another in the epoxy so far, something I didn't really talk about at the beginning, but you should make sure of having good kiln-dried wood and kiln-drying is really to make sure that you don't have any bugs coming out of a finished project because even if you encapsulate everything in epoxy, if there are live bugs inside, they will come crawling and you can see here, these it's some little bug holes and I buy all my wood at Gobi Walnut so I know it's all kiln dried and will be treated so I'm just filling all these little bug holes with more. epoxy which actually gives it a really cool look in the end, at least in my opinion, but this would be a real red flag if you just air dried the wood, so make sure you get good kiln dried wood if you're going to do one of these types of tables, here is a tip that I can give you that will save you a lot of time later and that is to brush the sides of the epoxy, this will really prevent the bubbles from sticking to the sides if you look at one of my In the first epoxy videos, did you notice how much time I spent filling these little holes that are the microbubbles right near the edges, if you brush the sides that will really save you a lot of time later by preventing those microbubbles from sticking like I mentioned. before, this is about two and a quarter inches, maybe a little more even in some spots and after about 14 hours you see that it's about 95 degrees, which is a good temperature, you want to be warm but you don't want to go over that. let's say 120 degrees and I'm loosening these clamps because when the epoxy cures it shrinks a little bit so you don't want to prevent the wood from moving with it which could crack your table so just tighten them up and you can see there.
After 20 hours it becomes very thick, everything cures very well, so I really like what I see in this epoxy. So far this liquid glass has the same cure time as the other major manufacturers, about 72 hours, although I've found that's not always the case. consistent, but in this case at 72 hours it was rock hard and ready to come out of the mold and you may remember that I used a mold release and that's not actually what sticks to the caulk I used around the edges of the mold and that caused everything to stick together. That's why I need these wood shims, which is a little annoying, but you can see that once I release them, there is absolutely nothing on the bottom of the table and that's where the release agent comes in because if I hadn't used release agent. that whole piece of melamine would have been bonded to that epoxy there for those of you who have seen my videos before, you've seen me go to creative
woodworking
in Portland and it's just a big industrial workshop that you might want to do something in. do your research, there might be someone in your town with a big planer that rents the time, they charge $75 for a half hour and I can do this in about eight minutes so it's definitely worth it much better than using a router sled or something so if you don't have access to a large store.I actually have a blog where I have a few different methods on how to flatten tables like this in your garage using something pretty simple, so I'm lucky to have a big shop that will square it up with their sliding saw, flatten it out with their big planer, if not If you do it, it doesn't mean you can't build a table, it just means I'm a little luckier than you. I would like to know from you. Guys, in the comments, this still counts as, say, a DIY table. If I can go to a big box store like this, have them do a lot of the heavy lifting, so let me know in the comments what you think if this still counts. the table myself or if it's some kind of cheat a few months ago I went ahead and started a blog and before I did I wasn't really sure if it was going to be necessary if people were actually going to use it and now that I have it I'm very happy to do it because I can go really deep into some things that are a little boring to some people but are really useful to others, like things like this, sanding things like the finishing process, whereas I can actually do it. in depth and not have to worry about making a really exciting youtube video that will generate a lot of clicks, so I will include links to the ones I have, a sanding one and a finishing one, plus many more.
It will really help you, you can save it as a bookmark or reference if you have questions during the sanding and finishing process. One of the most useful products I found in the last few months is this black star glue and it works. Really, very good,especially because I make so many black tables, these little micro bubbles. You saw I brushed them before, but I didn't get all of them and in this one I use a very thin, cheap brush from Amazon and I just go. go back and just brush all these little spots and I spent quite a bit of time doing this even though I have my trick that's supposed to save you from having to do this is to go back and hit it with the little brush and the glue ca will save you a ton of time and leave almost perfect results.
After I finished rounding the corners with this 8th inch bit I was going to do some more touch ups and then I would be ready for the osmo 1101 slim and that's what you see here is just a very thin finish that soaks in and is supposed to help much more with water prevention. This is a relatively new product for me, but look what I found, I found that it's not really a weak point. It's actually just a porous spot and if you saw my last table built I ran into a similar problem, it was a little different than this one but I swore I wasn't going to do it on this table and sure enough I found a problem spot. so I had to sand it down and find a solution to harden that area and the solution I came up with was to add this very thin ca glue and it's similar to the black ca glue I was using before but it's very very thin so it goes away to soak to stabilize that type of porous wood.
Go back to finish it and hopefully everything works this time, but I was pretty upset with myself for letting that happen since my last table had almost exactly the same thing. thing so we're going to go ahead and add finish and see how we did it and this is the osmo 3043 and as I added before I have a whole YouTube video and a blog post on how to add this finish and how to get a really perfect finish even on a dusty workshop that can be a real challenge for most of us small workshop carpenters. I get a lot of questions about what polisher I'm using and this is a gem industries polisher, it's kind of a repurposed floor sander, I think it is and it can actually be used for sanding wood as well.
I just find it's a little big for most sanding, but what I'm doing here is coming back with 600 grit after it's cured a day later, adding another coat and when you're sanding. I really need to make sure I get a really perfect, even sanding, any stains will really show up, so I go back and apply another coat with this 30-43 polish, do it a third time, that's what I did there, sand it a third time. with the 600 grit and doing a top coat with the 3043 and I know this is a little rushed so I recommend you watch my other YouTube video on this finishing process before you dive in and try it yourself.
The good news is the tactics we use. I made it to fix that kind of soft or porous spot whatever you want to call it. The finish worked looks absolutely perfect. I just couldn't have been happier with it. You can see here how much shine you can get with this type of hard wax. of finishing, a really great finishing process. I recommend trying it yourself overall, the ac trick worked and now I'm ready to move on to the base. I had a local fabricator named Bryson Steele custom fabricate the space and he did an amazing job and has done several. bases for me before so I knew he would do it and I also knew his measurements would be exactly right and this space was made before my blouse was made so I had to make sure my blouse was exactly the right size because I knew your base was going to be the right size and if I didn't cut the top off perfectly it definitely wouldn't look right as this is one of those spaces that goes all the way to the edge and now I'm going to go ahead and add these threaded inserts and most importantly when you make these threaded inserts is to make sure you're using the correct drill bit size and I will say when you make them in epoxy, although I hate adding instant threaded epoxy.
I'm really afraid the epoxy will break. I used a slightly large drill bit for that and then added a little more epoxy. You can see a bit of a soup in there, but you usually want to make sure you use the exact right size bit. for your threaded inserts otherwise the wood may split, at least I tend to go a little smaller in my holes so if you use the right size bit a little larger they will go in much easier and won't They tear off and you can see that they just fit really well, so make sure you use the correct bit size for your threaded insert.
It's kind of the theme of this part of the video, the space will be powder coated as soon as I'm done here, so I'm doing a final test fit where I insert each bolt and make sure everything fits perfectly to knowing that everything will fit together perfectly when you come back from the dust. If you've been paying attention, you might know this. What I will say is that I actually have a full video on my photography method, so I'll add a link in the video description along with links to everything I've used in the video, like this photography background I went through. a lot of colors trying to get the perfect copper for this base and I will say in the iPhone video it looks very orange in person it looks amazing so the photos I took looked great but don't go by what you see here.
In the video I'll show some photos at the end, but it looks much better in person than it does here in the video. You're probably wondering now what I thought of the liquid glass epoxy and I will say that I loved it and I should also give a disclaimer. They sent me the epoxy for free. They didn't give me money to make the video and I told them from the beginning that I was going to report, right or wrong, what I thought about epoxy, but no. I thought it was amazing. I have had problems with ecopoxy over an inch and three quarters before this one had no problem getting to two and a quarter it cured very tightly.
I have had other epoxies that did not do this. It never actually cured very hard so I was very happy with how hard it cured, it doesn't mean that another subsequent table I make with it can have a bad result because I've had that before where I had a great table with one . epoxy, so the next table I made didn't turn out as well, but I will say that I can't wait to try another table with this epoxy. I'd love to hear from you in the comments, firstly what do you think? this table and second, what epoxies they have had great experiences with and maybe epoxies they haven't had the best experiences with.
I will advise you to try to keep it fairly clean, but let me know in the comments what epoxies you have had. had good experiences and maybe not so good experiences with
If you have any copyright issue, please Contact