DIALUX EVO : 2 SIMPLE METHODS TO MAKE INNER COVE LIGHT
Jun 02, 2021Good evening guys, I'm Mel, welcome back to my YouTube channel. In this video we are going to learn how to
make
an indoor Cove, so previously I made this video on how tomake
a suspended ceiling and dialogue with Cebu and add Covelight
to it, so in this video. I showed you how to know the exteriorcove
and after making this video I received a lot of comments on YouTube, LinkedIn and Instagram, where many of you asked me to make interiorcove
s and different roof designs, so I thought I would do it in our cove. today, so let's go and check out some pictures of the interiorlight
.
Well, basically this is an example of Cove's interior light. We have the roof on all four sides and its vision and strip are in place, so we will prefer this image for reference. I will return to the dialogues so as you can see I have made a
simple
living room model and there are two living rooms, first one and second and both are identical to each other if you look at the furniture and everything, they are all both. identical, so I made this identical because in this how to make with a charcoal light tutorial, I will show you twomethods
and mature, you can do it, so from those twomethods
you can follow any of them.
More Interesting Facts About,
dialux evo 2 simple methods to make inner cove light...
You think it's easy and one more thing, if you want to know how, you know, I made this room identical to this one, let me know in the comments below and if you're interested, I'll do our tutorial on this one too. so let's get started, okay, I don't have any false ceiling designs here nor do I have any AutoCAD files, so go to the reference lines and draw a reference grid, okay, I'll just do point four and point four , so this will be my method. one here, I will do my method one and here will be my method two, so in method one we have drawn the reference lines which have a point of 0.4 for the length and width, so once that is done, go to the ceilings, okay, make sure you draw. it's in story mode okay so once you're in story mode you can see here there are two options up here see insert sitting on the dome and draw on the roof so our first step here would be to draw the roof in the room, okay?

I'm going to start from here, watch the steps closely, okay, second point, sure, so what point here, four points here and I'm going to close this roof, okay and then I'll right click and close the polygon so that you can see here my then my The C shaped roof is already done, but I want it to be off in all four corners, so what I'm going to do is select draw on the roof again, make sure I choose it from this end, place a point, second point and then reveal it, okay, closed polygon. and your roof is ready, so I have drawn the four sides, okay, let's go and check in the 3D view, okay, this was a tricky change and it is a little bit down, don't worry, we can adjust the height, like this I will do it two point seven meters. you can change the distance from the shelf, oh, so that our distance from the shelf is low to 0.7.

You can do this one too, since two point seven meters fit. Now you can see that my ceiling is ready, but I don't have a space to put my unlit light. for that one, what I'm going to do is select this one, okay, select this one and on the near sides, side scrolling makes it a one meter point and now you can see I have a place where I can save my flight buddy. exactly the same way you're going to do for this selected, make sure the near sides are marked and then have them point a meter between and here you go, my roof for the
inner
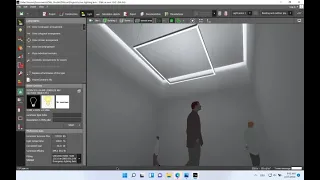
cove is ready, okay, we'll just add a little bit of color, so let me do this navigation with 80% reflection factor.I'm just going to replace the material and yeah my roof is ready so once your roof is ready go back to the ground view go to the lights and select your flex strip or IES for Cove Light okay so if you want the IES file, if you want ideas for Cove Light, just watch this video on how to make a suspended ceiling. In this video I have even shown where you can go and download the IES files. back I have my IES file I'm going to draw an arrangement of lines just take the start point end point okay then define the number of luminaires so here let me do ten okay so you have to place the numbers of luminaires yours is such that there is no space between these two bright, okay, you can have the space between the dark, but sometimes what happens once you do the calibration part shows that dot, dot, dot, so if you don't want to have the dot, dot, dot effect, then make it a continuous light, so just go and check on the side, okay, our light is here.
I'm just going to move it up and rotate it so that it reaches the light outlet so that the light outlet reaches the ceiling and I'll position it so that you You can see that you've applied the reach light here, so once finished on one side, just copy this and place it on the other side, like this, go to the section view, rotate it correctly and adjust it if necessary. So I've placed Cove Light here and on this end, so buddy, let's finish it. I want to make sure and here you can copy it the same way or you can draw it, so let's draw it, okay, start from here and end here. make sure there are no gaps between them go to the side view, let's copy this control-z control me and move it to the other end go to the side views and rotate it so you can see here I have placed my LED strips on all four sides and towards the left off the reference lands layer, go here and just click on this one, so let's shake the CCT of this one, okay, so it's 1 point, 7 watts, 200 lumens and 3000 Kelvin, so okay for this one, let's do it now. the calculation, go to the calculation objects and draw a complete project, so yes, we have finished the calculation and you can see the f-calado cove line effect, we have the
inner
core Freddy, you can say this, this looks totally okay so you can just save the view and rate and track so this was method one on how to make Inner Cove and now we're going to create the Inner Cove method for this living room so before we do that just let's go and save the view for this. one okay save the new view and it is saved okay now let's do the method two before we do it before we do it we need to cancel the calculation so the calculation object and cancel it this is my second room to be, okay, go to the plan. see the construction and roofs in this method what you need to do is that in the previous method we used the option of drawing a new roof and we drew C Schaeffer's airship and finally we captured a square ship so guys on the matter select first the ceiling and then start navigating into the room, okay, for this one, for this one, you can define the shelf floor distance, which is the height of the ceiling from the floor.I'll keep it at 2.8 meters, okay, so we have our ceiling. but we need to have some opening where we can place our inner cove, so we'll go to the cutouts, a rectangular cutout and first we'll draw an imaginary rectangle. You can go to plan view and adjust the crop. Yes, I don't have an AutoCAD file. so I'm using these reference lines, so I made this cutout. You can see my roof is empty, it means it's hollow, there's no thickness, so selectors 1 and here on the roof thickness increase 2.2 meters and then go to the cutout again. select this cutout and limit this cut depth to 0.1 meter, so we have done the cutout well, it also represents the roof, but there is no place where we can keep our polite agreement, so for that what is the next step , I carefully select the rectangular cutout again.
Cut out and draw an imaginary cutout. Go to the plan view so that it is a little larger than your first cutout. This is basically where you will store your. I made a strip, so my first cutout started from here and the second. cutout I have left a space of 1 meter. Okay, my second cutout is ready for this one. You are also going to limit the cutting depth and make it to 0.4 meters. I have a place where I can store the LED strip. I'll show you on the plan see this one, but it's too thick, you know, in our AutoCAD it fell when we see it's falling slightly and the thickness is too small for that one, we'll just go to the 3D model again, select a second, come to the sectional. see, select this one and break it down, bring it down to decrease the thickness of this roof, so it's up to you how much you need, so I need it.
This amount is okay, okay, I'll go check it out and you can see here. I have trapped a ceiling where I have a place to store my LED strip. Check in side view. This is my navigation, so now just add some texture. Let me keep it white with a reflection factor of eighty percent. Just replace it and go to the side view, so make the reference lines invisible, so in this method I have already placed a strip there. I'm going to copy the same LED strip. Here I have finished copying my little strips. You can make an arrangement of lines or something like that.
I'll go and check in the 3D view, okay, my little suit is in place correctly, yes, to a certain extent, this is method one and this is method two, so this is method one and this is a method to just calculate, so my calculation. is complete, we will go and check the results you can see here, this is the result of my method, and this is the result I got from method 1. They are both similar in this, the ceiling is a little lower and this one is fine. but anyway, the process is the same, the result looks the same, so it's up to you, whichever is easier for you, you can follow it, method 1, method 2, so guys this is all in this video, It is ok for ceiling designs and black color.
I'm going to make a playlist, ok you can find it in a coke or a taco and in the next few days I will do a self-study to sell or drop the roof than different designs of dropped roofs, if you want any type of old roof, you can just to make Ping. If you send yourself to London or Instagram, you can shave me the reference images and I will do a tutorial or not. I hope you found this video useful. If you did, please like this video, subscribe to my YouTube channel to explore more and chat with me, thank you.
If you have any copyright issue, please Contact