7+ DOLLAR TREE DIY ORGANIZATION IDEAS & EASY HACKS ~ MULTIPURPOSE ~ CRAFT ROOM ~ KITCHEN ~ PANT
Jun 02, 2021Hi everyone Josie, here I live at 50 and up, thanks for joining me here on my channel where you will find DIY, practical and
easy
, mostly affordable. Today I have a new collection of DIY Dollar Tree organizers and I'm so excited because I'm going to be using these fall signs that they sell at Dollar Tree, so sit back, relax and enjoy this video. These fall signs come in these four designs or styles. They are made of, I believe, chipboard or melamine. I'm not too sure but they are kind of like wood and what I like about them is that they are more durable than plastic and the first DIY I'm going to create is something you can use to organize small things and you know me, ya I have shown it to you.
In the past, I have a pretty worn collection, so anyway I just want to show you here that you won't do much transformation if you don't want to because I like this gingham or you know, the buffalo check. style that they have here and I'm going to remove this one here where you can hang it on the wall because it was meant to be displayed on the wall because it's a sign so I'm going to use it as is. and it's the perfect size for me in most washes, in fact, if you're a
craft
er or you like to journal or you like to scrapbook or embellish your planners, it just stays on your counter or on your desk, you can take it anywhere you want to do your journaling so yes this is just an idea to organize your washes especially if you like to use them for those of you who sometimes ask me what is washi.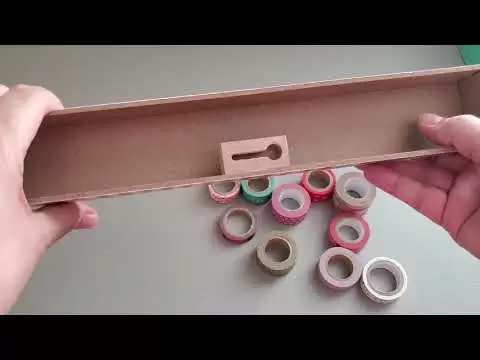
More Interesting Facts About,
7 dollar tree diy organization ideas easy hacks multipurpose craft room kitchen pant...
Well, a washi is this type of decorative paper tape and they originated in Japan and are thin enough. that you can actually cut them and I will show you here how
easy
it is to use it as a dispenser because this wooden sign has a sharp edge and all you need to do is cut it like this and you can use it is easy so it is also a dispenser not just a organizer, and using the same sign, this is also the perfect size for organizing those paint bottles. You knowcraft
paint bottles, so this is the two fluid ounce size and this is Waverly paint. it just fits in there, of course, it can only fit seven pieces, not eight, because the width is also limited and also what you can do is try to organize these paint bottles.
This is another idea, if you want to store them properly, it is better to do so. the other way around they maximize space so here's another bottle which is a slimmer paint bottle and I think I can comfortably fit more than seven as you can see I was able to fit nine bottles these are the two fluid ounce bottles They are sold at Walmart as well as Michael's and are the same size. They also sell different brands at Dollar Tree but the same size bottle, so I think this one is also good if you want to put them in a drawer where you want to store them.

You can buy several of these wooden signs and all you need to do is invert them to remove the hanging bracket and then it will work, as you can see here. I have this sterilized plastic drawer and most of my craft supplies are in the sterilized organizers because they are cheap, I bought them at Walmart so this one is deep so I could fit several of these and put or organize my paint bottles and not just my paint bottles, as you've seen me organize my washes, I can insure them. inside this drawer, in the next idea, I'm going to use six pieces of this wooden sign and just set them up.
I'm not going to hot glue them because I'm just showing you a few. Ideas you can do if you want to hot glue it, but I think even without gluing it you can use it as is so you can remove things or move them around so it's really up to you what you want to do here and what. What I'm doing here is putting three pieces on the bottom, then two pieces on top of the last two pieces of the first layer and then I'm going to put another piece on top of the last layer so it's like a ladder. so to speak, with the different stages, like steps on a ladder, so I'm just showing you here again a total of six.
They put or line up three pieces on the bottom, two pieces on the second level and then one piece on top and there. You can actually organize your paint bottles and the great thing about this style is that you can put them in and you'll still see what's in the back. This is also perfect for organizing spices inside your
kitchen
cabinet so if you have a lot of spices. You know they sell these types of organizers for spices that you can use in your cabinets or even in thepant
ry and they are very expensive, but here for sixdollar
s you can use this and you can organize several bottles.I think you can also use this to organize your nail polishes if you're looking for some
ideas
to organize your nail polishes and like I said before you can hot glue them on so you know they won't come apart easily but I'm just showing you here or showing you what you can use this for this is what you see on the side like I said it's like a staircase where the level changes so you can see what's on the back just one level it's very hard to find in the back if they are on. the same level so if you're increasing the height it's better, for six bucks it's a better deal than most spice organizers you can find out there and you can also reverse this if you want to corral it better so I'll just show you how do it here, so that the way you line up the first three signs or the bottom layer, you will only invert the first one, which will be your first level, and then on the middle or second level, you will invert another one and then another one or the last one at the top so there will be three inverted signs and the other three are not inverted and then you can hot glue them on.I like the style better, not just because it's drop-proof. I don't need to touch it up or paint it, this seems fine to me. I like those styles of paintings, as I said before. For the next DIY I'm going to use this 11 by 14 frame that I bought at Dollar Tree and I'm just going to remove the inserts including the glass, after I remove all the inserts and the glass I'm just going to bend these metal fasteners here just using my thumbs to bend them, now you can remove them or pull them with pliers. I decided not to because sometimes it's Better not to because if you know this frame sometimes they can break easily so I decided to fold them and then I'm going to use this as a stand to create a hanging organizer so I only need three of this hello fall style that I like it.
This style a lot because the design looks like leaf designs here on the outside, so I'm just going to glue this to the frame and this frame size is perfect to support these wooden signs. I will be using hot glue for demonstration purposes but I just want to warn you that it is best to also use it along with your e6000 hot glue or even fix everything they sell at Dollar Tree so you can find anything that is similar to the e6000 as it will provide adhesion better and more stable. or support for this wood science, especially since the finish of the frame is a little slippery.
Hot glue won't work there, they come apart easily, especially if you live in a warm, humid area, so here I'm just going to measure with my ruler and just measure the distance evenly and I think what I've done here is I've made the I was spacing out about four and a half to five inches, just testing the size, as you can see here, I'm using this one
dollar
bottle, so I'm just going to mark the bottom of each sign and that's going to be my mark where I'm going to stick them. , so I'm happy here and as you can see at the top, there's just a very narrow part where the top is, but that's where I'm going to hang the nails.I'll just be using galvanized nails to hang them on the wall, so again, for demonstration purposes, I'll just use hot glue, but if you're going to do this, use a commercial grade as well. glue that will hold better or there is a gorilla hot glue you can buy that is like e6000 but it is a little expensive but if you want you can use pixel or e6000 just hot glue it for extra support or to dry. quick, but make sure you use commercial grade glue so that the bottom one has the most support of the three signs because I'm also using the frame at the bottom to glue it on, so as you can see, I'm just pressing it in here, so that will hold up better, but the other two I'm just going to glue the ends so it's even more important that those top two are actually secured with additional more durable and stronger glue if you use the commercial grade glue that I'll have to dry this for the night.
I would suggest several hours. It's up to you if you want to paint the bottom. I'm not going to do that, so here I'm just going to reinforce the back with more hot glue on the edges. or the ends especially the top two shelves now I call them shelves because they will actually be wooden shelves that you can hang on the wall so this is it and if you don't like this look you can definitely spray paint it or refinish it , so now it's hanging on the wall so what I did here is I used two nails and this is how I hung it and look at it now so what I did was the heavier bottles are on the bottom because it's better holder right there, the ones on the top are the taller bottles which are lighter, so imagine this, if you have a collection of nail polishes, you can use this organizer for your nail polishes and also for your condiments or spices again, make sure to use it.
Commercial grade glue, not just hot glue for your next DIY. In my opinion, I'll show you a better version for five dollars, so I always give you alternatives here, so the first one I showed you, you don't have it. To finish this one off, I'm going to show you that it will hold up much better again, use a combination of hot glue and commercial grade epoxy or e6000 or fix everything to combine all of these materials, so five pieces of these wood signs of any style, because that? What I'm doing here is I'm also going to paint this.
I show you here. I have e6000 and I fix them all together to connect them all and then I will combine them with hot glue so they dry quickly because they fix. everything and e6000 you need to dry overnight but for instant gratification use hot glue to match so to hang this on the wall I'm going to take advantage of the greeting part of this sign so you can hang it without any extra hardware on the back because en They are already hollow and I am going to use two nails. You can also use hooks, but I'll use these carpenter's nails and then hang them on the wall using the hollow part at the bottom again.
I'm just going to level it out. in the end, using my hot glue, I'm going to apply hot glue here in this area, which will be enough to cover the width of the bracket, those two brackets that I'm using and then using e6000, I'm going to combine them and each time I use my thumb to press so that the glue sticks better so check that the bottom one is level, I just want to make sure it can sit on top of a flat surface like my work table here and that's when I know it's level, but you can also use a level by the way , they also sell them at Dollar Tree, so what I'm going to do here is hot glue the one on top again, making sure that for you, who are doing this, you're going to combine it with an e6000 because I don't want Blame me if I drop it because I don't live in a warm humid area for the most part, my hot glue is fine, but I would.
I suggest using commercial grade glue, but again, I'm just going to line up the edges to the end or the top of these two signs here and then I'm just going to press with my fingers like this and then for the middle shelf. I'm just going to look at it at the right height as well and then I'm just going to apply the glue and then I'm going to connect that last piece and then I'm going to use my thumbs or fingers. I'm just going to make sure to press so the glue sticks better and then I'm going to let this dry for a few hours before I apply the paint, but here I'm just going to give it a try and it looks really good.
You can probably lean it against the wall like I'm testing here and it should work too. but I'll post it up high next. I'm going to paint this and I'm using this lagoon necklace, it's like teal blue and this is an Apple Barrel acrylic paint. They sell it at Walmart. I think it costs like 47 cents. a bottle, so I'm just using an artist brush. I love this color and this would be perfect for my craft
room
because as you can see even that organizer is almost the same color and if you've been following me here, my channel, you probably already know that I lean towards this color so just paint it with a couple of coats of paint, I think that's fine, so what I did here was paint with one coat and then let it dry for a couple of hours and then I applied my second coat of paint and here it is, after painting a couple of coats of paint, I made sure to paint the areas that can be seen, including the bottom.I didn't paint the inside of the shelf because I'm going to be putting items on there, they won't be seen anyway, so here are the two nails justfor carpenter nails and just tapped them into the wall. I made sure they were within a distance of where I could place this, so I'm just going to be sitting. this is right there on top of each nail on each side and voila, it's hanging now without me adding any hanging hardware and this is where I'm going to put my paint bottles again since I'm rearranging or redecorating this craft
room
.I want to put them all. there on the wall I can see them and here it is. I really love how the two hanging shelves turned out. I like this one better because it's more durable because the frame here allows for more support than the other one. picture frame the other one is just thinner or more polished or more modern this one is more farmhouse for my latest DIY I'm going to use six of these signs of fall and I'm going to connect three together twice, so three and three because this is going to be two levels and this is going to be a cart.
I'm going to use a combination of hot glue with e6000 or fix it all up as well and just line them up. I'm using this solution as much as I can. bought this at Dollar Tree in the hardware section and I'm telling you it's actually very durable but make sure you have proper air ventilation because this one really smells and can get CC if you're sensitive so I just want to make sure I give you a bit of caution, so after applying a generous amount of fixol, I also put a generous amount of hot glue to reinforce my connections and then press again with my fingers and then use some binder clips to adhere them better.
So I'm going to do the same thing here on the side and I'm going to do this in fast motion and then leave them with some music while I do the other set as well after letting them dry overnight. This is how they turned out and I have a three-compartment shelf, so this one will be two levels and, like I said before, I will use these two paddle board-shaped cutting boards or the plastic cutting boards that they sell for a dollar as a support.
tree
, so I'll put them on each side. This is another version of my DIY that I created almost three years ago and I'm going to insert a photo here and in the top right corner I'm going to put a link or card to that video, you can click on it so you can see the full video when I created it ago three years.I know some creators or even viewers have already used it as inspiration to create their own projects and here I am. I'm going to show you a different version because I'm going to use this as my organizer for my k-cups and tea bags for my hot drinks station and this will be in farmhouse style, now you're going to love it. here I'm just showing you that I'm just lining them up making sure I have them level again. I'm looking at where I'm going to place them. I want to make sure when I'm creating multiple levels. or more than one level of organizers that I have enough free space for my hands or even for anyone who is going to reach for things, especially the items under here, combination again using fix everything, I will apply it to the side and then I go I also have I have to apply hot glue so I place the paddle cutting board on top of my workspace so I can see the bottom lined up with my wood signs or my shelf and just make sure I line them up correctly. and the bottom edge of the cutting board lines up with the bottom of my shell so I'm pressing again with my fingers to make sure it's secure and at this point because of the hot glue drying fast it's going to be a little difficult to move it.
At this point already, that's why I made sure it was already aligned. Next, I'm going to evaluate or look at where I'm going to place the top tier so that I have enough clearance not only on the bottom tier but also where I'm going to put my handle because this is going to be a cart. The cart has a handle and I'm going to take advantage of that hole that you see there from the cutting board where I'm going to line up my handle. so I just want to make sure I have enough room on both rips or both trays, so here I'm just repeating the steps that I did on the other one, combining applying my solution and my hot glue and then pressing with my fingers. to make sure the tray sticks to the plastic cutting board and then while it is in this position I apply the fixative and hot glue to both shelves or trays and then I will place them on top of the plastic cutting board and making sure to have that board line up with the board on the opposite side using my fingers again to press and make sure the glue sticks and then I'm just trying to see if it's level and then I'm drying I'll leave it aside overnight, not standing like that , then after I dry it overnight, I'm going to paint it and I have this oleum oxide chalk paint on linen.
I bought it on Amazon and will link it in the description box. next, in case you're interested, I love this color and it matches the color of the cutting board, although I'm going to apply a little bit of it to the cutting board just to make it a little more uniform, so I'll just go going to apply a couple coats of paint on these wood signs or my tray shelves so here it is after applying a couple coats of paint and I'll probably do a little touch up later if I see there are some areas but I think it already looks good as it is, so I'm going to put my control like in the first project.
I used the rolling pin I bought at Dollar Tree. I don't know if they still carry it. but back then I bought 10 pieces of this so I have to use what I have, but you can also use the plunger handle they sell at Dollar Tree. In fact, I've already used it in some of my projects. Also, but since this roller is a little shorter than the width of my cart, I improvised by adding some cardboard cutouts on each side, so that's something I cut out of a shipping box. The one that is thick, do not use thin cardboard. or else it won't hold up because you know those shipping boxes are very durable, so I just cut the boxes with the circle in the shape of the ends of my rolling pin and just shaped them, as you can see here.
I'm trying it on for size and I see this is what it looks like, they're just cardboard and then I'm going to hot glue them on each side and here's the piece of cardboard that you know from the shipping box. I just want to show you. I cut two on each side and then I cut the shape of the ends of my rollers and then glued them there, so this time I'm going to use my e6000 and then I'm going to apply my e6000 to each side of my extended roller. and a makeshift roller, and then I'm also going to apply hot glue for a faster bond, but the most stable bond will be provided by the e6000, so you should combine the e6000 with the hot glue so that it dries quickly. with hot glue and then it joins better with the e6000 so put as much glue on as possible or be generous with the glue if you are doing this because again this will be the handle and will support the weight of not only the cart but also the contents that it contains, another option would be to use some kind of screw that can go through and it will be more durable than using glue, but the epoxy must also be durable, it is like liquid nails and here you can see me trying it too. to reinforce more through the hole where the perimeter is or the ends and yes, that should cover it well and here also on the opposite side here I'm doing this on the edges and not on the one that doesn't connect to anything so it's the connection that I'm reinforcing, then I press both ends with my fingers and then dry it again overnight.
I'm going to paint my handle and to give it a little contrast I'm going to use this Waverly paint or chalk paint it's the color of the elephant originally I was going to leave it unfinished because I like the natural look of the roller but I decided to paint it gray or this elephant finish so I can use it as a contrast and since I'm going to put the buffalo checks, they will blend better and here it is after a coat of paint and I'm going to show you again that it's Waverly's gray elephant and I bought it at Walmart.
I just want to show you my Original or the first DIY from last time three years ago and as you can see here, I actually have two iterations here where I also revamped this DIY organizer and decorated it for fall last year. I'll insert it in the top right corner. Here too, as you can see, I also used the rollers as a handle and painted it white and then wrapped the rope there just to finish it off and I'm going to imitate this buffalo check style using the same paper as well. It was a piece of wrapping paper that I targeted for a dollar and I got it back at that time too since I still have a lot left over.
I'm going to use the same paper, but you can use any type. of paper, scrapbook paper would work or contact paper in any style you like. Dollar Tree sells a lot of contact paper and it would work well too, but here I'm just going to trace with my fingers where I'm going to place this. wrapping paper and I'm going to press it more like a crude method that I've used to be able to trace the notch there, the edge of the cutting board and then use my fingernails to mark, you can use any sharp object. object, but I feel like fingers would be better so you can really feel where it is and then I'll just use a pair of scissors to cut and I'll use my brush and apply this mod podge. and this is how I'm going to place this paper on my cutting board.
I'm just applying a generous amount of mod podge and then making sure that when I attach my paper there aren't a lot of air bubbles and then I apply it. mod podge again on top to camouflage the ends of my handle. I'm applying this nautical rope to finish it off which will cover any imperfections on those edges and to cover the holes I'm also wrapping the piece of this nautical rope and then just to cover it, kind of like creating a button to cover it, like the other one I made three years ago years, this is how I finished it, so I'm attaching it and repeating the same style or steps on the opposite side and Here it is, I love how it turned out and it has three compartments on each level, so there are a total of six compartments.
I'm going to show you that I'm going to use this to organize my K-cups, so I have this decaf. The K cups I'm arranging in each row can fit up to six pieces of these K cups, so for each tier I have 18, a total of 36 K cups, and I know I've mentioned here in the past that I have stopped using k -cups because they were not recyclable but I found a site and some of you also mentioned that they can now be recycled and can be reused to germinate your seedlings so I decided to try again and these are the decaf ones because I can't drink caffeinated and I love this one style because it suits my style and instead of those bulky keurigs I have this unique dispenser for k-cups and I bought it on amazon, this one is not sponsored but I found one that works well, it doesn't take up much space and I can put it on top of my tray.
I love this tray that I bought with our family's initial on it and that I bought years ago at home goods. It has some tiles, it's easy to clean and I like that chef, they carry the bread so they can hold it there and I bought those cups at Dollar Tree. Also these are the coffee mugs they sell, they have gray and black, so I bought them there too. everything goes together well, I'm really happy with how this cart turned out and I love it, but since we're also tea lovers, I'm going to show you that I can also use it to organize my tea bags, so I'll just be lining here.
I collected all of our different flavored tea bags so it's up to you if you want to use them this way apart from the k-cups so I kept the k-cups below on the bottom tier and then the tea bags on the top tier and from Here we are tea lovers, my daughter and I, and then my husband too, and we drink decaffeinated coffee and some of our teas are also decaffeinated, so I think this is the perfect organizer and if you are going to put a price on this one, I mean the The total value of this one is not even ten dollars, so creating an organizer that actually looks good is just amazing, so I hope you enjoyed this video.
If you did, give it a thumbs up, share it with anyone who might need it. a project like this and I want to save some money and I love being able to use materials from Dollar Tree so have a great day everyone thank you for joining me here if you are new to my channel welcome if you haven't subscribed yet subscribe and don't forget Click the notification bell icon so you don't miss any of my new uploads. If you are interested in any of my projects, check out my playlist. I have many there, leave me some comments below. also follow me on my other social media accounts that I am showing you here on screen have a great day everyone, I will talk to you again in my next video, take care and god bless you, bye.
If you have any copyright issue, please Contact


