2020 Drift Supra CAD Designed Roll Cage Install and Fabrication
Jun 10, 2021I'm Stephan Papadakis, we're here at our shop in Carson, California where we're building the new
2020
Supra on our newdrift
car. We already took the car apart and actually made a thousand horsepower from the engine. You'll find a link to those videos in the description below if you want to watch them, but for now this is my favorite part of the build, where we get to choose a lot of the parts we'll put on the car and then also design. many of the components I want to show you the details of some of the projects we have going on, let's get started, so in thisroll
cage
we wanted to take a step forward and push ourselves to the limit of what we can do with the The most advanced tools we can get to In order to design theroll
cage
we had to determine what space we were working in so Craig from Hall Designs came and scanned the entire interior of the car, the scan tool sends out a laser and can actually read, save and create a model of the topography of the car as it continues to scan the car, it continues to build that surface inside the computer once all the interior scanning was done, we sent that information to Igor at Triton. engineering, he's the one who actually made the CAD model for the cage based on our parameters, then once the cage was fullydesigned
we emailed those prints to Hal West, manufacturing, they're the ones who actually look and see how to bend and laser notch all tubes.
The roll cage is made of chrome-moly tube one and a half inches in diameter and 0.95 thick. They start by taking a long stick of the chrome-molybdenum tube. The computer tells the machine how far to pass the tube, how much to turn it, and what the profile should be. Where the two pieces of pipe meet when you weld them, you want to make sure you have the smallest amount of space between them as possible. All the points where the roll cage attaches to the unibody chassis, we actually have plates that again were all CNC cut. the laser and then the CNC were bent and fit perfectly to the profile of the vehicle.

More Interesting Facts About,
2020 drift supra cad designed roll cage install and fabrication...
Once all the tubes were CNC knotted, they then brought it in and started bending it. We had two different types of curvatures in the cage, one or two standard radii like five. one inch radius and they were able to use dyes on them. We have another part of the cage right next to the driver's head that we wanted to keep as high as possible so it has a really long profile, they actually laser cut a template and then rolled the tube to meet the template that they could. Make notches and the entire tube in less than a day.

Once back at the shop, you can see everything laid out how it will go in the car. At this point, the cage goes in a little. Like a puzzle, each of the plates and each of the tubes are numbered, so we welded most of the cage except the base plates, so we could lower the cage, weld the top of the cage, and then come back. to upload it. into position and then the laser cut and CNC bent spot covered the holes and also reinforced the entire area where each of the roll cage legs meet the chassis.

Kody has years of welding experience, so we brought him in to weld. Next on the cage list was the steering rack. In order to adapt this rack to the Supra, we need to make a rack adapter, so I started by measuring all the dimensions of not only the factory crossbar but also the rack we are going to
install
. Also, here's a little trick, if you want to find the center of the center of a hole, what you need to do is take your caliper and measure the inside diameter of the hole and zero it to that measurement and then when you measure from the edges. of both holes, it actually gives you the center to the center.I then went into the CAD software and
designed
the bracket that will mount the rack because the part is too big for the 3D printer, I had to build it in two pieces and then glue it together. together and the nice thing about the 3D printed part is that we can verify that all the models are correct before we go to machine them like this one, the rear frame support, it was actually hitting the engine oil pan once we put it on and you I can see where the two nicks are and it actually got dented.I went back to the CAD software and added a couple of features that would clean the oil pan and then it was done. We modified the subframe a lot to adapt it to the different rapids. Change the rear like that. The reason we use this one is because it is very strong and can handle over a thousand horsepower, but it also has an easy to change gear ratio. The way you do it by removing this back cover is very easy. You can quickly change these two gears and now you have a different ratio instead of before, where you actually had to take the entire differential out of the car and put a different one in that already has a different ratio to be able to do a quick shift. on the factory subframe we took it to our friend Nate.
He started by making a fitting that way when you start cutting it and modifying it, it won't flex or move and it will still bolt back to the car, so Nate started by removing a lot of the brackets that we're not going to use and then cutting a lot of it off. of the subframe material to place the quick derailleur inside it. Nate had already been to the shop and we worked together on where he wanted to mount the new quick shifter inside the car, he knew exactly where to place it, so once all the material was removed and the quick shifter was mounted in the position where it would eventually we would want it, we didn't bring the entire subframe to our Shop again and check to make sure everything fit correctly.
There were actually several parts of the car that we had to notch in order to fit the quick shifter, so we went ahead and started opening up the chassis to get the quick shifter to fit into the assembly. The box on the back here that we're taking out is where the battery was originally located. The factory hub is a one-piece Preston deal that has rubber isolators and you want it for general street riding and comfort, but for us we're game. to compromise all comfort for performance, so after measuring all the factory rubber bushings, I designed what I wanted the solid bushings to look like and then printed them on our 3D printer.
I decided to make this a two piece, it will be a top and a bottom that will press in and then the single original screw will hold the entire subframe up. The suspension we got from a company called Wise Fab, they actually specialize in designing
drift
suspensions, which are all the blue parts that you see, we're working on. with them to help develop this kit and with all their experience building the kits and our experience running the cars, we ended up with a really good combination once we have the suspension, shocks and everythinginstall
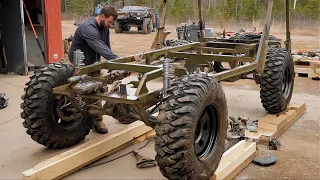
ed on the car with the help of El RS, our guys, we put it on with some mockup wheels and tires.We want to put this on the ground for a few reasons, number one, we need to make sure the entire suspension is clearing the chassis and the tire is moving forward. through a suspension travel you have full clearance inside the chassis and in the front, we have noticed that when we have extreme steering angles, but the big front tire actually hits part of the chassis, it hits enough that we decide to take a We removed some material and then welded a plate back together to make it stronger again. Now with the rack mounted and the suspension on, we started working on the steering arms and then the steering column.
In this whole build we have to make sure we are within the shape of the drift rules Kevin from the series, the technical director came and we discussed the different parts of the car that we wanted to modify and make sure they were legal within the rules, things such as the subframe bushings, the steering rack bracket, That way, we modify the steering wheel in the front for the additional steering, even for the SFI steel bell, which is a safety component. That way, if you have a clutch or flywheel failure or something like that, then it protects the dry and keeps everything inside of this. black bell housing, so the driveshaft and axles were both from the driveshaft shop.
They made us a carbon fiber driveshaft that goes between the transmission and the rear. They are lighter than steel driveshafts and are actually stronger than aluminum driveshafts. and then both axles that go from the rear to the hubs and drive the wheels. These are all racing components that can handle tons of torque and tons of horsepower and an entire season of racing and we found that the carbon fiber driveshaft can actually help the axles and rear end live. a little bit more because it eliminates some of that impact when you release the clutch, so the brakes we worked with stopped working and they already had a kit for this Supra that was pretty close, it's weird that In fact, we can just bolt parts on to it. a car, but it was cool because not only did they have the hat that fit, but also the front caliper and bracket, and for those of you with a keen eye, yes, this rotor is backwards. to screw in the wrong side for the mockup, but when we do final assembly, all of that will screw in the right way.
The front calipers we will be using are the technical six piston stopping calipers, there are a lot more breaks than we need, but with the large tire size we are using, we actually have to have the car at a fairly high minimum weight, around 3200 pounds, so when building this construction we are not looking to save a lot of weight, although for such a large caliper these are quite light and another good thing about using a larger caliper with a larger pad is that with all that material of pad we should be able to get a season or two out of a set of brake pads, the rear setup was a little more challenging The hat on the road is bolted on without a problem, but the stop system bracket had to be spaced a little differently than the one they had for our wise and fabulous knuckles and all the drift cars we built actually have two calipers per rear wheel. and the reason is that when you drive the handbrake and then pull the handbrake you can't feel it on your foot or if you pull the handbrake and then push the footbrake you can't feel it on the handbrake. and then for the second caliper we are going to make a CNC bracket, but the red one we have now is just the 3D printed one that we are going to use for the mockup with the huge rear tires that we used.
We actually need a lot of braking force to lock them, so we build a reinforcement plate where the handbrake turns in the tunnel and then pushes a rod that actuates a hydraulic master cylinder that is mounted behind the driver's seat, the car pedals. They are all custom, we are using a drive by cable pedal, it has a small sensor that tells it the position to the infinity in which we are going to use the infinity and then it controls the throttle body depending on how you have programmed it between the ratio of the pedal and opening the throttle body, then we made a complete bracket that holds the brake on the clutch pedals.
The entire bracket is then welded to the car in the exact location to be comfortable for the driver after determining where we wanted the fuel cell. On the nitrous bottle we then designed the entire structure of the rear. The structure not only mounts the fuel cell and nitrous bottle but also protects it. We used our prop table to make the frame. The entire rear frame is made of steel. it's a mix of box tubes and round tubes and unlike how C and C designed everything for the roll cage, we're using hand benders and Nacho's, the entire fuel cell nitrous support took about three or four days of manual welding and all that.
It's all good, so thanks for watching. I hope you enjoyed it. If they did, hit the like button if you want to see more and the rest of the videos. As we continue to finish the car, consider subscribing. I appreciate you seeing me. see you in the next video
If you have any copyright issue, please Contact


![Building a StreetHunter MK5 Toyota Supra in 16 minutes! [COMPLETE TRANSFORMATION]](https://i.ytimg.com/vi_webp/KtMpU-ISX8c/mqdefault.webp)

