1971 Dodge Gets A Slant Six - Engine Power S2, E3
Jun 06, 2021The
power
of theengine
completes the classic Chrysler Slant-6engine
build and I found a neat place to put it last week. In enginepower
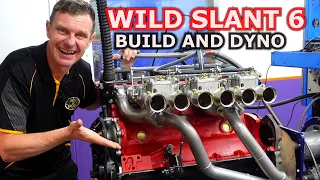
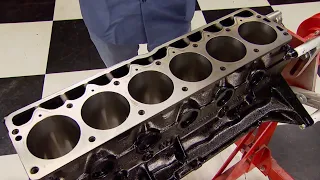
, it saw us take down a 225 cubic inch Slant Six, which was Chrysler's most durable and reliable engine ever built. Unfortunately, we were left out. The elements and heavy corrosion prevented us from reusing it, so we started with a later model block and had it freshly machined. The crank was now installed with an upgraded one-piece rear main seal and the reconditioned rods would drop through the holes with new pistons fully connected. A refurbished cylinder head was dropped onto the deck and the engine was finished off with performance parts. of Hooker, often Hauser and Edelbrock.
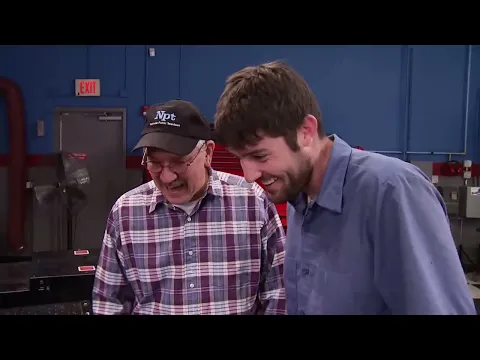
We couldn't dyno our Slant-6 because the diameter of the bell is too small and it wouldn't fit the dyno, but we told them we had a home for it and there's nothing better than this 71 duster when it's cold it spits and sputters I have to heat it up it has an exhaust leak so it makes a lot of noise and here is its owner Ken Symington who has an emotional attachment to this work in progress you know this car is over 40 years old not many of them running mainly since my wife She bought it new when I met her, she was blind. cute when the next time I saw her she showed up in this red car and the red car and the blonde hair went together and I knew perfectly well that she was in trouble she loved it, it was her first car, maybe he likes it more than she does .

More Interesting Facts About,
1971 dodge gets a slant six engine power s2 e3...
I never asked him that question recently. Ken's son paid to have it returned to its original condition by sending it to a local body and paint shop where he started the Refresh. The car was stripped down to bare metal and received a couple of new panels early. The original color was restored now the final touch was the black striping which gave it a nice but subtle look. Ken's next update is obvious, everyone will have a 340 or 440 and a job or product price. I don't delete it, I just want to drive and in short educate people about what kind of engines were made in the '60s and '70s and the Slant Six is a classic and that's why we asked you to bring the car here, this It's actually more fun than dying in a big tower no, I feel safer, but not just for fun, let's see what this one does, here we go, we'll do the pole from 2,000 to 3,800 and I hope we can get there, this one isn't It is the original 225 engine.
It was replaced by a 95 horsepower 1975 model in the '80s and many miles have been covered since making this duster a perfect home for our leaning tower of power. Well I guess we're there and a whopping 64 miles per hour made just over 70 horsepower and the graph tells the story, we're not laughing because this was a staple of economic performance back in the day so To get Ken back to a reliable cruising state, we will be upgrading the Summit Racing cooling system to drum. to a classic performance products disc brake conversion kit, all new steering links, shocks and mounts from Rock Auto, a Yukon single ring and pinion, gear and axle and ADCO sway bars for better top-down handling .
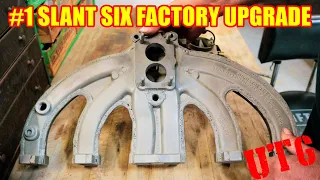
We will start removing everything we can without draining anything. fluids, however, this will include the single barrel carburetor intake manifold and cast iron exhaust manifold. This duster was factory equipped with air conditioning and is going to be that way again now that it has been out of service for quite a few years, so there is no refrigerant in the lines, allowing us to remove them without an evacuation system, we can now Remove the massive starter motor and use our Matco drain pan to drain as much of the power steering fluid as possible from the reservoir. The same goes for the master cylinder, now we can loosen the alternator to remove the belt. then on the mechanical fan and remove it with the water pump pulley now we have access to the fasteners that hold the air conditioning compressor bracket in place so that the whole assembly goes also from below we can drain the refrigerant and oil from the engine remove the transmission connection on both the torque converter and the flex plate remove the transmission cooler lines and remove as much fluid as possible from them.
Now the driveshaft can be pulled into the bell jar so we can drop the transmission. This is a 904 that is being put on. Replaced with a remanufactured unit with the engine mounting nuts removed, we can remove this 225 from the car to make way for the new bullet. We are back and before the new engine and transmission come in, we have a lot to do underneath, when will be the last time? You took off a hubcap, looks like it's been a while for Ken, the front wheels are 14 inches in diameter and cannot be used with our front disc brake upgrade as they require a 15 inch wheel for clearance, please making the brake drum dirty and unpleasant.
The assemblies are the next parts to come off now, the easiest way is to separate the upper and lower ball joints and remove the entire assembly as one assembly, followed by the upper control arms and shocks. We are also going to replace the bushings on the strut rods so they can be removed as well, this requires removing the torsion bar by loosening the nut at the front and removing the retaining clip at the back. Now the bar can be pushed back so we can remove the lower control arm assembly from the upper control arms. They are shiny new, we will clean and paint the undersides to match with VHT black epoxy paint that is rust and salt resistant while drying.
We can fit classic performance uppers that are a direct replacement. They come ready to screw. With new bushings and ball joints already installed new bushings and washers are placed on the strut rods to eliminate movement that can affect the alignment of the car while driving, on the other side of the strut rod we can place the lower control arm renewed as it slides. Through the K member and force the lower arm down with a pry bar, we can reinstall the stock torsion bar and retain it back with the factory clip. This classic performance drum to disc brake conversion fits 63 to 76 B and E body Mopars.
It now comes with an 11-inch vented rotor that has a five-by-four-and-a-half-inch bolt circle. You now also get a power-assisted boost master cylinder and proportional valve already pre-assembled. Now the kit also includes new axles, steering links, calipers, brake pads and hardware for easy installation the axles to the lower control arms first using the castellated nut and cotter pin now the upper control arm is attached You can attach to the shaft in the same way with the bearings and shaft greased we can slide the rotor into place the shaft. The nut should be finger tight as the rotor rotates.
Once the bearings have lost all play I will preload it into the next slot that the cotter pin can fall into, since the bearings are new the new pad can be placed in place and then the single piston caliper with the another pad inside these clips are all that hold it back something else you may need besides a motor our new shocks now these are KYB gas fit we got from rockauto.com replacing the brake lines is a must for a car this old these They came with the brake conversion with new brakes and suspension we are going to restore firmness to the steering wheel we are also going to replace everything that has a ball joint because frankly we know they are all worn out and that will include a new pitman arm, Ayler arm and new ends Inner and outer tie rod ends with new adjustment sleeves.
The first thing to remove is the worn idler arm, we will use our Matco air hammer and ball joint separator to remove. If the new one can go back into place and tighten, the pitman arm joint is separated in the same way, then the nut that secures it to the steering box is removed, we will be sure to note the position it is in so that come back the same way. To keep the steering centered using this pitman arm remover, we will remove it from the spline shaft it is wedged into and replace it with a new one making sure it is in the same location.
Now replace the drag link and finish the headset with a new flange. rod ends and sleeves, all the front end needs is our
slant
six to fill that big hole from the bracket to the chassis, the motors come in and the owner comes, that's great, we're back and ready for the real deal of this classic. engine build bringing it to life into a classic period cruiser with its new mounts and this Duster Royal Pan and truck installed, it's time to call it quits. Yes, yes, good job. Very clean looking powertrain products sent us this remanufactured 904 automatic transmission.The rebuild process is simple: keep the original parts together, such as the valve body, housing and hardware, as if they left the factory for a more reliable unit. Now, once assembled, each is tested on your custom dinosaurs that apply force to replicate real-world driving conditions. They know it's a solid unit before they leave their facility. They also triple check all threads and fasteners to ensure proper torque specifications are achieved. Plus they supplied the torque converter to make this a package deal. A Dodge Ram 318 starter motor that is smaller and spins faster. turn on the tilt now the booster and master cylinder are the final parts for the front brakes the assembly bolts to the factory master cylinder bolts you will also receive a new power steering pump and an air conditioning compressor from Rock Auto will be supplied to the battery with We also have a new alternator from Rock Auto.
Now the newly painted fan can run and drive the three Nuvi belts to keep this Slant-6 cool. This replacement radiator that directly fits Rock Auto. You will also receive new hoses. In fact, we're done. We removed the entire engine connection, from the wiring to the fuel lines to this classic Mopar air filter, tore down the rear end and replaced the 276 ring and pinion with a 321 Yukon gear and shaft, the leaf springs little spring left. on them, so it's getting nice from classic industries and pair them with new shocks as well as for rollers, Coker Tire Mopar rally wheels with trim rings and center caps wrapped with BFG Silver Town Redline radials made by them, which will complement the color of the cars.
The exhaust is scratch built using two and a half inch stainless steel pipe from Magnaflow and an 18 inch straight muffler topped with a scoop at this point this project is finished. Wow, and just in time, it's super cool, I feel like a kid. like a kid at Christmas, yeah, well the good thing is you can take it out of your duster, put it on the tractor and put it back in the duster, it's multipurpose, how many horses do you think it's pulling, we're about to find out what those are . The red stripe tires really make the paint job pop and we didn't tell you, but when you dropped the car off, we went ahead and put it on the dyno to get a baseline, it was only making 71 horsepower.
I was that for a motor. For that age, I think I have a lawn mower that produces a little more. We're taking this one to a safe 4,500 rpm. Look at that 125 horsepower here. 161 pound-feet of torque. Wow, we're not done yet. Oh, we're not done. let's get a little more out of it oh really yes mega timing chain two more degrees of initial timing for a total of six 129 and 164 gained three foot-pounds and all the power that's impressive one last execution with two more initial degrees. for a total of 8 130 to 170, that's wonderful, 2 grades got three horsepower and six pound-feet and now you can't get used to this.
I see him rolling down the road, at full speed and now he can do it with almost double the power. He began by tipping his hat to Ken for keeping the legend of the
slant
-6 alive. An important but often overlooked aspect of engine building is balancing, and there are two types of balancing that are performed on your engine when you take it to the machine shop. The first is dynamic, which means rotating the crankshaft with weights placed on a machine to measure the balance tolerance; the other, aesthetic, means weighing all the components and making them weigh within a certain amount, since inline cranks do not require a balancing wait to balance the spin.The parts do not have to go with the crank to the mechanical workshop. Mike and I will show you how to statically balance pistons and rods yourself with some things you probably have lying around, like a belt sander, adie grinder with a few cartridges and carbides, plus something you'll actually have to buy, like this affordable Goodson balance setup. Now, doing it yourself will save you money at any online engine shop because they won't have to take the time to balance them. Parts weight now matching all of these components will help the engine run smoother and last longer regardless of the application.
With our Goodson gram scale turned on, we'll start by weighing the pistons. Be sure to pre-number them so you can keep track. of the weights to avoid confusion now what we are looking for are the lightest of the set now we record the weight of each piston and find the lightest ones that weigh 604 grams the objective is to make them all weigh within one gram of each one, so So the next step is to set up your grinder to start removing some material. Now make sure you also have your safety glasses on for this because you don't want the aluminum to get in your eyes, starting with the heaviest one which was p1 at 607 grams the goal is to lightly grind around the thickest part of the area of a pin that removes weight.
Be sure to check it repeatedly on the scale during this process. So far we have removed 1 gram, so two more must be removed to reach the weight. The lightest piston weight is 604. This is one of those operations where you need to take your time and not be too aggressive. It's easy to take out too much and have to start the whole process again. Now back to the scale and the magic number. It has been accomplished by switching to a cartridge roll, we can clean any rough edges that created the burr and that wrap around the pistons.
We only had to remove weight on four pistons because two of them had the lowest weight of 604, which is what pistons normally weigh. within four grams of each other, which is fine for production engines with our capabilities of our setup here, why not make them all weigh the same as a race engine? Next are the rods. Now both ends must be balanced because the small end corresponds and the large end. spin so they affect the overall balance differently now that's where the Goodson rod attachment comes into play. We have to weigh the big ends and the small ends and find the lightest ones like the pistons.
We'll go ahead and start with the big end precision. and repeatability are key when using the accessory. Now I will place the rod with the bearing tanks facing down. Now I'll make sure the rod beam is level and not stuck in the fixture. If so, the reading will be inaccurate. Rods with large n weigh 424. grams, the lightest large end is rod 4, which is 421. The material should also be removed to a safe place. In this case, there is a different balance pad at each end. Using our Dake belt sander, we will carefully sand a little at a time.
Outside of the heaviest, start repeatedly checking our progress to make sure we don't overdo it. Now I am going to configure the device to do the same procedure on the small end of the rod, we only need to move the bushing from the large end to the other side and practice the same repeatability and precision as before the lighter small ends weighed 180 grams and there were two Of those, the heaviest was 182, which is a close range for factory production parts. Now I will combine the weights with the lighter ones in the same way as the large end of the belt sander with the weights of the small end of 180 grams and the large end of 421 grams, all said and done the rod should weigh 601 grams and Here's how to confirm you placed the dipstick directly on the scale and the magic number.
A job well done will appear, balancing pistons and connecting rods yourself is another task you can add to your engine building skill set and plus with a setup like this you can afford it and even put a little money into your pocket to help your friends. Also remember to maintain your balance and let the tilt be with you. See you next time.
If you have any copyright issue, please Contact