Dragon's Breath Table Build
Jun 02, 2024sometimes you just can't improve on what nature made perfectly, however sometimes you can, although sometimes you can try to do much worse, it's more yellow than I expected, my name is Cam and I can't draw if it doesn't involve a ruler , it's a shape that I'm incapable of creating, but for this
build
I wanted a really unique design, so I decided to get out of my comfort zone and try to draw something without a straight line, so I made some sketches and really did the best I could. to convince myself that they were just a small avant-garde, but after looking at them for quite a while I realized that a Jackson Poock painting would probably be a better starting point for a piece of furniture, so I contacted a friend of mine, who didn't You need a ruler to make a cool design, you can make anything including straight lines, although you have a hard time cutting straight lines.
If he saw the last video of him, turn it off. Sorry if it's too early, Chris, but I asked Chris from Force. Furniture, if he could help me create a design, he came up with this and I think it's a fantastic design. Now I just have to figure out how to trim it and make it look exactly how he designed it, which wasn't too difficult, but was a little tricky without using a CNC. I should probably clarify that I'm not actually
build
ing thetable
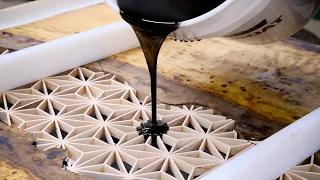
out of this thick MDF. What I'm building here is a template and building a template will allow this.
More Interesting Facts About,
dragon s breath table build...
I'm going to take a little bit more time to shape it hopefully as close to Chris's drawing as possible and then copy that shape directly onto the slab of wood and hopefully it'll be a perfect copy. Most of it was pretty straightforward. Chris gave it to me. He made me a drawing with a bunch of different angles and distances that I was able to refer to the big sweep I did with those fiberglass rods that are actually called fish sticks because they're used to fish electrical wires. I had to play in these corners. a little bit with some coffee cups and different shapes to get as close to the drawing as possible and I just smoothed everything out with a hand sander and I was surprised how well everything turned out because I had never done anything like this.

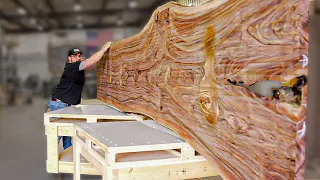
First, as exciting as Quin MDF is, I think you'll like the wood slab I'm going to use even more. This particular slab of wood is a $3000 Burl map slab, which yes, is different than Burl maple, it is actually a type. of popper tree and this one was rescued by a local company called Hamilton Le Supply and had two slabs of the same tree. There was a problem here: this whole area that is a little lighter was basically rotted. They said it was in the rain too much so this is actually very soft, the wood in general is incredibly soft, but this part was really concerning and since I wanted to try to add color to it, I wanted to make sure this didn't just soak it up. like a gram cracker, so I pulled out some dye of a random color and looked at it, it wasn't terrible, it wasn't ideal, but I think it will be workable.

I've always struggled with design and I'm not just imagining it. humility here I really think I'm pretty terrible at it, but I also don't think it's impossible for me to improve, so I work on it, I study it, I look for inspiration elsewhere, I follow a lot of different design pages on social media. and I recently came across this guy who is immensely talented and has a tragic name, we'll just call him Paul, but Paul had some of the coolest and most original designs I've ever seen and I really want to know how a guy like Paul comes about.
With this inspiration, what does it take for a great design? I didn't think he would respond to me on social media, so I did, it was kind of a joke. I asked the GTP chat. I said, Hey, respond like you're Paul and tell him. He told me the elements it takes to create a great design and I really wasn't expecting much, and they came up with this list and I read it. It's actually a pretty good list, so I'll do my best to use this list in this project and future projects to help me create better designs.
Now I have to say that my favorite point on that list is the collaboration point because I initially thought that using Chris for the design was some kind of cheating, but apparently I'm a great designer because we collaborated on it, we sat down on a video call, I It gave a lot of shapes, we moved the lines, I would say wider, shorter, longer, softer, things like that and finally the two of us came up with this design together. as great designers I just wish I had known about this when I was in school because I can't tell you how many times I collaborated on a final exam, it wasn't always consensual but I could have told the teacher I'm just taking design inspiration it's not really cheating it's like the moth in uh uh sounds in the lamps you don't understand the reference some of the viewers Scott never understands my movie references because he hasn't seen any movies so I hope some of you come out Really appreciate it and anyway, The first point on the list of what makes a great design is purpose: does your design really serve a function?
And I'm delighted to say that this has a purpose, first it will become a desk, but I think it has an even greater purpose than that because it will become a desk that belongs to one of you because in the end I'm going to give it away and everything related to this giveaway it is free, it is free to participate, shipping will be free, everything is free. So don't let anyone fool you in the comments by saying that you've won something and all you have to do is pay for shipping because that happens all the time and it's really very sad, so if you see this happening don't hesitate in helping. people because I will never ask anyone for money for one of these gifts.
Plus, this will be the biggest gift you've ever given. There are a lot of other things. I don't want to spoil all the details now, but there is a link in the description if you want all those details about this giveaway, it's close, luckily for me, that list about great design doesn't say anything about the craftsmanship, so you can ignore with security the fact that that board was cut 6 inches short and all the overuse of putty because I'm still in design mode here. I haven't fully switched to Craftsman mode but to fill this crack I'm using a faster curing epoxy than deep epoxy, this stuff cures in about a day and to get that black color I tinted it with charcoal which is really cool because it doesn't dissolve into the epoxy and it doesn't penetrate the wood, and this wood is not only very light but it's also incredibly soft, which is absolute.
Worst combination when it comes to potentially staining wood, so in the end, although I think this charcoal and the faster curing epoxy did a very good job of keeping that color from bleeding initially, I was tempted to sand and scrape this level of epoxy, but because The epoxy is very hard and this wood is so soft. I decided it would be worth heading into creative woodworking. Use your big wide belt sander which will ensure that the epoxy and wood stay absolutely flat and will give a much better result because I don't care how careful you are, if you tried to do this by hand you would always get a humped area and the wood would I would eat a little faster, so I think it was worth the trip.
If you haven't noticed yet, this
table
will be quite inspired by the guitar industry and the next part that I will try to incorporate was not part of the original design, but the more I looked at this great length it really reminded me of the side of a Fender guitar and I don't know if you're a guitar fan or not, but on the back of the guitar there's like a little relief on the body carved into that thought that could be really cool. on a desktop, I've never seen it done this way before and it could actually serve a small function as well, which I think is on my checklist of things that make a great design, so here's how it looks to me came up with the way to cut this.Relief I just did a bunch of measurements that go down an eighth of an inch or I think a 16th of an inch at a time. Now I'm going to connect them slightly with this precision ruler I found in my firewood bin. If anyone doesn't care about a piece of furniture I make, there are essentially an unlimited number of ways they can express their feelings about that particular piece and sometimes , I'm a little impressed or at least a little amused by what people come up with and The other side of the coin is that if someone likes a piece I make, there are really only a few versions of compliments I can receive.
The first one is beautiful. I would love to have something like this in my house and I would say something like that. a walnut table would fall into this camp. The flip side of that is oh, that's really cool. I've never seen anything like that, but I definitely wouldn't put that in my house and this is where I would say something like that blue end. The table I built a few months ago would fall into that camp and the next one, I don't know, it's actually a compliment, but it's kind of an overlap with the first one and it's kind of like yeah, that was cool the first 20 times I saw it. and I understood, it would be something like the black epoxy and walnut table like the one I built, you know, 40 or 50 times the Holy Grail, although the one we're always looking for is the, oh my God, that I've never seen anything like that and I would love that in my house.
I don't know if I've ever done anything that falls into this camp, but that's what we always strive for and honestly, if I look at this piece. and what I'm imagining will probably be in that second camp where yeah, that's cool, but I probably wouldn't want it in my house. The router bit I'm going to use on the bottom of the table is the largest. The bullnose bit I have is 7/8 inch, it's pretty big and if you want to know what metric is, I don't know what metric is, you'll probably have to look it up, it's probably impossible. simple as two or something that easy because everything in the metric system has to be easier, but in the United States we like to show our elementary students that the mathematics they are learning now they will need for the rest of their lives and I am surprised that American keyboards don't come in italics in that sense, but I guess that's the price we pay for indoor air conditioning being standard after editing my last video.
Scott came to me with an interesting question and said: How many total audio takes do you think that is? It took you to complete the voiceover for the last video and I know it's a lot of work, a lot of people think I'm better than me at this voiceover, but trust me, it's a lot of work, so I said. I don't know 300 takes and he said 750 takes total and that didn't surprise me at all and you're listening right which meant I had to stand at a desk for about 10 hours just to do the voiceover and it took about 750 individual shots.
It's needed to get a full voiceover for one of my videos, which makes for a very long day and why I love having a desk to sit at, because I'll sit down and edit a bit, then get up for the section. voiceover and I'll just go back and for that whole 10 hours and if you're curious, the last sponsored video I did was almost two years ago and it was a flexible place because I don't take on a lot of sponsors and if I do, it has to be a product that really use later. I fill as many cracks and small holes in the Burl with the glue sticks as I can.
I give it a light sandpaper and see what's left and what's left is usually a lot more holes, so this is the next stage to fill those holes. little wax filler sticks that are basically exactly what they sound like, they are filler sticks made of wax, kind of like a crayon, so I hit them with a blowtorch and these do a very good job of filling the almost impossibly small holes, but again it's necessary Make sure you use a clear coat finish on top of this and you can see how many of these holes I left there, but I was determined to finish it off with this filler bar.
Need another filler bar? You have someone. to the left of here it's getting a little plump we have others in the drawer I have this one too but I don't want you to get burned How could I get burned? I'm thinking about that angle. You got into my head. I was I'm very close to finishing. Look, I think I made a filling. Now I should explain why the giveaway I'm doing in this video is the biggest one. giveaway that I've ever done, as I mentioned, I'm giving away this desk, but I'm also giving away five of the 10 tables from my last video, my last video, I built 10 tables out of denim and epoxy and I'm giving away five of them and all of the Anyone who walks in just to walk in will have instant access to my epoxy table guide, something I normally charge like 15 bucks for, so everyone who walks in will have free access to it again.
There is a link in the description below. The process of bleaching the wood before coloring has me quite excited but also a little nervous because the guitar maker who helped me color these woods and in the past specifically told me that he does not do this and does not recommend it, however, I. I'm going to go against his advice and try it anyway. I think this is on my great design checklist. Innovation, right, or that's what we'll call it, but this is my theory:This wood has a really brown tone. Look I've had this problem in the past when you add color to Brown it just turns into a cloudy version of that color so my idea is if I can remove that brown and then when I start layering and adding those colors it just I'll get the true true color and none of that kind of muddy brown, but this is all kind of logic I've used in the past. and sometimes it works, sometimes it doesn't, however what works is this wood bleach, this is very good and one way to look at it side by side, it's shocking how much lighter it is and this only took a few minutes to to be applied and then dried. so now all I have to do is make sure that this logic is actually applied and working when I add the color.
I still didn't know what color I was going to apply or what that color would look like on real map samples, so I built a bunch of miniature mappa table samples and yes, those are the same wood and yes, they are actually made by hand. scale from there. I made a bunch of different die cuts with trans dyes and this is just plain old tap water from there. the first layer is a little thick. I learned that if you make it heavy and then sand it back in the additional colors, you can get some cool effects, but I didn't like anything I came up with so far and Scott was helping me on this, we were picking out some colors together, but I don't think he really loved anything.
I know no, it really wasn't the effect he was going for. He would come back and add another one. layer and just keep fading these out, there's a little bit of purple and gold, which was pretty strange, but I finally came up with something right after you left, I kept building up the color that we have like orange and black here, we built up some shellac to let's have a nice shine uh I want a little LSU theme I like it uh I don't think you really do I think you're being polite um because I don't like uh this is a lot a little Too similar to the side table we made, yeah, like that So this is what we got, this is called Dragon's Breath.
I think that's the term. Okay, I like that I did several different iterations, like using bleach and all this, but they're all essentially dark red to red. to orange to yellow and then I think this is uh, I think this is what we look like, what do you think? I think I agree. That looks a lot better, yes, a lot more variation, yes, and we don't want to be associated with the purple color of the SEC. It's the first time we've had SC to cut and I agree that the bleaching process did a pretty aggressive job of raising the grain, like when you wet a piece of wood and it gets fuzzy after it dries, so I had to do a nice thorough sanding job to make sure everything was nice and smooth and as I was getting ready for the actual die work I realized that Scott didn't really trust my process how sure are you that yellow is the way to go ?
Are you asking because you're not? I'm sure yellow is the way to go, it just looked a little bright on some of our swatches, it looked bright, I think as long as it's not too heavy and we follow what we did with the swatches, I think it's Se You will see very well, it is more yellow than I expected. I can positively say that some emotion was evoked when I saw this yellow and I don't know if it was a good emotion, but I do know that the emotion is on. my checklist of things that make a great design so we can check that one out of this build but even though the yellow was the same process I did on the samples I was hesitating so at the top I decided to do a process different. and what I'm doing here is I'm adding this orange and since it's been bleached and I'm hoping it gets that really true orange color, I'm going to sand almost everything near the center and all that. what's left is the orange in those deeper holes, so in theory I'll get a kind of pure yellow and pure orange without any of that muddy brown, but again, this is kind of like thinking about the logic that this whole process of making seemed like. death. like it was two steps forward, two steps back, sometimes two steps forward, three steps back because I liked the way the yellow and orange looked, then I added this and it looked terrible again and it didn't I don't think anyone could say it better than Scott here.
It sounds like you told a kindergartener to finger paint the sun, that was pretty well said by Scott, but if I were a kindergartner who was finger painting the sun, I might be offended now, so direct all that anger at Scott and usually when you're staining a piece of wood, especially a harder wood like maple, if you don't like the look of it you can keep sanding until the color is gone. The problem is that this one is so soft and so porous that I'm not so sure I can do it. I will be able to remove the color if I apply it wrong, especially on those tips of those type of horn pieces, that's where the really rotten pieces were still left and I was really nervous about adding color to that section, but I kept trying.
To soften it I added a little bit of water here and I found that the water really helped that transition between the colors based on all the guitars I looked at and the samples I made. I knew I wanted a really Dark Edge sound. I feel like the pieces that had that almost black perimeter were the most striking but again this is where it's riskiest because if I put this on too heavy or it doesn't look good overall it may not sand and I know that generally my projects turn out pretty well, sometimes they don't, but for the most part it seems like I know what I'm doing, but I can assure you that I don't really talk in the comments about this being like Bob.
Ross sometimes and I think, oh wow, you totally knew what you were doing and you saved it while I'm doing this now. I don't know if I'm going to save it like I think I will, but it also seems to me and I get nervous every time I do this, what do you think? um, very shiny, uh, yeah, okay, okay, let's sand again, we have, we have this as usual. Scott's silence said it all, but in reality he simply reaffirmed what he already knew. which didn't look good and there's no guarantee he's going to make it at this rate and without trying to be too dramatic.
I generally feel that if you keep pushing a project you will find a way to make it work. and I'm still sure I can find a way but as I sanded it and added more red it just didn't look right so I decided to try this, this is just a sanding block. I think the power sander was removing too much color so using the hand sander will allow me to really control how much I'm removing and that way I may not be able to remove all the red, I'll just remove a little bit, it helps. control that gradient from orange to red and this was actually Scott's idea here, he said adding the red might have been too much so we just added this orange on top of the red and that's the same orange that you see below, but when it was overlaid about that kind of half sanded red was starting to look really cool and this is where I was thinking, well we can do this, this could look good.
The last thing I noticed that didn't look quite right was that straight strip there where we curved around the edges and what I did was use the hand sander again to give it some sort of radius so that it just reaches a little point there, a little point at the end and again, hopefully, if I do. this with enough control and enough restraint, don't say too aggressive, it's going to look good again adding just orange here, so the orange over the dark red over the red was really starting to bring this home and I think I almost had it here.
If you weren't already aware of this, the 20-minute mark of a video is generally considered the kind of third-party equivalent when it comes to whether or not to escalate a relationship to the next level, so if you're considering subscribing to the 20-minute mark. minute Mark or 21 minute Mark may be a good time, however, if you are a little more old fashioned and want to take it a little slower, I want to make sure this is consensual. I don't want to pressure you to do anything. I don't want to do it, take all the time you need if you want to subscribe if it's meant to happen, it will happen, but know that I'm here for you and I'll be ready when you are, that's just how I am.
Addressing the really soft nature of this knot map, you can see those spikes there where the rotted wood was and it's absorbing even more of this epoxy, so I'm just traveling it off letting it absorb by hitting it with the torch, which heats it up. , it dilutes it and makes it absorb even more epoxy and I kept doing this until it didn't absorb any more and although this is going to have a very hard clear C coat on top, it's like for a clear coat, a Saltine, that Saltine it would have a hard clear coat, but if you dropped something on it, it would dent or break the saltine and the same thing would happen here if I put that clear coat on it and you dropped something on it, it would still dent the soft wood underneath, so this should give a good base solid for that clear coat.
In the end, I did two more coats of that epoxy just to make sure this soft mappa absorbed as much as possible. I tried to eliminate as much as possible. I could, but there were still some drips on the edge, this makes me a little nervous because you run the risk of sanding the color if you put that epoxy on the color, it's a little difficult to repair it and really make it look natural so smoothly. As best I could, I got it right and sanded it to make it as smooth as possible because I'm spraying a 2K acrylic and I don't know much about spraying.
If you've seen me spray in the past, you know I'm pretty. terrible at it, but like everything I'm working to improve, 2K acrylic is great because it's a two part finish, kind of like an epoxy where you add the activator and it cures much faster and this is just the sanding sealant , but it is dry. to the touch in about 15 minutes, which is good because if you look at the day I chose to spray, there's a lot of stuff floating around, so I can't waste the extra time sitting wet and again, like I said, I'm not very good at it, but I am working to improve slowly.
I knew I was going to have a few more holes to fill before I even started spraying, but I wanted to have a little more safety net, so I added two. layers of that sanding sealer and now I can see very clearly all those little holes that need to be filled and two, I have a slight protective barrier between my scraper and my sander and that color because, again, if I use a little too heavy With my hands I can scratch that color and can't really repair it, so having the sanding sealer there should give me enough cushioning to protect me from completely ruining it at this stage.
I know I said earlier in the video that The best likely outcome for a project like this is a project where someone says, "Oh yeah, that's cool, but I never want that in my house" and I'm as critical as anyone when It's about putting something in my house, but I spent a lot of time. Many hours looking at this because there were so many imperfections that needed to be filled in, there were so many coats that I made here that I started to wonder if this could be something that at least I personally might want in my house and I'm not there yet, but I really liked how this was forming.
I finally got to the top coat stage, got through the sanding sealer and got to the last coat and this is not a sponsored product. The one I'm using here is a 2K acrylic from a company called rener. I'll link everything I use in the video in the description, but nothing sponsored unless it says sponsored and this is the trigger I put in. I think a food scale does a very good job of measuring everything and I've been told that a little bit of water, just a splash of water, makes a big difference, but I don't recommend doing that with an oil-based finish.
Make sure you use a water-based finish if you want to do this. The last thing I do is just wipe it off with a tack cloth. My friend showed me this. Painting cars makes a big difference and again don't copy my style for applying the finish. I'm still learning how to use this but I found that having the version diluted in water with this makes it much thicker and much smoother it really lays flat and you can see it looks a little purple as it goes and that's just because it has a kind of blue tint until it dries and in the end it won't look like that don't worry the last thing I did before placing it on the base of the table was to make sure whoever wins is set up for success so i did a quick application of N3 Nano just to make sure it's safe from spills stains scratches kids uncles in laws on parole whatever one day for sure flexi spot asked me to help them promote the most stable table base ever have offered, the E7, can also lift over 400 lbs and That was the table base that was originally going to go with this table, however, once I put it on there, I realized it was too locked and extended I moved my hand to the flexible point and said, Can I put the other table base there? the same one I have on my desk so they sent me the modern version and said yes we have a table base for everyone which is great so if you want super heavy duty you can't budget with a tank getthe E7 plus if you want.
I want something a little fancier as I have the E7 Pro or the E7 is a great option. They all come with a 15-year warranty. You can add all kinds of accessories like the ones I have on mine. I have monitors. I have cameras. I have lights. and they are offering a brand on sale at flexispot. There is a code Blacktail 50. If you want $50 off your order of $500 or more, head to flexispot outcom. If you've seen my videos in the past, you know I'm never embarrassed. give my real opinion on a project I build, if I don't like how it turned out I'll just say I don't like how it turned out, I never think I'm going to trick someone into enjoying a video more by simply saying look how amazing it looks if in reality Doesn't it look amazing you guys have eyes, you can also see the projects that said: I love this piece.
I don't think I would actually put this in my house and I never thought I would say that when this project started, but I don't know if I'm alone there so let me know if you would actually put up a piece like this. your house too or is it just me my name is Cam and I can't draw I'm so exciting luckily that list on luckily that list luckily that Lu luckily that list about great design didn't say anything about great craftsmanship craftsmanship if you haven't already picked this up sake if you haven't collected it yet
If you have any copyright issue, please Contact