Making SmashBurgers on my Blackstone! Quick and easy tips and tricks for the perfect cheeseburgers!
May 01, 2024What's up guys? I've gotten a lot of requests from people commenting saying they want to see me cook on the 22 inch black stone and I just haven't had time to make a video so I guess my first video is The most popular thing people will do on the Blackstone griddles is smash burgers. I have now used my iron several times. I've learned a few things along the way. Now I'm just warming it up trying to prepare it. As you can see, many of you know it's been used and it's a little dirty, but you know the flat top is clean, but yeah, it's been a learning experience.

There are some things that a lot of guys on YouTube don't really point out, so I'm trying to point them out as we go, especially with the smash burgers. It took me three or four tries to get it right. It's not as
easy
as people say. but we'll go over everything and hopefully people will learn a fewtips
along the way. First import number one, the most important thing is to make sure everything is ready if you don't have everything ready in advance and you are going to fight and search for things whilemaking
it forget, it will be a disaster because they drive very fast if you don't have everything ready in advance if you cook them too long, even if it's like a couple of minutes too long, it's over, you know, because you know well, we'll get into the whole crushing aspect a little bit later, but now let's go over the things we have here.
More Interesting Facts About,
making smashburgers on my blackstone quick and easy tips and tricks for the perfect cheeseburgers...
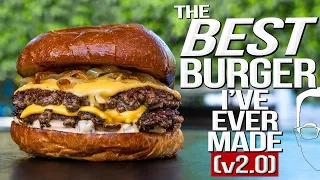
I have my spice mix, this is salt and pepper. garlic powder and onion powder, the ratio is two, two, one, so two salt, two black pepper, one garlic powder and one onion powder, as long as you get that ratio right, you're done. I don't have wax paper today, so I'm using a wax coated cardboard, it does the same job. Whatever works. I have six brioche buns. We'll make six hamburgers. I've made up to nine burgers at a time on the 22-inch black stone, which is more or less. the upper limit now I make my burgers pretty big um these are five ounce burgers and I smash them not too thin and I'll talk about that a little bit later um I have four cheeses because I'm
making
fourcheeseburgers
and two patties and I have my butter in there to pre-brush the grill when I put my uh oh oh stay away when I put my rolls down and I also put a little bit of butter when I flatten the meatballs so Now when it comes to flattening the meatballs, I'm not going to flatten them out like they're thin like paper.
The thing is that they cook too
quick
ly, you get a nice crust and everything, but they cook tooquick
ly when you flip them. the cheese, put the bread on top, you know, it's like it's cooked and the cheese doesn't really have a chance to melt, so I'll show you how I do it. It's a little different from the YouTube people. Oh well. some of the other people on YouTube, but I hope it works for you, so without further ado, let's get started. I actually have the Blackstone running. It's been getting hot while I've been talking, so I don't know if you can see it on camera. but you're starting to see a little bit of smoke coming out so it's really hot right now so what I'm going to do is put the buns in first, toast them, set them aside and then make the burgers okay so the grill has been on for a few minutes, let's say about five, maybe 10 minutes, even it's really hot, so I'm going to put the butter in first.
I have a stick of butter here. This is the easiest way, I thought. You could do it, you just peel it off, peel off the paper a little bit and just rub it. Oh, a little bit of water comes out because I actually took them out of the freezer, but anyway, I give him some of this. just like that 10 11 12. okay, leave that, let him put the rolls on us, just roll it up, it absorbs most of the butter, it's good toast and it happens very quickly, you'll see, I bet you this side is already there. ready for when it's almost there, you see you see how fast it was, it's literally like just a couple of minutes, look they're toasting, nice, look at that, oh, that's good, one has a little way to go , but these guys I could take.
I'm not sure these guys are probably done yet. As you gain experience, you will also know which ones. I see that one a little often, but you have more experience with where the hot spots are on the grill, so this is it. I've got a little bit of a way to go This one's got a little bit of a way to go a little bit more a little bit more so you can move them around and get a nice toast, the middle seems a little bit hotter than the corners, so this looks pretty good, It's hot, it looks good and it's okay, if we go over it a little bit, it's not a big deal, it will still taste good, there you go, it looks good and that's it, buttering and toasting the rolls is actually very
easy
, okay? ?Let's do the star of the show, which is the burgers. Now the heat is very high. You see, it's very hot. First we will add the butter, not a lot of butter, but a little, just so that it gives. a little bit of brownie a little bit of flavor there okay, we have our six places and we also have a little burger for me, get a little bit more, okay, if it's burning, okay, it's going to have a nutty flavor, okay, put down the meatball you hear that sizzle wax paper side down wax wax side down first give it a push I don't push it down super super thin because I don't like my burgers squished paper thin they come out about a quarter size inch thick just like that then push it down, hold for about five to ten seconds once you get the desired thickness and then remove the paper.
Okay, you'll repeat this process first of all before I forget to season it. Okay, let's do the next ones and so will I. Sometimes I like to put a couple of holes in them if they don't, uh, if you don't see any air pockets in there, if you see some air pockets like this come out, you're okay, look, that one didn't get much air. I put a couple of holes in the pockets because you'll see when the juice starts to come out through the meat, that's when you turn it over, season the next one and hold it for a couple of seconds, let it have good contact, take it out and season.
Look at these guys ready to flip, so I'm going to flip this guy. You see the juices start to rise from the top, there you go, ready to get ready, get ready to flip this one. You see that crust there, that's what you want. I'm going to put cheese on it. I'm going to put the top bun on it. It's going to act almost like a syringe. Same with this guy. This guy is ready to flip a good crust. Oh, you see, I forgot to season one side of the other. So let's make this one season cheesy bun ready, this guy is almost ready to flip.
I'll take the others down first. You have to move fast, guys. The spatula sometimes gets a little hot. Well, turn that down. Okay, put this guy down. okay, okay, now we have our little guy, I'll stick him somewhere in here, squeeze him in there, okay, season, make sure you don't forget that season has to move fast, okay, this guy is ready to flip, let them I'm going to flip a nice crust there. season the bun with cheese ready, this guy is still a little, don't you see, it's starting to bubble a little, but it's not ready yet, this guy is ready, I'm going to take it out, this guy is also ready, let's take them out, remember that everything is on high heat before it's even on high heat, so this guy has to go a little further.
This guy is almost there. I think he is more or less. This one is a little thicker. I didn't crush it as much as the other one, so take a little more time, but the juice is starting to come out. I'm going to give the cheese a spin. Oh no, it's not cheese. First season cheese bread. This guy is ready. I'm going to tear them off. There you have it, okay, let these guys go watch the bubbles start to rise. There you see those bubbles starting to appear. That's almost like an indicator that he's ready to turn.
It's not yet, but I want to get a little stronger. The guy is almost ready, I'm going to take him out now, our four
cheeseburgers
are ready. Okay, now we have our two burgers and our extra cool to go. Well, I think this one is ready to turn around. Not bad, give it a touch of seasoning. that guy will be ready soon this guy is ready to flip there we're going to give it a little seasoning and then we're almost done we're going to let this sit for about a minute, take them out and we're almost done.I forgot about the little guy, he's fine, I don't think he sees anyone inside, but he's fine. Actually, I'm going to put out the flame. Now I'm just going to let it cook for the rest of the time. It's going to take about another minute and then I'm going to put them on the buns, look at that color, that's what you want, some of it comes from the butter, most of it comes from the reaction that the reaction from my garden that gets the meat gives it a really flavor. nice, so I'm going to take this out now that we're almost done, give that one a little more, it's kind of in the corner, it's just not quite cooked yet, but I'm going to turn the flame on. a little bit on this side, so I'm going to let it cook and we're almost done with these guys, so I'm going to take you inside and show you what it looks like, so here's the finished product again.
It happens very quickly, I made four cheeseburgers, two hamburgers and a small burger in there and in total from start to finish, probably less than 10 minutes again, you have to get everything ready, make sure everything is set up and you just have to move quick because these things cook very quickly now I don't flatten my burgers completely uh I don't make them paper thin because in my experience I have noticed that they dry out a little if you flatten them to the point where they are thin, but not as thin as the paper, you can retain some of that moisture from the meat and still get a nice little crust, so I'm going to cut these out and show you what that looks like okay, so here's the burger with a decent thickness. to break if I squeeze it you'll see that juice you'll see that you'll see how nice and juicy it is if I squeeze this side you'll see that it's like you'll see that it's still preserved, it's fully cooked, which was what you wanted for the burgers for ground beef and uh, still It's juicy, so this is my way of making smash burgers, guys, if you find any of the
tips
in this video helpful, I'll give it a squeeze so you can see, you see that juice, right?There it is, it's kind of fat and juice, but it's everything that's good about a cheeseburger, it's not supposed to be healthy, so, um, but yeah, if you like this video, if you learned some tips, if you watched some of the techniques. use, you know maybe you saw in my video that you didn't see in other videos, please comment, subscribe to our channel, we will post more content as we get more experience with Blackstone and also as we learn some new recipes. Again, I appreciate your comments. If you think this video is helpful, please let us know.
See you soon.
If you have any copyright issue, please Contact