UTILITY, MUDROOM, PANTRY, LAUNDRY & COFFEE BAR ROOM MAKEOVER
Mar 30, 2024Hello everyone and welcome back to my YouTube channel. My name is Lorraine Rose. If you're new here, be sure to hit the subscribe button below. It means a lot to today's video I made about a client's
pantry
and cafeteria. Parking thisroom
, as she likes to say, works very hard. I thought that was a good way to put it. I mean, she uses thisroom
for so many different things, so it was just a matter of making it work much better for her. all this stuff off the floor, this is herpantry
area and I came in earlier in the week and I went through all of her food and I put it in the sections that I wanted it to be housed on the shelves and That's something that I would recommend you do when you go and to organize a space, create sections and then put those foods back into the spaces where you want them to go and that will give you a better idea of what kind of organization you have.
I'm going to need that space and then this is the
coffee
bar area and when you come back here you have thelaundry
area and then on this back wall she keeps several different items and we'll go over all the items and how I decided. to categorize them into each space as we go through thismakeover
, but without further ado, let's jump right into the video. The first section I worked on in this room was the cafeteria station and that's something I would recommend you do. Don't feel like you have to take on a whole space at once, you'll probably end up feeling really overwhelmed, just pick a section of a room and start there, so that's what I'm doing.
More Interesting Facts About,
utility mudroom pantry laundry coffee bar room makeover...
I'm starting with a
coffee
shop station and basically all I do first is remove everything from this station when you go to organize a space. It's very nice to start from scratch and I imagine it as a canvas, a work of art, it's much easier to achieve. creative and innovative when you have a clean canvas to work on, so that's the first thing I do. My client, who is also my dear friend, gave me a really healthy budget so I could purchase organizational things that would really help this space. It works best for her and her family, but if you don't have money to spend on organizing things for the space and all you can do is clean it like you see me doing here, then that will be a big help, so don't do it.
I don't feel like if you don't have a budget to spend on things you can't organize a space, what I always recommend you do is do what I'm doing here, empty everything and then deep clean that space as you see. I'm doing it and then just rearrange everything back into that space with the things you already have and that way you can start saving for the things you want, but at least you have a space that you like a little more than before, so that is the next thing I'm going to do, I'm just cleaning up this cafeteria station and now I'm ready to rearrange everything again, so for the cafeteria station I basically drew at home how I wanted.

Set everything up so you have your Nespresso coffee maker here and then your coffee maker next to it with your coffee grinder and then this will be like a decoration moment in the middle and then on the right we have her steaming her coffee filters. her coffee, her sugar jar and a spoon holder and then this is how I'm going to place everything on the inside of the cabinet and then down here is where I'm going to decorate her book, so let's go ahead and do that. now, but this helps me remember where I want to put everything.
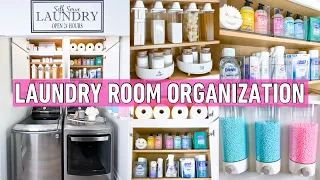
Hello, people ready to make another one. At that time my husband showed up and was actually building some shelves for her for her
laundry
room area and one thing that I want to tell you is that when you go home to put things in any type of glass jar and you take them out of a package where they may need the label that is on that package, simply cut it out and place it on top. whatever you're keeping in that jar and that's what I did for her because sometimes when we buy labels they don't say what we need them to say, they're more generic like almond flour or tea, but that's not the case.I don't say what type of tea, so I didn't label these jars. These go inside her cabinet at her cafeteria station. I just went ahead and did what you see me doing here now. The reason I like to keep things in containers and storage. containers and jars is because it forces you to maintain that system and keep it organized, for example when she goes to buy more tea bags, she can't just put them on the shelf somewhere. I bought her a tea bag organizer so she can keep her tea bags in there and I think that encourages people to be more organized and honestly, my friend is very organized.
This client, her house is so beautiful and so organized, I really don't feel like she needed me to do this because she's so talented herself, but she has little babies and sometimes it's not a matter of you can't do it, it's just a matter of finding the time to not feel bad about having someone come into your space and help you function better. For you, that's something I love to do for my friends is take their homes to where it works best for them, especially for moms, because sometimes they just need help and they don't feel bad about asking for help.
Well, now I wanted to be able to do it. I created some custom labels for all the baskets and storage containers I bought, but sometimes those basket clips can be very expensive and then you have to buy the labels that fit on those basket clips, so what I did was print my own . labels and I used some thick cardstock and then I just cut it out and put it on these labels that I got from hobby lobby and my client said she really loves the color sage green and this is the only part of the
makeover
. where I added a pop of color and it went to the label, so as I organize everything throughout this makeover, you'll see how I add these labels to different containers and baskets that I bought and that's an inexpensive way to add some really pretty organization . labels a space you have without having to spend a lot of money.I wanted to add some extra storage for my client to her laundry station and so my sweet husband was able to build this beautiful rack for her, this is so simple. and it's very easy to do, I mean it makes it look simple, but yeah, that's something I would recommend: if you have a laundry room, try creating some open shelves and that way you can organize all the items in the laundry room in those shelves in a beautiful way where not only does it work for you and there are things that you use, but it's also kind of a work of art, so we're going to continue to show you that in the works throughout this video for the station.
Cafeteria. And I put all of their Nespresso capsules, all of their loose leaf tea, and all of their stevia packets on the left side on the top shelf and then in the middle section I have four boxes of tea, so the back is where I placed it. tea bag that she uses to make iced tea when she's hosting and then her two front storage containers will be a tea that she could use more on a regular basis and then I have one that's empty and that way she can add to her tea collection and she won't have to feel limited and then on the right side of the coffee bar is where I placed all of her smaller coffee sundries and she has this bottle of allergy mix along with this bottle of thieves and she already had that she had those labels so I put them in front of the bins but inside those little boxes is where I put all the miscellaneous items and then on top of those shelves is where I put all of their coffee cups and on top of that the bottom shelf is where I put all of her cookbooks and just color coordinated them so I did white and then I made some of the books more cream colored and then I ended up moving this a little bit later in the makeover but that's just a tray which I found at the thrift store and then here is the right side of the coffee shop station.
I kept the rest of her books here and then she already had these two containers so I put her hot chocolate in one and her little mini marshmallows and another and put it here behind her books for a little decorating moment and then I bought her these two coffee bag clips. They're great because you can clip them on your coffee bags but then they also serve as a scoop for you and I just put them on top of your books as a little decor moment and then I found these super cute little goodwill cutlery and I'm putting them on top from the other books and I like to buy things that are decorative but also have a purpose, so I'm really pleased with how this space turned out and now before we move on to the pantry, I'm going to go ahead and put everything back in the top of coffee. bar station and I just used a couple of cutting boards that she already had and she went ahead and oiled them so they looked really nice and I used them to cover her wires and then one thing that I bought that I'm obsessed with I'll link to next are these beautiful simple syrup jars, they are glass with glass spouts and they are very pretty and these simple syrups are things that she keeps on her coffee station station so I thought this is a great moment not only for As I said before, keeping something in a container that serves a purpose but also serves as a decorative moment and that's something I always like to stick to with all my makeovers, is that I want everything to not only work and They have a purpose, but I want them to be decorative and that is something I try to implement even in my own home.
I don't like having a bunch of decorations and knickknacks everywhere that only serve as decorations. I want them to really serve. a purpose and in that way forces you to create a more minimalist home where everything you have is something you actually use on a regular basis, but yeah, I love them so much that I think I might have to splurge and get some. For me, these were a little more expensive, they were one of my splurge items for this space, but I figured you know what they're worth. Now that the cafeteria station is finished, we'll go ahead and move on to the first shelf. as you walk to the left this is how I laid out everything so now let's go ahead and organize it nicely guys while I'm organizing this pantry section I'm going to explain to you the order in which I placed everything in your pantry just to give you some ideas for your pantry, so on the top shelf I went ahead and made a keto basket for all your keto foods and then a supplements basket for all your keto supplements.
They are trying to transition to a keto lifestyle so I wanted to incorporate it into their pantry and then right next to it on the top shelf I went ahead and put a basket for all of their bulk foods for the things they don't make. . I couldn't reach regularly and then just below the top shelf I went ahead and placed on the right side four jars with all their candy inside. My client's mother-in-law gave her some bags of candy so I thought it would be a great time to have a little candy station so I made it for her and then right next to the candy station I put a basket that I had used and I put the remaining candy in that basket that was too small to fit in a larger jar and then what I did was I put all of their canned goods in separate containers, I just categorized them all and then I put labels on them, I put a good can label and then for the rest. of them, I did four through nine and what she can do is write a list of what is in container number four, what is in container number five, etc., etc., and then she can print that list and tape it or hang it.
That way, somewhere in our pantry, you have a good inventory of what's in each numbered container and you know what you need to restock when you go to make your shopping list, if that makes sense, and then on the shelf below where I placed all. her canned meats in one section and then right next to it she had an organizing container where she kept all her packages of meats and then on the right I put a big basket and that's where I put all her bread and then on the right side of that is where I placed all of your baby's food in clear storage containers.
She requested that most of her containers be clear and I will link the labels I used for this pantry below so you can label all of the clear containers and then on the bottom shelf I went ahead and put a basket for all of the foods from your dinner, so when you want to make dinner you can go to your pantry and look in your dinner basket and it just has things like pasta and things like that. that you can use to make dinner and then next to it I have canned goods that are for dinners like chili's and things like that and then on the rest of that shelf I put all of her oils and vinegars, I keep the ones that she probably uses most regularly in a turntable, it's a clear turntable and then next to it I put some larger clear containers and that's where I put the rest of your oils, vinegars, dressings and things like that and thenright under that shelf I went ahead and put all of her baked goods, everything she probably uses for baking in storage containers and labeled them and then on that same shelf I had a separate basket for all of her breakfast foods and then another basket right next to it with all your breakfast condiments, like syrups, jellies, and so on, so you have one basket that you can go to when you want to make breakfast and one basket that you can go to when you want to make dinner, and then on the bottom shelf, I put a basket. with all his snacks for his son and then I also put some of his snacks in jars and I also put all his s'mores in jars in that section and then the last thing on the last bottom shelf is where I kept his products and that's how I organized everything in this pantry and now that the pantry and the coffee bar are done, we're ready to move on to the end of this
utility
room, so while I'm going through this shelf back here, I'm going to explain to you the order in which I placed everything on this shelf back and this is where you'll see how this whole space works really hard like my friend said on the top shelf I went ahead and put all of her bulk toilet paper. towels, her bulk items like she also had some ziploc bags up there and then I went ahead in the middle and put a big pot when you first walk into thisutility
room on the floor on the left there was a bunch of different A lot Some of them were, you know, things that she cooks with, but not on a regular basis, so she didn't keep them in her kitchen, she wanted them here, so some of these larger pieces I honestly used as decoration moments, so that instead of the top shelf being just a bunch of paper products, in the middle is this beautiful pot and that's how I divided all those things that were on the floor there in the utility room into this back space here and then on the shelf.Right underneath I put two baskets, even though they were baskets, they were black metal and were transparent, so it gave the illusion that there was organization, but I could still see what was in each basket, what I wanted and when I had it . stuff on higher shelves like this, it's nice to be able to see what's in the baskets anyway, so this is a great option and I bought them at Target, they were eight dollars a piece. I'll try to find and link them below for you. but basically on the next shelf, I went ahead in a basket and put all of his cleaning cloths and then all of his cleaning wipes and his duster refills and things like that and then next to that I put his vacuum sealed package and his vacuum cleaner . seal bags and then in the smaller empty space next to it I placed a large punch bowl that she had with little glass punch bowl cups, so again it's something that you don't need to keep in your kitchen because it's not used all the time, but it is a great spot for the back of this utility room, that's where I tried to store all those kitchen items that are more seasonal on the shelf just below, where I put three of those same black metal baskets lengthwise. of that shelf and that's for the bulk foods as well as some of your bulk non-food items, so two of those baskets are for the remaining bulk foods that don't fit on the top shelf of your pantry and then the third basket I put your bulk trash bags and then in that basket with the trash bags I put your bulk baby wipes so it's like a bulk section on that shelf and then on the shelf right below where you have your microwave and then in the middle. of his microwave and the basket that I'm on that shelf, I put a cardboard box and that's where I kept all the documents that went with his washer and dryer, all his larger kitchen equipment, things like that, everything is in a box in a. section on that shelf and then in front of it I put a knife sharpening block because on the left I put a basket for all of your husband's things including his knives, his grilling equipment, any tools he may have, there's a basket just for him. and then right on the wall next to that basket we put a knife organizer and then I also added some little decorative pieces to that knife organizer to make it look not only functional but also decorative and then at the bottom two shelves penultimate On the bottom right side I put a big basket and that's where I put all of his books and bread making tools and then right next to that in the corner I kept his wheat grinder for when he makes bread so he has a bread making station and then right below it on the last shelf I put another basket and that's where I put all of her cleaning supplies and then on the left side of both shelves, next to those two baskets, is where I keep the rest.
Of the items that were on the floor, those kitchen items that she doesn't use all the time, they are just seasonal and that's how I organized everything on those shelves and then the rest of the items that were on the floor I housed on top of the two refrigerators that are in that space as well and you'll see that in a moment and then once I was done with this space I went ahead and worked on the laundry room where these shelves that my husband built for this laundry room The area turned out so beautiful, I'm so proud of him, so proud of his work and then he went ahead and built it too, he ran home this day, he did this while I was organizing the pantry, it's just amazing, he built this board station ironing so it's a place where you can hang your ironing board but also hang your iron and your starch and it's also decorative I mean it's so beautiful he did a good job so now I'm organizing this space one thing which I did just to add A little terrace for a moment in this space where I bought these clothes pins that are meant to be used when drying clothes outside on a clothesline.
I bought them at Hobby lobby and thought it would be a cute little decorative moment on her. laundry room and if you ever want to hang your clothes outside on a clothesline you can do that so again it's something I love to do. I love buying decorative items, but that can also serve a purpose later and then I put his clothes away. detergent in this big glass jug and I bought her some measuring cups so she can measure it and then I put her dryer sheets in this basket here on top of her dryer and then I gave her these towels and a candle and I just thought these are things that she can use, but they also look beautiful in your dryer when you go to do laundry and then I bought your notebook so that you can make a list every time you run out of something, whether it's food. item or a cleaning item in this space or a laundry item, she has a list and she can just write everything down and then I put the remaining laundry items in these baskets that I bought her and I also gave her this cute little freak. because they live right next to a lake and see geese and ducks all the time so I thought this would be a cute ode to that and then this is the beautiful ironing board station that my husband created for her.
I have one in my house. and I love it so here's a little before of this space just to give you a little reminder of what it looked like before and a little after and I love love love these shelves. I have a feeling we're going to get a lot of requests for these shelves in my future clients' homes just because I can't imagine if I love them so much and my client loved them so much how much other women would like them and then in this spot right here, We just moved the rest of her brooms and mops to the right side of the wall and then I bought her this beautiful clothesline.
I actually bought two and the second one is coming next week and we're hanging it on the wall right next to it and they're so beautiful they have a purpose but they also look decorative so I liked it and then I bought her this three compartment basket and also It folds up so you can store it when you need it, and yes. I am very satisfied with the result of this space. I feel like it's much more organized. Everything is raised off the floor and everything has a space and there are stations for everything she owns, which is great, and then the last space I worked on.
I basically took the rest of the things that were on the floor and put them in the refrigerator. I cleaned the top of the refrigerator for her. I put all of her paper products and her picnic items in this basket for her and then everything else was able to fit in here pretty well, so I'm really pleased with how that space turned out and that's pretty much it. The last thing I did for her was save this really big wicker bag and I put all her plastic bags in it and I hung it on her door and then I put all her stools right when you walk into the utility room on the wall and when they set up her sink there, they'll just move that that's the space where they're going to install a sink, so I didn't mess with that space, but that's it.
I will link my Instagram below for you, click on my Instagram and follow me because there will also be a ton of before and after photos of this space for you to check out and I really hope this video inspires you if you have a space similar to this and you're not sure how to organize it to make it work. All the best to you, I hope I can give you some good advice, but I love you so much and until next time, bye.
If you have any copyright issue, please Contact