FULL BUILD - REBUILDING A CRASH DAMAGED 2019 ASTON MARTIN VANTAGE
Apr 19, 2024Overseas, probably the biggest risk I've ever taken was literally just about three years ago when I decided to re
build
my first type of accident-damaged
car, which was Hannah's Audi TT, and as the channel grew, My confidence also grew. There's no mechanics, I'm learning as I go, like most people do, but this one is really going to take my skills overseas. Do you know what you're thinking? I get it every time I buy a new car, why don't you finish all the others? cars before buying a new one, well, I'm not making excuses, but let me explain that the C63 is practically ready to paint, which means it will stay in a body shop.
It's pretty much the same story with the Range Rover, it also seems the same story for the E46 M3 and I can't finish the GT86 until the Range Rover is on the road because it will tow the GT86. Can I just say that this is a terrible excuse to buy another car? I guess you're right, but turn. I just like foreign cars Aston Martin Vantage
2019
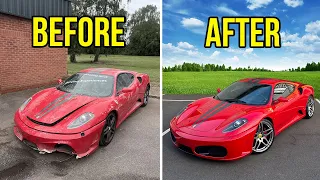
, it's beautiful, well it's beautiful if you squint as you can see that it has had a small dent in the front and well I'm not a genius but the chassis seems to have been moved in that direction, but as an Aston Martin Pros: This was really cheap, well at least I think the cheapest Aston Martin on sale in the UK at the moment is about ninety grand.
More Interesting Facts About,
full build rebuilding a crash damaged 2019 aston martin vantage...
It's a complete Aston Martin, although this one was cheap for pretty obvious reasons with the front end. so, with no
damaged
headlights and chassis legs looking like this, it's categorized as category s, which means structural damage, but as you probably already know from watching the channel, category s cars can be put back on the road in safe way as long as Since you have a mot test now before I tell you how much I bought it for and what exactly is wrong with it, let me show you a little bit now below, here is afull
y turbocharged V8 with 500 and I think three BHP.
Those two turbos sitting nicely on top of the engine, someone like me definitely shouldn't have a car like this. It has 19 inches of super light alloys. The six-piston brake calipers are British. The doors open upwards. It is rare in a car damaged by an accident. The battery is completely drained. flat but it has 14,000 miles on the clock, the rear end is practically intact and looks so sick with this type of ducktail spoiler for a two seater coupe that has very good trunk space and there is even room in the rear here to put even more bags the luxury of the luggage storage the whole leather on the car feels amazing and very good quality we have carbon here and something like racing style handles on the door cards it is rear wheel drive no It's 60 in 3.6 seconds a top speed of 195 miles per hour and I still can't believe I bought one, there's a problem, well there's more than one problem, but it won't start now.

I really can't thank all of you enough for being so supportive. throughout all these videos and this whole journey and this wouldn't even have been possible without all of you watching and after finishing the 140i
build
I wanted to take the content and myself to the next level as I'm always trying to put out foreign stuff. way we can start trying to get this going and figure out what's really broken, start by saying there is absolutely nothing online about this car that will help me in the slightest when it comes to fixing it now most of the time when I get stuck on something a quick Google or a quick YouTube on how to do it usually solves the case but with this it just won't happen now although there isn't much online about Aston Martins there is a lot online about c63 now why ? help me, ask right, look at this, although these cars had a final inspection done by this guy who works for Aston Martin, the engine and a lot of the things in this car were built by Mercedes, this is the same engine as the newer one.C63, that means this car is absolutely inundated with Mercedes part numbers and logos and this is the Aston Martin key, but under the hood it looks a little like this, which looks a little like that, pretty similar now my C63 and many other cars I've had have a pyrotechnic fuse that is here and when the airbags go off like in this car that fuse tends to blow just for safety reasons and when the guy told me even with the package jumper didn't start right, that was my first thought and that fuse is actually insulating that black wire that tends to go directly to the starter motor and I can see that the fuse is bad because as you can see here it is broken in the middle, like this As I did above I changed the black wire to the red wire which is constantly receiving power and then you should be able to start jumping that connection, it's exactly what I did when we went to pick up the car. to put it on the trailer but still no luck, the ignition lights come on but the car won't even start and since the car won't start that means we can't get it out of the parking lot so you're probably thinking hard how.
Damn, do we have it on a trailer? So we thank Mark, who went with me to recover the car. I put the link to it in the description box below, but we did it as a team and managed to get this car on the trailer and get it. Back in Leicester, Hannah seems to have already had fun as we couldn't get it out of the car park so the rear wheels were locked. These Starbucks trays became very useful, we actually placed them under the bat wheels and then used them. The victories were dragging it to the trailer, but getting it into the truck wasn't too difficult.
Take it out of a different story. The only way we were going to get this car out was if we could put it in neutral, so I called Aston Martin. which are really helpful and they put it there I should put it in neutral I don't know how it works so the guy I spoke to at Aston Martin Nottingham came to the workshop to show me pictures of which screw I should undo and then where to put it afterwards so I went under the Aston, located the gearbox and then removed this allen head screw and put it in a different hole.
It showed on the dash a
full
park lock, which surely meant the car was stuck in neutral, so We could get it off the trailer now, as you can see there's some pretty bad damage to the front driver's side suspension, so Mark had to kick the steering wheel to keep it straight. Like I had no control over that side of the car but sure enough I did it and it was out and on the ground so still to the day the car sat here and didn't move because we can't start it and it became a very expensive ornament , so since I put it on the ground I made it pop.I put the Allen wrench screw back in the correct position to put the car back into park because I thought it wouldn't start if the car was in neutral so I went ahead and started checking all the fuses in the car to make sure it hadn't blown. melted nothing. the positive battery cable here I can see that all of these cables have power and they just power all the electrical components of the car. It is that black wire that sends power to the starter motor. Now I found this in the middle which is like a Vodafone tracker which again, I don't know if they could actually immobilize the car, I mean they possibly could, it's probably worth giving them a phone call or the only other option I can think of is you have one of those phantom immobilizers. in which it requires you to enter a special code to start the car just because it prevents it from being stolen and there is no real way to know if it has one of them unless I contact the previous owner.
So if you're looking and know the previous owner, let me know in the comments section or just email me. When you try to start the car, this is what happens. The car has keyless start, but only to eliminate any problems. keyless star problems I'm putting the key in the ignition which is actually in the center console my foot is firmly on the brake but when I turn the key the ignition lights come on on the dash but nothing happens not even a crank from the starter motor so I went to the auto diagnostic tool when the car was on the trailer and when I went to look at the car I connected my diagnostic tool but I was only getting communication faults between the OBD and the ECU so maybe Maybe my diagnostic tool is not compatible with the Aston Martin but I was hoping the Autel would be so this is not the third time I've tried it and it just doesn't read any code from the ECU, no communication from the OBD port . to the ECU, this all made me worry: did the guy sell it to me after buying it at auction and then found out that the engine had died or there was a problem with the ECU so I just wanted to check the connections to the ECU first ECU? the loomwich goes to the ECU runs up here and then the ECU is literally right next to the engine there but I can't see any brakes or anything obvious about why there is no communication between the battery and the OBD port for the ECU the only thing that What occurs to me is that maybe the diagnostic tool is too old or hasn't been updated, all you need is a special tool to use on Aston Martins, so right now all this damage is the least of my worries.
If I can't start this or the ECU is dead then there would literally be no point in repairing it so I resorted to the only option and called Aston Martin Nottingham again. Yes, if you can help, I have a record. here and I need to get a quote for many of the parts I need and the availability of them now, although Aston has been a great help so far, I discovered some interesting things, but they wanted me to bring the car in to look at it. It's over, but I didn't tell them it was damaged by accident.
Now check the oil in this car, it has oil and it doesn't seem to be leaking underneath, although it doesn't have coolant, but that shouldn't stop it. From now until now Aston Martin has been a huge help, especially the chat telling me how to get the car out of park and into neutral mechanically, but there are some things they are quite strict about and don't want Tom Dick or Harry. fixing one of their cars back on the road, especially since it has structural damage, so things like this Lake chassis here, which is aluminum, it's actually called a
crash
can and it's actually split right in the back, which which is okay because I think further back is Okay, but they can't really sell me that because it's part of the safety structure of the car.They can sell me the radiators, the bumpers and that kind of stuff, except anything to do with the strip structure. They can't sell airbags to me, the only places they can sell them are Aston Martin registered repair centers, which they obviously can't, but don't worry, I suspected this was going to be a problem before I bought it. I checked with Aston Martin before pulling the trigger, but I have a little plan and the problem I don't have a plan with is that it won't start, so this was it. I was left worried and simply unsure. As for what to do, there's probably a good reason why Chat bought it at auction and then resold it to me on eBay, but then I thought about how similar this Aston was to the Mercedes, which sparked an idea earlier in the tool. diagnosis.
I've been selecting Aston Martin, like any normal person would, but this time I'm going to select Mercedes and choose the new c63s so the diagnostic tool will think it's scanning for the new c63s, which is basically the engine in the Aston and so far. seems to be reading so my fingers are crossed for this yeah so I think I've hacked the system here now I can read all the faults on the car literally this car should have the same ECU as long as the engine as well as on a c63s because I can literally read everything and this is what I couldn't do before and the main thing that I think is the problem here is the ECM so if I go to this Vault here I would have to select on that I came up with a screen that appeared a little Hope thanks this fault here says that the engine starter was blocked due to an accident so the starter motor is not working and here it says that you should be able to reset this I just hope this works because the car thinks that It is communicating with the C63, come on, not with an Aston Martin.
I literally have no idea what I'm doing right now and I've never done any of this before and I've never seen this screen on auto before so I was just winging it as I went along since I'm sure I'll have to do it. during much of this building power. Listen, what do I press? The phone started to turn on the ignition. turn it off then back on and then repeat the process if this works turn it back on now it's ok let's try and reset that
crash
sensor again if we can but after going into Auto and then resetting it again I think we had a breakthrough we we are moving in the right direction nowwe can put our foot on the brake we get the red light and then we hear we have a kind of half crank and then nothing happens now I can only think that this is because the battery voltage is too low but looking here they are around 11.9 volts, which is not good. 12 volts actually, but maybe you need 13 volts to stay.I'm not too sure we have a new battery with jumper cables on the old battery, but maybe we do. I'm thinking maybe I need to put in the new battery or use the jumper pack. I haven't figured it out yet. Okay, so we're looking for a new battery for the jumper pack. We already started all this. Chris, for moral support, now I'm here for good luck and I'll close your doors, otherwise it's bad luck, well that's not going to happen on this side, I'm afraid it's okay. Everything resets and let's see if we can do this.
Okay, start the engine, please, okay. I admit it. What I did in the last video wasn't cool, it wasn't funny, and it was childish, but you can't say it wasn't childish. entertaining if you missed the video then it's in the top right corner, but if you didn't then you'll know that I risked it all on the most expensive rebuild I've attempted to date on this foreign
2019
Aston Martin Vantage oh. God, this is going to be a big rebuild and we've already learned a lot in the last video. I explained why I bought the Aston, where I bought it and how much I bought it for and we managed to get it back here.A little help from Aston Martin themselves, but the main concern despite the front end damage is that I bought this car as a non-racer. I thought the reason it wouldn't start had to do with the Pyro fuse, which is usually the case with a car damaged in an accident, this fuse normally breaks when the airbags explode, but I told them. said a million times here are the broken parts reviews I skipped the connection from here to here, but still had no luck, nothing, now we also learned that under the hood of almost all of these Aston Martin badges there are Aston Martin badges AMG, the engine and many of the parts on this car are from a newer C63, which helped me a lot when running the diagnostic.
The car, connecting the diagnostic tool and running an auto scan, scanned the car as an Aston Martin but didn't seem to have any communication with the ECU, but I manually overridden it and selected Mercedes C63 which seems to like a diagnostic. The tool then showed a fault related to the crash data and gave me the option to reset it, which of course I tried and after resetting it and trying to start it we managed to get half a crank. I took a jumper pack connected to that. and you know what to do, we can do this engine start, we're moving and we start to reset it, it's basically a Mercedes, come on, now we have an Aston Martin Vantage running and it sounds sick, what a relief, one running behind. my, oh my god, if only you could feel the relief that I felt when this started up and I still feel relieved but also very excited now that this is working, in fact, inside the expansion tank there is no coolant, for what we can't.
Run this for a long time, which means we have a coolant leak somewhere, which doesn't surprise me because the front contains a lot of radiators, which is taking a fair amount of hit. I have since discovered that the Aston has three. driver setting for sport which is your standard setting then you have Sport Plus which opens the exhaust valves and also has a track which I'm not sure what it does but it changed the look of the dash and the exhaust sounds amazing. Foreign turbo. Craziness. The board is going crazy, it doesn't want me to rush this now that we know the Aston starts, we can dig into it and figure out what parts we need and what parts we can and can't order from Aston Martin, so remember.
The Aston Martin console is everything, unless we are a registered Aston Martin repair centre, which we obviously aren't, but one thing we can pick up at any local parts place is a battery, so that's first. what I am going to do. Replacing the battery is in a pretty tricky spot right behind the driver's seat and you have to remove the fuse box just to get to it but overall it's a pretty easy job now just before starting the car I wanted to put a little of water in there just to see if it would hold, but no, it came right out, so it looks like we're starting this scene without coolant again.
Now the next step is to get the Aston off the outside and into the unit so we can get started. When
rebuilding
it, there is only one small problem and that is that one wheel does not turn with the steering, as you can see here, so I had to improvise and just before putting it in the unit I noticed this kind of transparent film that What is on the paint here it's called paint protection film so the previous owner obviously took care of it and it should have protected the paint pretty well so before I brought it into the unit I wanted to give it a quick wash with ma details right now.We need to figure out how to put this on the unit, so we have the Aston right at the door of the unit and then we have to thank Mallory Performance for letting us steal the skates with wheels that you can put on. under the steering wheel Lift the steering wheel and then just slide the car as easy as that going up the smaller blue ramp because we have the Lamborghini on the big ramp which is pretty poor to say the least but we will continue that in a future video a stranger touched the inside of the unit and we can begin the actual rebuild.
The only thing I want to start with is to figure out why this wheel is not connected properly to anything and I have suspicions that maybe there is a broken part. tie rod end there, but let's take this wheel out and do more research and then we can start taking this card apart into pieces and figure out what we need to buy oh my goodness they are so light this is the lightest wheel 19 inch wheel Literally any time I've felt like all my days have a Fortune cost and they look good, Nick too, so he could be a winner there, so as I suspected we have a broken inner tie rod.
The actual tie rod end appears to be fine and the ball joint appears to be fine. We just broke the inner tie rod, which is pretty lucky because all the suspension arms look good and I can't imagine the suspension arms being cheap. The brake disc looks good. brake pads are good, caliper is ok, actually looks great Nick, but only the inner tie rod was ok to replace so I phoned the local parts store directly to see if they could order an inner tie rod for the Aston Martin and while they waited to be called I started to remove the rest of the damaged parts on the front end.
During this time, they called me to tell me that they couldn't get an inside bondage. Aston Martin tie rod release no one lists them so it's just a part of the main dealer so I had to call Aston Martin Nottingham it's a front uh on a tie rod it's the driver's side the other side yeah yeah really separate, but the rest of that of these um Jesus Christ, okay, cheers. Well, we have a first problem here, so yes, you heard right. Aston Martin doesn't sell the internal steering rack separately, you have to buy the complete steering rack, so I went ahead and started.
Removing the inner tie rod just to see if I could see any part numbers that were on there. I was hoping that if I could find a part number I could compare it to something they used on another car and when I got the interior join. On the outside of the rod there were some numbers that were stamped there and if these numbers didn't work I was just going to measure the inner tie rod and see if I could find a similar one, but I literally think after about five minutes of Googling that number of piece.
I think with Falmon just from a quick Google search of the little part number that was on this internal address bar. They seem to use the same internal address bar. I'm hoping they use the same internal tie rod as a Jaguar XF, so I'll call. fit the parts now with an XF registration order on a tie rod then cross your fingers it works so that's a Jaguar fits, the next step is To start disassembling this entire front end, remove all the damaged parts so we know exactly what to order next. Now there are a lot of pieces that make up this front end and I have a feeling we might not be able to do it. cross reference all of them because a lot of them will only be made specifically for the Aston Martin, but we'll see how we get on completely repaired worse and if it was an Audi, a Volkswagen or a BMW it would be a good quick fix.
And an easy job, it's just the fact that it's an Aston Martin and that's going to be the hard part of this whole build, so I think it looks a lot worse than it actually is, but you can see why these cars actually work. They cancel now. We are slowly getting there, there are still many more damaged parts that need to be removed, such as the arch cladding and the bonnet, and there is also a spoiler that is damaged on the other side, but little by little we have started to dismantle the front end , but an accident damage repair center, if they were to repair this under similar insurance circumstances, they would have to replace everything as OEM, for example, that inner tie rod we just talked about that couldn't be replaced with the Jaguar XF. tire rod, although it is exactly the same, well, we hope it is exactly the same.
They would have to get rear steering from Aston Martin, which we all know costs £5,800 plus the labor cost to install it and then that's even the To start with, you've got the rest of this to go on here, there's another perfect example. Remember the pyrotechnic sights that we are currently putting together this type of circuit so that we can get off to a good start. Now, if you remember in the first episode I told you that Aston Martin sells parts to the public that have to do with safety, like the protection cans on the front and some parts with the airbag, they will only sell those parts to an Aston Martin registered repair center just because they want their cars to be top notch when they get back on the road and not repaired by someone like me but I called them about a pyrotechnic fuse but it comes as a complete unit like this and this Aston Martin thing weighs 560 pounds and this is a bit annoying because we don't actually need that drop part, we just need this little fuse here, well I actually managed to find that complete pyro fuse kit on eBay second hand for 289, 99 which is still quite expensive and we only need that part of the fuse, but again we are using our brain here and in real pyrotechnics, the part we need there is a small part number and that part number relates to a fuse that also It is used in the Audi Q5 Maserati BMW 3 Series 5 Series 6 Series 7 Series and best of all, you can buy it separately on eBay for $27.99.
We just have to hope all these cross-reference pieces work and we'll win. I don't know that until they go out, there are some damaged radiators on the Aston Martin, the one in front of the passenger wheel is not leaking but is damaged and the oil cooler in front of the driver's wheel seems fine, but the rest of the Conrads radiators and air, well it looks like they've given the main radiator a bit of a beating here which is huge, looks good but at the bottom it's actually leaking coolant so we'll have to order one of these and just to keep track.
Of all the parts and expenses of this build, I have a whiteboard and a special thank you section on the side for people who help me, like Mallory's performance on the skates and Aston Martin telling me how to take the car down. in neutral without starting it now there is another big question here and it is the chassis Ben and if so the build will become much more expensive now almost most of the chassis is aluminum and can't be bolted on so I was pretty confident on this, but I won't really find out the good or bad news until I remove these front shock cans.
Well, so far so good, so this is what they call a shock can. It's a kind of warp zone. The part here is designed to crush when involved in a head-on accident, but I don't think the impact was actually that way, it was more of an accident that way and in this case it became separated from the world, but it's a good job. , it has broken away from the world because if that world holds, then we could be talking about a lot more damage than we originally thought, so this is where the shock can screw on that side and on that side and because it broke. away from the world, I'm thinking that this part should still be in a straight line, if that world had beenmaintained, then I could have pushed everything to the side, but you can see that there are a lot of braces here, which are all straight. a non-ballizable part as well and there are no twists, there are no curves or anything in that, as far as I can see from my eyes, this is all in a straight line and this whole type of aluminum subframe is not baltable, but you are talking about like I'm working on changing it, but again, I'm not a professional and I don't claim to be to say that the car hasn't lost its geometry just by looking at it, that would be like a silly statement, so it's definitely going to be go and do an alignment when everything is pinned down. again, but actually, looking at it, it really doesn't look that bad.
I think it will be little parts like this broken piece here that will end up jumping out and biting me because I can't cross-reference that with another car and well, it's a unique Aston Martin part because it's only made for this chassis and we all know how those go. Aston Martin prices and also for such a surprising answer in the last video that I can't. Thank you all so much for watching the video, liking and sharing it, and also if you are new here and recently subscribed, welcome aboard, the previous owner of the Aston Martin contacted me and we have the photos of the accident.
Overseas, as we have discovered, finding parts for a 2019 Aston Martin Vantage is not one of the easiest things in the world. This Vantage came free with a damaged front end, a damaged hood, many damaged radiators that we removed in the last video. a damaged wheel arch liner and both airbags deployed, but on the bright side of things, I bought this car as unused and we actually managed to start it without spending much practically any money, yes, yes, and in the last video I started We started to take apart the front end to figure out what's damaged and what's not, and we found that the parts are a little harder to find than we first thought.
Take this inner tie rod as an example, when I bought the car, we found that the inner tower had completely broken, the inner tire rod is the part that connects the steering rack with the end of the tie rod, which which allows the steering wheel to rotate when you turn the steering wheel. Now no one else could get an inner tire rod for an Aston Mine, so we had to call Aston Martin directly. They said they wouldn't sell them separately. They only come as a complete steering rack which cost around £5,800. There's no way I'm paying £5,800 on my own. for a steering rack I only need the inner tie rod for so I looked at the steering rack and found a part number that matched a Jaguar XF on a tie rod which brings me to this situation.
Oh, it twists into the steering rack. and it also threads onto the end of the tie rod, it's too short for what the Aston Martin's actual tie rod is. Now this inner tie rod here is off the Focus ST and it's the correct length, it's just the thread pitch. It's just not quite right now. This one is from a Mercedes C Class. It weighed 14 pounds and threads onto the end of the tie rod. It's a little longer than the Aston Martin, but we can trim it and it curls up. the steering rack now this tire rod is completely inside the steering rack and you can still see a gap between the actual tire rod and the steering rack and if you look closely from the passenger side it is completely flush against the steering rack, so The rear of the actual steering just isn't exactly the same and for me I'm not willing to take risks on something as vital as the steering, so on this particular part I seem to have suffered a loss.
I'm trying to avoid the Aston Martin tax. Or, boy, I've been shopping, look at all the pieces we have here. Now I have to say a huge thank you to many of you who have reached out to try to help me find parts for this Aston Martin and us. I've had Breakers Yards racing teams and even people who used to work for Aston Martin tried to help me with this, but most of this stuff here comes from synthetics or like a car auction. Breakers Yard which is breaking into an Aston Martin lead and I managed to grab some of the remains including the inner tie rod so a big thanks to Craig from Synetic who came over and told me about the Aston Martin they had broken into and the Second hand steering bar set me back 100lbs so Synetic becomes added to the Blackboard and you can see here how close we came to dodging the Aston Martin tax.
It was a little too short on the Jaguar XF's inner tie rod. All that's left to do now is snap the second hand onto a tie. rod to the Aston Martin and it's just a simple case of screwing it to the steering rack and then screwing it to the end of the steering rod. Now the car will need its wheels aligned later, but as a rough guess, we're just measuring. with a tape measure for now, although we didn't save much money on this inner brace, we still managed to save a little bit behind its second hand, but with the next part I think we are about to save a little money and that is this part hence it's the pyro fuse now this is the fuse that you all already know breaks when you hold the airbags and you can see the break at the bottom now from Aston Martin I want you to buy this whole piece here, which It includes the power techniques and the wick is actually between this part and that part again.
Aston Martin again, how about £580 for that full pyrotechnic fuse? Now I found that complete part that Aston Martin wanted. Selling me exactly the same thing on eBay for around £280 which still seemed a bit expensive for a part of Technics sights so I looked at the part number on the back of this and found this which is now unavailable at Volvo. This revised part from Volvo cost me 27.99 and looks virtually identical to the one that came out of the Aston and I have no reason to believe why it wouldn't work so let's fit it in, the reason why the power rejection is broken first of all. when the airbags deploy it is in case the accident is so bad that it causes a fire and the power checks are only there to cut off the power that goes directly to the engine, so obviously if it breaks down the car it won't start but we have learned By removing power from the fuse and jumping the wire to the car's main electrical system we can turn it on but this isn't really a long term solution and it is quite dangerous to keep it that way so I hope with this new fuse pyrotechnic.
We should get back to action and this one from Volvo fits quite well and exactly the same as the one from Aston Martin. I understand well, so it's a new cake of car reviews. I hope it works, but we can. I didn't actually test it to see if it works or not because well, we don't have a front end on the car and starting it right would cause havoc. So far, we're actually not doing that bad on the part side. things, but the reason is strange and believe me, I have looked everywhere for it, so let me show you the part that is impossible to find strange, as the passenger airbag exploded, opened a big hole in the dashboard and also broke.
The windshield is also now impossible to find this dash and not only do I have a good one, I also have a gun that is leather and red stitching to match the rest of the interior. Now there is a company that offers a package. where they replace the driver side airbag, the passenger side airbag and they also retrim the dash for you and it costs about three and a half thousand dollars. The only problem with that is that after we ship all the parts to them, it can take up to six weeks. to have the board restored and by then I would have forgotten how everything goes back in, so instead I'm going to do this myself and explain why, while I get this board out, this is going to be hell. travel, now this really works.
You could end up saving a lot of money again. As you know, my only option at the moment is to send the dashboard in for a refurbishment with all the airbags, which costs three and a half thousand pounds, but I can buy a new passenger side airbag from Aston Martin for £400. pounds and the second airbag in the steering wheel also for £400, then it's just a matter of repairing the dash. I talked to a few people and they seem to think I can repair the dash and re-trim the lever problem. I have to get it out first.
Now all the other cars removed the dashboard. I've always had a new board ready to go, which makes it much easier to remove. the dash because I can see on the new dash where all the holes are for the bolts that hold it to the actual car and now that we don't have that on the Aston Martin this is going to be really complicated there is absolutely nothing online or help that tells you how to remove this dashboard, so what you're seeing now is me trying to figure it out as I go, which is usually the case anyway, but when it's a car worth a hundred thousand pounds, I'm pretty I'm nervous about breaking something in the process and I'm also nervous about remembering where everything goes when I put it back together.
Now my first hurdle is getting the clock spring and lever out with the gauges and wipers on because there is no way a dashboard will come out with them on, but I managed to figure it out myself. Next up is the center console. I have to remove it to have room to take the dash out when I finally have all the The bolts came out of it and all the bolts on this center console were completely hidden, they were very hard to find, I don't know which trim clips on and which trim They are bolted together, so I was being as careful as possible. hugs, okay, I'll be honest with you, I'm absolutely struggling with this.
What we need to do is take out this climate control and take out the fans, but we can't do that until we get to the center console. I've been doing every Bowl imaginable on this center console and I still couldn't figure out why it wouldn't come off until now where I pulled out this little kind of knee pad here where there's an electrical connector on the back that slides on. and the funny thing is that if we take a look, there is a Citron and Peugeot badge on the back of this electrical connector, so not only do we have Mercedes AMG, we now have Citroen and Peugeot and to be honest, I prefer it anyway, the Mercedes side of things behind that was loose, so one was loose.
Well, we're blaming Citron and Peugeot for that. These are the last two bolts that now remove the center console, but another thing that is questionable is why. there are electrical connectors on the side as knee supports, oh oh my gosh, it came out okay, it's moving. There will be a lot of electrical connectors behind this because of that, but I think we just need to move it back now since my celebrations were short-lived because I took out the center console. I thought I was in the home stretch, but there was still more to unpack. I took out the climate control, the fans and also all the computers for the stereo but it doesn't matter how many screws I put in. actually the unmade dash still wouldn't come off, there were like bolts hidden somewhere holding it on, please let there be bolts underneath, it felt like the dash was held towards the back of the windshield and was waiting under this speaker here.
There will be a large bolt that holds it in but unfortunately there wasn't so I resorted to calling Aston Martin in the process of removing the dash right now and I literally have it close enough to everything but I still can't seem to get the real car body dashboard. It feels like something is screwed towards the side of the windshield. What I know is that we actually have a special tool to move taxes. Legends Legends, thank you, so it wasn't like that. what I wanted to hear a special tool to remove a board is here where I'm going wrong hello um it's difficult because when you have to move hold that it's very heavy even all of this like aluminum like cast aluminum yeah that's it everything, what is that! crazy, okay, okay, so this is what all the signs are leading to: we have to remove that type of whole aluminum mechanism with the dash attached to get the dash out and this is the news now that I have money for it.
This was literally just a handful of people I've ever taken a 2019 Aston Martin Vantage dashboard off of. There are probably a lot of people who put one on but never took it off, but I want to be one of them, so I'm determined to do it. this instead of taking it to Aston to have it done which would be exorbitant and seems so stupid that you have to remove this entire aluminum frame just to remove this type of top cladding that just doesn't work. makes sense, so now we have the Screensaver Nanito guys yelling at those guys that they are going down to remove the windshield and the windshield isdamaged and we need to replace it anyway, but I'm hoping that After removing the windshield, I could look just under the dash and see if there's any other way to get that thing out without having to get that whole aluminum casing out of there, so that just to give the screensaver guys some work.
A little easier, Hannah and I start removing the damaged bonnet, which needs to be removed anyway, and once removed, the boys can get in and start attacking the wiper blades and all the plastic covering surrounding the windscreen. Then they use their special tool that breaks the seal on the windshield with this type of cable and then they can lift the windshield to hopefully reveal some kind of easier way to get the dash off just when the windshield is out, it's revealed some bolt, which makes it a little easier to remove the board no that literally hasn't helped us one bit the only good side is we have a little more light to work in there and a little more space but there is literally no no bolts, everything is really flush and I mean it's not.
Coming out, it's definitely all connected to that aluminum frame. Now I think we have two options here. Well, I hope we have two options here. Now, this part of the board, here you can see it's one piece, except for the lever. It's split into almost two pieces and the original plan is obviously to fix this part here and trim it back now, if this can be done while it's in the car, that means we're going to have to remove this passenger side airbag from below. if we can do that and we can trim it back into the car it will be an absolute winner and then option two, which really scares me, is we have to do what Aston Martin said we had to do and remove all this frame aluminum and everything and lift the entire board and apparently it is very heavy.
I hope we don't have to do that, not only that Aston Martin uses a crane to remove the dashboard and we definitely don't have one. of those now with the s wheels and more and the front end just completely disappeared and I don't even know anymore, so far we have found AMG badges, Mercedes badges, Citroen and Peugeot badges, and I also managed to fix things using Volvo. parts and all that is in an Aston Martin. Now, this was once the cheapest 2019 Aston Martin Vantage in the UK and, in fact, I could confirm that it still is.
If we look at the Aston Martin Blackboard of Truth, we have only spent £307 99 repairing this one so far, but that was until today. We made some progress in the last video. One progress is that all four wheels are now pointing in a straight line. Thanks to a new second-hand tie rod that we managed to find on an Aston Martin that was being broken into pieces due to the problem we had and still have on the dashboard, this is the state current interior of the Aston Martin and that's it. because we need to replace the dash because the passenger side airbag has gone off now for someone who is not a mechanic.
I've managed to cobble it together with previous dashboards before but it looks like with the Aston Martin one you'll have to have a bit of skill now, as I mentioned I don't have a new dashboard to get into the Aston Martin, what I was going to do is replace the airbag on the passenger side, repair this part and then pry it back up, but to do that I need to remove the dashboard and this just won't come off despite the many bolts and electrical connectors that have come loose and according to Aston Martin, we have They have to remove this full aluminum frame and they use a dashboard crane to get this out so this is definitely not going to be an easy work crane that they use at Aston Martin to get the full dashboard in place and obviously I don't have one of those. those in my workshop, so it looks like it's just me against the board, but I hope we can fix that later in the video, but for now I want to continue with the X eria side, now that there is still a lot of damage.
Parts on the front of the Aston Martin that we need. It needs to be removed before we can start
rebuilding
the front end now Aston has sort of two arched liners, there's a carpet interior liner and then this fiberglass liner that actually holds the headlights as well, now We managed to buy all this as the old ones are damaged by the synthetic material with some sort of package, but what I'm trying to get to now is not the arch line, it's actually the hood hinge. You can see here a past experience I have noticed when a car breaks down.On the bonnet the bonnet hinges sometimes get bent and when you put a new bonnet on it's almost impossible to align it so I'm not going to take any chances with the Aston and in fact bought some new bonnet hinges to go with the new one . We'll also need the hood, but to access the hood hinges you need to undo this little wing on the side here, but now you can see I can access the hood hinge, which also has a lower hydraulic strut, which is pretty cool. and the final straw is for holding the door up when it is open.
Now it's on the passenger side, which seems to be the worst side. Here we have broken supports at the front along with broken radiators. Arch lining and who knows what else. here you can see the passenger side wing that just broke off in the top right corner and when I first bought the car I didn't realize that this wing was two separate pieces so that saves me from replacing this entire wing because it is just a part now, maybe if I'm watching my videos you feel like going out and buying an accident damaged car or maybe I've completely discouraged you from buying Demi's car now before moving on to the cosmetic side of things that still We have a lot of mechanical aspects to cover and here is pretty much the complete front end that we managed to take synthetic in the last video.
Now you can see the Aston Martin type built in sections and part of the One section is missing and if you remember from the first video where we picked up the car, the whole front end with the protection cans were bent to the side. Now this is what I mean by a shield can, so this sits in front of this. The chassis is right there and this is supposed to be like a crumple zone for when you're involved in an accident, since this accident is actually part of the structure of the car and it's like a safety feature that Aston Martin won't sell. directly to the public, they will only sell this shock can or cans to a registered Aston Martin repair center, so I have been very lucky to be able to grab the shock can here and the shock can there from an Aston Martin that had been broken up into pieces because they're really going to be like gold dust and it's actually very interesting to see how this all bolts together, it's actually all in sections, you have the front section of the shock weapons forward, then I have this section here that contains all the suspension and then it bolts to this section here, which is the entire chassis, I guess, and the complexity of it doesn't stop there, there are a lot of radiators and cooling that go into this Aston Martin, but let me explain that while I assemble, let's make this so that the only radiator or cooler that remained intact in the accident was this oil cooler right in front of the driver's side wheel, so that's the only thing I'm going to do. keeping by changing the rest of this front part that is now attached to this front part that we are bolting on now there is another radiator in front of the passenger side wheel, well now yes, there are companies that can recall radiators from the market, so basically you can take Take your radiator to the repair shop and they will remove the center but unfortunately but not surprisingly they couldn't do the Aston Martin ones but luckily for me I managed to get a full radiator pack so that's not it.
It's a big deal so now I'm bolting the old oil cooler to the new front end and there are a lot of other bolts to fix to mount the front end to the rest of the car as well and with that front end fitted with the shock cans we can now Start placing the rest of the radiators. Here you have a large main radiator which is for the engine coolant to stop the actual engine. This radiator has the same accessories as the C63, since it is a C63. engine, so it's not surprising that there is a strange condenser and right between the main radiator and the air conditioning condenser is another radiator.
I believe the radiator is a separate cooling system used for the charge coolers and the two turbos on this engine and to top it all off there is another one. A smaller radiator that sits on top of the one which I think is secondary to the engine and not forgetting the one in front of the passenger side wheel which I think is for the gearbox to cool, okay now we are making progress. We've added about half a meter to the front of the car now and it looks so strange and long, but I guess this is all for some sort of weight distribution, the engine is behind the front wheel so it's like a car. front mid engine and then we have a lot of weight here in the front, but I guess it's just to balance it out, but now we have the radiator pack on and we also have all the hood latches, now support. coolant, as you can imagine, this being an Aston Martin, it's not just a matter of refilling it and letting it run on its own, so as I probably mentioned, this expansion tank holds the coolant for the engine coolant and all of these lines go through here. this radiator right there and then through the engine to keep it nice and cool now if we're going to fill the coolant we can't just pop it in it has to be filled under vacuum and I'll explain why we're not doing it yet and then we have this expansion tank here same which is a separate cooling system for the two turbos here which have charge coolers there and also the gearbox which is located at the back of the car so you can imagine the long coolant lines running under the car , this also cools the gearbox, so even though it's just a small expansion tank, I can still imagine it will need a lot of coolant because there will be lines running from the front to the end.
Again and again this will have to be filled under vacuum to prevent airlocks from forming and explain what I mean by that as I mentioned later. Next we are at the hood hinges, there are three 10 mil bolts holding this to the frame of the car. and then the hydraulic struts too, it's a pretty simple job when you can access them and once you remove them, the new ones appear, which look exactly the same as the old ones, but you never know if they have the smaller ones. a little bit of flex that could really affect how the hood sits for people who stick with the arch liners.
Many of you asked how do I know where everything goes back together and how do I know which bolts go and where these little mail bags are that are labeled. getting up only seems to help, although my handwriting isn't the best, but I can understand it, so I guess that's all that matters. Finally we continue with the two air boxes and then the cold air intake in the front. I don't need a screen. I'm curious. Now everything is back up and running mechanically. Now the air boxes are on. The radiators are on. Now it's time for all sorts of cosmetics and body parts.
Now everything I've bought up to this point has been synthetic and the total of those parts weighs 210 pounds so far. I don't think we're doing that bad. I think about two and a half thousand pounds to get to this stage, although it still looks like a mess, but that was up to this point right now is foreign, so what you're looking at here is eight and a half thousand pounds on the front, that It may seem expensive, but in reality, when you break down all these pieces, it's not really enough and maybe it's an opportunity to upgrade.
I've updated, so just as an example, this badge along the front bumper weighs 360 pounds if you purchased it separately. I bought this whole as a kind of package and, well, tell me if I have a good one. Deal or no deal, let me show you, so all this stuff here comes from an Aston Martin racing team and when you have racing team stuff that means you have carbon fiber stuff and I couldn't help but grab more. little details and Bobs to improve Aston Martin models, for example this is a kind of big carbon fiber hood vent that is cut out here that was on a racing car, obviously this thing is not painted because the Racing teams tend to wrap cars. instead of painting it, I don't know if it's lighter.
I'm not too sure we managed to also get an unpainted front bumper, the front splitter and load more carbon fiber parts like this, which is actually that part of the front wing that we need to replace and well, now we have a carbon fiber for the wing, not only is there even more stuff here along with all the carbon fiber stuff. I managed to find some carbon fiber rearview mirrors thatThey were walking around the workshop. Also, I asked Nick if he could and they said yes. We also have a complete wiring harness for the front including all the parking sensors and the camera.
We have a carbon fiber rear diffuser that matches the rest of the carbon fiber. things and then here are the headlights, but we'll continue with them, so although these things seem expensive when you add them all together, I think it's a lot higher than eight thousand five hundred pounds, but there was one thing. I went a little overboard now that they had all this carbon stuff, but the only thing they didn't have was this front splitter here, which was a normal gloss black and which is kind of an iconic piece. The Aston Martin is like it has something so prominent at the front and I thought, well, if we have all the carbon fiber parts, I need a carbon fiber front splitter, but that's where I managed to find this here, a carbon fiber splitter. carbon fiber. and a full grill surround and this was from Aston Martin bits.com or dot Co dot UK, it was very expensive and I didn't want to buy it but I thought I had to and it was £1200 so I went shopping en masse.
I kept buying carbon parts. I didn't need them, bringing the total cost so far to £12,217 99p, but I can't help but upgrade the parts that need to be upgraded, they really don't need to be upgraded very well. Yes yes they need to be updated but right now I'm just assembling the front bumper which includes the front grille and parking sensors and of course that carbon fiber front splitter and I'm pretty sure Aston Martin used a better assembly . bank than what I did with it, all put together. I can line it up with the car and just loosely bolt it on.
We're not going to look at anything exact right now and what a difference a front bumper on the hood can make with those. huge vents in them, strange skin going under them, then I just have to transfer all the locks, wires and heat covers from the old hood to the new one, oh my goodness, look what a transformation the car is already sporting. More or less complete, well more complete, this hood is basically the entire front of the car and it kind of dominates the front with this front bumper as well and then that carbon splitter.
I think this carbon here and then it also matches the type of carbon. of the bonnet vents look great, but I don't think they'll stand out well against the black, so maybe a complete color change for the Aston. I don't know now it looks a lot better, but there are a few things that will need to be tweaked here and there, so right now the panel fitment is not quite Aston Martin spec, maybe more Range Rover spec, The difference between the hood and the bumper is quite large. I definitely don't think you should be able to place a finger. between that space, but there are adjustments for the bumper underneath here, which allows you to raise that space and adjust everything, but that's something we could do later, definitely, in the rear, it's not quite right here, there's a edge between the hood. and also on the door we can get that kind of perfect inch and that's why I left this kind of wing panel here because I can still access the hood hinge here so I can unscrew the hood hinge bolts and lift it up. and make it perfect, but not at that stage of perfecting all the lines yet, but I can't resist showing you how good these little carbon inserts for the wings look, they look so amazing, the easiest wing I've ever installed and when this It's below, look at that, it's like the V12 Vantage that has that kind of carbon insert.
It will look amazing when we have the carbon mirrors on too, it's a carbon overload but I definitely think the contrasting black with the carbon doesn't work as well as maybe a brighter color, well here we go, this is always a big moment. For the channel headlights, these are practically new headlights and were included in the £8,500 price for which I got all sorts of racing parts from the racing team and the second hand headlights sell for around £1,500 each, Now I'm pretty. I'm sure Aston Martin race cars don't actually use the original headlights, that's why they have new ones lying around.
They are used as something that is almost integrated into the bumper. I'll try to put a picture on the screen. Now on all cars we always seem to have problems with the headlights and these were the ones that came out and are pretty beat up and damaged and I actually wasn't going to buy these new ones here and I explain why now I have learned before in the past that yes a part number on the headlight ends in BD and the one that came off the car ends in A.D usually means there will be some difference in the headlights on some cars that might have been waiting around the corner. assist lights or sometimes high beam assist and some headlights have them, some don't, but on this Aston Martin I just couldn't figure it out and the other thing that I think is probably going to be the main problem: the headlights on this car. came out went left and I drove and of course we have a right hand drive car which means the beam pattern is probably completely different but maybe just maybe with the computer we can change it back to raw and drive, I don't know. but with all that in mind, I couldn't say no to the headlights included in the prize with the rest of the front, but I hope that in the worst case we can make a good set of headlights with four headlights. that we have with the headlights on now became much more obvious that well, the bumper needs to go up well at least a few centimeters because you can see a gap here, there is still a bolt to put under the headlight again.
We just want this one before we start moving around the panels and all you can see here is that there's a pretty big gap between the hood and the actual headlight. I guess it's supposed to fit nice and flush and not look like that, but black. The headlight inserts match this type of charcoal grill almost perfectly. The stupidest award goes to me. I was getting really excited to see if these headlights were going to work and then I realized the inside of the car looks good. like this and the battery is disconnected because all the wires are disconnected so I can't even tell if those headlights are going to work or not so it looks like we won't actually know if those headlights work or not until we have the dash taken off and then back in, the suspense is going to kill me on this one, so really ignoring all the panels lining up and whatnot, the next job is to get this dash out so we can address the passenger side airbag which strangely leads me to the reason why I haven't filled the coolant yet.
Now, once again, thanks to DTV Motorsport, an X Aston Martin technician came and showed me how this Dash works. I used to assemble them and the good news is that I'm actually not that far off, but the bad news is that I have dismantled a lot of things that I didn't need to dismantle, but the customer is right that the full aluminum frame does need to be dismantled. to get it out there is no other shortcut you need 50kg to come out of that car and the reason I haven't filled the coolant yet is because the heater matrix pieces that go from inside the engine bay to the Dashboard, if I'm right, runs on coolant and that is the reason heat and cold comes out from the fans inside the cabin.
Now they need to be disconnected to allow the dash to be removed for some absolutely crazy reason and also the steering column needs to be removed, so if I were to disconnect those two heaters the Matrix cooling tubes would go everywhere, I would need to recharge them again and that it would cause airlocks and all that, so we'll address that at a later date. I just don't know if I have the physical or mental strength to tackle this job today. Just a couple of videos ago I left the Aston Martin's dashboard looking strange in this state.
Now the reason I did this is thanks to this little thing here and this is the passenger side airbag and when you have an accident like this Aston Martin did and the passenger airbag deploys it also breaks the dashboard leaving it well and unfortunately for me this is all in one piece. it is not separate like the old Aston Martin is used to, which in turn means that to replace the passenger side airbag I also have to replace the entire dashboard and to replace the entire dashboard I have to take it out now replacing any dashboard It is never easy, but we've done it many times before on other cars with crash damage and it's capable, but it seems like it's a lot harder now on this Aston Martin.
I've been making all the screws I could find to try. loosen this thing, even to the point of removing the windshield to see if there were any bolts in the back here and it seems that although it feels pretty loose, it just doesn't move, it just feels connected in the back. here but there are still no screws here so in the end I got stuck and resorted to calling Aston Martin Nottingham and said why can't I remove this board but I undid all the screws I could see and then they said this. That's right, this whole aluminum frame that's built into the dash, which weighs 50kg, has to come out along with the wiring harness as well and that's because this whole dash is built outside the car and then hoisted up with a kind of crane when they make it now, obviously I don't have a crane for the dashboard in my unit, but what I do have is faith and I believe that we can still remove this dashboard ourselves without having to go to Aston Martin now before me.
Starting this amazing job, ironically we actually need to go to Aston Martin to get the next part we need, so come on now, the part we are picking up from the main dealers was actually cheaper than anywhere else and that's because because I couldn't. I didn't find anywhere else, but before I went in, I was sure to take a look at some of the eye candy outside, like this Vantage F1 Edition, and just look at the color of this Vantage inside the showroom. It's incredible, of course, I explained to the Aston Martin. Guys, what I was doing all comes out as one and before I left I was sure to get a photo for Instagram.
It is a very rare occasion that I am seen at a main dealer. We have the products and how friendly everyone is there. They are very helpful and the good thing is that we discovered that we have a free service with the car. I think the Aston Martin comes with four free services with the car, not with the actual buyer of the car, so that means when the car is fixed we can go back there for free and have a service, the only thing I'm really going to save on a little money, but I'll show you what we have here in a minute.
This box is reasonably priced and highly explosive. Of course, it's a passenger side airbag. This is the part under the dash but of course we have to remove the dash to get to it and the airbag cost me £486 55p. I already bought a steering wheel airbag and it was second hand and cost me £400 so with the two airbags I didn't think it was such a bad price and that brings the total build cost so far to £13,104 and 54 pence. and that includes all the extra carbon parts which of course I didn't need but had to buy, so I guess all I have left to do now is get this dash off the car, let's do that before we do this.
I spoke to an Aston Martin Tech and he mentioned that I have to remove the doors because there is a bolt between the door and the chassis of the car that needs to be removed to get the dashboard out, there is only one electrical connector to the door and then there is one bolt on the hinge top, a bolt on the bottom hinge and then there is a hydraulic strut that sits on the hinge to hold the door open and that also needs to be removed and I can lift the door myself, nice easy job if only the dash was like that easy now with the driver's door closed it's time to move on to the passenger side door and you can see here the latch is right inside this little cut here how crazy is that now if this hasn't put you off When buying the cars from Crash Demi, you must be angry by now.
I haven't done much from this center console, which turns out I didn't really need Aston Martin Tech to mention that there really wasn't much you had to do. undo it from the center console to remove it, you just have to disconnect the Loom from under the carpet here, so knowing that I went straight to it and if you would believe it, Aston Martin Tech was right, it came out easily just by disconnecting that Loom from there. I didn't need to unplug as much as I did and here it is outside on the floor of the unit, but the nice thing is that I can build this outside of the car before putting it back in.
The next thing we need to remove is the steering column. Actually bolted to the dash, as you can see here, there's a Black Bolt right there, a Black Bolt right there and two more that are right underneath with two electrical connectors and then it also connects to the rest of the steering column under the carwith this. UJ connection and is fastened with a bolt. You can see the steering column that's on the car, it's knurled and it fits into the UJ and to be safe, I'm going to mark it with a black pen just to make sure.
Put it back in exactly the same position, although there may be a cut in the ridge so you can't position it any other way, but this time I'm not going to take that ridge and now I can get out of the footwell. and we start unscrewing the bolts on the top half of the column, two more electrical connectors and then the steering column is removed from the dash, giving the column a kind of hose that runs from the inside of the car to the outside of the car. I only see the 10 mil bolt here. I thought this might be connected to the dash as well, so I started wrestling with that hose and undoing those bolts as well.
It's time to start labeling the mailer bags because we're about to start undoing the bolts for the aluminum frame that holds it to the actual chassis of the car according to the Aston Martin documentary I watched. I think there are like 33 bolts that hold it to the core, so it's just a matter of finding each Bowl without forgetting the ones that are there. inside the door now if you are new to the channel and you just got here watching this video I would like to explain to you that I am not a mechanic and this has all been self-taught so if I manage to remove this panel and put it back.
The least you can do to show your support is to click the subscribe button below foreign, but not enough, but the panel now actually moves completely, but once again, there still seems to be more going on. . On the back that connects it now there are two more bolts that I just saw down here, which could actually be the final bolts, but let's look at the strange thing, but I think I know where the answer is. Now we know when the board comes out. It comes out with almost everything connected to the dash, including all the heater fans and the Matrix heater and all that.
Now, for the fans to blow hot air into the engine, it uses the coolant and obviously the coolant is distributed well throughout the engine, so if you start your car in the morning and turn on the heaters, they won't be hot because the coolant hasn't reached the proper temperature, which means that in the engine compartment there must be a coolant feed and a coolant return that goes from the engine to the heater core inside the car, which unfortunately to me it looks like it will be behind this engine , so we have to remove all these reinforcements and this heat shield just to see if we can find those two pieces of coolant that go to the actual cabin and I've also noticed that right here there's a bolt there, a bolt there that looked like it might be for the dash and then looking over here, there's a similar type of bolts on the back, so potentially four.
There are more bolts we need to undo to get the dash off, but first of all let's get that Matrix coolant tube type off the heater let's do it wake up don't tell me I'm wasting my time so undo the strut bracket that removes the heat shield. Here you can see behind the engine the two coolant parts that go next to the AC tubes and the AC tubes are held on with two 10 mil bolts, but the cooling tubes are held on with two types of spring loaded clips, which It was like that. It's hard to get there.
I managed to remove the 210 moves from the air conditioning pipe, but those coolant pipes just wouldn't come out, so I tracked them down to where they led into the engine bay and disconnected them from there, which was easy enough. they were just on a little c clip and then I was able to get them out of the connection and then the other one ran right behind the engine and came out the right side now in a way that I think we're almost ready to go. I have whatever this pipe here is because I'm not too sure it has anything to do with anything, I think the air just runs down and then we have two refrigerant lines in there and then the air conditioning pipes are disconnected at the top rear and if you've noticed the dash is now I've moved away from the actual firewall of the car, what an absolute marathon this has been to get this dash out, but I think so, I think it's almost ready to go, but it's 50kg and definitely not I'm going to do it.
Able to lift this by myself, so I called some friends, you forget about bank 120, you know what I mean, okay, can you move, can you go back, sure you can back it up, oh yeah, okay, what's connected now, even though I thought I undid it? everything there were still some electrical connectors to undo oh it's just this Lou big fat man you ready Chris yeah now I can turn this board off yeah right transfer to you I got it you got it oh wow look at that tripod Chris, yeah, you know. how are you, oh, tripod, it's filming okay, yeah, and the board is outside the car.
It's been a mini journey tackling this board on the Vantage and it was a lot harder than I originally thought, but now it's out, I didn't know when. First I removed the airbag from the steering wheel, what kind of mission was I getting myself into but at Journey we have learned so many things like wondering and using Citroen and Peugeot parts and to remove the dashboard everything has to come together now, I would say it was fun, but I would be lying , but we have learned a lot so far with the Aston. Normally when you take the dash out you're left with a big mess of wires inside the car, when actually this time it's really clean and just empty here, you can see here the hole in the actual engine bay and this is where the two are. air conditioning tubes that were fiddling around in the engine bay trying to undo them.
They were at 10 mils. It's an absolute nightmare coming back from the other side. We also have the hose here that we undid and it looks like it's hot at four. The windshield we have two coolant hoses running through there that are still on the back of that big chunk of dash, but other than that it's pretty clean here and fingers crossed it shouldn't be too bad again. put it in and there's some good news about the dash being all in one piece and outside the car, and that's what we have. I can assemble all this before it comes back in, just like they do on this assembly line when they build these Aston Martins, so I didn't need to take out this whole center console, there's a lot of stuff in here that I took out that I didn't need everything I needed. so I can access the main bolts that are on the side and on the side as well and then I could just plug in the main wires that are all of this when we plug it back in.
As for everything else, it didn't really need to come out, but hey, you live, you live, you learn. I would never have known until I had made one, so now let me tell you the plan with this and the reason why we are doing this. It's because of this baby here and we need to remove the entire top of the lever from the aluminum frame and it's so close to coming loose that I think there's only a few more bottles left in the back. In fact, I'm going to try it now. At this point, I don't know if I'm surprised, angry, you know what it is?
It's not even a surprise anymore. There was literally only one frame on the board and those are, where are they? There was one, two there and three four there. that was literally it, if Aston Martin had made them into clips and not bolts then we could have removed this entire section of leather without having to remove all of this too, that's absolutely crazy it just doesn't seem right but I can Now let's see what, well, if an Aston Martin has fallen in love and the airbags are properly deployed, it's as good as a cancellation. A fear to think how many hours Aston Martin would charge to eliminate that is a lot of work and good.
I haven't even gotten to the point of putting it all back. I admit it would be a lot faster if you knew what you were doing, but it's still not a five minute job, but now we have the part we really need. dashboard, the lever part and by disconnecting it from the aluminum we can access the airbag from below, unscrew it and put a new airbag in, but that doesn't solve the problem with a break in the lever and we have some options with This one now my first option, which was always the original option, was to re-trim the dash because we couldn't find a new dash to install, we can't just swap it out and replace it, we were going to get this section.
It was actually repaired and then all the leather was re-trimmed on the top. Now this has to be done professionally and obviously it can't be done by Jack Jill or Harry, because well, this section here is all about safety and if I stick this too hard, it no longer has a weak spot and if the bag airbag were to deploy and it wasn't deploying correctly, then you would be endangering whoever is sitting in the passenger seat, so this has to be some sort of fix, but to the point where if an airbag were to explode, it would explode correctly, which you can imagine is quite difficult now.
The next disad
vantage
of repairing the dash instead of replacing it is prying which we are never actually going to do. get that pure Aston Martin shifter that they use from the factory at least I don't think they can, so Trim Shop would use leather as close to the Aston Martin shifter as possible and they'll probably do both sides just to avoid any discrepancies, but again, it won't be the exact Aston Martin shifter and if it doesn't match the interior it's really going to bother me and the only other option we have is to do something custom, maybe an Alcantara Dash, but that means we would have to change things on the interior to make it They match the Alcantara dash but I don't know but it could be a lost cause but there is another option.Now I stumbled upon this on eBay and this is the top piece of leather from a dash, not for Ad
vantage
. but for a db11 2017 model and although the boards are different, they have different faces on the actual lever part, it looks practically identical to the Vantage if you look at even all the fittings, the fittings and the holes are exactly the same as on the Vantage board and I don't know about you, but it would look absolutely crazy if Aston Martin made a dashboard that looked so similar but not the same. I mean, it would make more sense to make a dashboard with a completely different style, it just seems like too much of a coincidence that it looks practically identical to the Vantage's dashboard.I know they have different fascias there, but maybe they all have the same type of attachments. I don't know, but I think it might be worth a try. the upper level part of the DB 11 dash fits exactly the same as the Advantage so here's what the interior of an Aston Martin Vantage looks like without any dash and why it looks like the last few videos I've been through removing the dashboard due to This thing here, the passenger side airbag, as you all already know from watching the videos, Aston Martin has built the car in such a way that it has made it almost impossible for a DIYer like me to repair it and Put Advantage back on the road now, in the last video I managed to remove this dashboard complete with the aluminum frame to spot Aston Martin saying that the user uses the crane to get in and out of the car, it still looks absolutely crazy, you have to take it off. this complete aluminum frame with all the Matrix heater in there, the air conditioning and everything else including the wiring, just to get to this passenger side airbag, now removing that dash didn't require any skill in my opinion , it was mostly hard work, but putting it back in, that's where the skill will come, now finding a replacement board has become more than difficult, in fact finding parts for the Vantage has been more than difficult, so now that We have the complete board, just Now we have a few options, option one was to fix the original board.
What I mean by this is that we replaced the passenger side airbag that we bought from Aston Martin in the last video. This goes under the dash to replace the broken one here. and then we trim the dash again, but that option was quickly removed now, anything to do with airbags in a car needs to be done correctly, it's all about safety and I want to make sure the Aston Martin is as safe as possible. is when it came out of the factory if not safer so when I emailed the trimmers to tell them I was taking this board down to retrim they sent me this email and basically said they would not repair this board because of where was.
The lever breaks when it opens for the passenger side airbag now on dashboards like this where the passenger side airbag is hidden under the lever and then when it explodes it breaks the lever, that part where it break is kind of a weak point in the lever and also this little section of plastic here now, if this part of the board were lowered back down and then pried over the top, it would no longer have that weak point that it needs when the passenger airbag, making it unsafe. With that in mind, it leaves us stuck, but that's where I found this baby on eBay.
This is a db11 board and I just hope it is exactly the samethan the Vantage, although it is Aston Martin. We may be in for a few surprises now as we look at the top of the shifter, it looks pretty identical but this is a db11 interior and this is an Aston Martin Vantage interior. They are quite different, but the question is whether they use the same lever top as each other. Others Well I for one certainly hope they do because this is my only option and this option costs me 1,400 pounds which is incredibly expensive bringing the total cost so far to 14,504 pounds and 54 P but there is a difference and that is the lever.
The one they use on the Vantage board is slightly different than the one they use on the db11. Very, very slow life. I hope that's the only difference but I think we'll get away with the leather difference since it's just Sly but the The first step is to start removing the old parts from the db11 board and it looks like the person who removed it didn't He realized that there were four bolts holding the lever portion to the aluminum frame and simply ripped it off completely by breaking the clips with the db11. Board disassembled, now it's time to tear down the Vantage board by removing all the air ducts in the wiring and everything else that is connected to it to transfer it to the db11 board.
Strangely, the big moment, the reason we had to remove this whole board. Take out the passenger side airbag then reassemble the db11 dash or it will now be known as the Vantage dash and here you can see the difference in the lever around the speakers and the dash. It's just Sly and now it's time for the new board. be married to the aluminum frame maybe here Matt Armstrong was here 20. 22. smiley face it had to be done if anyone has to go through that torture of removing this again you should know I went through it now too.
Let's say the hardest part of reinstalling a board isn't necessarily screwing it in, it's figuring out where all the wires originate, all the plugs in the wiring lead somewhere, but if you route them in the wrong direction, they won't reach the plugs they need. . They're supposed to go in or they could end up trapped and the last thing you want to do is leave something unplugged or a cable stuck under the dash and not be able to access it after installing it in the car. Now double and triple check. I connected the new airbag and once that was done I was able to start bolting the leather dash to the aluminum frame and now I'm getting excited because the dash is starting to look more complete but what I didn't realize at the beginning is that Aston Martin actually builds these boards before they get into the car, so that's exactly what I'm going to do today.
We can find out if the headlights work and two if the pyrotechnic views from a Volvo car also work. So we almost have a complete dashboard and it looks good, but before we start lifting it we have to put this in, which is the airbag ECU. If you remember, in the Range Rover we have to reset it, whereas in this car. Pretty much the exact same thing now I sent this in for a reset and the guys actually mentioned that it had already been reset so when we plugged the car in the first video and then reset the crash data it must have already reset it.
So we didn't actually have to ship it, but if we don't hook it up right, you won't be able to access it without the dash, so this goes in and it's one of the first things we put in earlier. We placed the board and now we are ready to lift it. Here's the part where Aston Martin used that special crane to mount the dashboard inside the car when in reality all you really need is Hannah and me. Hannah held the board in her place. Look. I'll make sure the coolant tubes pass through the firewall into the engine bay and then I can start putting in the bolts to mount the aluminum frame to the car's chassis, not forgetting to make sure the wiring goes to the right places . and that all the plugs that are visible also go in the right places so that the entire dash is bolted to the car.
We are making progress. The question is if everything works after everything else is connected we still have the coolant parts to go in and the engine bay we still have a center console to go in and the steering rack and everything else let's move on there's a lot wiring everywhere but it all goes to one place and once you figure out where that place its pretty easy from there put it together again now I found out that one of the trickiest pieces was actually reconnecting the air conditioning tubes from the compartment from the engine to the dashboard.
It is a very tight fit and they are screwed together with two 10 mil screws. knots and once you have connected the air conditioning tubes you will also need to connect the two parts of the coolant that go to the heater array, one runs around the back of the engine and then clips on and the other goes on the other side. I'm doing very well at the moment and the dash is starting to look complete and is also bolted to the car which is a big achievement at this point as all the attached wires and many of the bolts holding the dashboard have been removed. dashboard to the real car, everything in its place.
I can start adding all the leather trim. The tricky part about all of this is that it has to go in a certain order. You might put in a section later only to realize you have to take it out to put in another. I go back to the section, but now I'm in the steering column. There are three electrical connectors on the steering column. I made sure everyone was plugged in. I have to push the steering column towards the UJ, all of which are marked in the last video to make sure everything goes back the same way and then I can bolt it all back together with the steering rack there.
There's one thing I was questioning about now these yellow connectors, you can see anything yellow here. with these types of connections it has to do with an air pocket and I know it's this connector down here and I don't remember ever disconnecting anything that has to do with an air pocket in this type of area right below. I mean, up here, this one is for a steering wheel airbag, but that one has no idea and it actually turns out that that plug over there is for some European Aston Martins that require a knee airbag for similar safety reasons, but the model The UK does not have a knee airbag under the dash.
It just doesn't have one there, but it obviously uses the same loom, which means there will actually be something that isn't plugged in, but that's so weird that I stressed out for at least half an hour wondering where the hell that plug goes because I don't remember unplugging it. , but we are all clear that it is not necessary to plug it in. Let's move on, now to the instrument cluster. There's an electrical connector on the back for all of this and a ridiculous amount of bolts holding it on. to the board with all the bolts in place and the lever placed on top, it's really coming together.
Next up is the clock spring and indicator stems, as you can see, going back to what I said a minute ago, I had to remove the instrument. cluster to put this in and that's because it's bolted behind the instrument cluster. I also had to move the lever under this because it's screwed in there, but hey, it's all experience, if I had to do this again I'm sure I would. Go much faster and the final part of this section next to the steering wheel is the shift paddles external to the engine bay to assemble the lower strut and everything else under the hood.
We are so close now that the board is in so we can move forward. to the center console again. Aston Martin assembles all of this outside of the car before placing it in the car and once this is done, it's time to plug everything in and place it in the car. It was very complicated and you are working in such a small space. but I was determined to finish this, thank you and we are already in the final stretch. Now there are many small things to do is clean the interior before putting the seats back. I used a vacuum and then moved on to the ma lever. cleaner which of course the links in the description box for these conditions the lever again has a nice matte look how it should look from the factory and it smells great and speaking of smelling great the next step was to make make the interior smell even better by using some of the rain sprays, I have been using them for a while on several cars and they are a lifesaver, they replicate your favorite aftershave like Creed one Million Dior Tom Ford even and they are great to use on cars , shoes, offices or anywhere you can.
You guys can grab one of these too with the link in the description and there's a discount code there for you to use too, but would you believe it? The interior of the Aston Martin is practically put back together, looking brand new and smelling great. I can't believe it's real or it surely isn't. No, please, no, please, no, please, no, please, no, I'm just kidding. We actually did it. The complete Aston Martin dashboard is now back in the car. I actually can't believe I did it. to get all this back, I just don't know, I just don't know how I did it, this is 100, one of its moments where you're just amazed, honestly, there were times when I was taking this Dash apart thinking there was no way, one I'm going to take this out and two I'll ever put it back in and I was thinking worst case scenario I'd have to go to Aston Martin to do the rest of the work but it's actually there.
So if you're watching this and don't have the skills to work on your own car, then use this as motivation. I literally have no qualifications or certificates and I managed to get the Aston Martin dash off and put it back on but we're not all the way through the clay yet. One step is to place a board. The second step is if everything still works. We still have the seats to put on and the steering wheel to put on and also the doors. so let's do it and then we'll test where everything works and we can also see if these headlights work and the engine starts thanks to those Volvo pyro shoes that we installed right above the battery so there's so many things to discover and it's going to be a great time afterwards that we have installed these seats and doors, so we are with the Aston Martin seats which of course are fully electric, so again there are a lot of cables under the seat and for me to screw them together.
I need to get the battery connected so we can adjust the seat back and forth so we can access where the bolts fit into the rails and so the battery continues for the first time in a long time okay so I think we have our First The problem and it doesn't really have to do with the dashboard, it has to do with the seats. Now to put them in, I have to be able to move them back to get to the front bolts and well, I connected the battery that was. low, it's at six volts, so we have the jumper pack here and we can see that all the lights have lit up in the center of the board.
I can click the power, we have all the lights on there, I can't. I put the steering wheel still because I don't have enough room but I have absolutely no power going to the seats and well, obviously I need it to put the front bolts in and the seat switches are in the back here and something tells me that I disconnected them and they didn't. I plugged back in. I checked the seat fuses. They are fine. All I can think is that I haven't plugged in those switches and to get those switches out I have to grab that. the whole center console out again, the only thing I'm thinking but I don't know is that the doors are not connected and the seats wouldn't work without the doors connected.
I highly doubt it but it's worth a try so I'll lift the door and then we'll see if it does a full circuit and maybe the seats will work after them but I don't know I highly doubt it but we'll try oh my gosh. Aston Martin surprises me. Again I have the door on and what are the chances the seat will move now? So there must be something on that door with that electrical connector there creating a complete circuit with the seat. I mean, oh no, yes you have. I took the doors off the car, you can't move your seat back and forth, what a cut, wow, so it turns out that the loom with the door is actually connected to the seats and it has something to do with the seat memory when you open the door. door. it would move back so you can get in and then when you sit in the seat it will move forward to your driving position so it's all part of a random loop but now I can move the seat back I can put the steering wheel on, we did it. everything is on the dashboard, the center console, the seats, the doors, everything is on and so far it seems to be working, of course we are missing a windshield, but that will be next and everything here is illuminated, even the dashboard seems to be plugged in it's also lit up, we still have a hold fault but I guess hopefully we can code it with the car later but we'll figure it out now as most of you know when we make a change to the dash always give it a score of 10 .10out of 10 it is that there were no leftover screws after replacing the board and zero out of ten is that there were 10 screws left, just over 10 volts were left over, it is less.
Figures, now you have to give it to me. This board has been difficult and now I have removed so many bolts which leaves me with a better chance of missing some bolts but here is the left bolt and I couldn't find a line anywhere where they actually went and they are all the same type of bolt, the T30 bolt and if I remember correctly, these were the bolts that held the lever to the dash frame and there are one, two, three. There are four five six bolts left, which actually gives me a pretty respectable four out of ten for an Aston Martin Vantage dash swap.
I think it's okay, but six bolts, I don't know where they went. A few videos ago we installed this front part, including these. headlights and we're pretty sure they came off a left hand drive car and have a completely different part number than the ones that were there which were completely trashed. Now you don't have to look far to find out how. Headlights are expensive. This one is on eBay for £1500 just for one but I haven't been able to see if these headlights actually work yet or not because we haven't had the dash fitted but now the dash is fitted.
Yes, we can try. if these headlights were ok I'm 100% hoping these headlights don't work it's a new car the part numbers are completely different I mean this guy is very sensitive to anything like that the ignition is on do we have The ignition, please, yes, we have the ignition, here we go, oh? Oh my god I can see the headlights working, no they are actually working, oh my god my appearance might have changed with the headlights. This seems to be the only time I bought headlights with a completely different part number and they actually worked on high beams and just to check the indicators, they work too, it may not mean anything to some people but to me this is unreal, still I can not believe it.
Come on, maybe my appearance has changed in today's headlights. I honestly thought they weren't going. working with completely different part numbers on a car that is so sensitive to part numbers and electronics and all that. I still can't believe it's working, even the sound of the indicator sounds expensive. Listen now, although the headlights had the headlight beam pattern they could be completely off because we believe that these headlights came from a left hand drive car and the left hand drive headlights have a completely different light beam pattern than the of a car with bright headlights and they drive, the only way to find out is to take them. to an engine test center, but so far the fact that they are actually running is a big plus.
Now I mention it a lot while it's on my mind. I'm going to a show called Gravity on July 10th. I will have a trading post there. I'm going to take two cards, one maybe the Aston if we put a windshield on and it moves or starts by then, but if you guys would like to come and see all the merchandise and the cars and stuff, the link is in the description box below and I'll see you there on the 10th but now we all know the next step and that is whether the Volvo pyro fuse will actually work and the only way we can know if it works or not is to try it and start the Aston but unfortunately for me and you , we have not yet called the two expansion bottles in the engine compartment and these have to go back to Kim Field, which is a completely different process.
About a month ago, I took a huge gamble by purchasing an accident-damaged 2019 Aston Martin Vantage. I bought it as unused but actually on the day of picking it up we managed to start it, yes but not for long because it had a massive coolant leak and it couldn't come off on its own because it also had some suspension damage. We managed to push and use carts to get the Aston inside the unit and to this ramp where it remained for the last month where we have been repairing it like you. The guys would know that we are fixing tie rods, we put on front ends, we put on headlights and in the last video we managed to put in a completely new dash and airbags, but since we did all this work we still have no idea. whether it will start or not the last time we started it we skipped the pyro fuse connection and it is not the safest option we have seen to change the dash and then also replace the pyro fuse with a Volvo pyro fuse because it was much cheaper and seemed exactly the same and we can't just go ahead and try to start it now because there is absolutely no coolant in there because we have removed all the radiators from the front and there are two coolant reservoirs, we have this one here and then under this Aston Martin plastic section here there is another coolant tank, this coolant tank is for the charge coolers and to call the turbos and I think it runs to the back to run the coolant in the gearbox as well, so we have to make sure that both They're full before we can start, but Aston Martin is Aston Martin alright.
Actually the engine is an AMG engine, but you can't just refill it anyway, it has to be vacuum filled and well, let's grab it to vacuum fill the system. of coolant, this is what you will need. The best way to put it is a vacuum filler, so we'll go to the expansion tank under the cap and then instead of the cap, we'll replace it with the vacuum filler. It has a pressure gauge on the top and a plug on the bottom to make a good seal with the expansion tank and it sections out to the right side where you attach a T piece and then connect to your airline, this comes out through the vacuum filler and when you open that tap it should create a vacuum in the coolant system but mine didn't seem to have a vacuum.
Now there is an overflow tube for the coolant that you can see here, which goes to another overflow bottle and then a tube that leads to the floor just to drain the excess coolant. so I thought this might be the reason I'm not getting any vacuum so I under the overflow tube and then tapped it with a bolt and some tape hoping to create some weird vacuum in the air compressor , still had no emptiness. the coolant system I can no longer get a vacuum through the cooling system there is no Eva, there is a big leak somewhere in the system or I am just not doing it right so what am I going to do instead of introducing coolant first?
I'm just going to run some water in there and see if there's any obvious spots that are coming out. I don't have a smoke test to prove it, but I'm just going to run some water and see. What's wrong because it's coming out, so it's obvious there's a leak? I just have to find out where it came from. I couldn't see much from below so I started taking apart the top end of the car, aha, found it. I found the problem here we go so it's just a radiator hose that wasn't connected to the many radiators in the front of this car and now hopefully we should get some vacuum and you can see here on my indicator that We are starting to create a good amount of vacuum and you know this because you can feel it in the refrigerant pipes, where it is sucked into.
After a while you can see that the cooling system was holding the vacuum so now it's time to add the coolant so I have to connect the coolant hose to the vacuum system and then it just sucks the colon into the system of cooling and then I realize that it looks like I have a bad pressure cage because it seems to say that at the same pressure it doesn't matter how much coolant I have sucked into the system now, as for the other expansion tank, well, they are no good news, my vacuum filler didn't seem to fit on top so I was going to take a chance and just fill it with coolant in the hopes it would purge itself, ok we look good, we should all be airtight now, fingers crossed, Both tanks are full, it's time for the moment I've been waiting for since I even booted up the board and that's getting started.
Set it up now before you go ahead and start the Aston. I just wanted to run the autel to make sure we don't have any dramatic fault codes. Remember we have to read this as a c63s because it won't read like an Aston. Martin, but we have learned that they are more or less the same and we suspect we have a few fault codes, but the one that worries me the most is the restraint system. The last thing I want is a fault code for the passenger side. airbag that is under the dashboard and is not accessible and that we spent hours putting right.
I had a sinking moment and thought we might have a fault with the passenger side airbag that we can't actually access without taking the entire dashboard, but we still have fault codes for the restraint system, but luckily they are fault codes that we were able to correct, so all these fault codes, if I am correct, are for the seat belt, so you can see here the script for the emergency tension on the tractor for the belt and the Front passenger adjustment is faulty, there is a short to the ground and now it is exactly the same for the driver's side, although the seat belts did not lock, they are still indicating a crash fault. code, so it looks like to get rid of this fault we have to take off the seat belts, send them in for reset and then reinstall them, but that shouldn't stop us from starting the car today.
Moment of truth, will it start? I don't think it's a good idea to sit here in case there's an air pocket. Yeah, actually, I'm going to sit out of the way in case you know about safety and all that. No, nothing, it turned red. Yes, it turned red. So press on. Oh she's good, you see someone, she's running and the airbags haven't deployed, she also has a check engine light, I'm not really sure which one that is right now. I'll keep an eye on the coolant reservoirs. I left the cup open, I hope there is some.
The airlocks or whatever air bubbles are in them will rise over the top and come out but the good news is it's running and hopefully no airbags will deploy and I think it's just those seat belts Those of us who need attention are practically at temperature. and everything seems fine, we still have the check engine light, the airbag light and also the bldg not available whatever that means so it doesn't seem to matter what I do. I can't get that fastening system off the board. with the seatbelt on, so it looks like we're going to have to take them out and send them to be reset, but now it's not the worst thing in the world.
I really can't wait to get this thing off the ramp and out of the unit and We're not that far away, there's a few more things we need to do. Yes, it's really just the hood and bumper that need pain, but what I want to do before I get pain is make sure everything is in line. up and at the moment we are far from that, the space between the hood and the door is quite large and it is also lower than the door. I didn't put the top wing back in place so I could access the hood hinges. just to move that around the bumper has a pretty big gap here there is a gap between the bumper and the headlight the hood is not the best fit at the moment The space is absolutely huge here the space is huge here and again this hood The space it's inconsistent with the one over there, so let's start this kind of tedious job of lining everything up before putting the wheels on and getting out of it to run up and down.
I can do this by accessing the hood hinge and then the trim. for the hood, back and forth and left to right, it's done from where the hood actually bolts to the hood hinge at the top. Now, when I went to Aston Martin to pick up the passenger side airbag, I asked the technician if they had clearance tolerances on the panel. and they said no, when they do the PDR inspection, they just make sure the panel gaps are the same on both sides, so my checking tools to make sure they're the same on both sides is this little trim tool and both sides seem pretty close but if I'm honest I don't know how well the panels line up from Factory and all I have to go on is this video.
I'm talking about Vanessa plus Advantage out of Aston Martin when we went so I'm just trying to get the bonnet lines as close as possible to that video and next up is the front bumper. You can see it's pretty low compared to the hood and luckily for me there are plenty of adjustment screws for the bumper to get it to where it is. Bonnet sits back and trust me, if you've ever done this job before trying to align panels on a car, you'll get tired. I actually ended up removing the headlights to try to align the bumper a little better before opening them again. inside and then I try to align the headlights with the bumper because they also have a lot of adjusting screws, this is honestly what Aussie things are.
I've played with this fortoo long and well, I thought I had the Gap panel. perfect here I thought I had it perfect here I thought I had it pretty perfect there you line up the headlights and then it's like the hood is just below the headlight, it's almost like the hood needs to come forward a little more and this gap seems too big, I don't know, but if I move the hood forward, this gut will get bigger, it will also mean that the body line here will also move forward and, oh, it's just and It's the same from the other side, the headlight barely it reaches the hood, but move the headlight back, it's just not going to solve things, it will be further from the bumper and I'll try to move the hood forward a little bit. but I don't see myself doing this well in the end.
I ended up giving up the hood and the bumper still needs to be painted, which means they will have to be removed again, but it would have been nice to be able to do that. to undo them, paint them, and then put them back in the same position, but it looks like we'll worry more about that when we get around to refitting them, since I'm sure they fit perfectly. They are all OEM parts and we know it. Everything we've replaced is in order, but for now I'm going to start screwing on all the final little details and if you watch the previous videos you'll know that I bought a few extra things for the Aston, like the carbon wing. mirrors instead of replacing the entire rearview mirror.
I managed to remove the cap and am then going to replace it with this genuine Aston Martin carbon mirror cap which will now match the carbon front splitter and carbon bonnet vents of course below. the rear diffuser we have a full carbon one to replace the standard rear diffuser but it wasn't long until we had some problems with that so this diffuser came off a racing car, now racing cars don't tend to have lights reverse. and well here is the reverse light which is just a small thing here and there is no other reverse there which is rented with some options and one option is to put the old one back and have a reverse light but no carbon and the other option originally was to drill this and cut it to have a reversal, but as you can see if we put this in the right place, it's a lot further away than the reverse light, like if we cut there it's just not even close to that. , the only other thing we can do is extend the wiring, like you just drill a hole and put a little LED light in there, let me know, well, let's turn it on and we'll go from there.
Now okay, let me look at it, we're like in a tight space, but this is absolutely colossal, you can tell it's a race car, this probably actually works as a race car feature, it probably has some kind of charge aerodynamics and it's there for a while. right, but it's absolutely colossal and I think in my opinion at the moment it looks out of place, it literally looks like someone just cleaned up some wood on the back, if we had a big spoiler to go with it it wouldn't be. It wouldn't bother me that much. I think this looks epic.
There's so much aggression, whereas the ducktail on the back doesn't have as much aggression. Vote, maybe we have to go back to the original. I think I vote. no let me know in the comments section let's take this off let's put a windshield on and we'll finally be able to get it off on the first try so maybe I'm getting old I actually said no to a modification and while I have time to think about my It appeared A mature decision screensaver with a new windshield for the Aston, the last piece of the puzzle. Foreigners aren't cheap at the best of times, but when in an Aston Martin it gets even more expensive now direct from Aston Martin.
The windscreen would have cost me £2,300 but from the screen protector it is still an expensive windscreen but it saved me quite a bit at £1,200. We also have a big thank you to Robert Auto Dents because I saw a pretty good dent on the passenger side. door where the old bonnet had crumpled, he went out and made some paintless dents in the door and now you wouldn't even have known it was there and with all that done the total cost so far comes to £15,704 and P54 but now It is the moment I have been waiting for all the time since I had this Aston Martin and it is taking it to the body shop for the first time.
I literally can't wait but here we go, I have no idea. how has this happened in my life, but here I am driving a 2019 Aston Martin Vantage that I bought and rebuilt oh we are already having a problem, we have a full gearbox, yes we already have a gearbox. Hi can I. You follow me because I keep cutting so like the C63 we haven't gotten very far before we have a problem, it seems to be something to do with the gearbox I think at the moment and I don't have the code reader with me. We're just going down the road to the body shop, but all we have to do is get there.
This is the fault of Edif not being available and that could mean absolutely anything in the world of Aston Martin. We also have an engine. The admin light is also on, so maybe we should just put it in normal mode. I got a little anxious to put it into sport mode, but we're waiting for Hannah to follow us and we'll see if we can. get it done there come on Aston, so as usual with cars with crash damage we're probably going to have some teething problems when we first take it out. Come on Aston, we're just going to the body shop, but it seemed like this was just a small problem. and then it seemed to drive completely fine despite the fault codes on the dash and it was also good to see that the 360 cameras were working too, but it finally made it to Allied Automotive where the hood and bumper will be painted nicely, so Hood and The Bumper is now disassembled and ready to paint.
I have taken it all apart but it can be put back together with the same alignment. Although we still need to perfect it so stay here for about a week and then the car should be completely finished so this is the day we will finally pick up the Aston, where it could now be seen as a complete car. Yes, there are some flaws here. and there we had it when we went to drop it off, but I hope to order them today too, let's go see what it looks like now with the painted hood and bumper.
This reconstruction is going to be very sick. Accident damage to an Aston Martin has not been easy but I was willing to take the risk of finding the potentiometers has been difficult but replacing that board has been next level but I hope in today's video we can get it closer one more step to solve it. Finally I'll get back on the road for real and here we have a black bumper that looks much better, oh, and the bodywork is already on, uh, wow, oh, it already looks very different because I still had a lot to adapt to.
I bolted the bumper to the car with some bolts and put it back in the unit and we are back in the unit. You may notice that Aston isn't quite complete yet, it's missing the headlights and front bumper, which is that way, but they're all painted and ready to go. I just didn't want to give it away so early, but the black paint now makes the Aston look much more complete, it's been sitting for a few weeks and is incredibly dusty at the moment. but I'm sure after a good clean it will look amazing, but the bonnet and bumper being painted of course wasn't free, this costs £800 which brings the total cost of repairs so far to £16,504 and 54p, and we have to do a massive thank you to the certified tinter for opening and tinting the Aston's windows, which in my opinion is much better, but unfortunately the cost of repairing this doesn't end there now if you remember in the last video when I took this out on his first little trip to the body shop.
We had a few crashes that showed up on the dashboard, one of them was an electronic differential failure of course, meaning electronic differential so the E differential works and works properly. We need to have a fully charged battery because it uses a lot of energy. Now an Edith does exactly what it says on the tin, she is electronically controlled and receives signals from the sensors in the wheels and will then send a different amount of torque to each wheel depending. in oversteer or wheel spin and she can do this in milliseconds, but for this to work we need a full battery charge.
Now when I bought the car I replaced the battery with a new one, but since it was here for so long it died and I can't seem to charge it again, so I think the solution was obvious. I needed to replace the old battery, which was actually a new battery. I go back to the store where I bought. Remove it and replace it with a new one and I hope that now, with the battery fully charged, we will not see any failure in the e-diff. I guess the only way to know if it worked or not is to take this thing out of its place. first proper drive, but to get this out on its first proper drive, we need to build the front end, so here goes, so this is the moment I've been waiting for so long to see the Aston Martin from the outside looking complete. like a completely intact Aston Martin Vantage.
We spent hours trying to line up the panels in the last video and we still couldn't get it 100 perfect, but now that the car is painted, I'm going to spend a little more time trying to perfect the lines between the bumper, headlights and hood, so what you're seeing here is just a fraction of the time I spent trying to align this and then of course there's the bottom tray to put the carbon hood vents in and then the Aston. almost done wow this is literally one of those pinch yourself moments, it looks so good folks that bonnie and a bumper can make it look absolutely crazy and the craziest thing about this.
I have an Aston Martin three years ago I was working in an Indian restaurant and now I have managed to rebuild an Aston to this point and I am about to take it for its first real drive. An ordinary person like me has managed to achieve his dream job and own cars. So, if I can do it, I'm pretty sure anyone looking at me can do it, and in that sense, because of the amount of hard work and money that has gone into this Aston Martin, I've given myself a little gift. I'm going to keep my butt inside at least for a while, so I treated myself to some beautiful matte Bond license plates.
I love them and of course these boards have been sorted by UMR accessories as usual, not quite ready yet while we can get out. and take it through its first real drive, it will be short lived because there are a few glitches and a few more fixes that will require it to stay in the drive a little longer than expected, there are a lot of cars with crash damage now. That have been repaired may look good from the outside, but they can contain a lot of unexpected faults, and sometimes the unexpected faults are the ones that hurt the most, especially when you go out and buy a car that you thought was straight and it isn't. problems and then take it home to find out that it's riddled with them, so in the final diagnostic report we actually only show three volts, one with a 360 camera that we can do a calibration for and we'll get to that later. the video the other one is for the air conditioning because we need gas in the air conditioning and another one is for the power seat something with the memory and the power seat but again we can get to that but that doesn't show us why we have a The headlight airbag is on here, we have a steel building not available, so maybe the battery didn't fix it.
I guess we'll find out when we take it for a spin and then this airbag here, front right and also front left, and those airbag lights. They are the reason why this first trip will be short lived but we will get to that later, for now I need to get this on the road so we will try to fix those lights later in the video and they become a little more complicated than which was expected but for now let's try to turn off the light in the building, okay, here we go, the James Bond budget is on the way, this time we're going to take things slow from the beginning, well, first of all, no, not yet we have building not available I guess not available is not as bad as broken, it is just not available maybe some calibration process is needed.
Not too sure so far edif not available yet so no electronic diff well I think it's safe to let the Aston breathe let's see what she can do thanks please standard exhaust system and we have shifting creaks downhills it's very fast now yes it was fast but the wheel alignment was all over the place so I took it to laser align it so all the wheels were pointed in the right direction and the steering wheel was straight which meant that I could calibrate the 360 cameras so that they all worked correctly and there was also one more thing that actually fixed itself.
I don't knowHow is it a miracle? The building is no longer available. The message disappeared from the board, we only have two more folds left now. I'm actually thinking the building was unavailable because the gearbox wasn't hot enough. Now I have a little temperature. It can be seen on the gearbox. It has disappeared. So far I've borrowed some warning lights on the dashboard, it looks like we've had a successful first drive of the Aston, what a car, it looks great from here, but there are a few things I'm still not too happy with. I'm not sure about the fit of the panel along this headlight.
I'm pretty sure there shouldn't be a gap maybe that big between the hood and the headlight. I have tried everything to make it perfect. It's exactly the same on the other side. It's almost like. the hood should move forward but if the hood moves forward it will be too close to the bumper but we could move the bumper forward but also if we move the hood forward we will have a much bigger gap between the bumper and the Bonnet and the door than just it's not going to look good hey Kev so I think maybe we'll have to look at another Aston Martin In the Flesh just to check all the panel lines but other than that we only have two more faults left and if you guys thought the Estimated repair was expensive, just look at how much it's going to cost to run.
I just bought 130 pounds in the tank of fuel and that's an estimated 180 179 miles and look, we have a full. tank there, we're back on the ramp, it didn't last long now. I won't be installing this badge on the front until this car is 100 road ready and we get back to the bug that prevents us from putting it on properly. On the road these two come on and this is caused by the tensioners on the right front seat belt and the left front seat belt but there is something we can do about it. The way to cancel that is to remove the seat belts which We will send it to the airbag team and they will reset them and then we can plug them all back in and it will be as safe as when it left the factory, the only problem is what I thought.
It will be easy enough to access the seat belts, but I was quite naive if this is an Aston mine. I thought I could save a bit of time by calling Aston Martin and asking the technicians how to remove the seat belts as it is much easier. when you know what you're doing, yeah that would be perfect, they never called back so it seems like the usual case, we do it alone. Removing seat belts from a car is normally never difficult, it's just frustrating to get to them as they are hidden behind a lot of panels and it's exactly the same for the Aston.
We removed the rear lever trim, which requires us to remove a lot of trim to get to it. There are bolts on the back that hold the package type. shelf, the trim on the headliner also holds the trim with the seat belt on, there are some allen wrench bolts we need to undo as well. I removed this entire center section here and all the bolts for this center section were hidden. under the carpet and there were a lot of them and then I was able to remove the panel enough to access part of the seat belt behind it here's the airbag plug that I'm going to carefully disconnect and then there's a 13 bolt thousand attaching the seat belt to the frame of the car, now the second half of this seat belt is connected right next to the sea, but it is impossible to get there without removing the seat, so it seems that the seats are coming off again and with After removing the seats, I can undo the other electrical connection for the airbag sensor and undo the final bolt to remove the entire seat belt and there they are both finally out, so the interior of the Aston, being complete , it didn't last that long and neither did it. drive in it, but now we have both seat belts removed and ready to be sent to the airbag team.
Here you can see the turnbuckle on this side, which I don't think is actually deployed, whereas on this side you can see here that it's a little bit shorter, so I would say that that side has been deployed, but this will all reset to the factory standards of the battery and everything then we can put them back in, that should take about two or three days, but look at the state of the inside. It was never going to be an easy job, was it? But once we wait a few days for seat belts to return, there are a few things we need to do now.
This probably won't make much sense in this video, but I'll find out as we do this in the next one, but for now I need to remove the calipers from the car, all four of them, which have brake wear sensors on each corner, so we need to undo those as well. . removing the brake lines and the caliper from the disc and I don't know about you but the Aston Martin sticker on the calipers looks bad in that sense, this is the rear one without the four calipers. I'm going to start taking the hardware off of them, so it's just a bare caliper and Chris will start cleaning them so they're nice and fresh with no dirt and we'll get them all clean, then we can start rubbing them with the Scotch pad.
Pick them up and you can get an idea of what's going on here and Welcome to our Aston Martin registered paint booth, it's time to mix the paint. Yes, white. You may think I've gone completely crazy, but I've been crazy since I was born. It shouldn't be a surprise to you, so now we're adding white paint to increase the layers. You might think that the white tweezers would get very dirty, but with a layer of ceramic coating, once they are dry, we should be able to avoid that. that and protecting the calipers at the same time, once we built up a few coats we let them sit and dry before adding the lacquer, how's it going Chris brilliant mate, that's how Aston Martin was fortified and then once they're dry Can I then?
Start reassembling all the calipers with the brake pads and then put them back on the car. The work is done with two white tweezers. The only thing we're missing is the Aston Martin badge here, but it should be here tomorrow. Update the stickers. I arrived and put them on the path that I think they should continue with Aston Martin always facing inwards, the steering wheel is the same for the one in the back, but yes, it is brave, but this will all make sense in the next video, believe me, I have not bleeding. brakes or anything at the moment but one thing I wanted to do is just put the steering wheel on just to see what they would look like behind the wheel because I know it's going to look absolutely crazy yeah man that looks absolutely mental but yeah like I said that it will all make sense in the next video but i don't know what you guys think people are too secretive especially in the uk when it comes to modifying or customizing your own car why don't you modify the car the way you want you want, especially since I'm going to keep this at least for a short period of time or maybe for a long period of time.
I don't know yet, so here's the 2019 crash-damaged Aston Martin that has cost me £16,504 54p to repair so far and that's not including my labour, but what a nice car it's turning out to be and, although it has cost me the best part of £16,000 so far to get to this point. It could have cost me a lot more. I managed to cross reference parts that Aston Martin used from other cars like Volvos, Mercedes and even Citroen and Peugeot to do a super expensive rebuild, it just got expensive but a few things were missing in order. to complete this car today and that should be in this box here we have the seat belts if you remember in the last video we still had two warnings on the dash, both referring to the belt pretensioners.
I sent the old belts. We go to the airbag team, they put new tensioners on the belts and this cost me £455, but with that we have new belts in a more vibrant red than before and once we install them, hopefully we shouldn't have any more lights on. On the dash the belts can only be installed one way, if you install them at the slightest wrong angle then the belts will simply lock and you won't be able to put them on and if you remember from the last video we had to remove them. Almost half of the interior was replaced just to replace these bolts, so it's a pretty complicated job putting this all back together, but once I got the belts back on, I was able to reinstall the seats and now it's starting to look more like a Complete Aston Martin, so here.
It's a complete interior and now fingers crossed there are no more warning lights on the dash so it should be a complete car and there's only one way to test it. The car will have some Aston Martin fastening failure now with the new seat belts. on come on, it turned off, no messages so far, ignition on, all lights on dash, no messages, looks good so far, we just need to check if we have any codes on the car, now remember we have to scan this car as a Mercedes 205. C63 we learned from the first day we picked it up when we tried to use the autel to scan it as an Aston Martin and it didn't work, but considering that the Aston uses an AMG engine, it seems that the ECU is also an AMG.
A lot of you have been asking where I got my car from and I'll put a link in the description box for that too but so far it looks like we have no faults which is great not even any on the foreign retention system yeah I love a photo here. I'm going to yeah, okay, 360 camera glitches, yes, while we didn't pass with flying colors, we seem to have a few glitches, all of which seem necessary. calibrating like the 360 camera and we need to add gas in the air conditioning, but no dramas there so it's almost flawless, some more advantage I would have from the moment we picked this up and the final part of the puzzle, well the seat. belts, calipers so white we painted the calipers in your last video and I was going to explain in this video why we went from red to white, but before we do that I have to make sure I bleed the brakes.
I didn't do this. Direct because I wanted to make sure the paint was fully cured before I started bleeding it and then I could accidentally drop some brake fluid in there. For this, I'll use my brake bleed kit that I grabbed. On eBay and on the Aston there are two bleeder nipples on each side and we are just going to vacuum both using my kit so this is the part where we split some people up now the Aston looks great in black I admit it, but it was I'll never say this color, it wasn't my final idea of what this car would look like once I finished it.
I wanted to do this carbon here and on the front I wanted to just get away from the car and also Black cars are one of the hardest to keep looking fresh, especially when I really want to drive this. Yes, that's right, I'm going to wrap it up. Oh no, why do you do that? You'll only ruin it. Look, we all like it. the same thing, we would all drive the same car of the same color, it would be a very boring world, yes, but why wrap fresh paint? Why didn't you paint everything if you wanted the color to change well?
It would have cost a lot more to paint than just a hood and bumper and plus the rap gives you the flexibility to be able to change the color of the car whenever you want, you can't cover up new paint or whatever color it is. that box well, I just don't like it, don't worry, it's not new paint, this guy sat here for a while, just like the Range Rover did before wrapping, just like the RS5 did before about that and just like the Gold 4 did it before I finished that and I understand that not all people are going to like what I do, that's the point of the comments section below, you can comment on your opinion, but if I'm honest, I've cast a little look at this and I'm not so sure about it on the wrap, maybe it will look different on the car and I know you'll also be asking me why I didn't wrap the car instead of painting it.
I would have saved some money. I actually did this on a few builds and some people said I didn't do a proper job because the car wasn't painted under the wrap, so at the end of the day it doesn't really matter. Which way I do it or which way you choose to do it if you're going to do it yourself at home, some people will like it and some people won't. I don't think there's a right or wrong way to do it. this, but for this time I have decided to paint it before finishing, so now that it is finished, let's show you the foreign satin red color.
I think that's the name. We used purple on Liam's Audi S3. and now it's time to use red on the Aston Martin. At first Glimpse wasn't too short, but now I've seen it in some sunlight, it has a nice glow to it and should look great against it. carbon, but there's only one way to find out what a satin red Aston is going to look like and that's to start putting it on the car, so why sit on red, but originally and I know a lot of you wanted to see British racing green. The problem is that British racing green is an Aston Martin color and I think if I try to replicate it with awrapper would just make it look like a fake version and wouldn't look good, so instead of trying to replicate something I wanted. go completely to the other end of the scale and do a color that Aston Martin doesn't make from the factory, sitting in red, that way I think the car will stand out from the other Aston Martins and at the same time give it a nice finish and it won't crash with the interior, which is black with red stitching and I think the white calipers will contrast nicely with this foreign color.
I want to encourage you all to not be afraid of what other people think about what you do to your car. Your car does whatever you want, what are we thinking so far? I'll be honest with you, when I put the back room in I wasn't too sure, but then when I started putting the door in I started to see. Lines on the car that I didn't even know were there, like here and all that, when you see it on the black side, it just hides those kind of lines and then it also makes the carbon stand out a lot more compared to the type. of red instead of black against the carbon, so right now I think we're on to a winner, we might be now my original plan was to leave these side skirts black, but now I have the door and rear quarter wrapped.
I think those side skirts look a little weird just being black, so I think I'll wrap them up, but I don't know, maybe I'll leave it for last just to see what it looks like and same thing. For the door handle I wasn't really sure whether to leave them black or red, but I'm sure these handles are designed to make the door look nice and soft and then being black it stands out a lot and yes, I think It probably has to turn red, it's just these parts of the handle here. It's going to be really nice to get a good cut out there unless we remove everything, which I imagine is going to be a whoa, it's going to be a nightmare, right?
So I think we'll try to wrap it with it on, but again we'll come back to that, so next is the hood and this one won't be like a normal hood. This hood is huge, it's actually wider. than the wrap, you can see here how much we're going to have to stretch the wrap to be able to do this in one piece, so I was here for quite a while trying to heat it up, pick it up, stretch it, heat it up. Pick it up and stretch it, and time and time again I couldn't get it to stretch the entire length of the hood, but finally with Hannah's help we almost got it done, but I wanted to be careful not to stretch it too much. discolors it, but I think we've almost hit the nail on the head with it and we look at it crashing into that pleasantly strange carbon, moving on to the front bunker, which is usually one of the most difficult parts of a car, but this front bumper On Aston, well it's quite small, very easy to make and with a bit of editing magic the left side is done and moving into the trunk but again all the panels are small so it wasn't too difficult.
If I'm honest, I made the executive decision to wrap the side skirt in red. I felt that being black hid part of the car and made the rear look higher than it really is and with the side skirt wrapped I can then fit the wheels and do the last finishing touches. before putting the Aston Martin on the pristine road for the first time since the crash foreign, foreign, cheap James Bond with holes in his ears, but what a car, it looks absolutely unreal and I'm delighted to be driving it for the first time. no faults it is absolutely I can't even explain the feeling you get driving this car.
It makes you want to make excuses to just get out and drive it. It's so good, it's fast, it handles well, the seats are comfortable and it looks. So good that I still can't believe this is my car. This is unreal from what it was to what it is now. Oh, it's absolutely unreal. Some of you may have noticed some changes I made before revealing this to you. Guys I still can't get serious about this and those were the side skirts here and also the front splitter now when I took the Aston outside for the first time after wrapping it something just didn't seem right and my eyes immediately went to it red side skirt that I had so straight the way I got rid of the red side skirt leaving it black, which then looked much better flowing into the black rear diffuser we have here, but still something was grossing me out and actually what is it .
It turned out to be the front splitter. I actually downgraded it to black instead of having the carbon one on the front, I think looking at it from the side of the car and seeing a carbon front splitter, then going to a black side skirt and a black rear diffuser just doesn't add up. It looked good, but now I think it works much better even though it is a little faded, but that doesn't mean I got rid of the rest of the carbon, from the front wing up. it's all carbon like the carbon mirrors and then also the huge carbon hood fence that it has and what a final product, well it's not final yet but we have some videos on that.
I received the Aston Martin log book. I happen to be the second owner the other day and to be honest I think it was a bit of a relief for the Aston because the previous owner did this to it and you guys have been watching me for the last few months rebuild it. "Getting parts for this and finally getting it back up and running, but today we'll find out how good a job I did because Aston Martin we're about to evaluate what a build it has been." I really enjoyed it, but today we will find out if I did everything correctly.
This has to be the best all-around car I've ever owned and it should be. It's basically a hundred thousand pound car and it only cost me. just under £17,000 to fix it, but how much did it cost you to buy the car? Well, you have to go back and watch the first video. I will now click on the top right corner even though the car costs around £17,000. £000 to repair I think we could have done this a lot cheaper but we bought a lot of unnecessary parts like the carbon fiber wing mirrors, carbon fiber wings and these huge bonnet vents but it looks amazing but one is missing thing on this list. and it's something that I do with all the accident damaged cars that I buy before I put them on the road and that is maintain them and that can actually be a big expense, but luckily I don't have to pay for this or do this I did it myself on the Aston Martin now, if you remember, when we were replacing the dashboard, we went to Aston Martin to pick up the passenger side airbag and while we were there they mentioned that this car was purchased with a service plan and that service plan. you keep the car and it has only had one service so far so we are taking it in for the next one for free so not only will Aston Martin check my repairs we will also get a service which is technically free but before we go there there is one more addition I've been dying to make to the Aston Martin since I put it back together and that is to get rid of this tremendous Arch Gap, hello foreigner, yes the Aston sits quite high. but that doesn't mean it's bad, it just doesn't look very good that tall, but I have a solution for that and it's inside this box here now these are KW adjustable springs and they will sit on the stock shocks which means that we can get the best of both worlds.
We still have the adaptive damping system that we control with the small button on the steering wheel. Aston, but we also have an adjustable ride height, which we can do using this little C-wrench. I have to be at Aston Martin tomorrow at eight thirty in the morning and it's now seven in the evening, you'd better let's install. I'm not sure how difficult this is going to be as I've never done one before but notice with the wheel removed it doesn't look too difficult, the whole shock and spring just sits on its own and is attached to the lower arm with a bolt and then there are just the bolts on the upper bracket so the first thing I'm going to undo is the bolt that picks up the shock on the lower arm at the bottom and once I undo that I can lower the car and start undoing the Top support. bolts, of course, there is an electrical connector for the shock absorber that controls its stiffness.
I have to disconnect it and to get to all the top mounting bolts, I have to undo the strut mount enough so I can get my ratchet under it. and then I can try to get the strut out, but it didn't look like it was going to come out, but now you all can see the new Aston Martin Vantage T that I am using and that we have made a limited number of the links in the description of one of them, so since I can't get the strut off just by unscrewing those few bolts, I'll start by undoing the upper Wishbone that's held on by two bolts with that off the way I did it.
I should be able to lift the strut up and I could, and with the straw and the spring out of the car, then I have to remove the top bracket and I can't use a normal ratchet because this cable with the electrical connector on was in the way, so I'll have to Use a gooseneck wrench to access the bolt in the upper bracket and undo it. The problem is that my Swan next Banner was not thin enough, so I had to make some modifications. to my tools here foreign modifications to my gooseneck wrench. I can then use the spring compressor to of course compress the spring which makes it safe for me to undo the top mount with my newly fitted Swan next Banner, now with the front suspension to get with the all new KW kit.
I have to remove this standard spring seat from the shock once that's done, then I have this adjustable spring seat to put on the shock and then I can start rebuilding it first. goes the new spring, which is much shorter than the standard one, then goes the dust cover, a shortened Bump Stop, another spring seat, an auxiliary spring, another spring seat and a top bracket and then the old top mounting bolt tight with my newly adjusted turtleneck. wrench and then we are ready to put everything back in the car. We have to say a huge thank you to dtb motorsport for getting me these KW springs as they managed to get me a pretty good price.
Regards, Dave, of course. Reassembling them is exactly the same as disassembling them, but in reverse, making sure that when we tighten all the bolts, we preload the suspension to prevent any unnecessary wear on those bushings and there we go, a front, moving on to the rear. the rear suspension is pretty similar to the front suspension the spring sits in the shock just like the front there is a bolt that holds the shock to the car at the bottom just like the front too I'm going to have to remove a drop link just to move To get it out of the way and to get to the top mounting bolts, I have to open the trunk, remove some carpet and then I can access the three bolts which of course are the top mounting bolts, not forgetting undo them.
The first electrical connector with the top brackets is ready. I can take the strut out of the car and Liam and I can start building the rear suspension with the new KW adjustable springs. The work is done. It's time to reassemble the strange springs. Adjustable KW springs are ready. They're looking at MIM, we don't know exactly what the height will be yet, but we have them on the absolute lowest setting. Hopefully we can get off the ramp now. I am aware that the standard wheels sit well. deep inside the arc, so now we have the solution.
If you've seen the previous versions, I normally change the alloys, but because these alloys are so light and the tires are made especially for Aston Martins, I just feel like they show through. Well I'll keep them too but as I mentioned they sit quite a ways into the arch and Aston Martin has a weird wheel PCD so I couldn't buy spaces on the internet, now it's real Mania although they haven't provided us with wheels for this build they have provided us with a solution and that solution is wheel spaces because I couldn't find them anywhere five by 128.
I think the PCD was for these Aston Martins so if I write saying I'm probably the only person who owns spaces for wheels with this size only on Aston Martin made especially from real Mania, let's put them on and see how they look when these cars are lowered and why let's do it, who would have thought? Not only did it give me a real Mania. with some amazing wheels in the past they are now making the stock wheels look even better than before with these hub centric spacers, these spacers bolt onto the actual hub and you may notice the bolts sticking out but they should fit just fine inside the cuts. on the back of the standard Aston Martin wheel, now I can't remember the exact size.
I told Wheel Mania to make these wheel gaps, but if one of you is looking and we have an exact Aston Martin kid like mine, feel free. to contact them with the link in the description, okay we're just going to go down, now the wheel wells are on the threaded shocks, will it be on the floor or will it be a nice respectable height? There we go, I feel like the ramp. Yes, I feel like he's going to get stuck.on the ramp oh oh, is he stuck on the ramp? I feel like the ramp is holding it up I think the ramp is holding it up, but those bat wheels, jeez, the ramp is holding it up so it can go even lower than that, it looks absolutely hitting in the front, we don't want to rub up, although we want a good fit, so we need to go to the wood and then come back, yeah, I think that was perfect right now, it's literally perfect.
I think I have enough clearance there, but they still have to adapt, they still have to adapt, that looks absolutely fantastic. Stunning stuff and you know it's good because right now this took a lot longer than expected, it's half the time. in the morning and at half past eight we have to be at Aston Martin in the morning, let's go abroad after putting them on and then taking them off, they set up. I'm going to be honest, horrible, the problem is with the adjustable springs on the standard draw. As soon as you go down a little bit, you lose a lot of play in that shock, so it almost felt like I was running on top, so it's lower now, but it's enough to not break my back and, yeah, anything. below I think so, you're just at the top, but I still think that now with those gaps and that ride height that's perfect, let's go to Aston Martin, here we go, it's doomsday, this is Jake and Jake is service advisor at Aston.
Martin we already have Jake to thank because you have been helping me throughout this Aston Martin build and to be honest all the Aston Martins have been great during this build even if they didn't sell me some of the parts I needed . I don't know, maybe they were just jealous that I didn't buy my car at least for the price, but hey, here's my crash-damaged Aston Martin Advantage inside the main Aston Martin dealership in Nottingham, who would have thought? This workshop is impeccable. We have James. The technician will take care of my advantage today and he will also inspect some of my repairs, but first we will go to the service and remove the air filters.
He already has the new filters aside and you. I can see here that my old ones are pretty faded and worn, but I think James has been pretty impressed with the rebuild so far and even gave me an amazing compliment. Oh, thanks, but the compliment was quick when he noticed I was missing some rubber mounts for the top. my radiator, so that's what those things were in my toolbox for the last few weeks, but hey, we can't all be perfect after the airfields were in James, he put the car on these really fancy ramps and started to check more and then moved on to removing the oil filter which, for the first time on the Aston Martin, was in a really clever place, right at the bottom of the engine where it should be, and with the oil filter removed you can begin Just remove the drain plug to drain everything. the oil comes out of the weird engine stopper that was in the trunk, which apparently is pretty common and I wouldn't have even noticed it, but he said those little rubber stoppers weigh five pounds each from Aston Martin and with the new oil filter oil inside and drain.
James tightened the cap and then started to fill the engine with oil using this cool machine here where you can type in how many liters he wants to put in the engine and get it exactly after that he hooked up his diagnostic tool and started the car by default . codes and we just received and there's something, nothing, nothing, wow, so at the bottom, there's nothing behind it, shiny, would you believe it? There are no fault codes using the genuine Aston Martin computer and you heard it there and the Aston Martin technician gave it the thumbs up.
I'm completely flabbergasted, who would have thought, but now we have more work to do, so with the service and health check done and we also have the wheel spacers and lowering springs, it's only fair while we're here to get it. This on the four wheel alignment because we would have completely removed the entire wheel alignment from the car by lowering it and making it wider but they mentioned that this is set up for a standard advantage but they will do the best they can so let's fix the tilt, alignment and everything, but so far so good, foreigner, this is really great to make this as accurate as possible.
You need a full tank of fuel and 37 and a half kilos in each seat of the car. The way James does the alignment, the car must be set up perfectly for when a driver and passenger are sitting in the car. It's crazy the little details that Aston Martin takes and it's definitely a good job doing this because after the computer took the readings you can see that the wheel alignment was completely out of alignment but it's not surprising that this car had a quite serious blow. Another thing I wasn't very happy with was the alignment of my panel.
I couldn't work out if it was too big or too small so James told me to go take a look at the showroom and look at the Aston Martins they had there and I honestly think my Gap panel was better than some of the ones. from the showroom. The panel line of this satin gray was visible very close to the front. It rolls but then opens up more towards the headlight, but I don't know, maybe I'm a little picky and speaking of picky, Hannah walked into the spec room where you can choose pretty much everything from colors to lever types and anything in between. want when you order a new Aston Martin, it turns out you can have pretty much any color with any finish, so maybe my satin red wrap isn't as unique as I first thought, and while we were joking around in the showroom, James was tough on I work trying to get the alignment perfect and it looks like I was having some leeway because here's my impression, everything went from all red to now all green and pointing in a straight line exactly how we like it, so it's up to James to take it out, take it to a test and make sure it's driving everything right so the tracking is done now and the car is driving straight and we're right at the end; well, it would have been the last thing, but the tires. could be a problem but right now the air conditioning needs to be running the number of times I've turned this front part off and on again and obviously I haven't guessed the air conditioning again and we're in the right place to do that.
So James is going to get on with that before finally finishing the Aston Martin, so with that coming up in a bit, taking a road trip in the Aston Martin is a must but always look good and Aston Martin has been great even if it crashed . damage one, these are the only things that showed up in the report there was minor damage to the offside front wheel there was some rust on the exhaust tips a very small Plymouth front license plate was missing and of course those tires were missing from the radiator, but other than that, look at all those green marks, can I call myself a mechanic?
We had some ambers in the back, but those were for the tires. I definitely need to replace them and there she is with the wheels aligned and air conditioned, now with the approval of Aston Martin it is a full alignment service covered by the service plan. Yes, the air conditioning works perfectly five six two eighty, so in this package you have a copy of today's service sheet. Yes, we also have another copy of the four wheels. alignment sheet and a copy of the visual health check yes nothing requires immediate attention ie we are all fine all good news shocking thank you see you later there is the Aston Martin which has been serviced by Aston Martin and we have got everything clear, a few little things here and there, but now we have the air conditioning aligned forward, we are a little lower, we are a little wider and, most importantly, we also have the service seal of Aston Martin.
I'm going on a road trip in the Aston Martin next week. Okay guys, you need to listen to this foreigner. It doesn't sound so bad. The thing is, that's the sound of an AMG engine, more specifically a C63 engine. These new astronaut perks are coming. with the Mercedes C63 engine as we have learned by rebuilding it and finding all the Mercedes logos spread throughout almost the entire car. The problem is that to me the C63 used to sound like that, so what happened, well, two turbos happened and it went from a 6.2 liter V8 to now. a four-liter V8, but that doesn't mean it's slower, this thing is an animal, it just means its sound isn't as AMG or Aston Martin as I'd like if for some reason you've completely missed this version.
I will pick up this Aston Martin with crash damage. I've been rebuilding it and over the last few videos I've been starting to say improve it in my own words, but today I'm hoping to make some more improvements to make this escape. It sounds better, we need to replace and remove some things and one thing I wasn't very impressed with and I'm sure you'll agree is the size and look of these exhaust tips for a screamer Aston Martin. The exhaust tips are quite small, they are quite pathetic and not only are they okay, they are rusted around the edge and apparently it is a fairly common thing even here, the Aston Martin technician noted it, so I hope.
We may be able to change them towards the end of the video, but we have other things to attend to first. This is the exhaust of an Aston Martin. We have two downpipes that go from each turbo, one on this side and one on that side. then it flows to the supporting cast and then from the supporting cats it flows back to this horrible box of bats. Now the downpipes will be the part that will restrict most of the power of this problem car. That's when I looked online. Downpipes I couldn't find any listed for an Aston Martin so I had to think outside the box, so in this box here I have a set of downpipes for a C63, obviously I couldn't find any through an Aston Martin.
These are from BR. Motorsports and I'm pretty sure we should be able to tell in an instant whether or not these will fit in my head. I thought the same engine might work, but now that I'm thinking about it, it's a completely different chassis, so come on. put this back in the air after comparing the two downspouts. I'm just looking at them under the car. I couldn't really see much so I only had one option and that was to start disassembling from the top of the engine. To see if I could see anything else from there, there were a lot of things covering this, like engine covers and heat shields.
I need to remove all of this so I can see the turbos and where the downpipes connect to them. that was removed, it looked promising to me. I don't want to get too excited too soon, but the lower part I have and the ones on the Aston Martin look very similar, so here we have the hole for the wood tensioner another hole for the wood sensor there we have the same one here we have the hole for the wood sensor there and the one right behind there now this route goes down the back and then comes around this route and if I look at it it's pretty similar and I'll be very upset if there's even the slightest difference , but I feel confident that that's it, fingers crossed because it will sound absolutely amazing. sure, let's make it so it's back under the car, let's go and I need to disconnect the secondary jacks from the bottom.
There's three bolts that hold the secondary jacks to the pipe and then there's an exhaust clamp that holds it to the rest of the exhaust and then there's. down with the Aston and can start undoing all the nuts and bolts that hold the downpipe to the turbos once I've undone all that, so I had Chris at the bottom of the car pushing the exhaust up and we found ourselves at the top because There can't be two places at once, yes, we're out. It was an absolute mission and a half to get that thing out that definitely came in with the engine and there's no way Aston Martin would put that in afterwards.
This is the moment of truth. I will be disappointed if they are not the same. That's the wrong side. Let's go the other way. I will be very disappointed if we have to put them all back. Please, it's too close to be the same. Looks the same. Same thing, it looks the same, it's too close for it to not be the same, but that means it may not be the same, yeah, here we go, so we go, it's looking out, it looks close, boy, oh no. The queue is different, right? no hmm oh no shorter here isn't it?
Let's take a look like here, so it's at the angle, it looks like the tail is coming off. Oh, I don't know where this is going and it only took me another 30 seconds to look at it. finding out that yes there was a little bit different, that's disappointing, we wouldn't have known unless I had taken it apart because it looks very similar and in my head it wasn't good, it's so similar, not being the same, turns out it's not the same lesson. We learned it, but we have plan number two and it's in that box, right there in that box is a set of Quicksilver secondary cat removal tubes.
We know they will fit because they are made for the Aston Martin now, when you put the pieces together. You may have made a smallmodification on them, now turning them into a zero cell sports cat, if you know what I mean, but coupled with the new Quicksilver pipes, this should be a recipe for some V8 Carnage that almost beat me, but we're on it. and now the question is did I ruin the Aston Martin with this exhaust because I really don't want to put all that back together Liam started quiet a little louder okay okay he sounds really nice that sounds good she sounded really good isn't it even those people bad oh okay okay wow wow okay I think it's a winner but there's still more we need to do we can't leave it like that obviously because of the new zero cell sports car so there's only one place we can go, so I. and Aston Martin have come to deutscheck where of course they made dmo's svj sound like this and if we can make an svj sound like this then I'm pretty sure they could make my Aston Martin sound a lot better now that deutscheck is known for making some crazy custom exhaust and that is what we will do with the rest of the Aston Martin exhaust but there is one thing we need to address before we do that and that is tuning it, this is necessary before we continue with the exhaust work because now that Aston can breathe better through the exhaust, the ECU needs to know that and if we don't it might put it into limp mode which is what we don't need especially before heading out on a big road trip with this foreign car.
Never Simple John has been slaving away on the Aston for most of this day and is now trying to figure out exactly how we can get around my special zero cell cutout part that I made that we detected was a workaround, so in fact, I'm going to come back here and John and I when I say John and I mainly John, I'll probably do some things and we're actually going to do some custom downpipes for the Aston Martin and then potentially play. a bit in the bat box but for now John is really tuning this car up we are looking at around 600 BHP this car will have now so it will be absolutely ridiculous all the power going to the rear wheels will be insane and not I can't wait to get this out and handle it with the new Power, the new sound, everything is ready to play now we're in the final parts, now Johnny's and it makes a big difference that someone else is doing it. work instead of me it's nice to have a little rest this is what an Aston Martin PHP 600b this is what an Aston Martin should sound like so many thanks to deutschcheck we will definitely be back to order those downpipes and exhaust tips but first to try an extra 100 BHP there is something we need to sort out and it was the tires in the last video, we took the Aston to Aston Martin to have it serviced and one thing that stopped were the tires and these tires are specially made for the Vantage so that there's only one place I can go to get them, so now four sets of new tires we can finally take this out for a proper test drive and test out the exhaust and the new power.
Come on, here we go, so new exhaust. system, which sounds crazy, we'll get to that later, but a tune that should give us over 600 BHP, we need to put it on the dyno to confirm that, so I'm sure we can head to Mallory Performance for that, but I've Me I resisted putting my foot down until now so we can all experience this together new tires on 600 brakes track mode manual let's do this okay, it's much faster. I couldn't look and again, oh, it has an immediate conversation and just hold every gear, it just takes huge advantage of what you're driving because if we're going to go on a road trip, you've got to learn how to drive it, right?
Now it's Hannah's turn to unleash the Aston Martin V8. you feel safe I'm not really sure actually go on then go and do it right she's alive it's literally a new life in the Aston Martin some people see cars as just a machine that takes them from A to B but this one is much more especially now, everything I've done to this Aston Martin, from rebuilding it to modifying it to the exhaust, and now the tune up has turned it into an incredible monster and we need to do a little recap of this, so Hannah. We're going to show everyone the end result, so let's move on to sport mode, which is just normal mode with the valves closed.
Yes, it is quite nice and quiet. Let's put it in track mode. An instant difference. Okay, back to the sport. Let's do some reps. in the sport I'm still making noise now track mode this is where it gets hectic send it regards well and truly alive I can't wait to get back to Dews Tech to make the bat boxes and we'll probably make a new downspout too who I know but if it sounds anything better than that, they will be new levels. Remember guys, if you want to continue supporting the Aston Martin build, we've made a limited number of these Aston Martin t-shirts with a print on the back.
I've improved the quality of the prints and everything, and they look great now with the oversized setting. I wear a large size. You can get them with a link in the description box below and remember there are only a limited number available. This is all. the last two pieces left to rebuild the Aston Martin wait, let's go back a second three months ago I took the biggest risk I've ever taken buying an astronaut with accident damage Advantage I spent endless hours rebuilding it comparing parts from other cars modifying it and then clearing everything up from Aston Martin and now we are about to attempt a two and a half thousand mile road trip.
Are you sure it's done? The plan is made to head from Leicester in the UK to a location. It's called Portofino in Italy, but we won't take the direct route. We'll stop at a few landmarks along the way for reasons you'll see along the way. That's if we make it now, Hannah and I won't. On this trip alone we have Chris Slicks, who is carrying his Aston Martin Vantage, which also suffered accident damage, and then we have Jack McNeil, who is carrying his one-litre turbocharged Micra, better known as Boris, perhaps a recipe for the disaster, but regardless of the car we drove.
We all hit the road and headed to Portsmouth where we bought the overnight ferry to our first destination in France, Saint Mallow. Okay, show me your key, why are you trying to flex my key? Just because mine is a reality, Mercedes, you know, pretend. no, no, it's not necessary, it's not necessary, so Chris has a Transit vanity with a Volvo key ring yes, with a Volvo key ring. I'm pretty sure this could be unlocked or locked a little bit, um, and this is The actual genuine Aston Martin engine in this is the real deal, the real deal and the real deal for the Transit kit and the Volvo drive.
I think it's pretty reliable. AMG, I would say reliable and of course the Nissan, we all know them for their reliability, but maybe me. I'm speaking too soon, but perhaps I didn't because Boris seems to be consuming miles as well as the two Astons. We weren't too far from our first destination and it wasn't long until we hit some really bad weather. I'm going to be friendly, oh I can't see anything, oh my God, but it rains and shines, we go through it and all the cars seem to be soaking it up so well so far until blue scars appeared up ahead, the roads dried out and we arrived. our first destination Le Mans Le man, the home of the 24-hour race, did you know that in 2020?
Aston Martin Vantage took five of eight wins here, taking home the trophies, the trophies we achieved for Le Mans and the good thing about it, you can drive the circuit well, at least in some parts. I'm not sure what actual curve we're on, but it's actually part of the road that's mental and then here's the gravel for driving on miles of Endless Motorway. It was nice to get a We put our foot down a little bit in all the cars we're in on a race track and the last time was on a race track. We had a little sound check between us, we did the 350Z, yeah, and the girl, I think she won the 350Z, I think we should. do the Mark II sound check versus we should find a good place to do it, yeah, let's go scout the track, we'll find a good place to do the sound check, yeah, and we'll check back.
We continued exploring and driving the three cars. very fun, maybe too much fun, but then we found the perfect place for a sound check, okay, okay, there's a little fake on this, those turbos, right, it's just a little, now here we go nab8 and what? How could we leave Boris out? This time, for his overseas sound check, we have a clear winner. Well we got a little detoured and needed to get back on the road because as you see we were still here at Le Mans and the next main destination was Monaco where of course we needed to get Redemption from the last video but suddenly Jack seems to have some Boris gear linkage problems.
I think what happened is that the screws turned blue. Often, basically, when I was building it, I put the bolt in the wrong direction and had the exact same feeling as this: it wouldn't go into gear because the bolt was blocking it from going into gear, so I need a jack. I don't know where Jack is. I don't know if people would have had the money for it. Which car would probably break down first, but this car isn't broken down yet? Okay, okay, there's a little problem with having it and it's just deciding which team you want to go on, so what I can't get is for everything to be flexible, no, no, it can, but it's rigid, it's like, oh yeah, the Samurai sword as a bread knife, yes, I could do it.
Jack managed to dodge something temporarily just to get the gear link working for now and as we started to run out of daylight we checked into the first hotel of the trip in Orador Succulent where we would spend the night and then continue the trip tomorrow morning. trip abroad, well you can say we are not in Italy yet and it is a bit boring, but we still have at least two more days of driving left, but we will play more lines to get on the road and I am very happy to be able to We will be back in the Aston now, whether we like it or not, all our cars have a history that we cannot erase, just like the next town we are about to pass through Orodor Siglan, which was invaded by the Germans in 1944 and we can see. the damage they caused because everything was left as it was, things looked good for all of us that day, but that gear linkage problem that Jack seemed to come back to bite him, so Jack Jack is under what's there, so Jack from Wilson, news mate, if this were Top Gear, all the men are left behind, everyone, go watch Jack's video if you want to know what happened to his car, Chris and I left, see you, Jack Rose from Rose, me.
Hannah and Chris continued to leave Jack nearby. Here, as we drove through the south of France, as soon as we could go at our own pace, we decided to test the difference between the two Astons and the Turbo last day and there is quite a difference, the weather was improving. and so were the roads we crossed the malau bridge and if i'm right this is the highest bridge in the world that we literally haven't even touched anywhere near where we're supposed to go on this journey through road so far and I can tell you that this is definitely the best car we have taken on a road trip.
It's so good. I just want to explain how fast and how good this car is. On roads like this, it's been an incredible ride, but when the time comes you have to do it. a slab, a car in front and you want to pass it, it does it and you have the utmost confidence that it could avoid that car with ease and we have it in track mode now we have the suspension in track mode activated. too and we'll show how fast you overtake a slower car ahead, three cars more than two foreigners, we stopped once more to fill up the tank and then heard that Jack had run out of fuel, um, we didn't let him.
We were going pretty slow, but yeah, I'm really sorry, but I think Jackson is capable of following a satnav. We all have walkie-talkies in the car. The problem is that Jack can't hear because he has all the windows down and no air conditioning. The fuel tank is half the size of the Aston and a wrong turn left it stranded on the side of the road. I just want to show you that you send a nice full tank. I have it there. Oh, actually, you know it saves weight when you don't have Jack. He was back and we could now join us for a drive through the south of France towards Monaco.
The foreigners were amazing, the views were amazing, and we passed through some amazing little towns that we would have never seen if it weren't for this road trip. Santa Pay was on the Route so it was only right that we drove around to check it out and there were even people who recognized me from the canal. It's absolutely crazy and since we were getting pretty close to Monaco, we wanted to give the cars a quick clean beforehand. When we get there, how good does that Aston Martin look, it makes me smile from ear to ear and a couple of miles later we arrive in Monaco, the hotels in Monaco are a little different, likecustom, you park outside and then the driver comes to collect your car and he does the rest, the Aston Martin seemed to fit quite well, but Boris on the other hand, go on, go, go, look how you park, where, where else did you want him outside, come down for me, just those two plus this one.
That's it, thank you please put it next to the 765. Foreign Monaco, the home of the famous Grand Prix and also the home of the rich and famous. We did our best to try to mix the sound and the Jacks. I feel the black power. Yes, time really is. our dollars but we didn't come here in an attempt to try to blend in and we will explain why we came here later but the next morning while driving enjoying the sights of Monaco I ran into someone or should I say. something that was so unexpected and what are the chances of this my old BMW M4 also arrived in Monaco and the new owner is right here how you found it it's great it's excellent it's excellent what a car oh it's so good to see it again yeah , I do it and it still has the key tag absolutely Min, look what a throwback, it's a money pit, is it still a money pit?
Oh my gosh, wow, this is a different flyer, you are picking something up no way. I remember this car was ridiculous. loud, they're going to kick me out, oh, it's open, now it's open, the valves have definitely opened now, oh, I'll give you a black one and then we'll contemplate three, two, one, okay, that's loud, the M4 was brilliant. Seeing him again on the road is like meeting a long-lost child and it makes me very proud, but that's not the reason we came here, so last time we bet 1,000 euros at the Monte Carlo Casino, that was the total fuel cost it cost. in the Lamborghini to get here and we lost this time we came to redeem the famous Monte Carlo Casino, as I mentioned before it took us 1000 euros in the previous video and we are here to get it back or it could be this. being the worst idea ever to park outside the casino is another terrible ordeal in Monaco in their own words they only let supercars park out front every time I bought one of my accident damaged cars we managed to get it. out and this time both Astons made it to the front, but what about Boris?
No, oh no, come on. Jack had to drive back to the hotel and then walk back to meet us, but he looks at those two Aston Martins parked out front. of which were accidental damage, no one knows the business well, this is it, we all know how it is that we are filming here, so we will get what we can, hopefully, even if we get the audio of this good luck, guys, so what .. here. we are in the secret chamber inside the casino last time a thousand euros were turned into black this time I'm going for the red if we win we will get our money back from last time if we lose we are losing a total of 2 000 Euros so we are looking for a number red.
There is nothing strange here. I went back to that casino. I lost, so the next morning we said goodbye to Monaco and headed along the coast towards the destination we had originally chosen for Portofino in Italy. The thing is, I saw some amazing photos of Portofino online before taking this trip, but what I didn't see were the roads, oh my goodness, this isn't great. Foreign trailers come via Land Rovers. The road is wide enough to turn, oh God. God, sausage, go as far as you can. I have no idea what the beeping does because it doesn't move anyone.
We noticed that the locals came up with a theory that if you honk, the car literally gets thinner. Then a tractor will come after we escape the narrow roads intact, we reach the center of Portofino. Foreign cars came to the center of Portofino and what a place Portofino is, but it is not quite, as we discovered a city to drive, but there is only one place we can go and where we can drive. I'll be honest with you. My original plan was to end the trip in Portofino, but after spending months rebuilding an Aston Martin to take it somewhere I couldn't really drive it.
We felt bad, so we got in the cars and drove 246 miles across Italy to a place called Stelvio Pass. We stayed in a hotel that night and were not disappointed, it was like Stelvio was already putting on a show for us. Wow, good morning. Faced with these incredible views, Jeff Stelvio was within touching distance now and this part of Italy was simply stunning. I even took the passenger seat for more views. We headed to the Stelvio Pass, one of the best driving roads in the world. I've never been out, I've only seen videos of it, it looks absolutely incredible and to draw the Aston Martin, there will be what this car was made for.
I can't wait to get there, come on, come on, would you look at this? and we're not even at the top how are we at 6,700 feet above sea level thanks Anna 2052 meters abroad these parts of the earth really exist Elvio Pass miles of hairpin turns and solid roads abroad this is what it was created for the track mode on this farm is absolutely perfect for it, the brakes are good, the downshifts are better, it was worth all the miles, all the rebuild, all the work and effort, the money I put into this car is worth the sorry for this moment, even now.
Losing that money at the casino has been an incredible journey and ending it on this path has just been no words to describe it. I didn't even think Rose like that existed. We continued driving through Stelvio Pass for the rest of the time. day making the most of the time we had and making the most of our cars, this also gave us time to think about all the memories that were created on this road trip, good memories and not so good ones, but the point is that it was the cause . that brought us to this destination, the cars that brought us together and the cars that brought us memories, so if you're watching this thinking about taking a road trip with your friends, go and do it, it will be the best thing you've ever done.
Honestly, it was one of the best things I've ever done in my life. Maybe sometime the sun is setting now over the Stelvio Pass and we are ending this trip with the smell of breaks and the sound of a fan exactly the way we did. I wanted to finish it and what a ride it has been, it has literally been the best ride in possibly one of my best cars I have ever rebuilt. It is a very good and versatile car and this is the exact reason why I put pressure on any of you. Guys, just go and follow your dreams.
I took a risk about three years ago by leaving my job and this is part of my job, it's absolutely unreal and we still have a long trip back in the Aston Martin, but let's leave it right here what a trip what a trip if you enjoyed it if have you enjoyed this journey with us press the subscribe button press the approve button and I will see you on the next video camera it's not a vibe it's not a vibe oh yeah
If you have any copyright issue, please Contact