Very Good Carrot Cake Recipe
Apr 19, 2024Hello what's going on? Carrot
cake
is better than chocolatecake
. What do you think about that? This is how I feel. It'sgood
. Today I'm going to show you how to make myvery
tried and true version ofcarrot
cake. It's soft, elastic, a little bit. seasoned and topped with a tangy but well-balanced cream cheese frosting. To start, I'll take two sticks of butter, three blocks of cream cheese, and one and a half pounds or about 675g of peeledcarrot
s. I'm going to leave this cream cheese out and then I'm going to preheat my oven to 350F now to shred these carrots for the cake.
I will grind them with the food processor. I always have conflicts when adding an appliance to one of my
recipe
s because not every
one has them except grating. The 675g of carrots we need for the cake require about 15 minutes of effort, which is much longer than the 2 or 3 minutes it would take to wash the food processor and sorting attachment, so that's the route which I recommend, but If all you have is agood
old fashioned box sorter, that would work perfectly fine too and once I've shredded all my carrots, I'll turn them over onto my cutting board and run the knife over them five or six times to break them. lower them further, this will help integrate the carrots into the bottom of the cake and help hide their stringy texture.
More Interesting Facts About,
very good carrot cake recipe...
I really hate carrot cakes that have crunchy carrot threads throughout this ruins the enjoyment of the soft fluffy cake and once my carrots are more of a ground texture than grated I will set them aside and mix my dry ingredients for that I will combine 550 g of all-purpose flour with 20 G of baking powder, 10 G of baking soda, 20 G of salt, 8 G of cinnamon, 3 G of ground ginger and 3 G of ground nutmeg. Now let's give these dry ingredients a quick breath to combine, then I'll grab my meat blender and start mixing everything else in the bowl. I will combine 400 G of white sugar 300 G of brown sugar 350 G of oil I am using vegetable but olive would also be good then 20 G of vanilla extract eight large eggs and then the secret ingredient 250 g of applesauce this makes the cake is super moist and fluffy in the bowl. then the paddle attachment goes on and I'll turn it until everything is well combined.

I prefer to make this mixture on a lower speed so as not to beat air into the eggs, which will cause the cake to puff up in the oven and then collapse. Later it's not ideal for a pretty layer cake and once these wet ingredients are mixed together, I'll take the dry and shake it into the bowl. Here we go. I will mix this on medium speed until there are no lumps of sugar or flour left. From here everything is combined evenly. I'm going to add the 675g of my grated carrots and then I'm going to mix them slowly to incorporate them, that's going to take about a minute and once everything's combined here I'm going to stop the mixer.

Scrape down the sides to make sure none of the flour or sugar has escaped the mixture now to bake this dough. I will take two 9 inch springform pans, if you don't have springforms I would recommend going for the leaf cake version. this
recipe
, which I'll get to in just a second, then I'll spray each spring form briefly with pan spray and then place a 9 inch round of parchment to make the ones I just traced on the bottom plate of the spring form to make . a circle of the appropriate size and then I cut it out. I will generously spray the sides and bottom of the springform forms with pan spray and then place both pans on trays so that the bottom batter doesn't leak into my oven once they are in.The molds are ready. I can add my cake batter. I'll try to make it as even as possible here. I'll just watch it and then load both pans into my preheated 350 F oven and bake them for 60 to 70 minutes now, the cake version of this recipe is equally delicious, just not as pretty. The mixing process is totally the same as for two coats, but the recipe is smaller and I will put that batch size for your reference. in the description below for the two layer cake and once the batter is mixed I will pour it into a sprayed 9x13 cake pan and then pop it into an oven at 350 to bake for 35-40 minutes while it bakes.
I want to tell you about why I've been using Bob's Redmill as my all-purpose flour in recipes at home and on this YouTube channel for the past 3 years. How about a quick story in 2021? I was actually loyal to a different brand of flowers than Bob back then. One day, out of the blue, it seemed like all my recipes stopped working and I started getting very inconsistent results and after a lot of frustration it became clear to me that the flower had changed somehow and was to blame for everything being a little strange. Since then I have been recommending Bob's Redmill to you and now I am very excited to announce that Bob's Redmill is sponsoring this video.
What a dream. I'm a Bob's fanboy because they use the highest quality ingredients and their products go through rigorous testing so you know you're always getting safety and consistency. Bobs makes a great line of flowers and baking products, most of which are in my pantry at all times and I like being able to pick them up at most grocery stores or even on Amazon. I'll leave the link below to the unbleached white all-purpose flour I'm using in this video so you can make this carrot cake exactly how I make it at home. Back to the layer cakes, it's been 70 minutes and it's time.
To check the condition, I prefer to use this $1 purpose-made cake tester because it's super thin and doesn't break my cake when I test it. The cake tester is clean, that means the cake is ready, so I'm going to take them out of the Bake and let them cool completely, that will take about an hour in the meantime, I'll make that tangy cream cheese frosting. Remember the butter and cream cheese we took out earlier. Well, now you're 100% room temperature and ready to party, so get ready. I started, I'm going to combine the butter, I'm going to combine the butter with three blocks of cream cheese, come on, come on in, buddy, then 10g of vanilla extract, 7g of salt, and 50g of sour cream for an extra spicy kick.
Now the whisk accessory. Go ahead and I'll spin it for 3 to 4 minutes until there are no lumps halfway through. I'll go back and scrape things up and get everything out of the whisk attachment and then keep whisking before I move. on the butter and cream cheese they should look super silky smooth, like this. Next, I'll add 375g of powdered sugar and then 25g of cornstarch. Cornstarch makes the frosting a little thicker and makes it much easier to spread. cake now drop this mixer and rotate the sugar and starch together for 1 minute, the final glaze should be 100% lump-free with a velvety mathematical sheen.
Flavor-wise, it's tart, spicy, and has the perfect touch of sweetness if you're making the sheet cake version. For this recipe again, the process is exactly the same, but the quantities are smaller for reference, they will be down in the description below. I'll move this frosting to a plastic freezer bag, this is my homemade piping bag for when it's time to squeeze. this frosting in the middle of the cake for now I'm going to throw this frosting in the refrigerator to set while I deal with the cakes at this point, these are cooled but still too hot to frost, actually at this temperature the cake is very soft and crumbly and that means a lot of crumbs will get into the frosting and we'll have a messy, amateurish looking cake, so to firm them up for the frosting stage I'm going to throw these cakes in the freezer covered in plastic wrap. for as little as 30 minutes if you're in a hurry, but preferably 2 hours and 2 hours later you can see that these cakes are nice and firm, so now it's time to build the final cake, but first I need to remove this firm, hard exterior.
Yes, this outer material tastes good, but it is chewy and has a darker flavor than we want. Top-notch bakeries eliminate all of this and that's one of the reasons their cakes are probably better than yours. The first step is to grab a long, thin knife. This is a 12 inch slice, but a serrated knife would also work, which I will carefully cut across the top on as flat a plane as possible using a knife that is longer than the cake, it's actually a little better here because the tip. it will extrude the far side and you'll be able to get a much better idea of what angle you're cutting at and once I get past the halfway point I'll put my hand behind the edge of the blade that way it won't come out and stab me once I'm on the other side.
Now I'm going to turn this cake over and then do the same on the back this time, however I don't need to cut as deep because the bottom edge of the cake is natural. Much flatter than the top, the top rises in the oven and there are a lot of slanted edges you need to get rid of and once you've cut out the bottom and top of two cake rounds, it's time to clean those up. edges. by the way, leftover cake is really good. Savor them below. I'll take a bowl or plate just under 9 inches and trace it with my pairing knife.
I'll make sure to keep the knife perfectly vertical as I go. I had a few mistakes during Testing and I accidentally cut a very strange diagonal angle on my cake and that was very difficult to cover with frosting and once I'm around here I will carefully remove the neck of the cake without breaking it and then remove it. the lid and now we have an incredibly clean looking cake cylinder. It's not perfect, but it's very good. Before I freeze them, I need to harden them one more time, so I'll put them back in the freezer for 15-20 minutes next time.
I'll grab my favorite cake frosting tool. It is called cake decorating turntable. It has rubber feet for stabilization and rotates so you can easily spread the frosting. Well, first I'm going to squeeze three dabs of frosting right onto the turntable and then Take an 8 inch piece of cardboard and flatten it now, three more little dabs on top of the cardboard and then I'm going to drop my first cake using my frosting piping bag. I'm going to swirl a /inch layer from edge to edge, then go back and use my flatter spatula to spread it out as evenly as possible.
If the middle layer of frosting is crooked here, the entire cake will tilt, so take your time and make sure it looks much flatter below. I'll drop the cake twice, press it down, and then add what's called a crumb coat. For that, I will move the frosting to a bowl and then take a few drops at a time and apply a thin layer of frosting. over the entire cake, maybe 16 of an inch, this layer seals the cake and prevents crumbs from curling into the frosting layer. Simply adding thick layers of frosting directly onto the cake breaks up the crumb and creates an ugly facade and once you have a thin layer of frosting on almost every surface of the cake.
I'll put it in the refrigerator or freezer to set for 25 minutes. This makes adding additional frosting much easier. 25 minutes later when I take it out, it's finally time. To finish off from here I'll add my layer of frosting and spread it evenly as best I can. I want the outer layer to be slightly thicker than a quarter inch overall. My best tip for applying frosting would be to always keep a thick layer. a drop of frosting under the spatula and use gentle pressure. You never want to scrape the cake with a bare spatula because that will remove the frosting, don't apply it too when it comes to the sides.
I think it's best to apply a lot of frosting at once. Place the SP vertically and use the platform's rotating motion to do all the work for you. This is a kind of practice that makes the situation perfect and it is difficult to teach with just video and words. You have to do it to know how to do it. Do it as long as you get it relatively evenly, you'll be happy with the results. Now the final step here is to add some crunch to the outside of the cake to achieve this. I'll take a big portion.
In a bowl, drop my cake into it and then take 8 ounces of chopped toasted pecans. I'm going to spread them out to the side so that just the five or six bites on the edge of the cake have a crunchy nutty texture. I really hate when people put things inside the cake like raisins or nuts. I mean, the nut flavor is very complementary here, but when it's inside, it happens for the reason I eat cake in the first place, which is to delight in the softness. Don't be crunchy, that said, a little nutty texture on the outside adds some contrast and puts a nice point at the end of the sentence.
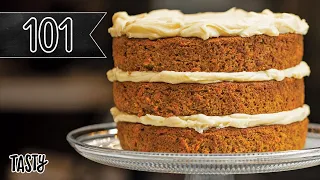
The last step here will be to take a dull knife and scrape the excess nuts off the bottom. Edge then very carefully lifts this cake off its platform with a spatula and moves it to a plate or plate that is easier to transport and if you are following the story of the cake in this video, now would be the time to use that frosting. The process here doesn't really need anyinstruction more than keeping the frosting flowing and trying to make it pretty. The experience of eating this sheet cake is actually very similar to layer cake, only it is not as pretty and there is probably a little bit of it. less frosting overall, it's still so much better than anything you can buy at the store and it really doesn't take much work when I cut the cake into layers, although oh my goodness you can see it's perfectly frosted on the sides, middle and on the cake.
It itself is so obviously moist, it's a spiced brown sugar cake, it's soft and fluffy, there's a little hint of the ground ginger and the tartness of the frosting on top makes it all have a perfect balance. I really think going through the trouble of making this cake. It's worth it because making beautiful things is inherently fun and the results are pleasing. I really hope you guys opt for this soon and if you do please tag me on Instagram now let's eat this thing
If you have any copyright issue, please Contact