Unknown Coatings - Ep 67 - How to Powder Coat Logos
May 30, 2021Okay, as you can see, we've already gone through the process of, you know, disassembling, removing the parts, chemical stripping, sandblasting, the gases have been cleaned, all that, they're all masked, as always, the plugs and all the threaded holes, all that shenanigans, um first step. of the two stages that we're doing in this is like a metallic black, it's actually called metallic black. I'll put it here somewhere, spraying it at 45 kv as prismatic recommends. A couple of people asked me about kv. and how it's relative, I have a video that I'm going to work on that involves that, but um prismatic in all of their stuff has an application guide that tells you the recommended kv, so if some of you haven't realized that is there, What we're going to do first is spray this area black.

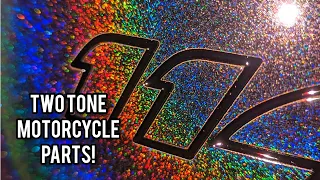
Some people choose to do the whole gauge. It depends on the color that is spread over it. This is pretty cosmic pink, so no. a color that lets things bleed through or show through a lot, so I'm just going to do black in this area and that's going to go into the oven to take care of it, so throw in the collector here, set the kv and everything you're really worried about Se This is the service area where this logo will end. The rest of this won't matter too much in terms of the application. I want to keep it out of these bolt heads for now, let's just remove them. quick, no big deal, I just don't want to have multiple layers stacked on the bolt heads, so that's it, we'll throw this in the oven to start the curing process and move on to the next one and what I was saying about doing, you know, cover the entire clip with this first stage color instead of just the area where I want the logo, there are certain colors that of course will be affected by the layer below them, the one I'm using won't, but Yes If you're doing this with a color that doesn't interact well or showing a variation where you put black just in this area and then apply the next layer on top, you'll be able to tell where all the black was, obviously.

More Interesting Facts About,
unknown coatings ep 67 how to powder coat logos...
You're going to need to spray that, the downside to that is you're going to need to figure out what colors do that for you and what I mean. I have some kind of general rules that I follow. I'm all for it but they are very general, I mean ultimately it's a matter of trial and error, okay now on to the rear calipers, same mask same way, I already have the bolts in place on the rear even though they are not going to this base color, they will end up being the top
coat
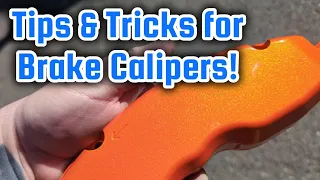
like I said, the nice cosmic pink, but the process is exactly the same, I just want to make sure I get a nice, decentcoat
on that front area, once more, I'm removing this ray. just because I don't want to stack multiple layers in there, as far as assembly goes, I bought one more of these and if you guys came across this video but don't know how to take the brakes apart or have seen it.
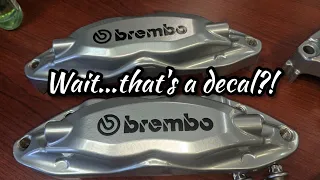
The process of masking brakes. I have a couple of videos here on my channel that show the exact process from start to finish. It shows complete rebuilds of the brakes, how to disassemble and reassemble, what areas are masked and not masked, and this is the logo we have. We're going to do um this is obviously just a Brembo logo this piece here is going to be for the front and then we're just going to do just the flower on the rear calipers so like I said the standard Brembo logo I've got the flower of cherry tree.

They go like a cherry blossom themed car. I do everything in Illustrator, you don't necessarily have to do that. There are tons of software available that will do this, including the software that comes with the plotter. Some people asked me. about my plotter, this is the one i use for almost everything, it's just an american cutter, it's the mh871 mk2, i think it cuts like 30 inches wide or something, i don't actually remember 34 inches, kind of ridiculous, i cut almost by itself 15 inch vinyl. However, we'll send this to the software and the plotter and show them that process and then we'll have to remove it, so the next step is to remove the vinyl.
They just have to do this. Of course, if you cut your own vinyl, if you get these
logos
or something from someone else, all of this should already be done, but all you're doing is removing all the excess vinyl, a pretty simple process, so just take each small piece um I use an exact or straight blade, I actually make pick tools specifically for this, if you want to do it as far as the color of the vinyl, I actually use this silver one, it seems to hold up a little better as you remove it afterwards. you heat it up, we'll get to this in just a minute.The metallic colors, both gold and silver, seem to work best from everything I've noticed, so like I said, you just remove all the excess, these ones here. junk that was cut on my test cut there and I usually make some extra just in case, I usually have extra room on the vinyl anyway so it makes sense to do it that way, like this and and this is, uh, I say it for me . This is something very quick and easy. I worked in the sign industry for several years, so I've done it many times, like I said.
You know, I cut more of these and ended up just removing them all at once. at exactly the same time just to make life a little easier stick them all in at the same time and then even these ones here that have been ruined you can also remove the usable parts in case for some reason you end up needing those parts. which you shouldn't do right because everything always turns out perfect every time, so let's see how to get rid of all this extra stuff that remains here. The next step is to record them well as far as recording goes, I mean it's pretty easy too. a bit, I've seen a bit of debate about the proper duct tape to use to do these things.
There are people who claim that this transfer is correct. I prefer to use the leaves as an adhesive or leave something that no one really says is adhesive. but you could see every place it got stuck while you were placing the vinyl. I've never had that problem on one part, but I've seen several people complain about it. Now it could be several people who have never done it or are just coming off of something. they read on the internet like I'm doing now, but who really knows once you're, once you're all glued in here, just cut out your logo or your
logos
and try to cut the lines like they're pretty straight, it just helps you. to line things up a little bit um oh, of course I do that, but this is all pretty forgiving, so lining it up a little bit, I mean, it helps, but as long as you don't pay attention to the line of the tape. you're actually paying attention to the vinyl you're putting on the logo or whatever, then you should be golden, so cut the rest off so they're ready, we only need two of the big flowers and two of the Brembo logos, so I obviously have too many, but as you can see, I already had wasted space on the vinyl, so it didn't really matter to cut that one, I skipped all the stuff that would normally be in these videos, like the blasting. and the preparation and all that um just because I just did a break video so I thought you guys don't need to watch the exact same thing over and over again it can't be fun okay we'll take the brakes. and start putting these things right, I brought one of each of the front and one of the back, obviously, one of each here to show you this process, just because it's so hot in the shop, it's legitimately the reason it's too hot. heat in the Buy, it's over 100 degrees here today, there's no effective way to cool the tent without the swamp cooler, but I don't want to deal with all the humidity, so we have our partially cured black here, metallic black, in In this case we have our vinyl. ready to go hopefully this is it yeah this is mostly in shot and you're just going to line it up you have this straight line for the bleeders so you have at least an idea of where it's going there's also a line here and here there's a line that defines the edges of this so you can center it and you want to touch the clip as little as possible when you put it on so try to keep your hand touching the tape just because, like with anything.Otherwise, you don't want to fingerprint anything you're doing. As for the dust layer, leave it and rub it off. I want to make sure you rub it. You can use a squeegee. I tend not to use a squeegee when I do this. tweezers like this because I don't want the squeegee to come out and hit the partially cured
powder
because it's not weak yet but it's definitely soft to a point so try again, this is a big pain in the butt here we go, good. and that's it for these, I mean, you know, if you have a more complicated logo, obviously these are more annoying, but this is pretty simple, let's do the other two real quick and start pulling the pink. dust on these what's up guys I just want to take a minute to interrupt this video and tell you about the Facebook page or Facebook group that I started.You can see here, just look at the UK space army. It's mostly just a buildup of dust. coaters talk about
powder
coating stuff, uh, mostly people on the channel, obviously, so I post sneak peek photos, videos, uh, upcoming stuff, uh, there's a lot of interesting questions and projects going on there, so feel free to take a look. I also want to remind you to make sure. to subscribe to the channel we're almost at 2000 subscribers so we're getting really close so please like and subscribe thank you okay because we're putting a second layer in theory or at least for the most part um we're going to finish.Let's go with the double layer tip, at least in my setup, I know mine is different than most of the guys out there. um kv, we're going to set it to about 40 and we're going to apply pink over all of this so that the front and back of this caliper, you know, this is the front, the other side with the extra holes for the bleeder and the line brake you know, we'll call it the rear, we'll cover it with the same nozzle in exactly the same place. settings in an effort to not have any variation because this has a metal or a pearl and I don't want there to be a ton of variations on that that you might get by going back and forth between prongs or changing settings.
So this color is pretty simple, it's very easy to work with, it's just kind of a pastel pink color. I don't know the best way to explain this royal color. You'll make sure you get in right here and then. Your screw heads I definitely don't want to forget, so I don't know how well you can see it on camera, but the logo is still very, very visible. It will become even more visible, of course, once we start healing this, but what? What we're going to do is take this and put it in the oven. The oven is already on.
In fact, I only have it set to about 300 degrees right now. I'm going to put this on the top of the oven towards the front where it's, you know, my air in this oven doesn't circulate, so that's the coldest area of the oven that's going to give me the most air time margin, because let's go. to put these to flow. Pull out and then remove all the vinyl so we can get to that part right now. I guess I'll show you a rear end and a front end of the rear caliper. You know, like I said, there's no difference. they will all be filmed exactly the same. um you'll notice a problem sometimes where you'll get these little dots.
You may have seen when I started spraying this, you get these little dots and that's all that's static. it builds up when you put the um, the end down essentially is from the transfer tape um, when you pull the transfer tape, you can get rid of that by rubbing like on the back of this with a dryer sheet to remove it. and do the exact same thing for you, so that's how long we're going to have all of these in the oven and start to flow so we can get all this vinyl out, so okay now we've got these things to the point of flowing.
This is the, uh, not fun part, you take an exact, you pull a corner and these lines are going to look a little weird right now, don't worry about that for now, like this, but you only have a few seconds to do this. The only downside to doing them this way is that you have a very limited window of time to work with, but let's move on. Technically, I'm doing this next in line, so I just have to do it with the larger calipers, of course. take more time and I hope you can see this, then I have to go back to the oven to continue loading, try the front clamp here and then one of the things that I rarely have this problem with, but if you have this problem where you get a piece of uh the wrong color, like for example, I have pink on black.
Here you can cure this a little bit more than just take it out and take a Q-tip with a little bit of acetone and remove that piece. You can also sand a little with a light color. and then apply a clear coat to all of this. These will also receive a clear coat. I'm trying to get them all out of here in a hurry just like that because it's
unknown
.If you have any copyright issue, please Contact