Top 10 Beginner Mistakes When Building a DIY Solar System
Mar 06, 2024Today's video shows the 10 most common
mistakes
beginner
s makewhen
building
their firstsolar
energysystem
. Also, if you're not abeginner
, you might want to check it out. You may have formed some bad habits over time, so let's talk about the most common ones. Mistake number 10 is connecting asolar
string to a device without checking the voltage. If the voltage is too high, it will destroy the device. If the voltage is too low it won't work and you won't believe how common this is. people destroy their solar charge controllers because they put too many solar panels in series and the voltage is too high or people use low voltage panels in parallel and they don't create a high enough voltage for the solar charge controller to do its job, Now you can avoid all these problems by checking the voltage before connecting to the device.
Each device has a working voltage range, for example, we have a solar charge controller here and there is a sticker on this side that says the minimum solar voltage is 120 volts DC and the maximum solar voltage is 500 volts DC , but notice it says VOC and that means open circuit voltage which measures the solar panels
when
they are not connected to this device, so before you connect the solar string to this device, make sure to use a voltmeter to test the voltage if it is inside of the working voltage range, you are ready to continue. The next problem is that there are not enough batteries or solar panels.
More Interesting Facts About,
top 10 beginner mistakes when building a diy solar system...
A lot of people will discharge their battery to zero and then say, "What the heck, my
system
has zero volts." It doesn't work this battery is broken and then they will call the dealer and tell him what the hell you sold me a bad battery. What really happened is that you don't have enough solar panels or you don't have enough batteries. Also, your battery should never run. reaches zero percent you should use an inverter or other devices that have low voltage disconnect and this is a very common feature on inverters, once your battery bank reaches a certain voltage it will turn off the loads, turn off the output of the inverter and this make sure your batteries never go to zero percent in my current system, once they reach about five percent everything will automatically shut down, if you don't have it it will put your batteries in safety mode and think your system has broken down.
I have to use an alternator or a battery charger or something to revive the batteries again but again this is a very common beginner mistake and people think that their battery is dead but that is not true now whether you have a low voltage disconnect or not. You should have enough battery for a few days of backup, if you don't you didn't design your system well, so watch my book or my other videos and I will teach you about days of autonomy and how to have a large reserve capacity if your system It's well designed, it should never go to zero percent, that's the whole point of a backup power system is that you need to have power at any time, so yeah, check out those resources.

Number eight is
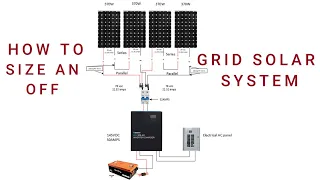
building
a system that can't be scaled every time you build a solar power system you have to think about how can I add more batteries in the future and how can I add more solar power panels because it doesn't matter what you tell yourself yourself in the future, if you use this system every day, you're probably going to want to expand it adding more solar panels adding more batteries is just the natural way of things now some ways you can future-proof your system to make it more Scalable is number one having large bus bars that can handle a lot of current, this will allow you to add more batteries when you want, next time use larger cables than necessary especially if you are upgrading your inverter in the future Nearby, copper is not cheap and if you buy new cables every time you buy a new device, you will then spend a lot of money buying a solar charge controller that is larger than necessary and will allow you to add more solar panels in the future or By purchasing solar charge controllers with multiple inputs you can then add another set of panels during the winter when you need power during that time The next mistake is low quality circuit breakers and not using the right circuit breaker or fuse for the job for example this is a high quality circuit breaker but it says 42 volts DC maximum, do not use it with a 48 volt system 12 and 24 volt systems can work very well with this but nothing more than the following circuit breakers are rated for DC applications or AC.This breaker is rated for AC applications, so I can't use it to disconnect the battery or anything on the DC side of my system. but this circuit breaker can be connected at the output of the inverter because it is alternating current, a circuit breaker has to interrupt an arc and a DC arc is harder to extinguish than an AC arc, so for GC you should get devices with AC rating. CC and this is a DC rated bow. marine grade circuit breaker, but notice it says 48 volts DC maximum if you look at the data sheet. 48 volts is the limit.
If you charge a 48 volt lithium iron phosphate battery, it will exceed this voltage rating, so it is not appropriate for that either. Home circuit breakers are AC rated only. Do not use them to disconnect a large battery. Additionally, fuse boxes must be of high quality. This is for low voltage DC, like a 12 volt system, and is made by Blue Sea Systems. This is a Fantastic fuse box because if you go to Amazon there are a lot of low quality ones and I would never trust them in a million years so spend the extra money and get a marine grade Blue Sea Systems fuse box or something equivalent.
The next mistake is using copper. aluminum clad, these cables come with a lot of cheap Chinese inverters on Amazon and you want to avoid them like the plague, these cables are a drag, they can melt, they can catch fire something, so avoid them at all costs, you should only use copper and unfortunately, No I have no copper clad aluminum to show you in this video. In previous videos I talked about this in more detail so I'll have them linked below but it's a wire that looks like copper but it's actually aluminum and you can tell by when you cut it you can see the shiny aluminum on each strand inside. , but it looks like copper on the outside and is technically safe to use if you know how to use it, but most beginners should avoid it like the plague every time you use it. aluminum, you must understand that aluminum expands and contracts at a different rate than copper and when you have the two connected you will run into some problems, the terminals can become loose over time and the conductivity of aluminum is not as good as that of copper , so you have to use thicker wire on the cheap Chinese inverters that come with copper.
Aluminum cloud cables will usually be undersized and people will have problems using the cables that come with it, so right when you get that stuff you'll want to throw it in the trash and make your own copper cables now number five will piss off to some of you and it is soldering large terminals. This is incorrect when you have a large wire and a large terminal and they are both copper and you want to crimp them with the proper tool. and that will create a gas tight connection which is mechanical and this is superior compared to a solder joint and this is due to several reasons, firstly a mechanical connection with a cold weld means that the metals become one , they share electrons and you have the lowest resistance path for those electrons to flow with solder, you have a different metal flowing into a gap, there is plenty of surface area for that conductivity to occur and you are sharing electrons, but it will have a higher resistance than a connection crimped mechanical connection will always be superior to a welding job, there is no doubt about it, this also applies to corrosion, some people say oh if it is welded and it is a marine environment it will be better, again it is false, use a dry copper terminal, a dry copper wire. finish it and then use marine grade heat shrink over it and you won't have problems until the end of time.
Also, all low voltage DC electronics manuals, especially for the marine sector, say to crimp. I've never seen anyone say it in a professional manual anywhere. soldering a heavy gauge wire that is not correct and if you think about it just to get the solder to flow effectively you need to heat that joint a lot and you will damage the insulation of the wire and you may not even heat it. On the other hand, a sufficient crimp is stronger and you know it's been done correctly and you can check a crimp, you can cut it in half and see how all the metals are cold welded together and that's better, if it's a strong connection, but this will not do it.
Stop some of you. I know some of you love to solder for some reason. I love soldering boards, but with cables it's not at all illogical, so yes, they should stop doing that. Number four is complicated wiring jobs and this is crucial. I have seen this. When people build batteries, they just have this nest of wires on top of all these exposed battery terminals, which is not safe. Additionally, having more than three terminals on a single terminal is also not ideal. You need to space out your things and organize them. You will be able to see each conductor and if you can label it it is even better, you can also bundle too many cables together especially with zip ties, if you have a lot of high current conductors wound together they will not be able to dissipate heat as they are designed if you have a separate cable it can dissipate heat and it will stay at a low temperature if you have a lot of wires bunched together that heat won't escape and you'll get hot spots and that can cause fires or other problems, melted insulation and other things, so let those wires breathe, let them label them and leave them color coded and pretty, make them look good.
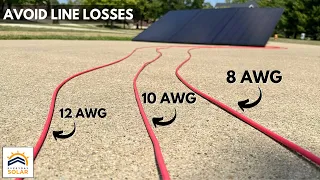
Number three is improper wire gauge sizing and this is a big problem when building your first system. If you are building with copper, you need to find a table that shows the maximum ampacity of the copper you are using to ensure it can carry current to your devices from the battery to the solar panel. Any connection in your system needs to have a wire large enough to carry that current and this is called the maximum ampacity of a conductor. There are tables available online that show how much current a conductor can carry without getting too hot.
Technically, copper can carry a lot of current, but it will get so hot that it will fry everything around it or trap something. on fire so you need your copper to run at a good temperature and the best way to avoid problems is to oversize your conductors or use what your device manual recommends and this is very important with any device that has the detection voltage of Your batteries, if you have an undersized cable, will alter the voltage readings and will not work properly with, for example, the solar charge controller. I will use the largest size copper that will safely fit into that terminal and keep the wires as short as possible. possible, so read the tables, read my book, watch my other videos and size your cables correctly.
Now I need to make this clear with the solar charge controller because this is where people screw it up the most. The battery connection to the solar charge controller. Choose the maximum size of wire that you can safely put in this terminal and use that and keep those wires as short as possible and you will have no problems and each device has a manual with the recommended wire sizes so read the manual also on sizing of cables for an Inverter if you have an LF inverter and you are running inductive loads, such as large motors, it is preferable to have the largest cable you can fit on that thing to have a nice cool cable and voltage sensing capabilities for low voltage .
The disconnect works fine, so yes, try to oversize as much as you can, but don't oversize to the point of causing a problem with the connection to the device, for example, putting 4 gauge Ock wire into this little breaker is bad. idea. There isn't enough room for that much copper in this terminal, so think carefully and try to overcalibrate your cables where possible, but don't do it to cause more problems. Number two is wrong tools or low quality tools and this is huge, don't do it. Use these cable cutters to strip cables. I see this all the time on YouTube and this is wrong.
You need to use a wire stripper to strip wires nothing else. Now these are high quality wire strippers. This one is made in Germany and this one is made. In England these last for years and all building systems should have them on hand, also small gauge wire strippers, buy the more expensive wire strippers, if you buy the cheap ones you will have a bad time. Plus, high quality crimpers are just as important, this one is my favorite. I have a lot of recommendations on my website, but yes, spend the extra money and get the good tools.
I use it every day and it works fantastic. Additionally, if you work withactive batteries, you should buy insulated tools. These are isolated. ratchets and these are high voltage screwdrivers, use them if you are working with current sources that you can't turn off such as battery cells, very important and even just some pliers, buy the specific electrical one, you will find that there are little features made here. for electricians and if you know how to use them it will be very useful don't try to use a pliers to crimp a connection you need to use a crimper always use crimpers to crimp and nothing else now this is expensive and I love my fluke but if you are a hobbyist you probably don't need spend so much money.
You can get by just fine with Klein Tools, they have high quality material and work great or on commercial electricity. I also like some of their stuff and these are Klein like Well, they're made in America and I've never had a single problem with my customers tools so they're really good stuff. Now let's say you're desperate and need to strip a wire with one of these cutters. Technically you can do it. Do it but if you are a beginner, I recommend not doing it and waiting until you get the right tools. This is so crucial and honestly when you build your system you just have to do it right the first time and once it's done it's done if you make even a single mistake in an electrical system it can cause problems down the line every connection every piece of work What you put into that system must be perfect so that no problems occur.
Now the number one most common mistake beginners make is loose terminals. I check the systems when I check them I pull out and just move the wires around to see if anything is loose and sure enough I almost always find one that I can boot that is horrible and can cause fires, melted terminals and problems with voltage sensing on the devices . and a lot of problems people have is because they have loose terminals so you want to tighten them hard but you don't want to over tighten them so the best thing you can do is get a Torx screwdriver and a torque wrench that will allow you to reach the torque spec. exact for your terminals and I admit that at the moment most people don't use them, unfortunately many electricians have a good idea, but that's no excuse, we should all use torque screwdrivers to get the exact torque specification now, the complicated part of terminal tightness is that you could have high quality components, you could have high quality wires that are the right size, you could have the best circuit breakers in the business, but if you don't tighten them properly you're going to have problems and it's the most common mistake I've ever made.
In my lifetime, this is especially true of the large lithium iron phosphate battery banks that people build with raw cells. You have many terminals and they all have to be tightened perfectly so that you don't have any problems. Please understand that over time a terminal can become loose, it is always a good idea to re-tighten everything every six months or so when something gets hot and cold, expansion and contraction can cause this wire to come loose, these are usually not terminals high quality on this Victron, but you should check them to make sure they don't loosen over time, especially if you have aluminum cables, that's another problem as they expand and contract at a different rate than copper and some of the terminals, depending on how they are designed, you might have some problems with them coming loose, so yes, I like to check all my connections every couple of months to make sure nothing is loose.
Now something that can help me with inspection is to use a thermal camera whenever I have a large bank of batteries with I check many terminals for hot spots, this will allow me to instantly assess if there is a loose connection and retighten it. Also with any system that has a thermal camera it's great to see if a device is failing if the terminals that connect to the conductors are failing, if a circuit is failing or anything else, a thermal camera is fantastic so a screwdriver Torx into the terminal, stick it in there, set it to the correct torque specification that is on the label and then tighten it until it clicks and that will prevent most problems.
I've seen so many slower charge controllers with loose terminals that it's crazy to walk up to a friend's system and move the cables around and try to pull one out if you can pull one out by hand. It means something is not set to the torque specification and that's it, those are the most common beginner
mistakes
. If you disagree and think I missed something, let me know in the comments section below and I'll see you in the next video. Thank you. byeIf you have any copyright issue, please Contact