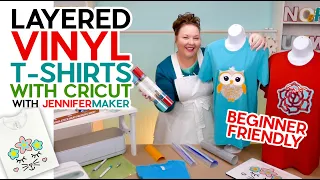
The Best Tips For How To Layer HTV on A Shirt
Jun 05, 2021Hello everyone Tanner Bell, welcome back to the Creators Who Will Learn YouTube channel. We're so excited to have you here today because we're going to give you our
best
kept secrets for applying the heat transfer pattern to t-shirt
s. It's a lot of fun, but before you start and make sure you hit the subscribe button, if you're new here, if you're not subscribed yet, you need to hit the subscribe button because every week we have new videos that teach you something different. things about how to master your die cutting machine and master your maker you will learn membership if you are not already a member, check out the first link below so you can sign up and become a member, our members have access to over 1500+ Falls cut fonts, over 200 with our annual membership, you also get a commercial license included in that tier and access to 3 completely free training courses in that training course which is the annual membership, so make sure to check it out in today's video.
Like I said, we're going to go over
tips
forlayer
ing heat transfer vinyl on a t-shirt
, so let's go ahead and jump right into it, okay guys, we've got the t-shirt laid out here on our Cricut ez press math, I think one. One of thebest
tips
for this is, no matter if you're using an EZ press, no matter if you're using an iron, anything like that, use an easy press mat because it's going to be extremely helpful. Second tip is you always want to put your D house about three inches from the neckline generally our Cricut is heated up and ready to go it's squeaking at us but what I was saying is now you want your shirt on the decal to go on about three inches from the top.
More Interesting Facts About,
the best tips for how to layer htv on a shirt...
I always run into the problem that my decal is lined up correctly, so what I like to do is be able to take these two sides here, you want to line them up perfectly, so you let them line up and kind of lift up the shirt, you're lining these up. two lines here and then as you hold it up, you want it to fall and you want to make sure that they line up at the bottom as well so that the whole fabric is perfectly in the middle and now What you're going to do is take your easy press after that it's preheated and you just want to iron it for just a few seconds.

Let's give it the perfect middle crease so we can put our heat transfer on. bottle in the right area if you want it to go in the center, so now we can take it once we open it. You can see this perfect lawn right here, so it's going to be really helpful to have that and So I'll stay there for you guys for quite a while. I think it's a really cool fold. I hope you can see that and now that you're clear, today we're going to work with a really unique image, so I said about three inches down from the top, so I'm going to trace my first
layer
and this is not my next tip.
I like to build my layers and watch the image come together, that's how I format it and how I'm going to layer it down, so I like to build it up and like the heat transfer vinyl comes with a built in transfer tape and it's sticky , it's very easy to do, so now I'm going to take the next layer that I want to have down here and I'm going to work with it. I think I'm going to put the blue layer in an what I love doing this here in a minute so you can see how that should be placed and you're building your place all the different layers and then look how easy it is you'll be able to set it up like this so you've set up all the layers and then you can go back to this last layer right here and put these three together so now You'll be able to peel off from the bottom as you go and you'll start layering for a nice smooth process so now what you can do is peel this off and you can preheat the shirt If you want, I think with the cricut.
Preheating the shirt with easy press mate is not as necessary as it used to be, but depending on your climate, if you are working in a basement, I recommend just a few seconds to preheat it due to the fact that it gets hot. the moisture will come out and it'll be really cool so we just let it preheat and for this image there's really nothing to, um, you know, center perfectly, so we go, you know, put that in and then I always like to have something to measure just to see how far down and you know, it's woven at two or three inches.
This is a youth shirt, so it may measure less than three inches for youth shirts, adult shirts. I like to see it like that. minimum of three inches or so, so now that you've applied that down, you're going to take the easy pressing. This is the easy no press bun and we're just going to apply it for 30 seconds at 3:15, make sure to apply firm pressure and easy pressure, Matt is taking this heat and sending it back to the back which is great If you don't have an easy press mat and are doing this project, feel free to use a folded terry cloth towel. two or three times on a granite countertop, which is a great tip for any beginner who wants to play with heat transfer vinyl without the commitment.
Mott's next tip, guys, is that I want you to check for bubbles that can rot here in the heat. transfer vinyl, okay, that's an indicator that it's stuck to your shirt, so let that cool ox fan it out, whether it does anything or not, I have no idea, but now I'll just peel it back and I'll walk, layer one is down, so now you want to take your layers and you're thinking about what layers are next, so you're just going to peel off the next layer like this and we're going to be able to place it down here, so you're going to trace that. down and then what you're going to do now is we can take the easy pressure and drop it on the next layer, but guys, what's going to happen is you're not ready to know, you really don't want to? to expose the vinyl to the heating plate that way, so how do we fix it?
What do we do? All we have to do is take this piece. This is the piece that we just peeled off the green and you're just going to trace again. just to protect that green key transfer model, so now we're going to take it and plot it for another 30 seconds or so and I've seen people really articulate, like articulate some new Tom or a certain amount. of seconds to hold it down, like just 15 seconds and stuff like that, you can do that because it's going to heat up in the different layers, but I like to pretty much do the full 30 just for myself.
I haven't really seen a difference if I just did 15 or something like that so I like to make sure it's down and now you're going to want to let this layer cool as you can see it doesn't affect the green H TV at all and now your blue it's down, so then You're just going to take the next one, take it off. You can see this is our next layer, so now that we've applied it, we'll take that green leaf again and apply it to protect all that extra. heat transfer vinyl and we're going to repeat that process so we're going to lay down this carrier sheet one last time and one of the things you might be wondering is why do you have to do each layer individually and things like that. and the real reason is that you can't clip each of these layers and do a one-hit wonder when you're working with all these different colors and you see that you know four different colors here and you really want to grab a layer. at a time and you see how easy it is when you do one layer at a time, you can line everything up and really have a smooth, effortless process.
I mean, how easy is it to have something so pretty with so many different colors. and really very, very simple, so we set it up this way and sometimes you'll see us, you know, we'll be able to apply two layers at once, but for this project and the specific situation we don't recommend it and Okay, so we'll fill it in. and now we're going to let it cool and now you can see that we already have our awesome image applied and that's really some really awesome tips and tricks for mastering heat transfer vinyl on t-shirts. How wonderful it was that today we were able to master layering heat transfer vinyl on t-shirts.
It was so much fun and I love giving you all the tips and tricks to make some amazing projects if you are going to make one of ours. Amazing projects that are a multi-layered image on a t-shirt with creators who will learn how to cut Falls. Be sure to share with us in the members-only group if you're not already a member, be sure to check out the creators who will learn with ease. /join is the first link below and to get instant access to all of our amazing members-only benefits and if you have any questions, leave them in the comments, like the video.
I didn't subscribe and turned on that notification. belt if you want to be notified when we upload new videos or go live for a craft workshop and I hope you have a fantastic day, see you in the next one, bye guys.
If you have any copyright issue, please Contact