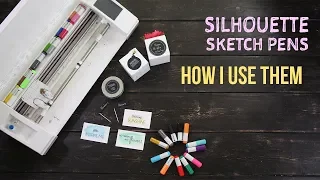
Silhouette Sketch Pens (Silhouette 101 Video Class)
May 10, 2020Welcome to our class on
cutting machine to create new shapes that go beyond simply cutting or printing your designs. You can use pens on the portrait or
cameo curiosity. I'll use the cameo 3 which can hold two tools at once, which is similar to the curious one, but you can also use drawing pens on any silhouette machine even if it only has one tool holder. I'll use the silhouette study. version 4.3 standard edition most of the time, but I'll show you some additional features you get with Designer Edition and point them out when we get to them.
pens
. I'm Kelly Waymond and in this class I'll show you how to usepens
on yoursilhouette
cutting machine to create new shapes that go beyond simply cutting or printing your designs. You can use pens on the portrait or silhouette
cameo curiosity. I'll use the cameo 3 which can hold two tools at once, which is similar to the curious one, but you can also use drawing pens on any silhouette machine even if it only has one tool holder. I'll use the silhouette study. version 4.3 standard edition most of the time, but I'll show you some additional features you get with Designer Edition and point them out when we get to them.
The tools you will use to draw designs are simple. Will use pens. a pen holder and that can be adjustable to use other types of pens, you will need some type of sheet and you can use paper, which means any color or size of paper. Once you know how
sketch
layouts work, you might want to get creative. and try other tools and materials, especially if you're curious, If you're wondering when you might use markers, let me show you some common applications. Markers are useful for drawingsketch
designs that you create or purchase from the silhouette design store.
More Interesting Facts About,
silhouette sketch pens silhouette 101 video class...
Unlike full-color printable designs or cut designs, you can also have your machine ink text and designs instead of printing. This is great for writing with colors like white glitter or metallic colors that aren't printable and can be really fun. to do on dark paper Drawing pens also allow you to write on small pieces of any color paper that are too small to fit in your printer. You may also want to use drawing pens to sketch out a design before cutting it to test its size or placement as you can see that sketching can expand the capabilities of your silhouette machine and you can get really creative with how you use their machines.

Fun Asians as we go will cover the important points and techniques you need to know as we create some sketching projects in this In the first project, you will learn how to find sketched designs and how to make a simple sketch. Sketch designs are different from normal cut designs because they are made up of individual lines that must be drawn instead of using a blade on your machine. I'll insert a pen, you'll see what I mean when we get into the software in Silhouette Studio. I want to open a sketch design, so I'm going to do that by going to my store tab and this will open a browser where you can search specifically. for sketch layouts you can type a keyword in the search field or you can just look at the layout categories so I'm going to go to layouts and click on cards and tags and then I'll be down here and check the box for the sketch filter , now it shows all of these designs as sketch designs and you can see it because they have this pencil icon that indicates that they are a sketch design, so you can scroll here or you can use keywords to find what you're looking for, but this filter sketch helps you limit results to sketch files.

Fonts can be a little more complicated to search for a sketch font so what I usually do is type sketch font into the search bar and this will show you will find more than just sketch fonts but what you are looking for are our fonts single line instead of full ones. Let's go back to Silhouette Studio and I know I already have some sketch designs in my library so I'm going to click on the library tab and I'm going to type in presence in the search bar and then I'm going to filter by sketch so I click in file types and I just want to check the sketch layouts box to find my sketch files that are presence related, so I'm going to double click to open the one I want.
Some sketch files come without cut lines and some do come with cut lines. This file does not come with cut lines so I will create my own cut. line drawing a rectangle for the size of the front of my card, so I'm going to make it five point five inches wide and 4.25 inches tall and I'm just using the scale option on my quick access toolbar, now I'm going to group each gift for itself when I select them it's all in different parts so I'm going to group them again using the quick access toolbar and then I want one more of these gifts so I'm going to replicate a copy of the shorter present , so I open up the mirror panel and I'm going to mirror it to the left and slide it over there, so now I just want to resize it to fit the front of my card.
I'm going to arrange a little bit here to make sure they're spaced out. all right and just drag a corner handle to resize it once it's the right size I'm going to go ahead and group those gifts and select the outline of the card and the gifts and just center that to push it down a little bit with my keys arrow and that looks good now I'm going to zoom in so we can see it better. I want to change the line color for my sketch designs to green. I usually like to set my line color to match the color of the pen I'm going to use, so I'll use the quick line color in my quick access toolbar and change the line color to green for this sketch design.
Okay, so then we're going to set up our page size and make sure it's set to 12 by 12 for my cameo and we just need to make sure it's placed within the cutout boundaries of the page so we're ready to go to the shipping and when you work with pens it is very useful to cut by line. color so this is how we're going to work in this class we're going to go to the line tab so we've got this ready so the tool number here only applies if you're using a dual tool holder machine like the Cameo 3 or the Curious, hey Dennis, can I ask you to change?
Don't blame me, let me read it again, yeah, sorry I didn't warn you about that, so the tool number here only applies if you are using a machine with a double tool holder like Cameo tres or curiyo, if you are using a portrait or an older cameo, all you need to do is add a pause between tools, so I'll show you two ways to set up tool switching. In the software so you can know how to work with a single or double tool holder, we will first work with the pause method. Okay, so the pause method to use a single tool holder first will just ignore this tool number column if you have a portrait or something connected, you won't even see that we want to make sure that this green line color is at the top so that you can drag them as needed and place them, but what's on top is going to draw the cut first or draw first the material I want is medium pattern paper for my action in this one I'm going to choose the sketch and that automatically chooses my pencil drawing for the tool now the red line that we want to cut Lastly and again we want the material to be patterned paper and this we want to leave with the cutting action and we want it to use the blade so that the red line is set to cut at the end and we're going to right click on the green one and just choose add pause, you can also add and remove pause down here instead of right clicking, so what we're going to do is first place the drawing pen on the tool holder and set the Leave the sheet aside when you send the work to your machine, the top line will do the sketch and then it will stop at that point, you will remove the pin and place the next lines tool, which is the sheet, and you will do Click Resume on the software You don't need to download the mat in the middle.
If you have a machine with a dual tool holder, you can save time by continually moving it from the first task to the next, so I'll show you the dual tool method below. Alright, so we're going to remove this pause and now if you have a dual tool machine, this tool number column will be displayed and again we want to drag the green line to the top and this time we want to set our tool. number to the blue circle or to the right side again we want our material to be pattern paper we want the action to be a sketch and we want the tool to be a drawing pencil and then the red line needs to be there to cut at the end the number of the tool should We are left with the red circle so we are going to put the blade on the left side and again medium pattern paper will be cut for the material action and the tool will be the blade so this is almost ready to ship we just need to insert our blades and pens in the correct holders and we load our paper and now with the tool holder we set it up in the software so that our blade is in the left tool holder and it matches the right circle here it matches the right circle in the software and then this one has a blue circle and that's what we set for our drawing pen, so we'll go ahead and place our drawing pen on the right side and that's ready to send, so first do the green one with the drawing just like we set it up. in the software, the right side first and then the left side exactly as we set the order in the software.
You should note that pen designs can take a while to draw, so be patient, the more lines in your design the longer it will be. I'll take now, we can attach this to a card base. I'll just remove the cutout from my mat. I'm going to turn my mat over so the paper curls less and we can attach this to a card base I have. I already cut this out. I'll use some adhesive. Any type of adhesive works well for applying the front of a card. Just line it up and now we have a little card with a very cute sketch.
If you want to do something to improve it. a little bit you can add a little happy birthday sentiment. This is done exactly the same way I sketched it out and I have a cut line to cut out the outside and if you want to step it up even more you can take your draw designs and just color them in with colored pencils just to make it a little more fun. Now you know how to choose sketch layouts and how to use cut-per-line color to tell your silhouette machine which lines to draw and which lines to cut in our next project we will work with other sketch layout and sketch fonts in the next project .
I want to show you some advantages of drawing that I really like. I'll show you how to use your favorite regular pen in the Silhouette Adjustable Pen Holder. Use it to draw on dark paper that may not work as a print cut and we'll do it on a small sheet of paper that's too small for a printer and we'll use a couple of sketch fonts so you can see what they look like. so in the silhouette studio I have a blank document open and I'm going to open a file called bicycle sketch. Now you can see if we zoom in that it is made up of individual lines that we will draw with a pen. just cut the paper if you tried to use a blade here my paper that I'm going to cut or draw on is already precut 24.7 5 inches I by 4.75 inches so I'm going to set that is right now like the size of my medium in the page setup panel so I just need to resize my bike to about four point four inches wide okay and I just need to align this to the page and then I'll add some text I'll get this about where I want it, so for the text I'll just click on my text tool on the left, as usual, click down on a cursor and type hello and enter.
I miss you now this. The text may look normal if you're used to cutting vinyl or colored paper, but pens don't automatically know that they only know how to cut or draw along the cut lines on the page. Now I don't want to just draw the outline of these. letters, so I need to choose a sketch font or add an inner fill, so let's choose for this project a couple of sketch fonts. I'm going to double click on my text, I'm going to go into text editing mode and I'm going to put it in center justification and then I'm going to highlight this first line and I'm going to open up my text style panel so I can choose a font and in this I'm going to choose a font called mr. stripey and I like the size of it so now I'm going to select my bottom line and this one I want to change to a sketch font called stick sketch font and this one I need to change it to 24 points to make it a little bit smaller and I need to change the line spacing to close that space there, so I'm going to set it to 30%.
It's now a real sketch font, as you enlarge it, it will keep its lines together even as you enlarge it. really big, so you can see down here, it still looks like a single stroke and that's what makes a sketch font work really well with pins, so I'm going to undo that and go back to the size that I want and I want to change everything. my colorsline on this page to a black line color. I don't have white, so I'll go ahead and use black. I'll be drawing this in white, but I just want it to be a line color that's different than normal. red now I could add another outside cut line again like we did in our last project, but my paper is already cut to the right size and this time I'm just going to draw and not cut, okay, so I'll spend a minute. and arrange them so they look good, push that with my arrow key and as I zoom out a little bit, yeah, I think it looks good, so we're ready to go to the submit tab and again we're going to work with the line. tab, so we're going to draw by line color, if you're working with a double tool holder, go ahead and switch to the blue circle on the right side, you don't have to do that, but I usually always draw on the right side. side and keep my blade on the left side if you have a single tool holder, that part doesn't matter, we're going to set the material on pattern paper, which is actually still and we want to make sure that our action says sketch and our tool we can leave it on a drawing pen.
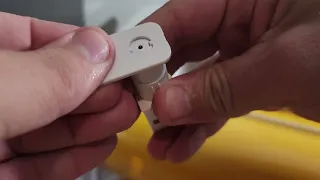
This time we're going to use the pen holder, so let's go ahead and choose the pen holder and I'm going to show you how to put it in the pen holder before you actually hit send this time I'm going to use a gel pen in the adjustable pen holder and I'm going to show you how to do it. Make sure the cap is off the pen and there are three collars to accommodate different pen widths and we're going to use the medium one, which is white, so you can loosely fit it into the main pen holder or you can slide it into your pen first.
Either way, it works fine, but the point is you'll be able to screw this collar on and keep it tight and make the tip of your pen no higher than the top of the cap, so while it's still a little loose we'll put the cap on and we'll make sure the pen doesn't. go doesn't push that out and we're just going to tighten it up and make any necessary adjustments so we want the tip of the pin to be at the same height as the cap here we have it and it's nice and tight, we don't want it to move while it's drawing, which is ready to go, so we'll go ahead and place our pin on the right side that we set up in the software, lock it in place and just ignore the sheet that we have.
I don't have it set to cut anything so the blade stays there, it won't do anything. One more thing I like to do is scribble on some scrap paper to get the ink flowing, put it on the mat, and carry it around. and then I can click submit in the software and that will just make the color of a line just draw our design in white, so if we look at these lines you can see that it's nice and crisp and clean and it looks like you might have done it . You drew it, you wrote it yourself, but you didn't need your silhouette machine to do it for you.
Instead, we'll go ahead and place this on a five by five inch card base with a little bit of adhesive. Now that we have covered many of the advantages. to use pens with this project we discovered that we can write with white pen on colored paper we discovered that we can write with white on colored paper instead of trying to print to get a similar look, we can to use a small sheet of paper on which it would be difficult to print, you also know how to use your own pins in the adjustable holder and we also look at single sketch fonts that are perfect for drawing text.
Next, let's see how to draw with various colors. So far we have drawn with single colors, but now I want to show you how to draw with multiple colors. We will also talk in this project about adding sketch fills, so I started designing a birthday card and I want to draw a design in multiple colors to add to this card base. I'm going to go to my library and I'm going to use this pot sketch, so I'm going to double click to open it and we've been lucky with this file because it's already broken down into pieces that we can recolor and group pretty easily, so I'm going to ungroup this and I want to change this line color series.
Make sure you don't change the fill colors. We want to leave this as the outer cut line, so I'm just going to leave that red as a cut line, the middle section go ahead and group it together and this is just going to be a black line. Now it's on the left. I want the bottom piece to be blue. I want the stems to be green. and these flowers I want to be yellow now, if I just click on a selection box around them, I also select the green stem, so I'll hold down shift and click on the green stem again to deselect it and now everything what I have The ones that were selected are these flower cups, so I'm going to go ahead and group them together and change them to a yellow line color.
I'm going to go ahead and group them all together since we're eventually drawing by line color you can group any color and still draw or cut them individually now we're going to select these three flower segments and I'm going to use my Center tool in the quick access toolbar to center them all together if you're using a different layout and don't focus. Perfect, just remember that you can select them and use the arrow keys on your keyboard to move them into position so they look the way I want them. I'll go ahead and click on group and these are already a good size to fit on the front of this card.
I'm going to cut, so we'll put this aside and continue working on the text. I already wrote happy birthday and I used the Happy Birthday font and as we get closer you can see it's quite small. and delicate, you don't want to cut it out of paper or even vinyl because it's so delicate at this size which makes drawing now a great option, as I mentioned in the previous lesson, if we draw now, we'll just draw the outline as you see. Here last time we remedied that by choosing a sketch font and this time I want to show you how to turn it into an Abul sketch design that looks more bold or filled, so we'll select that first and move on. go ahead and solder them together so we don't have to worry about these little overlaps, almost choose to right click and solder and I can also group that at the same time so they stay together as we move them and I want to draw this the same way. with the same pen as the center section of my flower and we chose black for that, so I'm going to choose the same black line color for this sentiment and then I'll make a duplicate copy of this because I'm We'll show you two things, two ways to get a look bolder or complete it, if you have the designer edition or higher, you have access to special sketch features that change the outline or fill of a design, so we'll continue. and find that in the line effects panel, if you have a small monitor, you may need to click on this little air arrow pop up, but you're looking for this little squiggle icon which is the line effects panel, we have our text . selected, let's choose a border effect down here and I'll go with the approximate one, which is the fourth one.
Now this text is very small, so it will look messy until we refine it. I'm going to go to the Advanced tab and I'm going to set my stroke length to 0.875 and I'm going to decrease the density to about 50% and you can play around with the round with those advanced settings to get the look you want, but I think the incomplete look works fine with the incomplete. flowers that we have set up now their sketch effect is not limited to text, let's look at these hearts for a minute. You can also add designer edition with designer edition.
You can also add sketch fills, so I'm going to ungroup this and I'm going to choose again in the main tab of my line effects. I'm going to use this second row for the designer edition sketch effects, so I'm going to choose a couple of different sketches from Phil here and you can even combine them with border effects. Again, you can adjust these with the Advanced tab. Something I like to do is play with the offset so you can make it go further or leave more space or get closer to whatever edge effect you choose, so it's fun to play with.
We're not actually going to use these hearts. I just wanted to show you those sketch effect fills that you can get with the designer edition, but let's look at another option for filling text or other shapes. We'll see this, these happy birthdays again, the line effects. was available to everyone for all silhouettes, still Silhouette Studio users on four point two point four seven one and this is a great way to use your sketch pins, so we're going to select this unaltered happy birthday sentiment and then the first tab of The line effects in the first row are available for any edition of Silhouette Studio, although they are simple fill effects, so we can choose any of them.
One of my favorites is the spiral that is on the last one, which is the last one in the row. You can see it starts to fill with little lines and as you decrease the spacing, those inner lines get tighter and tighter and fill that font, so I'm going to drag it all the way to the left and you can see what it looks like. pretty full, just keep in mind that when you add all those little extra lines, when you add fills to a sketch design, it's going to take longer for your machine to make all those little extra lines, so be prepared for that, so now I have two options for outline our feeling on this card.
I'm going to go with the full version as I demonstrate how to set up the sketch with multiple colors in the submit tab. Now we'll go ahead and organize this. I want to make sure that my flower and my sentiment look good inside this card front that we're going to cut out so it looks nice. I'm going to group this text with the card base so those two stay together and so I'm going to draw and cut out on a piece of pattern paper and then I'm going to move these flowers to the opposite side of the mat that we're going to draw and cut out on a piece of white paper and as I am using a whole 12 by 12 inch mat.
I know I have room for the cut lines that are on the outside edge of my flowers and the edge of my card base, those should still be red and then the various sketch lines should be different colors. we are ready to move on to the submit tab, go to the cut by line color tab and generally you want to draw first and cut last and you can choose the order for each line color. Let's drag the red box to the bottom. because we want to cut at the end, that is the one that will be left as a cut line with the blade and then we will go ahead and establish the order to draw first the black and then the yellow, then the green and then the blue and finally it is going to be cut . the red of each material we want to set on medium pattern paper and you would choose that, of course, for your own paper that you are going to cut.
This bottom red line we want to be a cutting action with the blade and then we want to change. the action on the rest of these to draw, you'll see that it sets them automatically, so expect a on the tool holder now if you ever have additional colors on this page for this tab to cut by line color if you don't want it. to cut off those extra colors, you can just uncheck the box right here, okay, this is what I want to happen. I want to draw everything in black and then draw everything in yellow and I have two tool holders so I can do those two. lines at a time, so my black pen is going to go in the left or red tool holder, my yellow pen is going to go in the right or blue tool holder, so I'm going to change that right here on this screen right now. so I can swap the colors between yellow and green, so let's add a pause, then I want to draw with green on the left tool holder and I want to draw with the right on the blue tool holder, so I'll change that. blue, a blue to blue line and add one more pause once you're done with those two and everything is sketched out.
I can with that final pause take out the pins and just add the blade into the left tool holder and that will cut my end section so My mat fits two papers and they are the same thickness so I have them all set up as the same material. If you need to cut separate paper thicknesses you can also set them as separate line colors here and give them their own settings and again if you only have one tool holder it will just ignore this tool number column and you can just add a pause between each line and swap your tool after each line.
This may seem complicated, but if you practice using the line color. tab I think you'll find it's easy to think through and logically set up your cuts now that we have it set up. Let's load up our paper colors tool on Matt, load up our pens and load them into the Cameo before cutting when you stop it. You will see it shows the pause on the screen, at that point you will change your pen and blade and click resume in the fens tab of the software each time you will leave your Matt charged all the time until it is completelyfinished, so to match what we've set up in the software, I'm going to draw and cut on white on this left side and I'm going to draw and cut on the pattern paper on the right side, we've set that up. up, so we're going to do the black first on the left and then draw with the yellow on the right and when that stops, we'll change the tools to get to the first pause in the software and that just stays in place, no we need to unload the mat, so we're just going to take out these pens that are here and we have it set up so that the green is drawn next on the left tool holder and the blue.
We're going to draw the next one on the right, so when they're there we'll click Resume in the software, so we've reached our second pause point, we can take them out and the final section will just cut with the blade on the left side, like this which we'll load it in there and click resume again everything's done so we'll download it okay so I removed them from my cutting mat and I'm going to add the cut out flower to my sketch. base just use a little bit of foam adhesive to make it come off the card and we'll add it to this card base that I already cut with a little bit of adhesive and finally we'll add it just to a solid base one last time so this is the version with the full sketch fill that we use and I also have a version that has the sketch effects where we use the designer edit just to make a sort of scribbled look that matches the sketch flowers which is the most complicated cut you can possibly get You'll have to deal with the fact that you can add more colors and just follow the same process of sorting by line color and adding pauses so you can change pens.
Now that you know how to draw in various colors, you'll relax a little and use line effects once again in our last project to draw a photograph. In this final lesson we will turn a photo into a sketch design, we will do it with tracing and line effects. line. Keep in mind as we go that not all photos work well for tracing. converting to sketch layouts now images with a white background are much better than a busy background, so I have a photo open and the background on this one isn't that bad. Your photo needs enough contrast between highlights and shadows so that the software can easily find those dark images. areas I already cropped this photo to fit a five by seven inch frame, so I'm going to go ahead and open up the trace.
In the panel we first choose select trace area and drag a box around the photo. I'm also going to zoom in a little bit so that this yellow these yellow areas start to fill in as they encounter the dark areas, so normally you'll increase the threshold, but that also depends on the photo you're using and I found that photos of people at They often work best using the high pass filter because it looks for edges and not just general darks and lights, so I'll set it to high pass boost. up to about 14 and then I'm going to increase my threshold just to 49 and that's fine with me, so I'm going to select this top stroke style to say stroke and then I'm going to move the photo to the side and that just leaves the cut lines there on the page, let's select them and set the line color to black.
Any color is good except red when we are drawing, you can choose it to match your pen if you want and now I will open the line effects panel that is selected, so what you choose next in this row is your personal preference . This time I'm going to use the line fill effect and I'm going to reduce the space so that point zero to zero and you I'm just going to choose on your own photo what looks best to you and now I have my sketch line set up, but I need to draw a rectangle so I can crop it after I draw it to fit my frame, so I'm going to choose my rectangle tool and I want it to be seven inches wide and five inches tall, so I'm going to choose my scale tool in a go to toolbar quick and then all I have to do is center it again with the quick access toolbar and they look good. so I'm going to group it and send that on the page once again so we're ready to go to the send panel and again we'll choose the line action tab like I always do when I'm drawing and here you'll notice there's one of these colors of line that is not color and that is actually for the photograph itself and we can just ignore that it's not going to try to cut and it's off the page anyway, but it's just off the way I'm going to drag it down okay so my black line color I want to be on top and I want it to be drawn on the right tool holder so I'm going to set it to tool two on the right side or the blue circle the paper the material can actually be any paper this, when we cut it, we will set it to pattern paper that is the right thickness for the cardstock that I am using in this first line the color that we want it to draw and the tool that What we are going to use is going to be another brand of pen in the pen holder and then we'll just check our red cut line that we want to be on the left tool, it's set to cut and it has the correct material. set up for cutting and has our blade for the tool.
Now remember that if you are using a single tool holder, you can ignore this tool number column and you can use a pause between them to swap your tools and in fact you can just check cut or not cut one at a time, whichever works best for you, okay, so this is ready to send, you're going to draw it with the black pen and then immediately cut the outside with the blade, we're using the pen holder again, so I'm going to take the cap off my gel pen and we're just going to slide this here again.
You can unscrew it completely and put it on your PIN or you can just leave it a little loose on the holder where we want the tip. of the pin to touch the top of the cap so we'll just hold it in the places where we screwed it in tight and that's at the right height so it's done and we'll move on and I hope to go ahead and scribble a little bit of flowing ink , load that tool on the right side, load our paper and once we load it, we'll just click submit software and it will draw first and then cut.
Now, this particular design took about 25 minutes for the Cameo. to completely draw everything if you are working with tighter lines tighter spacing will take longer if you leave the spacing further apart and wider it will take less time so be prepared for that when you are drawing now if you use a metallic pen or with glitter, you will be able to see this type of glitter as you turn it into light, we will simply insert it into a frame and that's it, tracking down and choosing the right photo may take some practice, but being able to draw photographs with a pen on your Silhouette machine it's great.
I hope you enjoyed this class on using pens and sketching features in Silhouette Studio. Now you know how to find sketch designs in the design store, how to draw and then cut. use line cut color on the AB penny how to use silhouette drawing pens how to use other pens in the pencil holder how to draw in various colors and how to turn a photograph into a sketch design while practicing the techniques in this class I'm sure That you'll find new ways to use drawing pens and unique ways to use the software's drawing features for other tools on your silhouette machine.
Check out our other silhouette 101 classes and tutorials through silhouette 101.com and the silhouette youtube channel. You can also contact Silhouette support for help at Silhouette America com. Have fun with your new drawing skills. Oh
If you have any copyright issue, please Contact