Sharpening Drill Bits - The Long Way Round
Jun 05, 2021So I had to order some car care parts, specifically a handful of small bearings and while I'm waiting for them, I thought I'd make a quick video. I received quite a few requests for
drill
bitsharpening
and today. It's International Drill Sharpening Day, so you know it seems appropriate, the car is pretty much as we left it in the first part, although I made a little progress on the control system, but I need to gather enough images to make a second one interesting part. In part, think ofdrill
sharpening
as treading water. I know there are already a lot of great videos on this topic.
However, you asked. I got engaged. This is going to be some hands bit sharpening, but with a twist, sorry, let's do what we did in the high speed steel lathe tool sharpening video we'll start from scratch, make our own bit and see why, when , where, how and who we should sharpen, what is the effective way to sharpen them when they are dull. I mean, there's a little more work. and making your own drill bit from scratch, of course, but once we get to sharpening it, it's how to sharpen them when they're dull. In our case we'll start from extremely dull so on the right you're looking at a dull drill bit my trick to sharpening something I've never sharpened before something I don't know how to sharpen is to simply look at a new sharp thing and copy what you see on the dull thing, grind the dull thing until it matches Now keep in mind that not all exercises are created equal, you can get some real winners right out of the box with boring exercises or even the other way around, like with anything else, you get what you pay for, make sure you copy something good, now the problem with copying. geometry of a sharp tool to a dull tool, although you are likely to sharpen your dull tool, it doesn't necessarily tell you why they are sharpened the way they are and whether, for example, you needed to make changes in the case of the bit to say a different material or if you wanted to drill a large or small hole, you wouldn't have much of an idea how to do it.

More Interesting Facts About,
sharpening drill bits the long way round...
You probably won't have that idea either after watching this video, but we'll try. I'm going to do this with a piece of round material, some cold rolled steel. In this case, this is just a cut off of a piece of the driveshaft I'm using for the kart. Let's not get into why we're starting. rounds hit and don't say square material, but if you think you know, leave a comment below. Cold rolled steel is not a good bit, it's too soft, but for the amount of grinding I'll have to do to make this. on something that drills well, it's easier to show it to you with this than a solid piece of high speed steel.

This is just for demonstration, although it should be hard enough to drill a clean hole and say some wood or maybe even try some aluminum in the lathe tool sharpening video. Before we do anything, we try to make a cut with just the blank space. I'm not going to do that, hopefully, it goes without saying that just a round piece of steel won't do anything at all. Aside from maybe burning if it's not obvious, you might want to stick to buying new drills when the old ones get sharp to state the obvious, this has no cutting edges, the first thing I'm going to do is put two cutting edges on. on this, since we're doing a two flute drill, your classic twist or work or drill, you might take a look at this on the bench, since we'd like to drill a hole while it's spinning and the round face is what's touched.

In our work, you would expect the cutting lip to be somewhere a
long
that face, somewhere near the center line. Now, to leave a sharp edge, we will have to cut some material. Removing that material also results in our first flute basically being in an empty spot where the material we are cutting can come out and out of the work what you are seeing on the screen would be the beginning of a single flute drill there are single flute drills. and they are actually quite interesting but they have a different shape. geometry entirely, so we'll skip them and jump straight to the classic two flute you probably have at home or if you're like me you might have one in your pocket right now, okay, anyway, two flutes will need two grinds if Make those two sharps so that they meet in the center.Basically you would cut the drill in half lengthwise and it would fall apart. Two pieces will need to separate those sharps a bit and doing so will leave a bit of material called netting. We'll get to that later, but the web is what gives the drill strength. The larger or thicker that web is, the more torque it can handle. The downside, of course, is that we don't have cutting edges in the middle, which is problematic as the flutes trying to cut the center just spins, they are getting hot and bothered, making it difficult to push the drill into the work.
I don't remember exactly, but I think the thickness of the web is usually around 15 or 20 percent of the diameter of the drill. In fact, let me check my three-quarter inch drill. This seems to be a little bit more or one hundred thousand and ten. I have this stock on a square Kollek block to make it easier to turn 180 degrees. I think I'm going to go with 150,000 as' because I think it would be easier to see a little bit later in the video. I'll mill these two flutes and then we'll take a look. Now we have two flutes on that front face.
Ideally, this would be done with a large ball or bullnose end mill just so the inside corners aren't sharp stress points, but let's take a closer look at the flutes and cutting edges we just made, if remember the lathe tool video, if the angle that the tool and the material are 90 degrees, it basically has no rake, it's not very sharp, but the way we milled it resulted in a 90 degree edge, it's a very strong edge but not very useful for what we needed to do. I'm going to re-cut these flutes right now. I'm going to use a 30 degree angle block just to angle the bit up and give the cutting edge a sharper angle.
I'm going to try not to miss that sharp corner. we set it with the first cut just because it's in the right place, okay, I managed to make a hole in the piece, but now we have some backslope on that face, we have a positive rate, our leading edge is one step closer to being helpful I wonder if this is how they make through hole coolant drills. I'm a little bummed that I made it. I had never tried this before. I hope it still works anyway. Allow me a quick analogy. Can you imagine what these two chisels are?
The two cutting edges of our two flute drill bit would be arranged this way, maybe technically I guess it's an angle like the tip of the drill bit and they would be spinning trying to drill a hole now I think we all can. It's related to the fact that chisels don't cut very well standing this way, they might be excellent scrapers, but they wouldn't move much material, you'll want to give them a bit of a tilt, something like that now they come. They actually have one chance to cut material and this rake is exactly what we just cut on the mill, so if I turned them, say, on the drill and tried to drill a hole, I'd probably get hit in the face with a chisel.
Now imagine that somehow we could twist these chisels around each other as if it were a giant twizzler with which we would end up like a spiral staircase, something you could say, maybe like a drill bit, on which the twisting speed of that would depend. spiral of that helix. how far back we tilt the chisels, the steeper the chisels, the steeper the helix, let's go back to the twist drill
bits
, consequently the primary and secondary bevels that are on the chisel, that is what we will grind next, the Parallels will never be right. so we're talking about how the positive rake was created when we tilted the twisted chisels back.I'll take a closer look at these two exercises, it's a little subtle in this case but this is what I got, one has a steeper incline. The helix angle is usually called slower and the other has a shallower or faster helix angle. The one on the left has a star helix angle and has more turns, which means that one has more inclination than the other, now the more positive the helix angle is. the sharper the tool but the weaker the cutting edge, could you explain the technicality here because they are actually two different types of drill
bits
, but generally that means that the drill bit with the faster helix would be better suited for softer materials, in In this case that bit is very good on aluminum and you will find that drills made for drilling harder metals have a slower helix to give them a stronger cutting edge.Our 30 degree helix is a compromise, neither fast nor slow. It's your standard drill angle, now I can. I didn't cut a propeller on my milling machine and believe me, not a day goes by. I don't feel too bad about it, so this is all you can get, but I hope you can imagine that these cuts would continue all the way to the back of my router. the drill that creates the flutes on the same page now, can I continue? We'll need some relief on the face behind the cutting edges. We may have a sharper edge, but there is still no clearance there for the edge to actually move into the work.
The back of this edge would simply rub and make a loud noise preventing our sharp cutting edge from biting and removing material to create a hole before doing so. There is one thing we need to take care of now that will save us some time later. This drill doesn't make sense, since this drill would try to walk everywhere as if it had taken a Sunday walk. It is likely that different parts of the drill face touched the work at different times and places as it rotates, causing it to move out of position. mark, so let's cut a point at the end and for now I'm going to cut that point on the lathe.
We'll re-drill the point angle a little later and to be honest it will be more important when we're sharpening. Drill on the grinder, but for now I'm going to do it here. I'm going to choose an arbitrary tip angle of I don't know 118 degrees. It's okay, I'm just playing with you. 118 degrees is the standard drill tip angle for general purpose drills for now, you'll have to take my word for it, trust me, I'm a fan of getting a 118 degree included angle, my compound is set at 59 degrees from the lathe axis , well, it's actually starting to look like a drill as you can see, it's starting to look more like a drill.
Now look closely and you'll notice that the cutting edge is still somewhat square to the trailing edge. Still no relief back there. This drill would rub as much as it would. Before you know it, it will be better to do it in one place instead of walking. It will cut that material on the grinder. This next step would probably make more sense on a belt grinder, as in against the flat plate, but I'll bet there are more people with bench grinders than belt grinders. If I didn't say it out loud, we'd go through all this again, but faster when sharpening an adult drill bit with a dull drill, all the work we've done so far will have already been done for you by the drill manufacturer.
We hope all this nonsense we're doing now gives you a taste of what's to come later. Well, we have two cutting edges and we saw it on the lathe. Because the material behind that edge is square to that cutting edge, it doesn't give you any room to cut, so we're going to remove some of this material immediately behind that edge on the bench grinders, the support of the tool is placed on the center line of the grinding wheel since the wheel is round, anything we push against the wheel will end up with a bit of an angle, so if you look at it this way, it touches at the bottom, but there is a space at the top, so you'll end up cutting a an angle in the front is technically hollow ground, but in this case it's small enough that it's also flat now.
I personally don't use the tool holder and I recommend that you don't, but feel free if it makes you more comfortable. You'll get much more feedback and control if you hold the drill in your hands than if you rest it against a vibrating grinder. Now I don't want to lose that nice angle that we put at the end of this drill. I want to relieve the back, so there are two things we need to keep in mind while sharpening first. I want to keep the drill at the same 59 degree angle that is built into the tip, so as I sharpen.
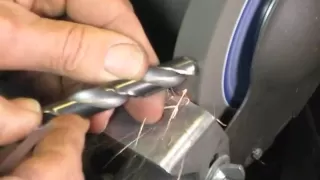
I have to pay attention to make sure that the cutting edge is parallel to the wheel and as part of that I also want to make sure that that edge is level, meaning that the rotation of the drill is aligned with the wheel that we have to maintain. Tracking both that angle and the type of rotation as we grind, so with the drill body at 59 degrees in this case and that flute parallel to the ground, I'm going to start removing some materialuntil you get up to that edge, check your progress while you're polishing and just dip it in some water when it starts to get too hot to hold, when you start to see the sparks breaking across the cutting edge consistently from side to side. other.
I know you've reached that edge, okay, so I hope you can see this. There is a nice consistent polish all the way to the cutting edge. I haven't broken that edge, so my angle should still be correct. We are very close to having a sharp edge. drill bit, I can almost taste it, no, wait, sorry, it could be the grit from my grinder now, if you look closely, there's still a little bit of material that we didn't get by just easing up to that edge, basically, this part back here you could Even I still see some blue, this needs to be removed again.
If you just look at the geometry when you hold it and think about that edge trying to move towards the work, you'll notice that this should sort of continue down and away, that's what we're going to polish now and I'm going to try to polish it until it's aligned. with the opposite flue. I'll take it up to about this line here, this is more. or less like the first routine except that to get to that material you will have to turn up the wheel a bit and just polish and check your work as you go, it will be a combination of sort of adjusting the angle and rolling the drill until get this material up to that line, well, I think that's what it looks like.
I went back up the hill probably a little bit further than I needed to for this cold rolled stamp is soft, it's a little bit more gripping than your standard high speed steel bit. You know I'm doing it in the face of camera performance anxiety, but now we have a sharp edge, the primary relief and then, I guess, the secondary relief. Now some people like to do this in facets. Instead of rolling the drill against the grinding wheel, you kind of sharpen the first type of second and then the third just remove this from the highest part of the trailing edge, the back of the heel, to make it look more like a prismatic shank.
It has three angles that create complete clearance around the edge wrap. Now, what we've done here is basically the same thing you would do to sharpen a chisel. You have the primary and secondary bevel that provides space for the cut. edge, the only really tricky part is that it's kind of round or tapered, so you have to be a little bit lighter with your feet on the wheel, you know, as you move the material, you're trying to get the geometry you want, come on to try it, since it is a piece of hard wood. I mean, it's not hardwood, scientifically I don't know if it's not, it's not pine.
I'm not exactly sure what to expect here. I haven't tried this, but in theory it should drill a nice clean hole, so I'm no expert on this, but I don't know if those splinters don't seem too unreasonable. There is a lot of sawdust. I don't know if that's the drill or My speeds were not correct, that progress seemed a little slow. Let's try it on a piece of aluminum. It didn't work, so that's why they don't make mild steel drill bits, but now I'm curious. We said before that the web thickness type drill tip can't actually make any cuts because there are no cutting edges there.
I wonder if we tried this with a pilot hole larger than the smoothed area if that were not the case. I had better luck, I certainly made a tip that looked like a drill bit, but maybe you can see that the aluminum is sticking a little to the cutting edge there and you heard a decrease in speed, so this seems like a good time to talk about thinning of the network or the division of the tip. Point drills are somewhat similar but they are different, let's take a look at this one and a half inch drill.
This is a somewhat extreme example, but it's easier to see now. Normally I wouldn't split the tip or thin the web. on a drill this size because I wouldn't use it without a pre-drilled pilot hole let me explain to you the way I normally sharpen drills this is more typical of the type of grinding I personally do it's more of a
long
continuous grinding sort of thing, you know, I'll set the angle, make sure the tip is balanced in the center and then I'll just blend the relief on the back, the net on this particular drill is a little over two hundred thousandths, that's a pinch.Over five millimeters, the point at the end of this web, as sharpened, is called a chisel point. We said the part doesn't cut the center, it actually just pushes the material out of the way until it picks up and cuts nicely into the next one. part of the drill that would actually make any cut if you think about what the network is trying to do while this drill spins it would be like trying to make a hole with an equivalent sized drill just maybe imagine it spinning backwards so it can't really be short, I would try to get material out from underneath to make big holes like this, I would first pre-drill the work, in this case with a drill, maybe one or one and a half times the size of the net that way.
When you go in with this drill, the web pushes against anything, as it is the thickness of this web that causes high drilling forces. The other way to reduce those forces is to make the web thinner at the tip, basically doing some local polishing. In those areas, by making the chisel tip smaller, it will be easier for a thinner chisel tip to penetrate the material when trying to drill now. This is usually done on the edge of the grinding wheel on smaller drills that you might use, say, a dremel tool now. This here is a split point exercise.
Now the split points don't always look the same. Each brand has its own opinion. It may be a mix of split toe and web thinning, but take a look at how they've done it here. the primary bevel is ground a little steep and long the second bevel or secondary relief grind is also quite steep, it cuts the heel of the primary grind and also splits the point where they grind almost to where the center of the drill is. of the tip of the chisel I was splitting it on this drill doesn't have much trouble cutting mild steel and that tip geometry also does a great job of keeping it on center or on a center punch mark so I was going to sharpen it This drill that We saw earlier in the video with the corners chipped, it actually has enough damage and needs a bit of rebuilding.
I would probably hone the end and then start from scratch, which is a little more challenging than just sharpening it. a dull drill bit. I mean, the steps are exactly the same, but if you're just learning how to do this, you know not to make it too difficult from the beginning, so I dug through an old box of drills. I have probably 20 pounds of old drills and I found this: It's a 7/16 about 11 millimeters, the tips have burned a little, the angles are all ridiculous, it's even quite magnetic. I wish I could tell you that I bought this. kind of a flea market, but I'm pretty sure this damage is my fault.
There is almost no space in the back. The angles don't look good. The two lips of the drill are of different sizes. To be honest, I'm a little embarrassed. I think it might be more like a dull drill bit that you could try to sharpen at home, so this could be it. I don't know an easier place to start. The other thing you'll want to have is a drill gauge. A drill gauge is really nothing more than a broken protractor as if it were stuck at 59 degrees, you would use one of these to set the point angle of your drill for a 118 degree bit and you would use small graduations on the scale to make sure that Both flutes are the same length.
The cutting edges are equal, which means your tip is in the center now, actually, 118 isn't really set in stone, it just happens to be the angle of the drill tip that works, you know reasonably well, in the Most materials, all-purpose, one size fits all. If you work more with harder or softer materials, plastic, aluminum or brass, that sort of thing, you may want to look at drilling plant angles and simply sharpen all your drills to the appropriate angle, they will work much better on most of the cases. job you may have to use one of the easy ones, just place the drill against the gauge and look at the top, hopefully you can see that the angle is pretty close, but the two cutting edges are different links that look like it's almost at the thirty-two mark, that's the wrong angle and it's a little longer.
Now punch gauges are quite inexpensive, but if you don't have one you can of course use a protractor and scale to do the same thing. Use the protractor to keep track of the angle of the drill tip and use the scale to make sure the cutting edges are the same length if you don't have a protractor. I've seen people use a pair of hex nuts that include a one hundred and twenty angle. degrees but as I said before it is quite close and if you don't have a drill well I can't help you in my case the first thing I want to take care of is this magnetism there is nothing worse than trying to sharpen or even use a drill bit that accumulates lint on the end, I could use one of these things, magnetizer, demagnetizer, you can get them pretty much anywhere.
I don't even know how much they cost more than they are worth, for sure, maybe They are really good for small screwdrivers. I guess technically in this case this drill would fit into one of those openings I have and what I prefer to use is a proper degausser. It's a little small, but for what I do it's priceless. I bought this shortly after getting the surface grinder as any part that comes off the surface grinder is highly magnetic which again gets annoying very quickly. Well, it should be a lot less complicated to deal with. Often now if you want you can mark a line with like a sharp marker on the rest of your grinder just to help you keep track of the angle of the tip, but I'm still going to start sharpening and keeping track with the drill gauge, as we noticed on the bench, one edge is longer than the other and is at the wrong angle the other is pretty close but is a little short I'm going to keep the drill parallel to the ground again the round wheel is going to add that I don't know five or seven or eight degree clearance in the back and I'll just keep alternating sides until it fits according to my drilling gauge.
I will submerge it from time to time to prevent it from getting too hot. Now I hope you can see this. Both cutting edges are the same length and at the same angle, that means the included angle is correct and the point is in the center. The other thing to note is maybe I can show you here that the cutting edges are parallel to each other, that's how they're going to come out. the wash if you're just resurfacing a dull drill if you're doing a full facial reconstruction you'll want to keep an eye on that the other thing we haven't talked about is the angle of the tip of the chisel, you see the angle that connects sort of two flutes in the center they should be about 120 degrees.
I don't know how much that is, but it looks like right now I'm going to relieve the back of those routines again, cut this stuff here I am. I'm going to use blue Sharpie so we can keep track of how far that polish goes on that primary bevel, and just like we did before, I sharpen that secondary relief or secondary clearance to sort of the opposite cutting edge, trying to keep everything as parallel as possible. In fact, if I look closely I think I can even see some wear on my grinding wheel because the grinding wheels are a bit bowed, so although it's not strictly necessary in my case, I'm going to use this mainly on machine tools on the lathe and on the mill, let's try to split this point just for the sheer thrill of being alive, okay I lose, that looks more like a web thinning maybe than a split point, you can see that the chiseled point is still somewhat continuous on the top, I bet the thing looks absolutely huge on camera compared to what I'm looking at, but anyway there's not a single point there to catch like a center punch, yeah, try it, this could have been one of those, he should have stopped while he was ahead. moments a piece of cold rolled steel, let's see how this works.
I'll try it here first. I want to see what the chips look like under a constant feed rate and if the cutting edges hold firm, we'll try it in hand. drill it and see how it feels there, you certainly drilled a hole, the cutting edges are still intact, let's try a pilot hole, okay, so I intentionally let that run at a constant feed rate into the material, that's why You saw that all nesting birds usually bump the handle or drop the feather to break these shavings, but this is more what I was looking for. Both flutes are practically creating this.
It's the same identical chip so the initial cuts were good but my split tip sucks consequently thisIt was running at 600 rpm and a little over 2 inches per minute. Feed rate of 50 millimeters per minute. Let's try the hand drill. Okay, this is a piece of mild steel, just somewhat hot rolled. Don't know. A quarter of an inch thick. Six millimeters use the same pre. - drill because I don't feel like pushing a half inch drill bit through hot rolled steel and here is our same 7/16 drill bit, the cutting edges are still there so that's a good first sign, see how it feels okay so I mean a half inch hole sucks to drill by hand, but other than that split point I'm happy with how it's accomplished so just one last thing I wanted to mention, what we just went through to good or bad applies to any type. drill bit or cutting tool.
Hopefully you see the parallels between what we did on the drill and what we did in the lathe tool sharpening video again. If you've never done it before, just look at another equivalent drill and try to copy that geometry. In boring, each drill will have a slightly different geometry depending on the job it is intended to do. As a last example, let's look at a masonry bit that looks a lot like our metal drilling bit, but the actual sharpening geometry is a little simpler and it still has flutes, they don't do as much as the other bit, they really just They are there to move away the material that the tip of the tool, the carbide insert in this case, is breaking off and really just has that primary bevel. on both cutting flutes on the secondary it is stated that it is just backing material on the steel shank that is brazed into the cutting tip, certainly if you grind this far enough back where you run into it you will need to clear it now to sharpen one of these , it's really just a matter of hitting the two main cutting edges.
I mean, you'll want to do this with like a diamond wheel on your grinder or a green stone made for carbide, you'll go crazy trying to do it with a hand file, but if you have masonry bits and you've never sharpened them, try it and I'm sure that you will achieve it. I'll see that it makes a big difference. I don't know how my 10 minute video always tends to turn into half an hour like always. I hope you enjoyed it thanks for watching and I guess I'll see you in part 2 of go-kart.
If you have any copyright issue, please Contact