Setting up a CHEAP and EASY Homelab Linux Server
Mar 17, 2024There is a big misconception about how much it really costs to build your own home laboratory. In this video, I'm not only going to show you that it's very affordable, but it's actually very
easy
to get up and running. a small Linuxserver
, set up a really nice panel to manage multiple applications and really get a chance to dive into the potential of what it can do for you just by having a small home labserver
, now you can really set up a home lab and run multiple services. I don't need such a powerful machine at all.
I have videos using old laptops as home labs and those have their own really great use cases, considering the built-in UPC keyboard display and everything that can be used on a single board computer like a Zima. board or even a Raspberry Pi or my favorite mini PCS. Now, the misconception may be partly my fault because many of the mini PCS I've been covering recently have been quite expensive. I've looked at some of the Intel Nooks. which have a high price and even some of the high-end AMD machines. That's where this video will be a little different.

More Interesting Facts About,
setting up a cheap and easy homelab linux server...
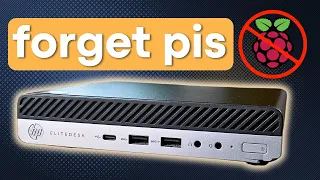
Here we have the geekom mini air 11. This is an incredibly affordable mini PC. This is the geekom website. This is the Mini PC that we are going to look at and you can see that it costs one hundred and twenty dollars, an incredible value. They sponsored this video and sent it to do this demo to show you how affordable it is. This may be, of course, it is not necessary to use your specific mini PCS and there are other affordable options. This is an Intel Celeron based system. The Zimba board, as I mentioned above, is another Intel Celeron base, but it's one of the reasons I really like it.

These mini PCS are because the RAM is upgradeable and in many cases the SSD is upgradeable, which is something I have already done. This is the small nvme SSD that came with this device. It has 256 gigabytes. For me, I need a little more. In my home lab, I'd say the minimum you'll want is probably a terabyte, if not two. Now, this doesn't have the option for a 2.5-inch hard drive, which can really increase its storage potential to what we'd want. go with something a little bit chunkier like this, it's here, but for budget systems and just starting out, this here will work great and if you're going to something budget like this, these little Intel machines are awesome because hardware transcoding on Intel CPUs it's generally a good deal if you don't know Hardware transcoding is actually like converting media on the fly, like downscaling something from 4K to 1080P and Plex or Jellyfin while you're on, like your mobile phone for example now just a quick overview of the hardware.

Here, this is specifically an Intel Celeron and 5095 with four cores and four threads. This thing is really light. It weighs just over a pound. It has Windows 11 pre-installed on the SSD I took out. I put a terabyte here. which we are going to install Ubuntu Server on this has dual channel ddr4 memory, it ships with one device, one 8GB per device, so if you want that dual channel speed you may need to choose another device, this thing is listed to be compatible. up to the terabyte I put here looking at some of the i's or here we have a USBC these are just data so they can't be used or they can't be used to display on the front here we have a single USB 3.2 Gen 2 we have our auxiliary our power button we have some airflow on the sides a Kingston lock on this side we have an SD card slot on the back we have our 19 volt power and a mini display port we have a gigabit Ethernet two USB 3.2 gen 1 ports another USBC for data transfer and then an HDMI.
This is the minimum configuration you will want. You don't really need the mini display, as long as you have an HDMI you're good to go and of course, getting into these little mini PCs and upgrading them is really
easy
- just unscrew these three screws here, which also act as sort of pads for the feet, unscrew the ones that come off and you'll have access to everything you want to access so It's the device again, they sponsored this video so if you're interested in watching it there will be a link below so what we need to do now is install Ubuntu Server on it, for this it's a pretty simple process, so.I am not going to make a complete step by step guide on installing Ubuntu server. Too easy. You get a USB stick similar to this one. You're going to want to connect it to your machine. I will notice that it will delete everything. on it, so be sure to backup that USB if you want. This is the type of official Wiki for Casa OS that we will use a little later. They are compatible with Deviant and Ubuntu Server, as well as Raspberry Pi. OS, if that's something you're going to want to use, then from there you'll want to use a tool like Etcher to flash the ISO file you're going to download to the USB you're going to use.
If you want to connect it, go to your BIOS or boot menu. I think in this case it can be removed or escaped, it will vary depending on the device you want to use and actually booting from the USB you just flashed, you may need to disable security. it boots depending on if you get a weird error like ufi, that's something you'll want to do and then once you're in, it's as simple as following the prompts, selecting your keyboard, your language, all that kind of stuff, making sure you select the right hard drive, you'll want to look for third-party drivers in case I left a link below for a full Ubuntu server setup tutorial, but it's pretty simple all you're doing.
What I want to do for sure is make sure that if you're installing this, you back up everything that's on your hard drive because we're going to erase it. Select the appropriate disk within the installation. It will give you what your IP address is. I highly recommend connecting this to Ethernet because using Wi-Fi and trying to set it up is an absolute hassle and two Ethernet is going to be much more reliable, so take note of the IP address you're going to have. Spit it out, you'll use it later to connect to the terminal and install Casa OS.
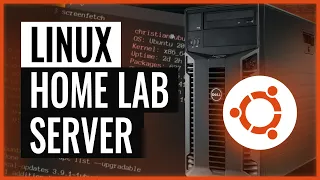
Make sure you select to install the open SSH server, you want to not need to install any. of these snap packages that show up, we could do all that kind of stuff later and run the install, let it update, reboot, and if everything is fine, you should get a login prompt. If you forgot that IP address, you could obviously use IPA. So from there, let's move on to screen recording and do the actual installation of Casa OS. It's made by the same people who make the Zimbabwe board, which is a wonderful little single board computer. I generally prefer the small mini PCs we are working on. here because we have options to upgrade storage RAM, things like that, the zimmerboard doesn't have that guaranteed, it has that mini pcie functionality which is cool and the Just Cast OS has a lot of options to make everything really easy to set up.
Down here we can see that some of the Docker applications or containers have a good amount available to start with and what we're going to do is we're just going to scroll up here and we're going to copy this scroll command, so let's give that copy, there we go, this will install Casa OS and all the prerequisites, but now we will do it, since we installed openssh when we installed Ubuntu Server, we will connect to it, so for this we are going to open a terminal here and we are going to log in via SSH, so SSH is your username in the IP address.
I think it's 152. I'll go back there and come on, it was three past five. I didn't restart it properly after the initial one. installation so now we are on geekum 11 air now we have some updates here so generally before anything it is always good to update our Ubuntu server so let's do a sudo apt type of update in our password, let it update those repositories and pull any possible updates, there we go, now we will do a sudo apt update, let's go ahead and restart all the services and okay, there we go, now we are updated, so all we have What to do to install this is to glue it.
The curl command that we copied earlier hit Enter and now we have launched the operating system created by Ice Whale, so they are installing all the necessary dependencies and we can monitor and see exactly what is happening here, so we have network tools that are being installing calls and there's a big list of everything it's grabbing, so we have several Python packages, just a bunch of dependencies in general, you can see it by unpacking and grabbing all the ones that even says, ignore the following error, it installed all the necessary dependencies that you can see. It is grabbing SMB clients so we can easily log in by installing various dependencies.
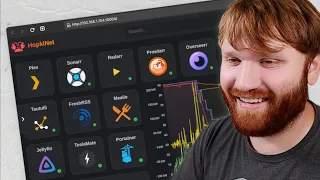
It's unzipped Docker, so all the apps and everything we're going to explore are based on Docker and you could probably even install something like protainer with this and have it work together in that sense, so this is installing the iso versions Home OS and we keep scrolling down and this is where we are so it's installed successfully it's starting all the services right now and boom there we go as easy as our Cas OS is 0.4 and it's running here so If I go ahead and copy this, open up our web browser, paste it in and press Enter, you'll see it'll take us to the OS streaming page, so I'll continue. and in full screen listen very quickly, let's zoom in and then we just have to click Go.
It will ask us to set up our account. I'm going to match it to our server. There we go, great and here we go. I'm going to take the news from the blog and here is our server and this is a really beautiful dashboard, we have our system statistics, it only uses one percent of the CPU, we have our power usage, our Rams, we only have eight gigs , but it's I'm not really using that much here we have our storage that looks like it's not using the full terabyte, so if I go here, they have combined storages, they have a couple of different new things here that I didn't notice last time, here's the full storage right there so it probably needs some tweaking to make it work properly, there's our full drive and we can see stats like our temperature and all that, if I go back to storage I can create storage here so if you want to connect external drives, you can mount them through here.
I got some network stats that don't really do much at the moment. We have the option to synchronize our data. Improve our home. We can add things here and we have our applications. and drag these icons around the installed default app files, so if I were to open this up, we would get a great overview of our various system files and let's say I go to Media, for example, I wanted to create a new folder to which I could call. this is something like Tech Hut and let's say I want to mark this as a shared submission, that goes in here, there's not much to do, so let's go down here to share, for example, and let's go to roof, click on the little menu to get the network path you can see. the options here if I want to give this a copy, for example, enter here, it doesn't show up by default on my network share, but if I pasted this by pressing Enter, there we go and I should be able to go and grab something here as a previous project, copy, paste it and here we go, now the network transfer speed here is a little slow, that's because I'm on this computer's Wi-Fi network from further away, but if I come back here we can see that. it's actually working so if I go back to my media and go to Tech Cut you could see this is a one click micro Weber video and we already have something there so now there's a really cool default app if you're going to When
setting
up a home lab, you'll want more services than just a file sharing type of thing, so that's where your App Store comes in and again, these are just several Docker containers that are pre-configured to be able to easily install through this system.Jelly Fin right here is really good if you want to create your own media server. I'm not going to talk too much about r apps. I have to tiptoe around this, but I love them, let's say in theory. One of my favorite use cases for having a home lab server is something like a photo backup, its own self-hosted Google Photos alternative, so if I go ahead and grab this, if I install Photo Prism here, the account Default is admin Home OS. and obviously we could change these, let's go to the next steps and it will go ahead and start that installation for us now while it does that.
I'm on my phone here. I opened an app called photo sync. I'm going to go ahead and continue, it allows us to select send receive continue, this is the app that Photo Prism recommends for backup, so I'm going to go ahead and get out of here, we're going to go to
setting
s, we're going to go to configure and we can see the photo. prism right there we will do theproof. I'm just trying to show a demo here. prism photo an editing account. I'm connected to my local network so I'm going to do it that way so the admin password 168.1.153 is Casa OS and everything looks good so I'm going to connect it to see if it works and there we go perfect so now I'm going to finish and I'm going to click on this little sync button and I'm just going to to send, let's send them all and send it through the photo prism, let's send it to the root and there we go, so now if I go here to the photo prism, we can see here it will open in the proper port on its own. app own small website kind of deal here photo prisma is loading let's log in with thatThe default information you gave us was the name of the administrator in Casa OS.We can see that nothing has been found yet, but if we go to the library, we will scan again, so let's start, it will go through all our files and see if we have anything there, but you can see that it is indexing the Google Pixel 6 camera, for which loads into the same type of directories that I'm using on my phone and we can see the numbers start to fill in here so we have video place tags and a lot more if I went back to the home page for now we can see some things starting to appear, for example this image here that I took and posted recently.
There's a little yellow box there, but that's just a quick example of a really rough setup. I'd like to go through it and set it up, set up SSL certificates and all that, but this is just an example of something you can do by having your own
cheap
little home lab, so now if we go back to AppStar, you could do things like at home. guard app assistant Caliber web we really have a ton of different things here ready to install and play including the protainer torrent client that I talked about before honestly this is my preferred way of working with Docker and if we just click install, will allow us to jump to an instance and this is a pretty lightweight application so it should be pretty quick and it's done.If we click on Protainer, here we are, we have our new user set up and you'll want to continue, set up a strong, complicated, secure password, create a user from home, we have our local environment, so I'm going to go live to it real quick , there we go and if we go to Containers we can see that we have a prism photo and protainer, so if you have a more essential hands-on approach to managing Docker, this is one of the applications that integrates easily into that type of thing, like I said before, how could they make them work together considering the fact. it's actually here, it's quite possible that if I click on the little plus sign here, we can install a custom app or an external link here so that it can sort of act as your control panel, something like homar or heiml , it can act like that, like a custom app, for example, if you installed something through Protainer and it doesn't show up here, this is where you'll want to go ahead and add that you can add icons, the actual UI ports, volumes, variables, etc., really interesting stuff and of course if we dive in. here we can jump to a terminal, so let's copy this connection and then here we are in our Ubuntu terminal, so you don't even need to SSH like we did to install it, you can access terminal directly through the Home OS panel, so now it's really at this point that you have the framework and foundation to start testing Docker containers.
Really start experimenting with what Home Labs can do for you and it's super
cheap
device we're on. demoing this is under two hundred dollars, you get a Zuma board that Casa OS ships in stock for about the same price, but again, to start with, mini PCS are awesome because you can actually upgrade the RAM you can add like two . Terabyte SSD without having to have anything stuck to the side, really cool stuff, so with all that big thanks again to geekum for sending us that little mini air 11 for us to review if you're interested in purchasing it.Be a link below. Of course, they have other models, so you could get something a little more robust. If you want something more powerful, like hardware transcoding for media, they have AMD machines. I'll leave some links below and with all that I hope. have an absolutely beautiful day and goodbye
If you have any copyright issue, please Contact