Set up a Full Network using OPNsense (Part 2: OPNsense)
Mar 15, 2024welcome to my second video on how to create a home
network
using
opensense. In my first video I showed all the hardware that I plan to use to create this examplenetwork
and in this video I plan to configure opensense on my Mini PC VP 2410. Device here and if you want to follow it you need to have similar hardware you will need a USB stick and You will need to be able to connect your box to a monitoring keyboard or connected console port. another computerusing
a USB cable either way will work, but I'll talk about both methods as I go through installing open sense.
Once we have opensense installed, we will configure the rest using the web interface, so let's start with the first one. What we need to do is download open sense. If you go to opensense.org download, you will see this page before us. The only architecture option is AMD 64 64-bit. Therefore open sense will only run on 64-bit software. it's as if PF feels that both projects have abandoned 32-bit support in favor of 64-bit, since most modern hardware now runs 64-bit hardware, even devices like the Raspberry Pi have gone 64-bit, so for the image. write, there are several images that you will see Nano DVD VGA and the serial DVD image is useful if you are using a Mini PC or a micro PC or whatever, a desktop PC as your router's firewall device, although those are a bit some of those options are a bit less efficient, you could use existing hardware and if you have a DVD drive you might want to use the DVD option, it's basically an ISO image for most users, I'll probably use VGA . option if you are going to use a USB stick, it is how we will do it in this example and you have a monitor and a keyboard connected to your device to install Open Sense, you will want the VGA option if you are using the serial console, whether USB or another type of console, you'll want the serial image to actually load your screen properly, so those are your main options, so we'll go with VGA. and then you can choose your mirror where you want to download it from depending on the country you live in, you might want to choose one that is closer to you rather than the default option which might be in the Netherlands where opensense is located. the company is based, so basically you're going to click download and if you really want to verify the checksums, you can do that here's the hash, but I'm not going to bore you with the download.

More Interesting Facts About,
set up a full network using opnsense part 2 opnsense...
I already have it downloaded, so I'm going to switch to enter. I like to use Etcher for my USB, um flashing, because it's a good utility, it's very easy to use, just three steps, basically you choose from the file, you won't be able to see this box. it goes up, but I'm going to pick it once I find it. I don't want to choose my open sense that I've already pre-downloaded ahead of time, so let me do it real quick to get distracted here and I chose the VGA option, you'll see the image is there and then I'm going to select Target.

I already have Ubuntu installed on this disk. I'm just using this as an example. One flash drive, you will see all your Flash stops. Any flash drives you have connected will appear here in Etter. Simply select the one you need and then click the Flash button. Actually, I won't do that because I already did that step ahead of time, so once I do that, it'll go straight to disk and then I'll check to make sure everything looks good. So once you've done that, simply plug the USB flash drive on your monitor and keyboard into your serial device or console and continue.

I'm not going to show the serial console step, there is an extra step involved in that you need to have software that you can do serial consoles with, you can do it with PuTTY or Termius and applications like that will work fine before let's get to In the open sense installation
part
of this video, one thing I like to mention that I discovered when I was going through this isolation process and I actually re-recorded this section because to make this clearer, this installation that I'm going to do is I'm not going to follow the written guide I have for setting up afull
network using OpenSense because I assumed a normal standard Ami BIOS because I actually did it in a virtual machine so it would be easier for me to get screenshots, but that process is I wrote.About is what you would normally find and expect for the open sense, but I noticed that when I use the central boot BIOS with vp2410 um and if you have any other
part
icular model of central boot, you may also experience this: The boot process is a little bit different, so it actually affects the open sense installer, so you'll notice in the next few screens that when you get to the open sense installer home screen it will act, it usually has like an ASCII graphical text that says open sense. and some other information in there, like pressing a key to import settings and that kind of thing, um, but it looks like question mark gibberish and then it skips that part and you can't do any kind of preconfiguration beforehand. open sense setup before you get to the prompt to start installing so the process I take you to my website and if you want more details about that you can continue there but I'm going to do it this way because that's what I have installed on the central boot of my machine so without further ado let's start with installing open sense you will see what I am talking about as we get into this okay now I am building my open sense box and I am going to To press the Delete key to enter the setup process, you can press the F11 key to bring up the boot menu, but I am using a screenshot.You know, ikvm writes um, yeah, KVM over IP whatever you want to call it. with a tiny pilot, so I don't want to press f11 because it will take me out of my browser and you know, minimize what I'm trying to do here, so I'm just going to go through and show you if this This is what the main start menu looks like. for the vp2410 protectively. Here's an option for a single boot that would say the same thing as pressing f11 and you'll notice that I have a protect USB drive here and it's abbreviated as protect for short, so let's click on that button, press enter on that key and here there's the question mark menu I was telling you about, it's supposed to say open sense and all kinds of stuff and ASCII text.
Graphics it should let's say, but now we're going to launch this and normally it will walk you through the setup process like I mentioned earlier, but it actually skips all of that and it will take you right to a login prompt and that's where we can do our Normal open sense installation, so we'll do that installation first and then I'll configure. I'm going to reconfigure some of the default interfaces because it will put them in the opposite order of what we want. It doesn't really hurt anything, but I like having the wind interface as the first interface and I like having it, the interface is two through four to be the Lan interfaces, it's easier to keep track of instead of having the wind interface connected . on one of the random ports in the middle of I don't know, it's just a matter of preference, but I'll do it because it will match the written guide and it will also match what I showed you in my first video in this series on how to get everything connected and As you can hear on the microphone, the box in particular actually makes a little musical tune, which is great, it lets you know when you're booting up, which is very useful when it's on. my server closet here, uh, when I reboot, it makes a little tune and then when it reboots, it makes a tune, um, so I know just by hearing that, oh, it started, I can log in, I don't have to guess for you.
I know, keep testing the web interface to see if it's going to show up again because I can hear that it actually showed up when it came back on and that's kind of a feature that you can enable and disable in the open sense, you can disable the beep for ringtones. beep, not all of these little Fire mini firewall devices for PC actually have a little speaker like Protectly does to make those little beeps and sounds, so it's a cool little feature that you know is nice to have, I think if you like like it, if not, you can disable it.
Now that we are at the login prompt, we will type installer as the username. If I actually click on the screen, since I'm using a screenshot program I need to create. Make sure you click on the line screen, OK, installer and then open Sense um is the password, default username, password by default, it will use the US keyboard mapping, so you can say Enter, If you are using it, you will have the option to ufs. or ZFS filesystems in general, it probably doesn't really matter which one you choose, but ZFS has some more robust features, even if you're only using a single drive you can still take advantage of the ability to take filesystem snapshots which some people like take. a snapshot of their filesystem before doing an update, so that if an update goes sideways, goes wrong or whatever, they can just revert that to that snapshot and the entire filesystem and go back to where it was before of the update. is probably a very good option for you if you are not using virtual virtualization or virtual machines and are typically doing a basic installation.
I would recommend you know to just back up a configuration file, but that doesn't capture everything, um, and you know. a snapshot restore is also much faster, but it's awesome, it wouldn't hurt to have both, you can have your config file as a backup and you can actually go back to the ZFS snapshots, so it was installed as EFS file system, um, since I just installed. I deleted this in a previous run of this video. I'm going to go ahead but it will say that Z root is already taken because I already have a ZFS file system installed on my box so I'm just going to replace it because this was just one that I just did in a previous video and I'm not going to keep it because I had technical difficulties.
So you can do a stripe mirror or any type of Z raid, any build for most people. firewall uh Device, or are you going to make a striper, a mirror, a stripe, if you only have one unit, a mirror, if you are going to make two units, you can make more units, three units or whatever, but for the VP 2410 protection, it actually supports two drives, two SATA drives, so you could mirror that box, so let's make a stripe and the drive that's there is an m.2. It's a particular brand unit because I got it protected so first drive here uh to select it just press the space bar it doesn't tell you anywhere on the screens that you'll see down here that you can see the eight emmc unit gigas, the eight gigabyte emmc drive that comes with the protection you can install on. there too, but I don't think eight gigabytes is enough, especially if you're going to be doing logging and stuff for the firewall, but we're going to go ahead and say yes, let's destroy that.
You will always receive these types of warnings when installing an operating system in general, so you will see that the current system is being cloned. The cloning process is actually quite quick, as you will see, it actually takes a bit of time. More time to verify that the file system didn't actually clone or install it. I'm using a USB 3.0 stick connected to one of the ports on the VP 2410 which are USB 3.0 3.0 ports, allowing installers to be a little faster than a slower USB stick. Actually, I haven't been smart. The USB sticks you should probably do and my accessories review.
You could do a benchmark to see how fast it really is. It would be worth checking it out. Actually, the process is fast enough. I don't really need to skip it, I guess we'll talk about it a little bit and do this, so this will be done very soon, what will happen next is that you will be asked to change the root password. before restarting your open sense because it's already finished installing, so I recommend that if you can, you change your password right away, but if you're not connecting anything, it will change in the web interface later, you just have to make sure you don't forget it because that It is important security.
I'm glad they ask you for it before finishing the installation because it's nice, so we'll do it here. Let's press Enter. I'm going to type in my root password trying not to mess it up for the video. It just takes a few seconds and you will be back to the same screen and then we can say continue complete i.e. complete the installation right now, now it will restart and it says that the Open Sense web interface will be available in 192. 168 1.1, that is actually the same default IP address range that you will see on a consumer router, so if you are transitioning from a consumer router to an open sense, this part will look very familiar because it will be the same IP range. of your devices, so when you connect them, I hope this works.
When we connect, you will have the same ranks, yes, up here. I hope it actually boots into it and not from my USB drive. I can tell maybe if it isbooting a little faster than a USB drive, that's kind of a general indication, but the easiest way to tell is if you use your root username and use your new password that you just entered. log in success
full
y then you know you're not booting from the USB drive because I didn't want to bother removing it, it's behind me, but I don't really need to take it out because I didn't make my USB drive my main boot disk, that's why I like to make it just one time. it boots because I don't do it very often so you don't have to worry about it always starting every time and after passing this PF register you hear the beep tones.Okay, now we're at the login, so let's do the next thing. root user Pat and we're going to use the new password that we wrote and we'll see how he logged in, so now I know I'm not booting from the USB drive, which is really cool, that's what I want one thing we're going to do before login to the web interface is that we are going to change the Lan and Wan interface mappings because by default, as you can see, igb 0 is actually interface one, igb1 is the interface. two, how it's labeled on the box, it's labeled one to four igb 0 um we want it to be the WAN.
I always like to make the first interface the WAN interface and I like to make interfaces two through four the My Lan interfaces, so I'm going to swap these two interfaces and show you how to do it before logging into the web browser. and then we will do the rest of the configuration through the web browser, as you can see with the menu options. I want to go to option one of the menu to assign interfaces normally if we were to go through the configuration, such as how my written guide was made, without using central boot, these interfaces would already be in the correct order and then we would go directly to the browser, so you said you wanted to configure delays now and we're going to know that we'll do those things in the web interface and without VLANs.
Okay, now it says to enter the name of the winning interface so we have four interfaces from scratch. three, the main protection boxes are pretty simple because zero is one, one is two, two is three and three is four, we'll just use igb zero for gain and then for ground we'll use igb one and Then optionally we can set Optional interfaces for the second, third and fourth ports, which are IGB2 and IGB Three. We could do it here, but I'm going to do all of this in the web interface because, um, but since we're doing it. a delay.
I don't want to do all that configuration on the command line. You can do it. I just want to show how to do all of this in the web interface because that's how most users will set things up. 'let's do for the option interfaces, we're just going to say just do nothing, I'm going to say enter and that way we're just reconfiguring when you're on ground notice uh at the top of the screen, ground was igb 0 and when was igb1, but now at the bottom here when is igb 0 and Lan is igb1, so that's what we want, so we basically swap them and luckily we just swap the interfaces, any of the configurations that were with the interface by default. before like Lan uh, actually it still has it, which is good because we don't have to change IP addresses for now.
I'm going to leave them the same for Lan um. I'm just going to use the defaults for that, so That's cool, now we swap those interfaces at this point, we're ready to connect to the Lan interface, so I want to show you the physical connections that I want to use to configure the remaining part of this OpenSense guide. I'm using the Goin r86s box I have here as my Ubuntu desktop. This could be your laptop or PC or any device that suits me to use these small devices. This is my vp2410. The first port is the WAN interface.
The second is. is the ground and the other two are going to be our delay that we're going to create and that only has the VLAN traffic, so we're just going to connect this port, we're going to connect it to port two and once we connect this here, we will first do all the open sense setup and then eventually in the next video we'll do the network switch, so now we're on our little mini PC here. which we are using to configure opensense. The first thing I want to do is let you know that you can't look and judge by this icon whether you're connected or not because you're not connecting to the Internet, so it probably has a question mark there, but if you make room for IPA, you can see Fusion Linux and you can see that we have a valid IP address 192 168 1.100, so that's a good indicator that we're connected to the Land network and um now. we can write open uh these IP addresses here.
I've logged in to different setups with different ports and such, so basically type 192 168 1.1 and it should redirect you to https, so we'll set our firewall box to open sense, except risk can continue. I have this saved from where I've been playing with others, so basically you want to type root as your root user and you just enter the password that we entered during the installer, so I'm just saying: no. I don't update um so when you first log in to opensense, I don't want to walk you through this wizard you can go through several steps, um you don't have to do the wizard, what I like to do is skip the wizard and show. where the actual settings are because if you want to change these things in the future you won't know where they are located based on the wizard because you can always run the wizard again if you want, but I think it's better to learn where the actual settings are.
The settings are located rather than relying on the wizard, maybe if it's your first time using it you can cycle through it. It has a good basic set of general system settings that you may want to modify from the beginning. You already know a lot. of the settings for the wizard are on the settings pages, so we'll see the settings um General System Settings General page, so this will be our hostname for your box um for your open sense box, you can provide it a domain name basically or a host name um and a domain name for your network so for the host name I like to just call it a router uh or whatever it's also a firewall but we'll just call it a router um and you're about to follow this local domain because you don't want to, you don't want to call it local on its own, you don't want to do this because a lot of those domain names are used a lot for like local.
Discovery and things like that, so it will come, it will conflict with all those things, so you don't want to, it will conflict with all that, so let's do it. I'm going to make a little plug into the home network, guy.com. there, for a website, you can use whatever domain you want, you can use real domain names like uh, I own my own domain name, that's what I use it for my network, um, that's a domain name too real, so I like to do it. that's because you can have internal and external hostnames so you can resolve them seamlessly and you can do split DNS and that kind of stuff that I wrote about on my website, so I like to use real domain names, um, that It is not like this.
You have to do it, you just have to make sure you don't choose one, it already exists because you know there are DNS conflicts, if you choose like amazon.com, you don't want to do it, you won. You probably can't go to Amazon if you do that and then just choose your time zone, you can change the time zone. I'll leave it for this purpose, you can change it to whatever you want, there are a few different ones. themes you can choose if you install them out of the box, there are no themes installed but they have dark themes and a lot of people like dark themes so this can be confusing for some people who have a DNS server, here's how it works the system. will use like this is because there are several places where you can enter open sense DNS information and if the system configures DNS servers and this page is what the opensense system will use as its DNS so by default it says allow that DNS is overridden by dacp or point to point protocol on Wan, so by default if you are connected to your ISP and have a DHCP you are weighing, it will use whatever server your ISP uses etc.
Um, that's something you might not want to do if you want to use your own DNS, but for now we can probably leave that because if you connect this to your network, it will use your network's DNS, um, whatever the network is. you're connected to um, so it's going to use that as a gateway, which is fine for our purposes, um, but I'll come back later and we'll modify the DNS settings later, but for now we'll leave that and just hit save, okay and then we will go to the admin page settings Administration and you will see that it is set to https by default, it already has a self-signed certificate generated, which is fine, you will get warning messages. you know there's probably ways you could probably create your own if you really don't want to you can do HS TS HTTP Strict Transport Security you can enable that for additional security um yeah so you can't people you can't hijack or http sessions as easily um disable the web GUI, we don't really need to do that, let's see, um, I'm trying to see if there's anything else you want to do, you can do some HTTP compression, um, so this is something which I recommend changing if you want to have additional security, we can configure the open sense web interface just listen on the ground, we don't have any other interfaces configured at the moment, it says: I know what I'm doing, so I'm going. to click on that um, but we're only going to allow it to listen on the Lan interface because that's going to be our management network, which means we can only configure since over the land interface, if you really want to, you can allow. devices on any network to access its open sense interface, all you need is a firewall rule, um, but at least it's not listening by default for any devices to connect within each network, each interface we're going to create for each network, um.
I would like to change that setting for added security if you want to allow SSH, which I recommend doing SSH so you have another way to get into your box. If something breaks with the web interface, you need to restart something or whatever you can. allow the use of root login if you want, but if you do, I recommend using a key, so if you use a root login with a key, it is much more secure than allowing it if I press prevent password, that is the least secure way to allow access. with for root um, if you're really paranoid you can create a separate administrator account and not allow root at all, but one thing to note that I wrote in one of my guides is that you don't get that nice options menu to help you go through some settings in open sense, if you don't use the root user, if you use another administrator account, you won't get that nice menu, so that's a privilege of being root user, get those extra options, so let's uncheck that allows the password, but what will that root log in?
But we'll have to set up a key right now. There is no key. You have to enter the user and add a key to the SSH key, which I won't really go into right now. um, but we'll come back to that, maybe in a circle, and then when we're done with all the videos, to do some of these additional features here, um, the console controllers, the VGA, that's how we set up the open sense we use. the VGA console controller, um, you can set up a secondary one if you want to allow serial console connections so you no longer have to have a monitor and keyboard connected, and I unplugged mine.
I'm planning to use this SSH and Web Browser, there are the two main ways I access my box. I don't really connect the VGA anymore once I set it up. And I actually like to use the console to install Open Sense with the USB console as well, it's pretty cool, but anyway. So this page doesn't have much to change, you know, there's a couple of additional security things that we enabled, we enabled SSH because I think that's important, so once we do that, we'll save I'm trying to review some of My Notes here to make sure I include everything as I go, just reloading, they show us even though we didn't really change any settings that would cause, um, you know, we didn't change the port number or anything like that.
We're not going to lose access to this page, we didn't change it back to http or anything, so there's nothing crazy, um various, the various page here is useful, if you want to make thermal sensors, you need to change them. This is to say that this system has an Intel processor, so we want to choose Intel. If you don't choose this setting here for your thermal sensors, you'll get one sensor readiness and it stays the same and it's not really your CPU. temperature I'm not sure what it is, if it's temperature anyway or if it's just a value it randomly freezes at.
I'm not sure it's actually not useful at all, soyou should definitely choose the thermal sensor. Hardware um, that's the most beneficial thing here is that you can make some regular backups of some of your reports and stuff here. Energy saving. This option is really interesting to use. You can use Power D. and make high adaptability, which is the default setting it allows you. to get more performance um and since it's adaptive it will actually boost your CPU and then lower it again to try to save some power but you can actually set it to minimum if you want to know use minimum power but you don't care about performance , but in the case of firewalls, if you probably want maximum performance, these devices are pretty power efficient anyway, but I feel like I haven't tested it thoroughly, but it seems to me that maybe you can generate a little more performance by use power D because I feel like it allows the CPU to go up and down a little bit more because I think without it I don't know if it really does because you can look here in this setting it says it monitors system status and various power controls so, in a way, you know, it makes some more automatic adjustments, rather than keeping it at the same level all the time, I think if you don't have it enabled.
So I played with that, I think it actually helps a little. If you want to change, you know, do some things with swap files, you can do some of those things here. I'm not going to go over all the options. I'm just trying to make some of the minimal options to get started. I reviewed many of these options. I went through my guide and I actually made notes on what I want to change for this video because I don't have It's time to do a bunch of settings, that's why I'm going to go back and you know, we can tweak some things and make it a little bit more sure later.
Okay, so those are just a couple. options I didn't really modify all the things, there's just some little things that are useful to change, um, but now we can jump right into the, you know, something else that I finally, right? You're probably like: why? Didn't you make this faster? But I want to explain things in detail like I do in my written content so you know that you can understand these things better, because the menu of interfaces that you will see we just had the land and win that we set by default, so what we have to do now is go to other types, so since we are going to create a delay because we already have Wayne and the earth, we just need to configure the other two interfaces, now the remaining two and we are going to create a delay.
You don't need to create a delay if you have gigabit uh devices. It's probably a good idea to do a delay because I think it's well supported. um it even works with uh I feel like it works well with Zen Armor and some other things like that, where sometimes those interfaces don't really work that well with maybe the delays and things like that, so with some of the IDs, ya You know. IPS ID because of the network map, you know all that kind of stuff, there's a lot of stuff playing there, so since the interfaces are slower, if you have gigabit interfaces like the VP 2410 that we have here, create a delay it can give you a little extra bandwidth if you have it, it only helps you if you have two devices running a full gigabit, it doesn't allow any device to get two gigabits for a single device so you will only get one gigaby, that's it the speed limit, but you can get two. devices to a gigabit at the same time without creating bottlenecks between each other, which if you are transferring files between a couple of computers you could easily achieve, so I feel like having a delay is useful because yes, if you only have one computer transferring files and you have some other network activity, it may not be saturating your network.
I feel like it would help alleviate these bottlenecks a little bit and they won't and it will allow you, if you're transferring a gigabit over the networks, it will. It still allows you to have a little extra overhead even if you're not maxing out both one gigabit streams. I think it can still help a little bit, you know, alleviate bottlenecks a little bit that way, one device doesn't hog your entire network. what we're going to do is go into a delay, we're going to go to the live page and we're going to create a new delay, so we have to create if you're going to create bridges, delays and vlans and those. types of interfaces we have to make them first before you can assign them, so keep that in mind because you have to create, you are basically creating different logical networks in addition to the physical networks, so you will see why there is a delay.
You will see that you will be able to choose igb2 and igb3 because they are not currently assigned to anything, so you can create a delay with them. You can't create a backlog with anything that's already assigned because it's already been used. so we will choose these two networks and then for the protocol we will choose lacp and there are different options if you just want a simple failover or load balancing between them. LACP protocols are supported on managed networks. Network switches. well, I like lacp because you automatically know that we will load balance and stuff for you, which is good, the hash layers you want to choose at least um level two and three for your hash layers because that gives you more, allows you mix um or balance the traffic between uh your interface is much better, you could do all four because that gives you even more, um, if you do all three, I mean the options, and you do level two, three and four, it will use all those things to help balance the load and this is optimal if you do two, three and four at first.
I didn't know if I could select L4 if my network switch only supports L2 and 3, but it doesn't really matter what the network switch side says. I've noticed this much because I only did L2 or L3 once and even though I had the switch I had, I had L2 and 3 enabled, but since I only had one enabled and oga since I was playing, it doesn't actually balance very well even if the switch says it should bounce better but when I put L2 and 3 open it balanced much better so the traffic was split up much more evenly so that's all you have to do. you just have to um, you can put a description in there if you want, um, let's go ahead and do that, actually, let's go ahead and do that.
I forgot to do that, we'll just call it a delay, it's not that original because I think this description will appear when we go to sign interfaces, so it's important to put a description. I'm going to sign the VLANs below because I want to assign all of these interfaces before configuring each interface, once we have all of this assigned. we can just click on each interface and we will configure each of those interfaces, that's how I did it in my guide. I think we went through every part of those, setting everything up first before assigning them.
We can actually do this part and this is where I'm going to have to click on one to see the device. You can leave this empty and it will, it will automatically generate a name, so you don't need to put it in. Everything that was there used to be back a long time ago, they didn't even have this option here, but now they change the way interface names are generated, so they really give you a way to control that a little bit instead of just leave. is in the default value, but what is the default value that will be the primary interface for all VLANs?
Note that you can still select igb two or three, but we're doing a delay now, so let's go to VLANs. sit on top of the delay that way all the traffic going through the VLANs will go to that logical interface which is the delay so we can distribute the traffic. We don't want to use igb two or three for the VLANs because I actually want it to be on delay, so for all of these we're going to choose the delay and we're going to choose the VLAN tag, we're going to do 10. and we're going to do this TMZ, there are VLAN priorities that you can configure, I'm just going to leave the best, I prefer all of these um uh, you could if you don't like a voice over IP network or something like that, you know, you can choose a video or you're doing the video streaming that you want. to make sure it gets higher priority, I'm not sure how much it actually affects, it's kind of an aquatic QA service, but I'm not sure how much it affects the extra throughput between networks.
It would be interesting to try it out to see what happens, but you'd really have to stress test it to see how well it works in terms of performance, so this week we're going to create our VLAN 10 DMZ network. So I'm just going to move on. through these real quick because this is going to be the same, okay, we're just going to repeat, uh, of course we can, it's just that we're in Cape Lag, it's not the background anymore, so we're going to repeat all of these and this this one. passed. Are you supposed to create all VLANs?
We are getting different VLAN tags. I like to make my VLAN tags somewhat similar to the IP address because I will do 192 168.20 and matching the VLAN type makes it easier I don't have to do it that way, it's usually what I prefer because it's easy for me to know which is the VLAN number, so let's make it 30. I'm trying to make this match my guide I made online. This will be the iot network. I'm just creating a couple of sample networks to show what you can do. You don't have to create these. you can create fewer of these. you can create more of these.
In fact, I do more of my own networking than these. It may seem excessive, but I actually like to separate things by logical function or, you know, by functional domains, so call it or whatever, so even if there are only a couple of devices there, I won't do it because I too many transmissions on a network and things like that necessarily worry. I always like to have them separate because it allows me to group devices and apply the same firewall rules to that group of devices, so it's a good way to group. and contain and make firewall rules on each type of group that I want to control in a certain way and usually if I put all my IP cameras on a network and I put all my two IoT devices on a network and patterns emerge that emerge that from how I want to allow access between networks, so thinking about where you wanted to place your devices and how you want to separate them really helps you formulate how you want to configure your VLANs for your network, so I think it's very important. so I can think about how you're going to do that, so here's a delay and we're going to do 40, this is going to be our guest network, so the reason I have several networks that I'm creating is mainly to show different examples of how they may use different networks and I try to create different firewall rules for the different networks so that I can show them a little bit, well, what the reasoning is behind some of these networks that we use.
Come on and that's because I just made five VLANs just to show you some examples here and the IP camera on this one is saved, okay. I'm going to apply this and now when we go to tasks, we'll be able to see VLANs one through five. here, so we'll just assign this and use the same description that we used for the VLAN tag and there's our interface name because that way they're all the same, it keeps it consistent. There's that. and it automatically goes to select them, it looks like um, oh, I just realized that I need to change something, that's why I hesitated, but this is what happens when it gets, I actually screwed something up and I was demonstrating something, but hey, we're . doing this on the fly, right, we're doing MP camera, wow, okay, all we're going to have is we have our Wan and we have our ground for our management interface and we have our 5V grounds set up and we can just do Click save, okay?
Now that we have this setup, we can go through each interface and see what we need to configure here. I want to start with the WAN, you know, but there shouldn't be anything you really need to configure here unless your ISP uses something other than dacp. so by default we should be able to leave DHCP on. Ah yes, the only thing we need to change. I forgot about IV IPv6. We need to change the size of the prefix delegation. This largely depends on what your ISP gives you; it will probably be for residential ISPs. It will probably be 56 or 60.
I'm going to choose 60 because I know it works with Comcast Xfinity Internet. I'm not sure if I'll give you 56 unless you're a company. I'm not sure, so this is your prefix. delegation and then you could say send IPv6 prefix prefix hint. I think it's generally recommended if you know to try to say Hey, I want this, you know, it forces you or gives you a stronger cue. I want this prefix size um. So those are the only things you really need to change in the country: your prefix delegation, that's important if you want to have multiple networks with IPv6, if you only have one network that is a flat network, which is a real basic network, you could do it that way, you can leave it at the default settings if you do, but we are going to create a more advanced and sophisticated network, so we are going to have IPv6 on all networks, so let's to apply those changes let's go to Lan, that This is what we will do next.
This is our admin interface and you'll notice that it already has static ipv4 and it has a tracking interface. This is what we want for IPv6 yeshave. Dynamic IPv6, which is probably for a lot of people. I wish it was static, but it's not for many of us, so if you trace the interface, luckily the Lan has already configured how you'd probably want to configure it so that you only trace your We're going to trace the WAN interface and because we have the delegation of prefix of 60, your first 64 bits are your network, uh, part of the address, because we only made 60 bits out of 64, we have four bits, which means we can have 16. networks that we can work with, that means that we can have a prefix uh ID that starts with zero, which we have here up to 15, 0 to 15, but it starts to receive this is hexadecimal, this prefix ID, so it will go from zero nine and then when you get to 10 it will be a and then 11 will be B 12 will be C and then it goes up to 15, which is correct, so you could go from 0 to F basically, so zero one two three four five six seven eight nine a b c d e f um those will be all the prefix IDs that you have available if it doesn't reduce 60 or it knows that its previous delegation is 60. um, it will you have 256 networks, if you know the size 56, you can have many networks, no more, I should say, um, so this is what we will do here, actually we don't need to change anything for the terrain because it is set by default.
I just wanted to show you what it looks like now for the other networks because we created them. These are new networks that we created not out of the box, so we will always have to enable and bypass the interface. removal so you can remove them without unchecking this box, we're going to say static ipv4 and then we're going to do the same thing here, trace the interface, go back to the interface, okay, ipv4 one, so we're going to do 192 168, move the mouse so you can see and we're going to do 10. this is where we're going to put point 10 for our network um and then this is static ipv4, you want your interfaces generally to be point one um and then you want to make sure it's the slash 24 because that means you can have 200 uh 255, you know, 1056 256 total addresses on that network, but point one that takes one, point one, takes the address and you can't use point 255, so you actually have 254 addresses. which you can use on that network and not 256. um, so we're going to do the technical interface and four on this we're going to use a prefix, how do you want?
We are simply going to increase each one. one is fine and then we are going to allow manual adjustments in the dhcpb6 router ads so after doing this I realized that I probably need to change something to land. I thought it's good. I forgot to mention it. I'll mention it when I got to the home page and clicked apply United settings when I needed to to save time because it takes a few seconds, you know, to apply these changes. You did this? This part of applying changes is actually much faster when you have a little time. slightly faster system, this is not a slow system, but it is slower than my VP 2420, which doesn't take as much time, and I feel it depends on the changes you make, if it takes longer, that's okay, let's come back to earth .
It's a mess, yeah, but that's what I'm doing right, so let's go avoid removing the interface, um, just so you know it just does it where it can't be great and remove it and I forgot it for IPv6. I like to allow manual adjustment. the hpv6 router and ads, so this allows you to make some additional settings. We won't do it yet because you'll see that every page has this correct. You know we didn't change anything, so DMZ is our first network. VLAN, our users are second, so we're going to use our network, so click on the user, we're going to enable prevention and then the ipv4 Gunner phase okay and then these menus will open down here, this part is just going to be a little bit. a little repetitive, right, some of these settings I really lost my keyboard there, okay, too bad, okay, and then we'll choose 24.
This part is the same, so I'm just mumbling a little, we'll choose two, let's make sure that Press OK, save, we have to make sure we press save, we don't have to press apply yet until we're done, but we can, you have to press save, the third network is not enough, I'm just going to order. I can keep it clear here, right click on these two options ipv4 static ipv4 tracking interface um and two one six eight thirty this will be thirty that right, you'll see the pattern that we're doing here 24. these will be three, right 33 kind of goes together. , right, it helps keep the networks nice and organized and then on the fourth network we have two more left, just bear with me, you guys wanted a video that said it would take a lot longer than a written one. guide I apologize.
I'll probably have to break this video into pieces. I was going to do the whole open sense setup and a video about myself, I don't really know. Maybe I could make two or three videos, right? I don't know the happy aesthetic before we follow the countries because I want to explain a little bit, not only you know, do it very quickly, some people just make videos very quickly, uh, wow, I don't do that, I make videos very quickly and I try to skim the things really. quick I want to make sure you guys understand this because I know it's going to be helpful because I wish I had detailed information when I was doing this starting out.
I just had to learn, read, play, I already had a little. of networking experience, which helped me because I had a Cisco CCNA in the past. I bought him in the year 2000. I thought that was how old he was in the year 2000. This sounds so old when I say that man is so old. Why isn't he so old? I had it. I just got out of high school, so I was in high school in the year 2000. I graduated, so if I told you how old I am, okay, this one will be 50 because that's who we are. our fifth network, make sure we are at slash 24.
If you just put slash 32, that means an IP address, so you can't have any network underneath it, it's just an interface, so it would be a useless network , we can't, we need to make sure that it's forward slash 24. um and this will be five, okay, it's finally gone through our interface and now we can hit apply to all of our interfaces changes. Okay, now we wait for this. The next step will be for you to have the ACP, um, because, by default, the hcp is only configured on the Lan and when the interface, um, but now we also need to configure all the VLANs, um, because each network must have a little DHCP range in general, unless for some reason you have IP addresses on every device on that network, which yes, depending on what it is, maybe if it's IP cameras you might want to do that , I don't know, but I'll show you how to do it for each network as soon as it just loads, they did it, maybe I didn't click on it, sorry, oh, there it was, okay, maybe I didn't, I didn't I know, I was just sitting there waiting, just talking and I didn't realize the last bit.
The night I clicked on it or I clicked too soon or something is right, so what we're going to do now is go to the Services menu, go to dhcp4 and start with the land that We're just going to look at the land and see how it starts with 100 and it goes to 199. And I think I had to cut there a little bit real quick in the video because I wanted to check what I actually had. my guide to be consistent, but it defaults to 100 to 199. I just did 100 to 200, not that an extra p isn't going to be as important, but I just want them all to be the same and consistent with my guide that I wrote um, no, you can choose a smaller range, you probably don't have 100 devices.
I don't know if you have them, if you have more, you can choose more. I'm just going to make them all 100 to 200 just keep it nice and clean uh consistent um but that's all I'm going to do for each of these networks so I'm going to start with uh I'm just going to go all the way down let's start with DMZ you can do this. you can just copy this and then paste it to the right and you say like that, you could do this and then and then 200, so it's the same kind of boring thing here.
I guess let's do this, but this should be a little bit. a little quicker, let's copy this. I don't have to write 100 as much, we're still between 100 and 200 on each of these, so this is when you connect a device to your network or connect over a wireless connection, that's what IP addresses go to. to do it right, you'll get one in that range and then if you're going to assign static IPS manually you have to select it outside of that range, some devices, or some firewalls or routers or whatever, will allow you to choose a device within its range and be okay with it, but the open sense likes to have it out um it might even give you a fit, you know, if you don't, let's see here we go maybe just maybe I should speed up these parts where I'm doing this, I'll continue with the rest, yeah, it would be easy, uh, here we go, we're in the final stretch, maybe that's what I'll do, I think it's okay, I just realized, um, I screwed up.
Again I messed up again so I forgot to enable it we have to enable all of this man okay it's getting really late so this is probably the worst time to do this because you have to stay focused because I'm trying to narrate. this and clicking all these settings, but at least I understood it and didn't have to go back and redo the video. I'm going to continue with this. I'm just going to show you that I'm just going to enable each one. of these and go down to the right and see that Lan is already enabled, user right and okay, here we go, now we have it enabled, now we can go to DHCP V6 for IPv6, okay, so for IPv6 the interesting thing is you actually.
I can't assign HTTP V6 because it says there is no available range configured because we are not connected to the network. Everything is dynamic for IPv6 as we have it configured now, so you can't even enable IPv6 yet until you do. We're actually getting an IPv6 range address range from ACP, so what you would normally do is enable it as ipv4 and we're going to do one thousand to two thousand and the way to do it with IPv6 is to do a colon and then you type that , so you are only assigned the last bits or whatever of the IPv6, it has to be 1000 to 2000 and it will take any dynamic part of that part of that IPv6 address and it will fill in a little bit of zeros and it will have one thousand two thousand, for which keeps your addresses pretty simple, so we can't actually save this, but I would just do that for each of these interfaces, once we're connected to the network, I could maybe display that when we come back around because I want to be able to show um.
I guess I could probably show this like this, after you configure that part you'll go to the router ads and click on DMZ and any iot guest interface and then I could say, you know, I like to choose assisted because if you look at the description here it says it will use a wizard, it actually uses stateful dhcpv6 and slack, so I think that's how DHCP V6 is used, not all devices support it. um it seems like I've read about maybe even some older Android devices and things like that, so it's interesting that not all devices support it, but almost all devices that don't support it sometimes support Slack, that's the only.
The way you can assign an IPv6 address is to be lazy, so if that's the case, I like to make a system because that way, either way, hopefully you can get an IPv6 address because I noticed that sometimes devices don't assign it. would get if you don't use Slack, so I'm going to hit save and see if it works, but I think we can do this part, we can say assisted on all of these Oops, press the wrong one, assisted, um, so we'll actually save them and at least we'll have this part done, we just can't do that part until we're connected to a real network, um, because we're not connected to any network, I should say computer.
I didn't actually connect anything right now, assisted, assisted, okay, okay, one thing I want to show is that once you have DHCP enabled, you can start connecting devices and it will start working as far as connecting your grid. One thing I like to show is that it's actually standalone DNS, so if we go to standalone DNS, we can go in here and see some of these settings here very quickly. By default it listens on every interface, that's probably what you want, I like to enable DHCP lease logging so that when you have a, you know that any device that gets an automatic IP address has a hostname associated with it, it will log it, so you can use that hostname when when you reference devices on your network, the same goes for DHCP static leases, you can also register those dacp static leases, so I like to enable both options so I can write the type of hostnames that I like on my network. of IP addresses all the time I think it's a very useful way of doing things, so another thing you might want to do is maybe, I mean, I don't think it hurts performance, it might slow down the queries a little bit.
I like the download. DNS Cache flush the DNS cache on reload because if I'm making DNS type changes, hostname changes and things like that, I have trouble retaining the old IP address unless I can sit there and flush the cache that you already know. detect it and delete it on my device because everything wants to storecache the DNS properly, so it's nice to be able to delete those things sometimes, you know, because they do it for performance, but if I'm making a change to a hostname or IP address or something that moves things to different networks, sometimes I need those things to play out.
One thing I want to mention is if you want to temporarily connect this box to your existing network for updates and that sort of thing. Go ahead and mention it here, but if you go to query forwarding and you can click on use system name servers, because we have a name servers wizard that I showed you earlier, it's set up to have DHCP override name servers as DHCP, whatever, since we. If you are not connected to the network, we will not see anything here, but if you are connected to your network you will see a local IP address or if you are connected to your ISP's modem you will see an ISP address. or a DNS server there, but if you're behind another router, I've noticed that if you use the system name servers and do a weird DNS query, it seems to work a little better, because I've had some weird things happen to me.
DNS because I'm behind my network and if I'm doing all my DNS stuff I normally do on my main router, if I have another router behind me I usually just forward the queries to my other router because DNS seems to work better that way so You might want to check this option temporarily if you're working behind your other router because otherwise you might have problems trying to download update stuff because the DNS won't work properly, maybe for you, so when we're done, you can uncheck it when it distinguishes your primary route or you can uncheck some of these options and we can go in and configure like DNS over TLS and that kind of stuff, but I'm going to get back to those issues, okay now that I've finished going through some of the basic settings of Unbound DNS.
I'm going to create a couple of static DHCP reservations for static IP addresses for some of the example devices on this network. Because we are preparing to create. firewall rules um, I'm going to create firewall rules for each VLAN that applies to the entire network, but I'm also going to create a couple of example rules for specific devices within each network because it's better to, you know, have your grain. fine. make sure you know the firewall rules as much as possible to limit access as much as possible, so a good approach is to have broad network rules that apply to everything, that are a little bit broader, rules that are a little more general , which works for all devices than isolating various parts of your network, but it is also very useful to be able to do this and it is more restrictive and secure to do it between individual devices if you only need access if you want your entire network to access a specific machine or if you want a specific machine to access another specific machine, it's good to have those fine-grained controls and then static IP addresses.
I feel like it's a little more reliable between networks because you can create firewall aliases that actually have dynamic hostnames, hostnames that I have dynamic IPS, but I found it to be unreliable at one point when I tried this a while ago, maybe it was a bug they fixed, but every time I use Dynamic, or I still say Dynamic Coast, the hostnames have dynamic IPS. Sometimes I would lose the IP address and then my name would no longer resolve and the rule wouldn't block access or allow access like it should, so I didn't find it very reliable, so I started doing static DHCP reservations and then creating a alias that points to the same hostname that you already know, that has a fixed IP address and that seems to be much more trustworthy, so that's what we're going to do next, as you can see, I'm going to click on here we're going to go to dhcpv4.
I'm just going to make static IPS for ipv4. You can also do it for IPv6 if you want. The process is pretty similar, but I'm focusing on ipb4 like I did in my guide. We are going to create a static IP reservation on each network. You can go to this leases page on dhcpv4 and you can see all the devices that have leases here and this is a nice quick way to add it as static. Learn about the mapping of an IP address to a MAC address. I mean, directly from this page, which is nice because you don't have to type this Mac address if you use this page, so once you're on the DMZ interface page at the bottom. you can create static DHCP assignments if you create it from here instead of the leases page, you'll have to manually type in the MAC address so I'm going to do it real quick and it's not very fun, I was going to try that.
Copy and paste, but since I'm using the screenshot program, I forgot that I can't do that, so we're going to write it real quick anyway, so we'll make this 192.168 10.10 notice that I'm using point 10. instead of any thing inside the point 100 to 2,200 because those are our dynamic IP addresses, we want them to be less than that, so I just choose this and we'll use it, we'll just pretend that we have a web server in our DMZ. Red, that's a plausible scenario and so what does that do? It saves successfully and then you'll notice that down here we can press, apply changes, but we can just like when the interface pages appear.
Actually, we can do this later, but I'll do it. just go ahead and click on it because it's pretty quick here, so you'll see at the bottom that we have our DHCP static mapping and we're going to do this for each interface that I actually have, uh, for the guest network, not really. Oh my god, I want to follow my boys. I'm going to go to User Network, sorry, and we'll click at the bottom because I didn't actually create a device for each Network because you know, it's just the guide. Anyway it's getting really long, so let's do this Mac address, um, it doesn't really matter, I'm just following it real fast, it doesn't have to be exactly the same, but I'll make it consistent 192 168 um 20 out of 10. and then this was going to be our PC on our user network.
Next we will have iot for all your iot devices so we will go to the end. I'm getting distracted here. and some focus, right, focus as I mentioned before, it's late at night and I'm recording this over several nights so that makes for long recording sessions so this is it again. I'm following the guy. just so you can see where I'm coming from, if you're also following the written guide, you can see me doing what I wrote about a video, I document it on video here, so this will be 30.10 and this is going to be our printer, so now finally we are in the last one.
I am making the IP camera network. Actually, I have three, three devices. I'm set up here. I'm going to pretend I have three cameras. just as an example of okay, IP address, so these I'm going to do these. I'm going to make these a Queen tool because I wanted to show a viral rule on how you can have sequential. I forgot 168. we You can actually have sequential um ranges in your firewall rules, which is a pretty good host name or put our host name. I'm just going to call IP camera one, okay, and we'll wait to apply the changes because I'm going to add two more.
Sorry this part is slow, but I'm showing it to you real quick. I actually used a website to generate a random Mac address to say, look, you know it's legit, it's getting late. I'm going crazy, guys, okay, I'm doing this. For you, I'm doing this for you, really okay, I'm doing this for you, so I hope you like it, um, so two three six third one eighty see eight nine 50. 12. I became three, okay, IP camera 3, coming soon, okay? Now I'm going to apply changes there, okay, now we can get to the point where we can alias firewall rules.
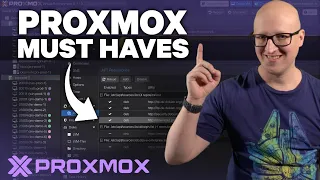
Aliases are really good because they allow you to make your rules more repeatable or readable. It's also easier to maintain, which is very helpful. I'm actually scrolling down to um in my guide here to make sure that I match when I type here okay, so let's go to the firewall section in the menu and then I'm going to go to the alias page and you'll see that seven are normally displayed by default, but I change it to 20 so we can see all of our aliases. These aliases here are all the ones that are created immediately. because we've never made any yet, so you'll notice that you have some, we have the buttons, those are filtered on the Lil Wayne IP side and they are updated periodically, I think monthly by default, and then down here on the bottom.
You see several network aliases are created by default and you'll see what these descriptions are when you go to create firewall rules and you'll see when the network lands there and everything, yes, you'll see them there every time you go to create rules. also see the Wan address and the ground address and one for each interface. The addresses don't actually appear here just the network ones, which is kind of interesting to me. I found that I found it kind of interesting, but here we are. We're actually going to use them as we create some of our firewall rules, especially if you're using IPv6, you don't really need to do that if you're not necessarily using IPv6 unless you really want to and I'll explain why.
In a minute, so what we're going to do is the first Alias that we're going to create, if we click on the Add button down here, we're going to call it Private Networks, we're going to use this rule to help. we isolate all of our networks because we're going to block anything that's a private network on every interface for every network, so when I say interfaces, interfaces and networks are kind of interchangeable and then you talk about it from a firewall perspective, like this you will see. even in the interface in the open sense in the web interface, let's say not on the Internet, so in the web interface you will see the terminology many times, we will say interfaces, but each interface can have a complete network outside of it. that's why we like to slash 24 in the interface instead of Slash 32 because slash 32 is a single ipv4 device address and if we slash 24 it's a complete network, you know, we mention 254 usable addresses because you know you have to subtract the two. there because one is used per interface and one is a broadcast the 255 around 255 is a broadcast address so we're going to create private networks alias so we're going to need to select networks so what are we going to do if I'm just using ipv4 on your network.
I also show IPv6 because as you know a lot of people are interested in it too, but I'm going to keep it a little basic because I don't fully use it on my own network because I've had problems trying to get IP addresses and certain things will default to IPv6 and if things aren't set up exactly right you're going to have problems, so if you're just using ipv4 you can use the RFC 1918 private IP address. ranges which is 10.10 10.0.0.08 and if you press the comma, um uh, I pressed it, it sorry I typed in the wrong box um 10.0.0 don't type in the category box like I did type in the content box if you do slash eight and then press the comma yeah it will group it into a little box there and then 172.16.0.0 slash 12.
Okay, you can look up what these ranges are online and they're not secret, so 192 168 0.0 16, okay. and I'll just press, I'd say common just to get that box, okay, great, type the next one for the character, but anyway, these are your private IP addresses for ipv4, this will block all of your existing networks that you can use. to block all your existing networks from each other. The nice thing about doing it this way for ipv4 is that if you add a new network VLAN in the future, you don't have to remember to add it to this Alias every time, so it's less maintenance, um, but since we're doing it, you know In this way what will be taken into account in the rules.
I'll show you later, but since we're doing IPv6, I want to remove this and because we're doing dynamic IPv6. actually, because if we're doing static IPv6, you can type in your full IP, you know you would have your IPv6 range, it would be yeah, whatever it is, let's say it's 2001 653, yeah, I'm just making one up. Okay, so let's say what the first half of the network address is. I'm just typing randomly and then a random address, so if you're not static IPv6, you could do something like this, especially if you had a slash 60, say. Um, you could actually do this along with your IPv4 addresses that we just wrote down and that would block all IPv4 and IPv6 from everyone that you would consider your private networks even though IPv6 is publicly addressable, but this is going to be one way that we're going to We're just going to use this Alias to isolate our Network, so that's the purpose of what we're doing here.
It might be a little confusing but I'll try to explain it as we go but you'll only need this just remember how we want to do this Alias so we're going to do it two ways but I want to show you the way I'm going to do it in this guide because it should work for ipv4 and IPv6 if you have Dynamic. IPv6 could also work for static, but if you have static, you can write it directly like I just showed you, so someone showed me that, in my original guide, I actually had tomake addiction, I did this in a longer way, but you can actually write. underline underline and show those aliases that are already created and notice that we have one for each network, so we can say LAN, okay and then we'll do underline underline, you know, option two and they'll be called different depending on how you added your interfaces , option three, so we're going to add each of these networks here and we're just going to add all of them except the WAN, of course, all of these optional interfaces, these represent your VLAN.
Networks, so if we add all of these to our network, this will be our private IP network, you know, IP network ranges, so this will be what we describe in our description here, so this will be what we will use to block and isolate networks, so I want to show them to you. you can see what's inside these aliases as we go down here if you go to diagnostics so let's jump over there quickly and click on the aliases and then you can go to your operation it says choose option on R2 you can see this is our network DMZ has the ipv4 address whenever you are connected to the network and you actually have IPv6 addresses assigned, you will get that network address for IPv6 there automatically, so we have ipv4 and V6 in this so you can use this alias. for both ipv4 and IPv6 to isolate your networks, that's a little trick I learned from someone who said you can do the underscores because I realized you couldn't choose um yeah, I was trying to like interwin, nonet or land.net and that doesn't work.
I think, oh, it's an underscore and you have to use those aliases, so I was doing it another way, it was a little more complicated, so now that we have that created, In fact, let's go and create an Alias. Let's go back to our aliases page up here. We are going to create an Alias for each system, so these will be just hosts. Okay, let's create because we're just. We continue this so we can query them in the firewall rule so we don't have to type in the IP addresses. If we change the IP address, we want to move it to a different network.
All we have to do is change it into this. Alias, so it minimizes the places where you have to edit the server. Yes, it's okay for IP cameras. Actually, we can. The good thing about this is that we don't need to create an Alias for each camera because I made the IP. addresses close together on purpose, the nice thing is that you can add a range here, you can say one six nine ninety two 168.50 Point 12. or point 10, I want to say two and you can see I put a dash in there 192.168.50 point 12. I'm going to make sure that I type this correctly and you'll see that if I click outside of it, it actually puts it in a box like that and I'm going to say IP Security Cameras correctly, so that's great, so you can actually content here, it actually put that network range there, um, I somehow missed it.
I accidentally wrote this in the wrong box, so I want to correct my mistake. I write it in a box, it catches me every time I'm not paying attention because I guess it's going to be the first box, but it's not the first box. This is iot Network. Make sure you receive it right now. Now that we have our aliases, let's create some rules. This is where you meet some people. I might be confused about some things, so I want to go to the floating rules. Flood rules can actually be applied to all interfaces, which is pretty cool, so it's not tied to a specific interface, which is why they call them floating rules, because you can just assign them. to whichever interfaces you want by default a floating rule will be applied to all interfaces, but you can choose any set of interfaces you want for the floating rules, which is interesting, it can be a little confusing which ones they apply to, but it is they open.
In fact, Synth added it recently. On the pages where the firewall rules are for each interface, they actually showed the floating rules and the firewall groups and everything that applies before the interface, which is really cool. I'm glad they added it because that allows you to see what other rules come, you know, or are applied first because sometimes, these rules that are applied first will trip you up because they're doing something before you can access them in the interface and something might be happening that I don't want to be happening right, so let's create a rule here in my example.
I'm just showing a rule. You would actually use this for different reasons on my own network, but for this example. I'm actually only going to do it for IPv6, because IPv6 relies on icmp much more than ipv4 and you almost always want to enable certain aspects of icmp, you can get real granular and which ones you want to apply, but to make it easier. I'm just going to allow all icmp because some people see it as a security risk but IPv6 is a little bit different icmp than how it's designed and it really helps the network run a lot better so um and if you like testing in line for networks, you are online, online test for IPv6, you will get much better scores if you allow icmp, they will take hits for that and because it allows you to discover things that you are still protected by your firewall.
I don't know what the exploits are for you, you know this scenario, but I haven't heard of a lot of things so I feel like it should be pretty safe. It would be better if it became more granular with but we're just going to do everything IP icmp may make you uncomfortable, but you should allow at least allow it on the Wayne interface, even if you don't allow it on your entire network, um, so come on We'll choose the TCP version of IPv6 and then we'll go to uh, we'll choose the protocol, we'll choose icmp and then we'll say the source is Indy and the destinations, any description.
I recommend saying allow icmp V6 on all networks. We're going to start with the Lan network and you'll notice that there are two allow all rules here so that you can access all the networks from the field. Some people like to do that with an administration. It worked a lot of access everywhere, but I like to restrict a little more even from the management network because if you get something there, you know it's the worst most sensitive network for something to go wrong, but at least it will be your other networks will still be protected if you only allow the access that you need, so what I'm going to do is we can delete them, but we're not going to apply changes because we'll lose the accent.
We have an anti-blocking rule, so you shouldn't be locked out of the web interface, but we're going to go ahead and remove them, okay, but we're not going to apply any changes, so we don't have to worry about You know we have an anti-blocking rule, we're not going to worry about getting blocked here, so I'm going to delete this so we can start over, so I wanted to create a rule, the first rule that we're going to use. our private network alias that I just created earlier, um, we're going to say pass, leave it at the default and we'll say default Lan and default flow, we're going to do IP 4 plus IPv6 and we can actually combine the rules on this one and we'll say any protocol and the source is there because we are on the Lan network, you can start typing it to access it and the destination we will actually choose, oh, we.
We're going to reverse fate, so don't forget this is critical and I'll explain what it does here in a minute. We're going to make Private Networks as your destination and all you have to do now is make a description that says allow access only to the Internet, okay, so this goes to what this rule says, it says everything that comes from the network terrestrial, which is a rule that applies to the terrestrial network, anything that comes from the terrestrial network and goes to any network that is not a private network, so it is allowing this, so one thing I forgot to mention is that yes when I removed all those rules, if you have no rules on an interface, it means everything is blocked, so only the only traffic allowed is local.
Traffic between devices on the same network, those devices can always communicate, because nothing is routed through the networks, so whenever yes, one thing you have to keep in mind is if nothing matches any rule, if it reaches the end of your period. list and it doesn't match any of these rules, it will be blocked, all that traffic will be blocked, so you don't have to put a rule at the bottom that blocks everything correctly, it will always happen anyway when you get to the end of all your rules , so it will just drop and then block, so basically we are doing almost like a whitelist, we only allow access to things that we don't allow access to, um, but there are still cases where it is necessary to use blocks , but I actually use passes almost more than blocks because what I end up doing is allowing anything that doesn't match a pass to be blocked anyway, so I don't really do that.
Actually, don't always use a lot of blocks unless it's like a malicious IP of IP that I want to block, so in that case, you definitely want to hit, you know, block those, but to allow access over networks, already You know. Because of how these rules are constructed, you don't actually need as many blocking rules as you might think, so this actually says, "When you reverse the destination, it has an exclamation point here in front of the destination, which means this." means no, so if you're and we're doing a pass rule, then I say it says allow traffic from the ground network, uh, where it's not a private network, that means anything that is a private network will be blocked because won.
Does not match this rule will not match this rule at all, so it will fall at the end, so by having this rule here where we have blocked access to all other private networks on our network. Well, this rule is here. will give us the isolation that we want, but we still need one more rule to complement this rule because if we leave it like this, you will block your DNS and anything else that is running on your interface, like ntp, like for your network time protocol. server, anything that is running outside of its interface. DNS is the most important if you are not using ntp, your local ntp for your devices, that may not be so crucial for you, but we need to add one more rule to allow DNS and we are going to put it before this rule, so, of the However we do this, we will need a minimum of two rules to have an isolated network.
There are other ways you could probably do it, like if we weren't blocking all private IP addresses and we were only blocking the other networks we have and not our own, no you know which one we're already on, you could get away with just one rule, but you would have to keep updating your network addresses all the time to be able to do this in a rule, but I like to do it this way because if you add new networks it is already blocked by default. I'd rather it be blocked by default than allowed by default because you might forget to add that network to your restrictions and then just have free access to everything so you can accidentally open a secure note, that's why we don't do that, that's why we're adopting this approach, so we're going to do a pass rule here on the LAN and we're going to do ipv4 plus IPv6 again.
It's nice that we can do both with one rule and the protocol we're going to do is TCP UDP. DNS is supposed to be UDP. We are going to say that the source is Land Net. As before, it is always better to say land network than any other normally because if you are in the country it is a little more restrictive and then the destination of course will be the Lan address, for so this is your gateway for all your devices on your on your land network, the Lan address is your interface address and that is your gateway to the Internet and to other networks on your local network, so it will be 192. 168 1.1 that is the land address and DNS server and when it does.
Independent DNS when it's listening on all interfaces, it will be on all the network addresses that you know, like that Lan address, DMZ address, iot address, all those things that are your gateway for each of your networks, they have their own gateway based on your interface, that's how you get it. to any other network, even your local networks, so the destination port range is DNS. There are some built-in aliases for the ports here, so we can use them with DNS and then we'll say allow DNS access. and then when you add new rules, it will place them at the bottom every time, so what you can do is click on that checkbox here to the left of that rule and then click on this arrow, which means move it upwards. this rule, so we want to make sure that this order is correct because the order is important, because it executes rules and the order in which they are in this list, so we're going to say apply changes now, this is the bare minimum. rules you'll want for most networks.
I'm going to create a rule for icmp for ipv4, this is pretty good yes, since your Your Land network will be the management network if you follow this guide. I think it's a good thing for network management as we are controlling your entire network infrastructure allowing icmp for ipv4 um so you can ping other devices on your network. Some people might not like to block ping completely, you know? icmp which includes ping and all the trace route and all that kind ofthings, but it might be useful to have this enabled for your management network so you can troubleshoot your network, so let's do TCP.
We're just going to do ipv4 as the default, we're going to do the icmp protocol and then we're going to say um land net, we're going to allow our devices to be on land net and if you could, you could say um, could you, if you had a specific device that you want use only for troubleshooting you can do it but we will only think about the whole network because it is our network management right and the destination is anyone and then we will just say allow it is good I have good descriptions so you know what is the use of allow icmpv4 um from Lan to all networks, of course, I didn't press the space bar here, we'll make it pretty, we'll make it readable, okay, and then we'll have to be like the previous one. one we're going to move above the bottom ruler, so we're going to put it in the middle here, you can actually put this on the top, it would be nice if you had to talk, um, no big deal, no big deal stuff. but we're done with the ground network, okay, now we just need to create rules for our other interfaces, which we can actually do.
I didn't mention this in my guide, but to make it faster for later interfaces we can. actually clone, if you notice this button here, we can clone these rules because they will be similar for each network. We're going to know that most of these networks will have at least these two rules, so we're actually going to clone them, so I'll show you how it works because this saves a lot of time. I do this a lot when there are rules that have similar cost networks. I try to minimize duplication between interfaces, but some of these rules for isolating networks have to be done, yeah, you know, on each network and some of the things you have to duplicate and just modify them a little bit or if you have a rule that's very similar to what you want to do but not exactly the same, you can use it to get a good start. it's so you don't have to type everything again, so we're going to use that when we go to the DMZ network, it's going to be next, so I'm going to start with my terrestrial network because it's the only one.
That's what we just finished and we're going to start with the bottom one here, we're just going to clone this one and since we're going to move it to the DM, we're going to clone it to the DMZ network, so just type DMZ, we need to make sure that it's important that make sure it's on the proper interface, which is DMZ and then we want to change the terrestrial network to DMZ .net. Everything else is the same private networks that we are still blocking that allow access to the Internet. we can still use the same description, so the nice thing is that it will take you to see how it got us to the DMZ network, so now we could just say allow overflow, allow access only to the Internet, which is great and we will give you the rules at the end just because it will save us some time, so now we come back here, we'll just do the same thing, DNS, we'll change it to DMZ, so this will save us a lot of time. here because that's why you have to make use of these functions, so we're going to do DMZ net um and then we're going to do the DMZ address, so we have to retain both so that the DNS permission rule um is correct.
And you realize that if we start from the bottom when we clone the rules and work our way to the top, it will actually put them in the correct order, so according to my guide that I made, that's all we're going to do for the DMZ. because we wanted to be isolated, it only has access to the Internet, we don't want anything, you know, accessing anything on our network because that's ours, the DMZ is meant to be its own network isolated from the rest of your network that the public can access um, hopefully, have other security things implemented in front of that as well, um, you can use Cloudflare or anything else, tunnels and things like that or whatever, so we'll go to the user now, we can start from this network. if we want, we're going to apply the changes, we're going to start from this network, we're going to do the bottom part and we're just going to do the same process again, we're going to go to the user and a user, oops, user. net, so here we go and we are going to clone the DNS user and sir, okay, now in this, in the user's network, we are going to allow some access from our PC or that we have, we are going to allow the PC or any device on the user's network it could be a PC laptop; however, we will allow this network to access our web server which is in the DMZ and also our printer which is in the iot network, so it will be able to access See how this type of access works, so we will create a new rule and we will choose ipv4 because now we are only using ipv4 protocol, we will use TCP.
I'm just referring to my list here, so I'm not trying not to spoil this, um, and we're going to say that the source user network destination is going to be our web server Alias that we created, that's why we created aliases so that you don't have to type in more IP addresses makes it really descriptive because you can see our destinations, the web server that you want to remember, which one is 192 168 10.10 correct and then the port, we're going to say it's https and it will automatically fill in the other two. port which is good um I don't want to say uh allow access to the web server and it's actually going to place it at the bottom like we said before on the right and then we'll move it to the middle right, it could be at the same top, but I I like to put the DNS that access the gateways first and then I usually put any cross-network access between my devices.
I just sandwich them somewhere in the middle. I don't want to have any order necessarily in the middle um because it doesn't really matter um for this specific type of access so let's do one more one more to add we're going to do this we're going to TCP UDP um because the printer I can allow specific ports on the printer, but I mentioned to my friend that I'm only going to allow all ports because for scanners, if you have an all-in-one printer, you have scanners and printers and all of that uses multiple ports, you could figure out which port it says.
I think I tried doing it one at a time with my printer and because it's a different discovery protocol, there are different ports that have trouble determining which ones I got tired of. I thought I allowed any because I just need access to the printer um someday maybe I'll tweak it a little bit more, but um, so let's say destination any uh there's no destinations printer, I mean, sorry, it's the port that's any, like this Let's say we have our printer alias and our destination port. We're going to say all ports and we want to go down here to the description and say allow printer access and we also want to move it up, so it looks similar to what I have in my guide, okay, now let's move on to iot, so Let's clone our rules to start.
Okay, it doesn't matter, it doesn't matter which network we click on and I want to click clone iot address i or T. Okay, okay, for the iot network we are. we are going to allow access to the web server, we have some devices and maybe we have some applications for services there, we are going to allow the TCP protocol and we are going to allow the destination web server. I like that you can just type the Alias and it appears and we'll https allow access to the web server. Well, one trick is I forgot that you can select multiple rules, so we'll do this at the end to tell you, I'll show you how to do it. this will be a little bit faster so we'll do it now, we'll add the IP camera streams and allow the TCP protocol and it depends on the type of video feed you're working with. with but you might need UDP um but if you're using rtsp I think you can use TCP that's what we're going to do in this example so the source is iot Network we're going to allow our iot network to access the camera . feeds, let's say the reason is that we have a monitor, a camera, a monitor or something that we can allow specific access to, although it is better to have it completely isolated if you want, but this allows us to have some monitors that you know, we can to have one.
I know we use our phones or whatever to access the camera feeds, so the source will be wait, what am I doing here? Sorry, I'm getting, they are being set as target IP cameras. I keep saying that, sorry, okay, IP cameras, our destination and we're leaving. to use port 554, you can create an alias for this port if you want, which is what I did so I could make it descriptive, but we're going to say that 554 is um a 554. that's rtsp, that's what a lot of cameras use. this real-time streaming protocol allows access ah, this is a delay, the IP camera sends, okay, the camera, and then we just need one more, we're going to allow access to the printer so we can print from our phone, say for example let's say iot would do the protocol with tcp udp and you will do it as iot net source and destination with a printer so this shows you some examples like how you want to allow access between your networks it still keeps things isolated and allows access where you need it. um allow printer access let's save this now we can select um three things at once of course I missed something and then we'll move it on top of this ruler and you'll see that the three rulers will jump up there and I'm going to go back and correct other error.
I forgot to choose a source, the iot network. Okay, it stands out pretty easily in that ruleset. I could see it with the supply changes. Okay, we're almost done with the rules. I got the guest network, so let's do it. I want to start here with private networks. We're going to make such a close guest network that it takes a lot longer when you're trying to describe it while you're making the video and go through everything, if you just write things in it, it's going to be a lot faster if you know how to write it without talking about everything you're doing, like this I'm trying to be a little detailed here, so like I wrote my guide so you can see what's going on and understand what's going on.
I guess not, so let's just tough out the gas. This is our usual destination. Wow, destiny. I want it to be ah. I accidentally clicked on the wrong address. okay, and for the guest network, we will allow you access to the printer so that your printing, your guest can print to your printer, you may or may not want to allow it, but if you want them to print to your printer, if you trust your people on your network, then we will choose the TCP UDP protocol and then we will choose Source, we will choose Yes and the destination printer.
We could have copied the printer rule probably to all networks as well. I just thought. about that, but it's not a big deal. I guess wow, accessing this takes a little longer, so just to think about it, you can copy any rule you want. Well, what I did for the um IP camera network I actually just copied it. the DNS rule, the reason why I did that, as I explained to you in my written guide, is just to reduce spam and firewall logs, basically because it always requests DNS all the time, when you block everything, like many devices still calling.
So to reduce that kind of spam and that extra traffic from checking DNS, I actually only allowed DNS, but I don't allow anything else that I can't remove yet. You can simply get the IP address where you want to connect. but you can't, you can't actually connect to it, so that appeases the devices. You know, this is good because it reduces a little spam and maybe a little network traffic, plus some devices keep trying and trying. Okay, now this completes the firewall rule configuration and this configuration actually completes all the configuration that we're going to do for an open sense.
As for the basics of what you need to do, there are many more things you can modify. and add, but this was like the minimum: We configured a couple of system settings that you want to configure on your system to customize it for your network We configured the interfaces We configured the delay correctly and then we configured the VLANs We configured dacp V4 and V6 and then we did a little Unbound DNS configuration settings to allow hostnames to resolve IP addresses. I also talked about forwarding queries in case you are connected behind another router and then we started working. about creating aliases for that, we're going to use in our rules firewall rules and then we created all the firewall rules that we needed for all of our interfaces, so, all that being said, that's just the basics, there's a lot of stuff in there, so this video is a long time, but there's just um, but I wanted to go over that I want to try to keep it as coherent as possible and just focus on the core aspects, uh, follow up videos.
Maybe I can do more security related things because that's it. It takes hours and hours, so this is the long part of the list of configuring your network because there are a lot of things to configure on your router's firewall device to configure everything for the basic network services, all configured. I hope you found it. This part of the video is very useful even though it is long and detailed. This is where a lot of people maybe get obsessed with some things, so I hope that if you're new to this, you know that you'll find what you need.
I find it beneficial and my written guide has more details that I go into a little more depth than in this video and just because there is so much,It takes a long time, so you can check it too. I have a link below. um but until next time see you in the next video
If you have any copyright issue, please Contact