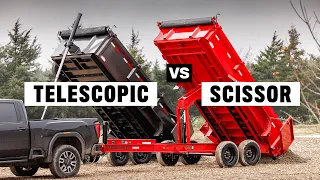
Restoring An Amazing Drop Deck Trailer!
Mar 28, 2024Alright, this is my hydraulic
drop
deck
trailer
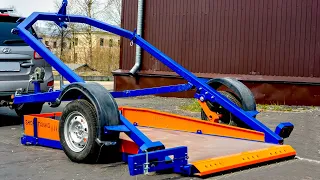
. It may look like a normal utilitytrailer
, but it is not. This is a trailer for moving very special equipment where the entire platformdrop
s to the ground. Now, at first glance, it might look like it's ready. to go it might need a newdeck
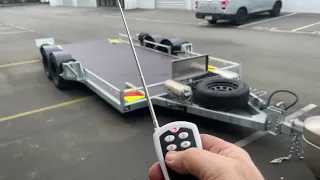
but I promise there's a lot more under the hood that I probably didn't even notice when I bought it and that we're going to fix today okay so like I said at first glance this might look like this . it's ready to work properly the deck is a little dented but you know it's easy to fix but then you dig into it now look at this so when I bought this the guy I bought it from had been using it to haul a skid steer that was at its rated capacity, now look closely and you can see that the side bars are totally bent and on top of that there are a bunch of structural cracks right here totally cracked and then again on the inside right there, the other problem is that This trailer is supposed to go up and down on a bearing track and then use that clip to hold on well at some point the bearings gave up but they continued to use it so this J channel type piece actually fits mounted on the bearing pin and This thing is pretty high now, it goes up and down, but at its highest point it doesn't even touch the clip, so let me show you what happens when this thing goes up and down and then I'll tell you my plan. how are we going to remove the deck and fix this, okay right now the trailer is in the raised position, it's actually not as high as it should be because the bearing is broken, but I'll show you what it looks like below. goes down nicely, as you can see right now, the trailer is completely flat on the ground, so if you were trying to put a machine on this, it's literally as easy as just pulling it up a little ramp, um, without tipping it, in a very, very safe way. to load and what I think is particularly interesting and cool about these trailers is that they are designed to be loaded, not hitched to the vehicle, so obviously you can load them hitched to your car, but if you end up in a tight spot where you have to like, maybe leave the trailer somewhere you can load and unload it with it flat on the ground which I think is a really cool feature in case you know you have to use it as a tow dolly maybe or you have to do something creative, uh, or if you want to leave it somewhere, load, unload, you know, keep things off the ground, so you use this lever and there's a hydraulic pack here to raise and lower the platform, so now the platform is lower. and you can see the way the pin travels along that axis now, if I were to stop here and try to lift the platform again, you would see that it actually fails to engage on this pin, so the only way to get it on that pin is with a car jack, but now let's lower it all the way down and take a look at this thing in the lowered position now that it's on the ground.
I'll show you how we really do it. You have to lift the whole trailer up to be able to get the bed out, so in order to get to these pins from the back, the whole bed has to come out of the trailer, but as you'll see, how would you do that now in Modern? versions of these trailers uh the company actually put basically like a cutout in this channel so you could lift the trailer and then slide the body forward. This is a very old version of this trailer and what I'm pretty sure they did is they welded these little caps onto the top of these channels and essentially they're kind of superficially there, you can tell because they're not completely welded on at all. sides, so what we're going to do is cut them.

More Interesting Facts About,
restoring an amazing drop deck trailer...
We're going to jack up the trailer and then we're going to lower the hydraulic ram as far as it will go, which should essentially drop the bed from the inside of the frame and then once it's out, we can work on fixing these bearings. We'll have even better access inside the wheels, uh, and then we can turn the deck on its side to cut the welds, remove this diamond plate and prepare it for a new deck, so let's get into it to get the actual frame. from the trailer above I used this high lift off-road trailer and lifted it from the center point in Between the Wheels.

Now I'm going to have to lift this pretty high to lower the platform enough to throw it. off those treads uh, this is a pretty complicated process and I'm starting it on my own while I wait for my friends to show up to give me a hand on this particular day. Now I've cut out those little plates. the top of the bearing races and now that it's in the air I can start to remove the pin from the hydraulic ram arm and I have a little jack there to take weight off the pin so I can get it out So once I remove that pin I go on the other side of the trailer after lowering the car jack and I have it on a block of wood and I use a trailer jack here to raise it and lower it. and now you can see the success.

Up until that point I didn't know how I was going to get the bed off the trailer, so it was very exciting to see those bearings for the first time and then I pulled the forklift out to try to pry this apart with a little more force. Now the whole trailer weighs around 3000 lbs so I guess the bed weighs about half that between 1000 and 1500 lbs so I had to pull it back and this is quite a difficult task and tedious process um ideally I would have lifted the trailer probably even higher, but I really didn't have enough room on my jack stands, so we settled for what we had lifted the bed with the forklift, we tried to pull it. straps and basically just me and my two friends were able to sneak it out from inside the trailer frame.
Now this is not something I want to have to do again, basically removing the deck and putting it back on, so all the work I'm going to do has to be done before I put this back together. Now we can use the forklift to lift the pallet and lean it against the wall so we can remove it. the road and we can start looking at the underside of the deck and inspect some of the welds and see how much work we're going to have to do on the frame of the deck. The other good thing about this is the frame.
With the trailer nice and tall, we can easily reach many of those crevices without lying on the ground, so we pulled out the Lincoln Ranger engine. The drive welder started that thing and my friend Matt, who is a structural welder, is going to do some serious work. welding on some of these cracks on this particular day, the Drive motor is a really great welder, the Ranger has been an
amazing
welder, great for stick welding and although I'm still learning the stick welding process, I use it kind of like a generator to run my other mig welders all the time, so the bed and trailer frame have a bunch of structural cracks where they were previously welded, so Matt gets to work starting polishing and Weld them with a 718 stick welding rod to fill those cracks. and actually joining these two pieces of metal together again to supplement the strength where these cracks already appeared, we will add plate stiffeners made of quarter inch plate over all of these cracked areas and actually make some type of additional plate. reinforcements where we think the trailer might crack in the future, so Matt makes a cardboard template, then cuts out some plate using the circular saw and can then weld these plates to the existing frame.It's doing a little bit of overhead uh and some vertical and in the end I think these plates are really going to make a difference in holding this together for the long term as I said before this thing was reused at its rated capacity for probably a few 15 years and he definitely suffered a lot of stress. Put it on. I don't plan on lifting anything that heavy. Can lift 7,000 lbs. I'll probably never lift more than 5,000 with him, so these plates will just ensure he lasts a long time while he does that. I get to work removing these bearings and these things are completely stuck on these pins so I'm using a specialized WD40 easy reach penetrating spray with the easy reach nozzle to try to break up some of that rust and then I use a rust remover. bearings. and a hammer to try to remove these bearings.
Now the penetrating spray really does a good job of getting there and that easy reach nozzle allows me to get to the back of the bearings and really spray it and I kind of leave it. I soaked it and then put a little pressure on it, let it soak a little more pressure and this worked great to remove them but I had to upgrade to a larger gear puller to do it because I broke this one and I want to thank the brand WD40 for sponsoring this video, I use a lot of their products to get the various stuck and broken parts out of this trailer and couldn't do without them so I upgraded to a larger gear puller. after adding a little more penetrating spray and letting it soak overnight and with this hydraulic puller and a couple hits of the hammer I was able to knock this bearing out along with the others that were totally stuck in there, these things had completely rusted out. and it was really
amazing
to see them come out without those bearings.I was able to move to the other side of the trailer where you could see that the bearing pin had been worn through the bed so I started by popping the C. Clips that were completely stuck there and at first I thought I would use the bearing puller to remove these clues as well, but I quickly realized that there was really no reason to save them, so after shooting him with a little penetration. spray and gear puller. I decided to just grab the angle grinder, cut them up, and then get them out that way. There was really no way to store them and I had already bought new bearings for them, so being very careful not to damage the actual pin, I was able to cut almost to the center and then just use a chisel to break it off and then remove it.
You can see how worn that pin is, but we'll fix it a little later. I used a cable. roll to clean the actual sleeve area and then I could slide that gigantic new bearing in there to make sure it would fit. I'm really excited to have new bearings in this thing, it will make a big difference, so moving on to the next phase of this. It was actually removing the trailer bed from the frame. Now, once we turned this on its side, we could see how deteriorated all of the tubes were, so I decided to take the circular saw and cut the bottom off of this tube and then flip the. platform down so I can cut it from the top now it was originally a 316 diamond plate and I'm going to replace it with a 3/16 flat plate because I don't want to have to deal with The Ridges of the diamond plate when I'm rolling Machinery using a pallet truck.
I'm using my metal cutting circular saw to do the best I can to cut the back into manageable pieces, but not cut the actual outer tube of the frame, so I just want to basically cut this out and remove it by cutting the weld, cutting like I could with a saw or a grinder and really just trying to get this apart, the old frame had really rotted out and I learned pretty quickly that the frame itself was in terrible condition so I ended up building a complete subframe inside the existing frame of this rig tow. It was a lot more work than I thought it was going to be.
One of the big challenges I faced was getting the old deck out of the sort of perimeter trim and now that I cut out the center, you can see what I'm left with, so I had to go through and individually cut each of these welds and let me tell you, it's Much easier to weld a seam than to remove a welded seam, so I'm using some faed abrasives ceramic cutting discs. They are absolutely amazing, they are much faster and more durable than a normal cutting wheel and they really allowed me to cut through these welds quickly and very easily and forensically remove the old weld, even in these tight and hard to reach places here I am using the Flathead angle grinder I talked about in a recent video and it was the only way I could.
As you get into some of these tight corners, you'll also notice that I'm losing all of the existing D-rings when I do this job. These are going to go away because they're welded to the deck, so when I take it off, I'm going to take those D-rings off and just replace all that stuff anyway. I'm doing my best to chisel away any corrosion left on the tube and everything will have a quick wire wheel and Everything will be primed with a rusty metal primer before we do more work to it, just cutting and grinding more welds on what seems like an eternity.
As I do this, you'll notice that I'm using this type of space device. I wear a paper unit, an air powered respirator with a grinding hood, so while I'm grinding up old paintand rust I don't worry about my lungs. I'm not causing any kind of damage to my lungs. I'm basically filtering out all that air and it really helped me working on this project because I had to deal with a lot of corrosion and it really made me feel a lot more confident while doing it, some of these areas had very difficult welds. but once we were able to remove the entire perimeter deck, we tapped it with a needle scraper to get into any of the D tar spots and ground out all the existing pipe welds that were stuck there, which I want to do.
Here is building a framework within a framework. What I realized is that this outside frame is badly damaged, so I bought some new 2x3x 3/16 wall tubing and I'm basically going to be wrapping a new frame around the inside of the existing frame, beveling all the corners so they fit snugly. and then I'm going to prepare everything before I solder it. Here's a quick and dirty way to very quickly bevel the edges of your tube by simply using my metal cutting circular saw the way I would use it for wood frames and just putting that piece nice and tight in there, priming everything so it doesn't there's a chance for more corrosion to build up between the tubes and then welding everything into place, I just sort of turn things around at first so I can position everything and then completely weld everything as I go.
It's really nice to weld on this new tube and what I found was the corner section of the existing tube while it was a little corroded in some areas, it definitely had the most structural integrity so I feel like I got a good joint and I'm not worried about this frame falls again. I can bevel the other side of this tube, put it in the other section and I'm actually going to change the way this frame was originally held up. There were two tubes offset to the sides, but I'll add even more ridges and more straps when I put this back together because I'm going to bring heavy machinery into this more with a sort of center point load instead of a bobcat or a mini excavator that we'll move to the side. end of this video, so we're going to join all this solder together and add additional frames to make everything work well. at night and probably driving my neighbors crazy, but really adding a very strong frame within that frame that will make this last a long time.
The next stage was to prime the bottom of the pallet I'm using to a thickness of 3/16. hot rolled sheet and I was only able to handle it in half sheets because I didn't want to try to handle a full giant sheet, which will allow me to have a seam in the middle but also make it more manageable and just circular. and give the whole thing a couple of welds to glue it in place and then turn it on its side so we can weld the bottom. I can't get to all the cross sections of the tubes from the top and I don't want to deform it by welding too much on one side, so we turn it on its side and lean it against the building with some safety straps and then we can weld everything from the bottom after to make some wire.
While I was walking around those corners, my friend James from American Metal Fabricator stopped by and wanted to spend some time with the Lincoln 215 MPI. This is a really great multi process welder that I am using at 220 using an extension cord and James can attach it. in a lot of time welding on the underside of the trailer and really making sure the deck doesn't go anywhere now while he's doing that I'm on the other side of the yard getting ready to re-weld these pins and weld these big indentations and I filled them in , so I used a map gas torch to preheat that bar, make sure it was nice and hot and then I went in, turned my welder on as high as it would go and welded and burned into those big indentations.
Now this will add a lot of strength and ensure these pins don't bend, they are like 3 inches thick so I'm not that worried about that but I want to make sure I add as much as possible. force that back on as I can now I have to do this on both sides and I make sure to clean it with a wire wheel, chop it up a little bit with a grinder and then let the preheat really soak in. nice and hot so that when I solder it definitely penetrated and I definitely feel like I got a good weld on both pins.
You can see the way the bearing still fits in there. I didn't warp or add splatter and then I was able to fit the new large Roller Race bearings in the rear section and the next step was to do some more reinforcements and I did that on the plasma table. I pre-cut them with the circular saw, but then I needed to cut some circles to go around those pins and here's a little trick if you have to cut a pattern on a plasma table that comes off the side of your material, if you can back something up against him, it will still be cut without losing its Arch so you can see that kind of C cut into this reinforcement and then I can weld this all around and really add a lot of strength to an area of the trailer that had previously cracked.
It's pretty incredible, they must have really abused it in their past life, but I'm sure that by welding those cracks together and adding these reinforcements we won't have to worry about cracking like that ever again. I'm so happy I added these. reinforcements too because with the platform on it would be almost impossible to get to them, so removing the platform and doing this job was really the only option. This was a really good welding experience project. I didn't expect there to be so much solder in this. I thought maybe we would spend a day welding, but as you can see from the days and nights that go by in this video, this took a lot of work, all these reinforcements took time to do all this welding. previously there were some kind of shitty crusty plates over these corners.
You can see the outline here and I had to replace all of that, so here I'm just making a cardboard template and I'm actually going to fold a piece. of quarter inch material around that corner to get a really strong reinforcement around the corner and I can weld it all in place by cutting a quarter inch plate with the metal circular saw and then going into the all-terrain hydraulic press. This just ended up on my H-frame press and I bend around this corner to get a nice 90° bend. I just check it as I go and this is a really great tool to have in the shop if you do some fabrication and need a break from the press. but you don't have the money or space to have a big machine.
This thing works like a charm. You just pump it manually with your H-frame press and you can see I have two really nice gutes and I made two on the other side. Well, after polishing everything up, I did some MiG welding here again, put my machine on high and welded this quarter inch tube with a quarter inch plate, so I can penetrate it very easily and weld them together. open up the corners to create really strong gussets on both sides, most of the weight of the trailer is going to be kept towards the front for the tongue weight anyway, so adding all these gussets to the front will really make this super strong, the only annoying thing.
Part of this whole process is the fact that I have to polish the powder coat every time I paint and you know it's a little tedious, you have to polish all that paint down to the bare metal, make sure you don't leave anything behind. otherwise the MIG welding penetration really isn't that good, if I was welding this I probably could have welded through some of that paint, but with the hardwire I'm running 035 wire with c25 gas. I really want to make sure that I have a nice clean welding surface so I can get a good penetrating weld no matter what part of the trailer I'm welding on Now with all that done the last thing left for the deck is to cut this fucking beaver tail.
So you can see I had some kind of thick plate that had made those cut angles and they were all bent. All this is super rotten. This had just been, you know, never washed, never cleaned, so I was able to cut this out. pieces with the saw and then I'm going to go ahead and redo this, but I'm going to use four pieces of pipe instead of that thick plate to cut the angles of the actual ramp, the other thing I'm going to do is I'm going to extend the length of the ramp a couple of inches to have an even more gradual ramp to roll things up?
Now I plan to use this to move machinery basically using lathes, mills and all sorts of things so I'm going to have to move it with a pallet jack so I want the ramp to be as smooth as possible and to do that I just cut them at a bit of an angle longer and I'm Using a piece of 2x4 tubing that I had lying around in the scrap pile, once I cut one of the angles and know it's right, I can use it as a template to cut the other three pieces, now the first two were a little more tedious but you'll see how quickly I can process these angles using the metal cutting circular saw here, so I trace the original first and then make my two long cuts.
Cuts I make my cut perpendicular. the back and I basically leave everything assembled until the final cut and then the two pieces essentially come out. I have to make two small cuts and I have two identical angle pieces that can now be welded to the end of the platform and make a really nice smooth transition, you'll also notice these little plates on the bottom. I basically wanted a safety break. Basically these are just small repair plates that go from the original trailer frame to the new subframe I built and make it so it can never work again.
I probably didn't need them, but it gave me a little more peace of mind to put them in there now to make sure they were really strong and secure. I welded them inside and out. tube, I thought that while I had access to it, I might prefer to look at it instead of searching for it with the soldiers there. I grabbed the rest of my 3/16 thick plate and bent it a little, I think it was a 4° angle at the end so I could make a nice clean transition from my ramp to the rest of my deck before flipping the deck over. below.
I just checked to put a clamp in there. I took a look at it. and I realized I didn't want to do six feet of vertical welding uphill, so I knocked the entire trailer bed to the side quite aggressively and dangerously while backing the trailer. I didn't realize I was about to drop the Cover, well everything was fine. I had that safety strap there, but now it will allow me to do the rest of the deck welding in one plane, which would be much nicer and easier. I will get a better weld. penetration and it will be faster, so I'm just doing a four or five inch sort of stitch weld along the deck.
I'm trying to distribute the heat as best I can. I don't want to overheat any particular section and while I'm here I can start welding some of my new 8,000 lb D-rings into place. The original trailer had six D-rings. I decided to use eight. I just felt that having two extra towards the center would be useful and would help me make a sort of cross strap pattern when I'm tying down any machinery. I'm also welding the deck to the outside of the frame on the outside and here I'm welding one of the D rings, now this. It's all clean virgin material, but I still want to polish that M scale.
I'm using the Victor grit, solid CC grinding discs, if you haven't tried them and do any metal polishing, you really need to give them a try. It grinds material much faster than any other disc I've used, absolutely Terri-esque on the Mill scale, and although they're a bit pricey, they're worth it because you'll find them easier to work with. your stuff, once you try these things, you'll be able to see that I have to stick my Mig gun in the back here between this frame, but it leaves me with a very nice weld on those D rings, now the ramp will have to be done in three pieces because this is the rest of the material I have and I just use a small metal block to hold it while I put everything in place and I can start turning it now.
I really like the way I did this because the end of the ramp doesn't have a seam, so there's a nice folded transition, so that kind of critical area where you'd be trying to roll something over the edge there isn't a sewing. to get in the way and once everything is flat it's basically completely seamless, like it was one nice piece of material, now with the deck sewn I could move onto my axles and my brakes. Now I had already removed the rear brake here and You can see it was completely filmed. I took out all these things.
I took out all the bearings. You can see how corroded these wheel hubs and leaf springs are. We'll take care of all that. I'm also going to replace all the bushings and shackles on this entire suspension so I bought new electric brakes and bolted them all up and these will make a difference. There were no brakes on this trailer when I bought it, but these guys still use them.they were using. I mean, these are self-adjusting electric brakes, they're rated for this trailer at 10,000 lbs., and I have one on both sides on the front axle. I didn't buy new bushings, but I was able to clean them with a wire wheel. clean the interior and degrease with a little bit of WD40 specialist degreaser and this will just help clean these things up and then I give everything a coat of Rustoleum oil based gloss black spray paint, not only will this make it look Okay, but it will protect it from any corrosion by having that oil based paint on there.
I also cleaned the wheels and you can tell that the rims are in pretty rough condition. I had a local tire store replace all four tires, but before I did that. I decided to paint the wheels black just to give everything a nice clean look. I cleaned it with a wire wheel and again hit it with some Rustoleum black gloss oil based paint and gave them a couple of coats and really gave them time to dry. inside my nice warm workshop so they could settle and then I would change those tires for the degreaser on this project.
I am using WD40 specialist degreaser and cleaner. Basically just put them in a spray bottle of water and you can kind of adjust the concentration they're great at going and they worked really well to clean this up. The rear axles don't have brakes on this trailer, but they did have a hub that needed some cleaning, so I took the cap off and took out the bearings every time. The bearings on these hubs seemed to be in good shape, everything already had a nice healthy layer of grease on them, but I repackaged, greased the bearings and painted all the mounting sections of the wheel hubs and you can see how this guy works trailer design.
I basically have a wheel hub that is held in place by two sets of leaf springs and it's a really nice and elegant design. You have these shackles on the back and they were made from a quarter inch plate. In fact, I remade them all at 38 inches. plate from scratch and replaced each suspension bolt with a grade 8 bolt and a distorted thread nut. This was a really long process. My friend Nicholas and my friend James came and helped me. I replaced all the bushings, all the pins. It took us hours and hours to do this, it was really very tedious, but when we were done it made all the difference with the suspension.
I also rewired all the lighting and added a breakaway, but I didn't film that because who wants to see me rewire? a trailer, so now that all that was done, the new tires were mounted, the new wheels were put on, all the suspension was fixed, the trailer was completely rewired, it was time to put the bed back on, now you can notice that the bottom of the deck is completely black, now we painted the bottom of the deck again with oil based paint and also primed it first which I think will really help reduce any potential corrosion that occurs from water splashing.
I never want to take the Lowering this trailer again was a pain, you can see it is very complicated to have the trailer so high. I have it on jack stands. I have it on pipe supports and I just don't want to do this ever. Again, the goal was to get everything perfect, to do everything very well while taking it apart and putting it back together. The problem was that I had to go pick up a machine the day after filming this clip that weighed about 4,500 pounds during the entire process. in Massachusetts so this had to be put together quickly and it had to work so we have the pallet on the forklift and I have some straps to keep it up and now it's the moment of truth the pallet is going to go back on.
These new bearings, is the trailer going to work now that I fixed all the problems? I fixed those bearings placed in all these new boosters. It really stabilized everything, so it took a bit of adjustment. Unfortunately, my forklift doesn't have a side shift, which would have been really helpful at this point, but between me, Mac, and Tommy, using some levers, we had to grab a strap and pull the frame because the frame was stretched a little, so which we had to pull the frame using a strap to do. making sure the bearings click into place and basically once we were able to lift this up a little bit and put a jack underneath it, we were able to get the hydraulic ram to grab that shackle and once the hydraulic ram had it, we were able to let the machine do the work.
Lifting on its own, I unhooked the forklift and I'm very happy to say that the first time we lined this up and took the weight off the forklift, it worked perfectly, the only problem I had was the little clip that locks the actual forklift. The frame in the bed needed a little adjusting but that's okay, it wasn't hard to do and then we were able to put the trailer down, take it on a main trip, test it a bit and drive 150k. I came home from Massachusetts with a machine. I hadn't finished welding the deck, but I had finished welding all the D-rings, so at that point I felt it was safe enough to use.
Now that it was done, now he could finish. welding the top side of the platform. I don't want there to be any of these cracks because when I'm rolling a pallet jack or something like that I need it to be perfectly smooth, so I welded every seam, but you'll do it. Note that I left a gap between my plates to have a nice easy weld, something that that weld could sit nice and flush on and would require minimal polishing once it was all done again. I'm using Victor CC grind solid grit. disc to polish all these welds super flush and this speeds up the work of this type of process.
You'll notice that my grinder is at a very low angle. Victor grit discs are a low angle grinding disc. They get a lot of use and, for this type of work it is so fast that you are talking about only a couple of minutes to polish a 6 length seam completely flush and it really makes all the difference in your hands to have this low vibration and low disc. noise now, of course, the The day I needed to prime this it had rained and I also needed to degrease everything with that WD40 specialist degreaser, so I washed everything, cleaned everything and then used some sort of roofing torch to dry up the water and make sure.
This thing was nice and dry before I gave it a coat of Rustoleum rust metal primer. Now I give a nice, healthy coat of primer to all the raw metal, which is exactly what we did on the bottom. Fortunately, I don't need to prime the entire trailer because the powder coat will basically act as a primer coat for the rest of the trailer and once I've given it a few days to dry, I come back with some Rustoleum spray paint and a little of Rustoleum roll paint now like a drug. I painted this with matte black paint thinking it was glossy because I didn't read the can, but that's okay, the matte black paint actually acted as sort of another coat of primer, so after priming it got a coat of matte black all over. the surface. and then I went back and painted it with two coats of gloss paint.
When I painted it black it really started to look finished and I started to get really excited about the work I had put into this and how fantastic the trailer was. this will be when it's finished, the last fabrication job to do was redo those little doors that would go over the toolbox and hydraulic pump, so I used the only door I had as a template and then cut a piece of sheet metal diamond in the workshop to make a replica of the door for the other side. They never had a door over the hydraulic pump so it got covered in rust and I definitely don't want the pump to break down.
It will probably need to be replaced relatively soon, but in the meantime I want to protect it as best I can, so I took that piece of diamond plate and then cut the other one and not only was I able to make a door for the right side. but make a floor for what is supposed to be the toolbox on the left side. I left some gaps around the edges in case water gets in, it has a place to go and that's where my wiring harness will go and where my ground is. It's going to be and this would be a good place to store things like chains or pins or extra clips, whatever you need.
I could put my binders in there if needed or straps. I'll probably just save a spray can. paint there, so if I see rust forming I can apply a coat of paint. I made a similar design to the factory with pin hinges on the other door so it can be easily removed and still allow me access to the hydraulic pack. so I add this little bar that's similar to the other side and I can put a cevis pin in there to keep these doors closed or if I want to secure the trailer I can put a padlock in there to hold anything else I need.
Inside, the last thing I did was with the wiring: putting everything on a wire loom and cleaning everything up. I tied all the cables tightly to the bottom of the trailer, making sure nothing was loose and nothing could be damaged and where I had to use zip ties. and held Downs. I was able to make sure each cable was nice and secure and that everything was safe from hitting the road to make sure the cables didn't get damaged. I just used a hole saw to drill a couple of holes. this 316 diamond plate to make sure all of my penetrations were really nice and with my junction box for my wires under this little door, I think it's just going to make sure that I have the least amount of corrosion on my contacts and make sure that my The ground point is kept nice and clean, wiring this trailer from scratch and doing new wiring was definitely the best option.
He made sure all my wires were nice and secure and I didn't have to worry about any of my lights breaking now it's all LED and I think all of this is going to last a long time. The last step for added safety was to add reflective tape to the sides of the trailer and I just got this on Amazon. It's like a 2 inch reflective trailer tape. I did my best to apply it. and then I used a roller like you would use on some kind of flashing tape to make sure it had a really nice, secure fit.
I think the tape really highlighted it and made it seem like it was new. I added it on all the The areas that travel on L would normally have the tape on a new trailer and it looks great, the black rims and new tires also really highlight the thing and not in this clip, but right after doing this I replaced all the nuts. with new chrome nuts to make sure they don't have cross threads. You can see the new dedicated battery Breakaway box I added on the left side of the front of the trailer and you can see the paint job.
Really to make this look good now I had to take it off the jacks and put it in the back of my truck so I could test the lights, make sure everything was working and go get a machine now, this new Ram 3500 that I bought . this year it has a cool trailer light check feature so I can easily pull the trailer out and then make sure all my lights are working my signals my brake lights check everything through some sort of sequence you can see everything flashing there and then we can go down and put a little equipment on it.
I have this little Surefire heater that I've been using a lot. It's a diesel heater that weighs a couple hundred pounds and you can see how easy it is. just roll that thing onto the trailer bed and lift it back up and put it in place, but here's real proof and a real testament to how useful a trailer like this can be. We go to my friend Max's garden and tear it up. the heater and then we're going to take your mini excavator right onto the deck with no ramps to deal with risky loading where you have the bucket down trying to keep it from tipping over, we just pull it right onto the deck and then use the hydraulics to lift this trailer and place the piece in its place.
This trailer will be absolutely amazing for moving equipment. I'm so glad I spent the time and money to rebuild it. Something like this cost around $20,000. I bought a new one and spent less than 10 buying parts and rebuilding, so thanks to WD40 for sponsoring this video, thank you all so much for watching. I am very excited to pick up machinery and show off this advancement in the future. videos I really hope you enjoyed it if you have any questions please leave them below if you have never seen a trailer like this and want to learn more about it.
I'll put some links below and I'll also put links. Check out all the tools and equipment I use below, also check out all my friends who help me with this. All of their pages are linked in the description of this video. Follow me here on Instagram to see more of what I do every day. and I hope to see you in the next video
If you have any copyright issue, please Contact