Repair of a Gibson Les Paul with a snapped off headstock
Jun 05, 2021thanks for watching this guitar playing video you're joining me today in my south london workshop so what i have today is pretty obvious is two
gibson
lespaul
s with tuners ripped off both ways and here are the tuners for these guitars , now for this guitar, the owner. of this guitar he was kicking around with it he put it back in its case he came home took the guitar out of its case a few days later and discovered to his horror that theheadstock
had just broken while it was sitting in its case he doesn't think it fell the case or suffer some kind of distress while moving, but I can believe in my experience that this could happen.
The guitar could just be in the case and the
headstock
was completely broken. In fact, he brought me another Gibson Les Paul with a damaged headstock, this is a more classic break, we're just surrounded by this area here where the neck is kind of open and that's kind of easier torepair
, but it's unfortunate to have two Paul capes, both with broken tuners and now, I would. I don't want to give the impression that my shop is full of Les Pauls with broken heads, but it's true that over the last 10 years the vast majority of neckrepair
s I've done have been on Les Pauls, so there it is.
More Interesting Facts About,
repair of a gibson les paul with a snapped off headstock...
The question is why these necks are more likely to break than other types of guitars. Well, I could say you know a lot about that, but if you looked, you'd mainly know the fact that Les Pauls are carved from a single piece of wood. which creates, I think, an inherent weakness and the grain structure around this part of the head to the neck, the thickness of the wood, when you actually look at one of them, look at a broken headstock, you see that the thickness of the wood around the truss rod nut, you can see how little strength there is and they're just better ways to make a neck, you know, creating that neck angle, whether it's through a laminated neck or a bevel joint.

I don't see guitars having broken necks with a bevel joint or laminate and they just come to work to repair them, so what can be done? Can these guitars be repaired or can they not be repaired? Well, the good news is that yes, they can be repaired. It is quite a difficult and technical repair it is a repair that I describe as not for the faint hearted because it requires a run down the back of the neck to strengthen this area around you know where the crack occurred because simply gluing these two parts back together would not be enough, it would just open up again but I'm going to show you how I'm going to do it and at the end of this production process these guitars will be back in playable condition and hopefully the owner will enjoy many years of being able to play these guitars again so let's take a look a look at this mast break in a little more detail, this gray part we're seeing here and you can see the same thing on the front.

Well, that's seeing the fiber overlaying the fiber headstock on top of the layer that Gibson uses. You can also see the soul nuts there and you know maybe you can pick up that underneath the soul nuts there really isn't much depth. of wood there only a few millimeters - just gently separate them at this stage because I want to push the repair stages so that this crack line that is really typical of a Les Paul break for the most part doesn't go all the way. Sometimes they just cling to the grain of the headstock. This crack line is a little more friendly than most.
Sometimes when they form a clan, you can barely see that the crack line can just look here where a small piece of wood has come off and there and there and the lacquers come off too, so the other Gibson Les Paul that we were looking at before it has a very clean break, yes it will come together quite well, where is this? It's going to take a little more work to get a good cosmetic finish out of this, but yeah, we can still do it, so thinking about repairing this neck break, what you could do is just re-glue these two parts together, but because the way this neck is broken, the actual type of gluing surface between the two parts is not great, so we have to kill this side by gluing fiber end to end, which is an inherently weak repair, so it won't.
Ok the only thing I'm going to do with the guitar once I reglue it is insert two ferrules on either side of the truss rod channel and that will just strengthen the neck with this neck break area and then spray dark brown. lacquer over the back of the headstock and blend it into the neck so it changes the appearance, but it will be a satisfactory repair and it's that compromise between changing the appearance and really well, the alternative is to just glue it back on. And I hope for the best, which is also not ideal, so you have to make concessions, but at least we will have a guitar that can be played with sound at the end of the repair, so this is the higher goal that, as you can see, is It's hitting again.
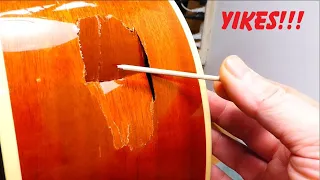
So let's take a look, you'll see. I just use a couple of calls that have had a little bit of cork added just to protect the surface where I'm planting, okay, that's great, let me zoom in a little bit closer, so here. Is it the crack line that runs through there? Know? I wonder if the camera can even catch it on the Gibson neck break scale. This is as clean as it gets, there's just a little bit of finish loss that I can touch up, but yeah, that's pretty cool, very little cosmetic finishing needs to be done there and let's take a look at the front, yeah, someone on the head. , the crack line is much more obvious running down here a little bit of The excess glue will come off from here, yes, so what I have to do on this side is fill along this crack line and then just sand it back and then spray with a little black lacquer, since it is black, it is much easier to hide this poor condition. so I'm pretty sure this will actually look pretty perfect once it's done.
A few years ago I had to repair a neck where the neck had practically split in half, so there was no option to fasten the two parts back. together like I had done for these two-ply posts, so I had to think of a way I could apply a little pressure on the end of the grain while the glue hardened and then also hold the guitar in place, hold the mast in place while routing the ferrules. between neck, so I came up with this jig that I'm also going to use to route the neck on one of these Gibsons, so let's take a look at this, so here's the jig, the neck sits along this part and the neck angle is set with this type of pivoting piece here and that is held in place by the dis wedge that allows me, as I say, to set the neck angle if I need to apply pressure on the headstock, I can do that by means of these shims so this part sits against the end of the head and then to apply pressure and just slide the shims over each other and that allows me to control the amount of pressure that I want to put on the end of the head where the router sits here and allows me to control what I'm doing when it comes to rounding things, so this jig just allows me to stabilize everything, just keep it in place, a plow, apply pressure if necessary and most importantly just it gives me a kind of visibility when m a get to that delicate Rati part on the neck of the guitar, so as you can see, I just made a couple of mahogany splints, these are really tricky to make, they just have to be made completely by hand, so what I'm doing.
What you're looking for is a nice, comfortable fit so that once inserted, there are no gaps around or minimal gaps around the ferrule, but equally, if they were too tight when they were inserted and pushed in, then they would push against this joint. glue. and put that glue on to line it up under tension, they don't have to be particularly long, but this is the weak area on a Les Paul, this is where they crack, so these ferrules go through that weak area and more importantly, Because the grain structure that runs along the ferrules is different from the grain structure of the spar around them, so they add considerable strength to this area once they are glued in place.
If your neck was painted black, then I probably inserted maple ferrules instead of mahogany. Maple is denser and harder than mahogany so it adds extra strength in this area, so the next job is to glue it into place and then once the glue is hardened and hardened, shape the ferrules. On the surrounding neck area, the next thing to do is dye. these two splints, so they have a similar color to the neck, why did I donate them to that pit to hide these splints completely? I would paint the back of the neck and sides of the headstock a black color and then shade that black with a brown color.
The neck and ferrules wouldn't be visible at all, but the only guitars ask me to use dark brown instead of black, so if I went straight ahead and sprayed dark brown over this area, these ferrules would be very, very obvious. So what I have to do is try to match that color to the existing neck color before I put fresh paint on this area. To do this, I'm going to use a product called glue enhancers and these are a clear dye, so I'm going to add color to try to get that color, which is going to be mixed with CA wall glue or super glue.
Why use that instead of just a wood stain if I put a wood stain or die? these ferrules i think the color will bleed around the edges of the ferrules and it will just highlight the edge of the ferrules and it made me feel more obvious while it is the CA glue, the ink CA glue will sit more on the surface and not seep through , so I think we'll get kind of a more consistent color match between the existing wood and the new ferrules. The CA glue will also seal the wood and fill these pores. Mahogany, if not filled, fills the pores, so when the paint is applied, the fresh paint should eventually seep into the pores of the wood and make this splint more obvious, so let's try it.
I tried a couple of types of color combinations today and I found that just adding what is this, this is the yeah, transparent brown, just using it produces a pretty dark color, even when I diluted it, so in this In this mix I'm just going to Try the tie with a small amount of brown and an even smaller amount of transparent amber, which I think can help give the right color. I prefer to go at this stage for a Light colored rather than dark colored, let's start by mixing the brown and add a little bit of amber.
Well, let's see, it seems that way, yes, but the US amber has definitely helped, it's actually quite good, I just dilute it a little more. let's try it I'd rather build this up in two or three layers and try to get the color match perfect the first time yeah maybe I just saw it a little bit further down that's pretty good that's pretty good . Yeah, like this, okay, let's do this, just use a brush to apply this, so I can get exactly where I want. Color matching is often not easy at all, but that's what I think is pretty perfect, yeah right.
The next part of this repair, which is touching up the shit line on the front face of the guitar at the headstock, allows me to use one of my favorite tools in my shop, which is this airbrush. I love the control this tool can have. to give me, I can apply the pain exactly where I want it with very, very little overspray. I can build this up in layers, it's one way the paint is if Laird means I have a lot less life zu1 see the painters are hardened and cured and I can get pinpoint precision where I want the paint to be reapplied.
Yes, I love using this tool much better than trying to do this by hand with a brush, the brush and everything means that you have a It took a lot of work to get it flat and level afterwards, so I'm going to let it dry for like an hour once and then I'll go back and apply some more. I can see. I have a little. a little bit more padding to do just in that area just got a couple of indentations there which knee I need to fix that bug looks really good yeah pretty good and the sides look really good too so just there and ready. just a cross there, but yeah, this plate should look pretty perfect once all the paint has been applied, so I bet the fresh paint hardens overnight and when you apply the paint, what's done is exposed, There are a couple of indentations in the finish, particularly just right there, which became more obvious once I applied some lacquer, so I filled those areas with a little superglue and then leveled the entire area.
Why stick superglue well if you could count on just painting over it with lacquer and it would cover those crevices, but over time the lacquer would progressively sink into the crack line and just expose those crack lines and those crevices, while the super glue wouldn't do it, it would just siton the surface, so to speak. so the super glue is a much better area, so now I'm ready to go and apply some more paint on these two dog heads while flapping. It's nice, now it's not so clear where the crack lines were, I think it was on the other side. and diagonally across there, but I guess that's good, I'm starting to not be able to see as clearly where the crack lines are, where it is.
I see the Lesbo Goldtop now it had a sort of matte black setting Mac with a white finish and I sprayed some black lacquer in the crack area and now my intention was to cut that out and blend it with the existing finish but when I started to make the transition between new and old just didn't look natural, so I sprayed clear lacquer over the entire headstock and had a conversation with the owners of this guitar about how we would finish it and their preference was for it to have a gloss finish, which is what you see on almost all Les Pauls, so as a dark gray it will look very natural.
Now I'm just going to trim the lacquer, I'm just going to go through several grits and polish this to a high shine, so in the end I decided not to film the lacquer spray on the back of the headstock that I was worried about. a little bit of lacquer floating around and getting on my camera lens, but I think you can see what I've done so far, so I used nitrocellulose lacquer which is now surely used on the rest of the guitar and also that nitrocellulose I used I just finished of adding a little trans dye.
This one is medium brown. This is from Stu. I'm a cadet in America, just a little bit of color in the lacquer and yeah this is going well so far so I just started with a lighter brown. as much as possible just to add darkness progressively as I go because what I want to do is not to go too dark at this stage to add as little brown as possible and you can see that the two ferrules are starting to be darkened a trial I have to do is to what extent do I keep adding Brown over the back of the headstock and around the ferrule area.
Sir, these two splints are almost completely darkened but therefore have a great contrast between them. the two brown ones will do. I simply accept that these ferrules become slightly visible again and therefore add less brown to the back of the headstock so that is the criterion to be taken. I think I'm going to add a little more color to the back. of the headstock and I need this ferrule area, but yes, so far this is going well. I'm a little pleased with how the ferrules are starting to be a lot less noticeable, so here's the headstock finished and just going back up.
I did it, I sprayed black lacquer over this area here and then I sprayed clear lacquer all over the headstock, then I cut it and polished it like you saw and it turned out really nice. I think the crack was crossed. there, but even to capture this light is quite, yes, it is very difficult to detect where it was, so yes, I am very satisfied with the way it was searched from the front. Well, there's no evidence to suggest that Nick suffered a broken neck, so here. Is the repair on the back of the neck complete?
I don't know if the camera can pick this up but that's where the dental ferrules are and the question on my mind when I was going to spray Lac on the back of the head and in the ferrule area was how dark do I make the lacquer too dark? and the serial number and the made in USA stamps would be completely lost in the light and the two ferrules would be quite obvious, so that was always the compromise, the question in my Keep in mind and until the lacquer is applied clear and it's all polished, you never know how dark that brown lacquer will actually be once it's all polished, but this was a very severe net break and you always have to make allowances. done between changing the need for the original look of the guitar and a successful repair, what we now have is a stronger neck, this neck will not break in the future, so yes, I am happy with how everything turned out, so here's two ways.
To repair a guitar that has a broken headstock, the headstock broke on this one, the gold top, I glued them back together and then repainted the headstock the same way for this one, but I also inserted slats around the crack area. owner of this one, I talked about inserting splints with him and his preference was not to go through with that and in a sense take the risk that actually this neck could break again, so I guess the question is what technique is it? appropriate. For what type of neck it breaks, what I would say is that the further along the grain line the crack is, the more it runs that way, the more likely the bond will be successful and the more transverse the crack will be. the grain plus ninety degrees of the fingerboard then you are trying to glue grain to grain and that is inherently weak it is unlikely to last very long if glued again and therefore you need to find some means of strengthening that crack area as I have done here, so thanks for watching this Phil, feel free to ask me any questions or send me a comment as long as it's a nice comment, but thanks for watching the Flame Guitars video.
If you have any copyright issue, please Contact