Python OOP Tutorial 1: Classes and Instances
Jun 06, 2021Hello everyone. How are you doing in this video series? We will learn how to create and use
classes
within Python and how object-oriented concepts are applied within the language now. There's a lot to cover when working withclasses
, so I'll break them up into several different videos. We will cover the basics of creating and instantiating classes, learn about inheriting classes and instance variables, static methods and class methods, and various other topics. So splitting them into multiple videos will allow us to focus on specific topics in each video, so in this video we'll be learning the basics of creating and instantiating simple classes, but first why should we use classes now?
This is not just specific to Python. You can see that classes are used in most modern programming languages, and there is a good reason for them to allow us to logically group our data and functions in a way that is easy and also easy to develop if necessary. Now just a quick side note when I say data and functions that are associated with a specific class. We call those attributes and methods, and you'll hear me use those terms a lot throughout these videos, so when I say methods I mean a function associated with a class, let's go ahead and get started, let's say we had an application for our company and we loved our employees. and our Python code now.
More Interesting Facts About,
python oop tutorial 1 classes and instances...
This would be a great use case for a class because each individual employee will have specific attributes and methods, so for example each employee will have a name and email address and also actions they can perform. It would be nice if we had a class that we could use as a template to create each employee, so we wouldn't have to do this manually each time from scratch. So let's go ahead and create a simple employee class and see what that means. It would look like this to create a class. It's as easy as saying class employee.
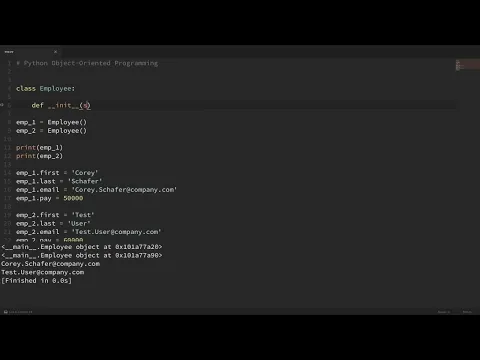
Now I'm going to leave this empty for now, and if we leave it like this and we get an error, if you ever have a class or a function that you want to leave empty for the moment, you can simply put it in a passed statement and Python will know that you want to skip it for now. Now we have a simple employee class with no attributes or methods. And I wanted to stop. here because I wanted to explain the difference between a class and an instance of a class. So our class is basically a template for creating
instances
and each unique employee that we create using our employee class will be an instance of that class, so for example if said employee 1 equals employee and EmPLoyee 2 equals employee, so each of these should be its own unique instance of the employee class, so for example, I go ahead and print both and copy and paste them in there and you can see that both of these are employee objects, and they are both unique .
They both have different locations here in memory. This is an important distinction because you'll hear me talk a lot about instance variables and class variables and it's important to know the difference between them. and I'll go more into class variables in the next video, but for this video we'll look at instance variables so that instance variables contain data that is unique to each instance. Now we could manually create instance variables for each employee. doing something like this So, let's say we want employee 1 to have a first and last name, so we could make employee 1 not the first Equals Corey and then we could make the last employee equal to Schaefer and also I could give you an email address, so I'm going to make it equivalent to the email from point 1 of the employee and just make the first name with the last name in the company communications and lastly, we'll go ahead and add a payment there as well, so I will make employee 1 not pay and we will only make 50,000 there.
Now we'll give the employee some of these same attributes for this one. I'm just going to do a User test and then I'm going to do a User test and I'm going to make 60,000 okay, so now each of these
instances
has attributes that are unique to them, so if I print it, let's say I could print the employee. dot mail and also print the employee to email. It seems like every time I gave you these instance variables, I forgot to include this employee here, so now let's run that so you can see that email was created for each employee.Let's say we wanted to set up all of this information for each employee when they are created instead of doing all of this manually like we did here. So we wouldn't want to have to manually set these variables every time which you can see is a lot. of code and is also prone to errors. Just like I did every time I forgot to change the employee, so we don't get much benefit from using classes if we did it this way, so to set them up automatically when we create the employee we are going to use a special start method.
Now, inside our employee class, I'm going to create this special start method. Now you can think of this method as initialize and if you come from another language then you can think of this as constructor now when we create methods inside a class the instance is the first argument automatically and by convention. We should call the instance self now. You can call it whatever you want, but it's a good idea to follow convention here and just use self. So after self, we can specify what other arguments we want to accept, so let's go ahead and accept the first name, first name and payment and I know we also had email, but we can create the email using the first name and last name, like this Now inside our Knit method we are going to configure all these instance variables.
So let's make point first equal to first and now. I'm going to do this for the rest of them too. So I'm going to do self-checkout or self-checkout at the end and self-checkout and for the email I can make the self-branded email equal to the first plus and then we'll put a dot between them. and then the last one and then we'll add it at the end in the company communication. Okay, so every time I say I'm the instance, what I mean is when we put the point first? equals first here It's going to be the same thing we said down here that employee one point first equals except now instead of doing this manually It's going to be done automatically when we create our employee objects.
Now they don't have to be the same. like our arguments, for example. I could make this name Self dot f equal first, but I usually like to keep them similar if possible. So I'm going to go ahead and set self dot first to equal first again, okay? So when we create our instances of our employee class right here, we can pass in the values that we specified in our anit method. Now our net method takes the instance we called itself and the first name, last name, and Pay as arguments, but when we create our employee down here, the instance is passed in automatically.
So we can leave out ourselves, we just need to provide the names and salary so we can create them by going first and we have to do this in order. So I'm going to pass all the same information that we did manually down there and for the second one I'm going to do it and User and I think I had it right, so what would happen on this line when we create this employee? The anit method will run automatically, then Employee One will be passed as me and then it will set all these attributes. Then it will establish that the employee's first point is equal to the first one we passed as a quarry.
The employee one who is the last one who is equal to what we passed is the last one and so on. Now that we have an IT method in place, we can go and eliminate these manual assignments that we made here. And you can see that by removing them we got rid of a lot of code. So I'm going to go ahead and comment. those lines print employees, and I'll just go ahead and print the email. So if I run that, you can see that it still works, okay? So everything we have so far, the names, the email, and the payment, are all attributes of our class now.
Let's say we want to have the ability to perform some kind of action, not do that. We can add some methods to our class. So let's say I wanted to have the ability to display an employee's full name now. This is an action you would probably need to do a lot with a class like this. So we can do this manually outside of the class if I came here and did Print and I could get the full name by just putting two placeholders in there and formatting it and saying used a period first and used a period last and if I go ahead and I print this, you can see we have the full name there, but that's a lot to type every time you want to display the employees full name; instead, let's create a method inside our class that allows us to put this functionality in one place, so inside our class here I'm going to create a method. called fullname and we can do it by just doing a fullname die now I said before each method inside a class It automatically takes the instance as the first argument and we're always going to call ourselves and the instance is the only argument we'll need to get the full name.
So inside this method here, I'm just going to take the same logic that we had here and delete it and go ahead and return that, but we have to be careful here because now instead of printing Employee and, I'm going to use self so that it works on all instances. . So I'm going to do self dot first and self dot last. Now that we created that method instead of printing like we did before I can now go down and type the employee's full name 1 point and print it. And if I run it, you can see that we got the same thing and notice that we need the parentheses here because this is a method instead of an attribute.
So if I left the parentheses removed and printed this, then you can see that it prints the method instead of the return value of the method, so we're going to have to put those parentheses in to execute it correctly, so now we have all the advantages of the Code. check here, so instead of writing this for each full name that I want to print now, I can use that method, so if I wanted to print the full name of employee two, it's as easy as replacing employee one with employee two and running it . and we get the correct answer.
Okay, and one more thing I wanted to point out here. Now, a common mistake I see when creating methods is forgetting the self argument to the instance. So let's take a quick look at what it would look like if we leave it like this, so now before we run this, if I just comment out this print out the full name down here and run this, then you can see that I'm actually going to delete these print statements. here too. Now I can see that this runs without any errors But if you were to try to run this method that we accidentally left out, run this and you can see that we get an error and the error we got was a type error.
The full name does not require positional arguments. But one. was provided now, this can be confusing because we don't seem to be passing any arguments here with the full name. But the instance, which in this case is employee two, is automatically passed. So we need to wait for that instance argument in our method. and that's why we added self, so I'm going to go back to the full name and put self back in and now when you run this, you can see that it runs successfully. Now we can also run these methods using the name of the class itself, which makes it a bit.
It's more obvious what's going on in the background because every time we do that, I'll do the full employee point name. Now we execute it from the class that we have to manually pass in the instance as an argument. So in this case, I'll pass. on employee one so you can see how they are similar, but not exactly the same. So I'll put them side by side so we can compare them here. So these two lines here do exactly the same thing, but here when I make employee one that is an instance and I call the method.
I don't need to pass self. It does it automatically and when we call the method in the class And you don't know what? instance that we want to run that method with, so we have to pass the instance and that is passed as self and if I go and print this and run it, then you can see it works. Just like if we had to print. takes out the employee's full name with a dot. And I wanted to show you that because that's actually what happens in the background when we run employee full name with a dot, it transforms into this employee dot full name and it passes employee one as self and that's why we have self for these methods, so I hope it makes sense to you.
It's not extremely important to know when we're just starting to work with classes, but we should understand the later videos once we start inheriting from other classes and things. So So I thought it would be good to go ahead and show it to you now,OK? So I think that will be enough for this video. We learned how to create simple classes, the difference between a class and an instance of that class and we also learned how to initialize class attributes and create methods now. We still have a lot. We'll cover in future videos and go over more advanced topics, so in the next video we'll learn about class variables and how they're different from the instance variables we saw here.
But if you have any that I covered in this video then feel free to ask in the comments section and I will do my best to answer them. If you enjoy these
tutorial
s and would like to support them, there are several ways to do so. The easiest way is to just like it. the video and like it and it is also very helpful to share these videos with anyone you find useful and if you have the means you can contribute through patreon. And there is a link to that page in the registration section below, be sure to subscribe for future videos and thank you all forIf you have any copyright issue, please Contact