Proving Angry Viewers Wrong
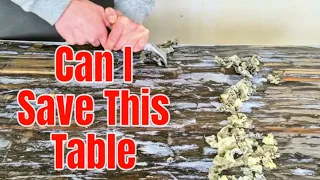
Jun 21, 2024Hi Johnny, here and today I'm building a dining room table using two of these rare maple slabs that I've had for a few years and had a hard time coming up with the right project for, but I think I found it on this table. I'm also taking a thousand year old design and trying to improve it so several months ago I made a kamiko table and said I would donate the proceeds to the Jonathan Cats Moses Woodworkers with Disabilities fund and I'm happy to announce that the table has just been initially sold . I initially had the table listed for $19,000 and it also included a set of chairs that I was going to build and the table was not selling so I removed the option to get the chairs and lowered the price to $12,000.

Well, a couple of months later a buyer came and offered me 10,000 and I accepted that offer, so the table sold for 10,000 and that table will be delivered to its new home while the Jonathan Cats Moses Woodworkers with Disabilities fund receives a good donation on my wife's behalf and when I said I was going to do this in that video, this left some
viewers
angry
because they didn't like this gift and thought it was shit that I kind of joked with my wife into thinking she would receive that table for Christmas and maybe you're right maybe it was a bit shit, but what my wife knows is that she's married to a carpenter, sorry, a maker, and she could always make him her own kamiko table, so that's it what happened she asked for a kamiko table for our new house I said yes and immediately remembered these two curly slabs of maple flame Burl cookies that I've had in my store for 2 years with no idea what to do with them and decided that would be perfect for this. table and I'm going to fill those voids with kamiko panels so far you've seen me clean the cookie slabs and prepare them for the first round of epoxy pores and while I prepare the epoxy form let me explain what I do.
More Interesting Facts About,
proving angry viewers wrong...
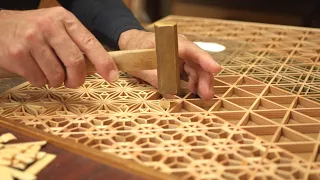
I'm thinking about the design of this table, now the top will be made up of those two maple cookie slabs and then I will pour black resin around them and in the middle of those voids in the slabs I will create chiko panels for inlay and this is where I felt that I had the opportunity to take that ancient design and modify it a little. I'll use the ASA NOA kamiko pattern, which I think is the most common pattern, it's the one I see. The most I'm going to do is take that design and add my own touch to it, basically trying to elevate that design, and to be clear, I'm not suggesting that it's going to surpass Japanese woodworkers or ancient Japanese woodworking techniques, that's not it. the idea and I maintain.

Japanese woodworkers with the greatest respect, but rather the AOH pattern seems to me to be a kind of template to build on and perhaps create something that is completely different. There are many variations of the Kiko designs and many variations of the asanoha pattern and maybe what I'm going to end up doing is making it look like another Kimiko pattern that already exists, but my goal is to take that basic pattern and add some elements to make it something different. , but I'll talk more about that later. I often do this where I see some interesting slabs.

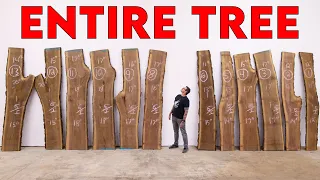
I posted on Instagram and grabbed them without having any plan on what to actually do with them and such was the case with this set of book shaped maple cookies. I don't remember how they were labeled, but I think they were like maple burl with ambrosia quilting. something that makes it sound very fancy and there is a particular Instagram account called worldwide Burl, they are based in the Pacific Northwest where the best wood is and they have these daily auctions on Instagram where you bid on different lots of slabs and I think I bought them for $350 or something and they looked really interesting and I knew I would eventually use them for something and then they sat there, two years went by and I periodically started a new project.
I was pulling these two. the slabs lay them on the ground walk around them move them in different orientations only to determine that they simply weren't right for the piece I was building at the time, but I think I finally got the project right on this table the first time. The problem I have to deal with is cleaning those gaps and this took a lot of work. The inside of these cookie slabs were a complete mess with many rotten and brittle sections and this little 3 inch Rotex sander is the clutch for this operation. This is one of those tools that I rarely use, but when I have to use it it's the perfect tool for the job, but I'm not sure that justifies the $500 plus dollars that this thing costs, the other tool that I really love for the slab cleaning.
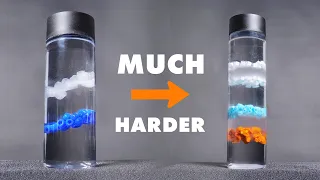
They're these little flap wheel sanders that fit on a regular drill, they're a lot less than $500, more like 10 bucks, and they're the best thing I've found for getting into some of those harder to reach areas, but they throw up a ton of dirt. dust, hence the Darth Vader dust mask contraption that I'm using here, but I like to include links in the description to all the useful tools that I use in each video, so I have them below, be sure to check them out. They are all Amazon affiliate links and anything I buy gives me a little extra change that helps support Johnny's builds and of course I always appreciate that I am going to pour the epoxy in stages and this first round of The goal is Fix the slabs in place and test the shape for leaks.
I'm going to use a thick, full setting epoxy which is my favorite of all the epoxies and I like to tin it black with a little India ink and this is the perfect balance of a deeper Poe epoxy that flows really well but then doesn't take 5 minutes. to 6 days to cure like 2 inch Deep epoxy for like a sick fathom thick and if you want to see all the different totle boo products that I use, I have a link below to the totalboat website and that link will automatically give you a discount on all their products on the website.
This is another great way to support my channel and my long time sponsor so again I think everyone who has done this. that and I will do it. I'm happy to report that I didn't have any leaks in these pores, but what I did have were a few other projects that came with those kinds of priorities, so after the first rounds of pores I put this project aside for about 3 Months to work on. these other builds, so here we are 3 months later with a couple of new tattoos, that's always the case and it's time to build this table again.
I don't really like doing projects this way. I prefer to have a vision for a project and then just do my best to execute it and my concern is that the vision I had for this table 3 months ago and the new ideas I've come up with since I put it aside won't mesh well, but I guess we will have to wait and see. I've been milling some maple and walnut to make the kamiko panel and you might notice some new tools in the shop. Grizzly sent me some new tools to try, including this 1000-pound Beast. of a 12-inch helical head jointer and also, if you look at the back, there is a sliding table saw.
I'm really excited about it, but at this point in the project I didn't have it set up yet, so I couldn't. I still can't use it, and I'm happy to report that another new tool I got from Grizzly is this drum sander, so no more hour and a half round trips to borrow my friend's drum sander and, for those who are new here, the whole Saga is that I sold my drum sander to a friend a couple of years ago because I never used it but basically needed it for every project since then, but now again I have my own drum sander and I promise that I will never sell this again and As I talk about this, I'm starting to realize that this is probably how most hoarders get started.
I mean, if we could travel to the future when I'm 90 years old and whatever version of American Pickers is on and it's two guys doing research. my junk barn is turning up some amazing finds, like a turn of the century Grizzly drum sander and a vintage Honda ridgeline in mint condition and a side note. I think it's a little hard to imagine new cars these days one day becoming collectible classic cars 50 years from now. like trying to imagine a classic car show in the future and it being decked out with this sweet cherry red Honda Civic or a Ford Fusion or imagining being like an old man at a classic car show and being super nostalgic for a Toyota Camry and me.
I'm not trying to do it with any of those vehicles. I just tried to find three of the most basic stock cars I can think of. I mean, I'm the guy who drives a Honda Ridgeline, ironically, so I don't have room to talk about anyone else's choice. of the vehicle the last time I made kamiko panels I used the angle grid which makes cutting the filler pieces a little easier but this time I'm going to use a square grid which adds a bit of complexity when cutting the angles of the kamiko strips , but I feel like you should be able to get much more consistent panel sizes, meaning you should be able to cut all the filler strips to exactly the same size and have everything fit, and while it seems like it should always be that way, what happens is once you start placing the filler pieces, you have a tendency to warp the grid slightly, not enough where it's noticeable, but enough where the pieces don't fit the same way and you have to spend more time fine-tuning them. everything fits and so far these grilles fit very well, it actually made putting the grill together a little difficult but at the same time it fits so well that I don't need to add glue nor can I try to take them apart. to add glue without breaking all the pieces, so I'm going to set them aside and work on the strips, but before I do that I want to quickly thank everyone who watches what the sponsor reads in these videos, as this is how I can keep the lights on here at Johnny builds and with that being said, here are a few words from the sponsor of this video who are looking for the Las Vegas experience but don't want to leave your house, enter the Golden Nugget online casino, did you know that Golden The casino online Nugget has a casino app where you can play all your favorite casino games right on your phone and the best part is that I'm teaming up with golden nugget online casino to tell you about an amazing offer they have going on right now , but First, let me tell you everything about the application.
Golden Nugget online casino is a real money online gambling app where you can play a variety of games including slots, blackjack, roulette and other live dealer games. You suggested I try blackjack in the last video and it has been my favorite game, you can safely and confidently play your favorite online casino games with one of the oldest casino brands in the US, where the Golden Nugget online casino is fully regulated and licensed to operate legally. Golden Nugget online casino is simple and easy to use. You can quickly browse through all available games and play right from your phone or tablet.
The Golden Nugget online casino offers exciting and rewarding promotions including limited-time offers, bonuses, loyalty programs and more, if you like the games you saw, download The Golden Nugget online casino app today. use my promo code Johnny builds and new customers who deposit a minimum of $5 will get $50 in casino credits thanks to Golden Nugget online Cino for sponsoring this video. I would like to fully acknowledge that while I am creating something that began 1300 or so years ago, there is nothing about the way I am putting this together in the traditional ball method. I mean, there's the fact that I'm cutting all of these strips on my table saw, but since I have about 800 pieces that I need to process for these two. panels I'm also going to use the disc sander to cut all the angles of the filler pieces and this will literally save me several days of work, but it feels a bit like cheating and as you'll see, the cost of taking this shortcut is all the skin I sanded off my knuckles while doing this.
I started having some ideas to create some sort of 3D printed jig to attach to the disc sander. I think I could make this process a little more streamlined, but I would mainly do it to protect my Knuckles from getting sanded while I was working and it was like when you accidentally bite your lip and your lip swells up and then you end up biting your lip 100 times more and it is like that. worse, imagine working on the disc sander and hitting the same spot on your knuckle that you've already skinned and I'm telling you, so if you decide to try this technique, I really want to warn you to be very careful.
To save a little more time, I'm going to place the GDs in the middle of the voids and put an I have all the grids together and the diagonals here and the last time I made kamiko I talked about how some of the kamiko craftsmen don't even use glue, everything fits together by friction and even though I'm not a craftsman. There is not a single stitch of glue in thisnowhere here next. I have to cut everything called the hinge pieces. There are 180 that I need to do since I'm going to use that disc sander jig. It's not as simple as if I was going to use the kamiko jigs where I'm sitting matching everyone up, but I think I've got it figured out and it should be a lot faster this way.
I'm trying to finish this project, so I'm going to do them on the disc sander, so I mentioned at the beginning of this video that I was going to try to elevate or improve this thousand year old plus design and although I don't know if I'm im
proving
it. I mean, I'll let you all be the judges at the end of the video, but I'd rather take that empty canvas that is the basic asanoha kamiko pattern and turn it into something completely different and here are a couple of examples of what I played with in my modeling software I went throughThere are several designs before choosing the right one, but there is really no limit to customizing a kamiko panel to your liking.I just looked online for inspiration. I found a lot of really interesting designs and patterns, but as I mentioned in previous videos. Sometimes the hardest thing is to avoid doing too much so I decided on these pieces that create a flower pattern and I could have put them everywhere but it would have been about 800 more pieces to add plus I'm really busy so here it is the final design I found and now it looks kind of basic, but I still have one more trick up my sleeve that will tie it to my last build, that Buffet cabinet I made for Katie and also, if you've done it.
If you haven't seen that video, be sure to check it out, as these two pieces go in the same dining room of our new house and create what is supposed to be, well, a matching set of sorts, anyway, you just need to watch that. video and then watch this one and then let me know what you think about how these two builds go together. I like to think that I learn from my mistakes and that's not always the case as I still do silly things all the time, but here I am gluing these tabs to help hold the parts on the CNC while I carve these flower pedal shapes to add them to the kamiko and this is one of those simple solutions where I feel a little silly for not having thought of it.
Before, I mean, I could have saved some expensive parts on the scene to avoid colliding with the screws I use to hold the parts together. Also, a viewer left a comment on my last video and talked about where the latest version of the Vectric software is located. which I use to create my G Code, there is an option to create exclusion zones in your workpiece and I am excited to know about it. I have not done it yet. I haven't downloaded the new software, but it will be very useful. for future builds but right now this board has about 300 of those flower petals that I need to carve and to avoid cutting the ABS out of 300 pieces I carved them about 3/4 inch across the panel and then I have to take that , to the band saw and cut them out to free up all those filler pieces and one of the main reasons I landed on this flower pedal shape is that I had a feeling that if I tried to embed full wedges I was imagining a slice of pie and if I tried to key it that way, the chance of them not fitting perfectly was around 99.9%, so by removing the bottom half of that wedge I'm basically making sure that these pieces fit together well since they are all angled properly. chopped up. the sides and I admit they weren't perfect, the space around that flower shape wasn't perfect but it was pretty close and I personally think that any variation of the pedals lends itself to the natural organic shape of a real flower or at least that is my excuse to make the technique sound better.
I haven't glued any other parts of the kamiko panel up to this point, but I know that if I don't glue these pieces they are going to float when I pour the epoxy and pouring the epoxy is the next step, so on the last Cho table I cut the panels in their I shape them to fit in the gaps of the slabs first and then pour the epoxy in the middle of the slabs with the kamiko inlay. instead and this worked but I broke a lot of pieces when I was cutting that shape with a jigsaw so this time I decided to change it and pour the epoxy first, basically create a big kamiko panel and then once that epoxy.
It's cured and locks all those pieces into place. I will be able to cut those panels into the proper shape to fit back into the gaps in the slab. I'm going to use full thick setting epoxy tinted with black India ink and the bubbles are My biggest concern is any pores so I'm brushing the epoxy up and around all the pieces to cover and seal every surface I can. I will make the base for this table with more walnut and here is a quick diagram. From the design I modeled now I wouldn't call this design Japanese joinery per se but it is somewhat inspired by Japanese tables I have seen and I will also be carving the asanoha pattern on the outer faces showing the legs will feature a Mor sentent wedge and a woodworking method that will hold the three base pieces together without the need for any type of mechanical fasteners and then I will carve those legs on the CNC, so I'm going to go ahead and glue them together beforehand and this way I can carve the shape in one go .
In hindsight I don't really think this was necessary on this piece as it would have been easy to glue them on afterwards, but this method will save me a bit of time so that's what I'm going to do, as I mentioned above that my sander Festival Rotex 3 inch was one of those expensive tools that I don't use that often, but I really love it when That brings me to another tool that I've rarely used, but this one cost me twice as much as that little sander did and It's this 3D scanner, but I feel like it's a good investment and so far all I've used is that scanner.
The goal is to scan the slabs for the two kamiko tables I'm building, so I can't say it's paid for itself yet, but I can imagine all kinds of uses for 3D scanning in my furniture, I don't know what. Those things are still there, but this is what I keep telling myself to continue justifying the fact that I basically bought a really cool toy and once that's done I can extract that 3D model that the scan creates in my modeling software and then use a drawing tool. called set point spline. I can draw the shape of the holes in these two slabs quite accurately.
I mean, it's not perfect, but it's close enough that you can't tell I've carved around the void of the slab. so it looks kind of organic and I'll show you here in a moment I'm first going to place the kamiko panel on the CNC to flatten out the excess epoxy and reveal the chiko pattern and this panel ended up at about 5/8 of an inch thick, so I need to go back and carve those slabs to make sure there is a 90° edge all the way around and remove enough material for the kamiko panel to fit vertically, but I don't trust myself or my accuracy.
So first I will carve the gaps into a sheet of plywood and then after carving it I can go back to the slabs and confirm that everything fits and then take the epoxy shaped slabs and everything back on the CNC and carve the pockets to ok those Kamal panels and the next carving is the most stressful carving of all. I mean, this is about a week of my life sitting at the CNC right here and one errant carve could cause the need to rebuild everything right, I know that would make this video have an interesting storytelling aspect.
I don't want to deal with that right now, especially on this piece with about 1,00 pieces making up the pattern and the kamiko grid and this turned out really pretty now that I cut it out. These offset inwards so they fit snugly into the gaps and any time you embed a shape as organic as this you need a little extra tolerance to fit and I was very cautious and actually carved these an inch narrower. that the voids they are filling and then they will be filled with the epoxy at the end. Now I'm going to epoxy them in place to prevent them from moving or floating before the next epoxy pour and this is where I can have a little fun with this design by adding the same koi fish design from that Buffet cabinet on the table.
Now on the buffet I used epoxy, but on this table I'm going to use carbs in The Recess for the koi fish and the idea. is to create something that looks like a couple of koi ponds in the gaps of those cookie slabs. I will add two koi in each void being careful to place them so that they look like they are swimming around the flower details on those kamiko panels that This required a bit of pre-planning, where I had to measure the locations where I wanted to embed the koi and then I got that model of the gaps in the slabs I made by scanning the table and with those measurements I can program the G-Code to carve those koi cutouts and when I make the koi I will make it with contrasting maple wood for the main body of the fish and then Purple Heart for the spots again.
I want to avoid the I need tabs, so I'm going to go overboard with some double sided tape here to hold them on and added a little Tolerance. I think I offset these pieces about 12 of an inch. I know that's a crazy number to shoot. but you know, hey, we don't use metric measurements anyway, this is another super organic shape where you need a little extra tolerance to fit, so I made them a little smaller and then this also creates a very thin gap. around each piece, so when you pour the epoxy, this will create a sort of subtle outline.
I'm going to use total vot high performance epoxy to lock them in place before the last round of epoxy pores and before I do those final pores that I need. to clean up a bunch of cracks on the top of the slabs and I'm going to use my Dremel with this little ball bit to fix this quickly so that when I get close to the end of this build I can start to see that initial. The vision came to life and I started thinking about where I started with this design and where I ended up and walking away from a project for 3 months is never ideal but that's what happened and this table is different so I want to say my designs are always evolving until the moment I start and throughout the time I'm building, it actually continues even after I'm done.
I mean, there's probably not a single thing I've built that I wouldn't modify now in some way and for me, this is actually a good thing, on the one hand, my initial designs are usually terrible and I don't believe for a second that I'm a master. designer. I mean, I'm definitely not. I'd say I'm passable at design at Best, but one of the biggest equalizers is time, so when I have extra time to iterate more and incorporate new ideas and get rid of ideas that I initially liked but then realized I didn't worked, I feel like this is the secret sauce to being able to design my pieces in a way that I'm ultimately happy with and none of this comes naturally or easy.
I mean, the more I build furniture, the more catalog I have to inform future design decisions, but I still have to look for inspiration. I need to see colors, materials, scale and texture and sometimes I get so inspired that I just want to build something that already exists and I say all this to explain my process to anyone who is ever thinking about getting into design, especially if you're like me. and you don't identify as an artist if you want to design but don't love your existing ideas, my suggestion is to simply put them on paper or, better yet, learn how to use modeling software like SketchUp and Shaper 3D. my favorite, but there are many out there.
I'm not loyal to any of them, but anyway get that first idea out of your head and it's important in my process to have something I can start working with, so in this case I poured epoxy around those two slabs with an idea I was vague about what I wanted this table to be and then had to put it aside while I tackled other projects and during that time I built my wife the buffet cabinet she was asking for. the last 4 years and while designing that buffet I needed something to elevate that piece so I came up with the idea of embedding and pouring epoxy to create koifish and when I went back to work on this piece I was able to take this new design element. something that was never supposed to be part of my original plan, but rather something that arose because I walked away.
I was able to take that element, incorporate it into this project and I think that was the final piece of the puzzle that this design needed and sometimes. I need to be reminded that it's all about trusting the process and at this point it's starting to sound a little cliché because I say it a lot and I sell products with that slogan, seriously go see my product, but it's exactly true and I want to expand that saying or maybe even add a new slogan that can coexist with the trust process and that is included in the representatives now.
None of this comes naturally to me, not carpentry, not design, not anything else that I left my day job to pursue full time. YouTube, so my little motivational poster in the classroom for this project is that no matter what you think you want to do or maybe you don't believe in yourself, put in the representatives even the most talented athlete or artist or actually, especially the most talented athlete, artist or any otherperson who is successful in life, everyone has to do repetitions. I mean, you never master anything the first time you try it, you have to do the repetition, you have to do it over and over in order. to master something so put in the reps and that's the end of the motivational speech part of this video and if you watch this far in the video comment this below and to reward the
viewers
who watch my stuff I'll pick a random comment in a week . to win a free Johnny builds t-shirt of your choice and keep in mind that any kind of creativity you use with the comment you leave will dramatically increase the completely random use of air quotes here, the totally random comet I choose so I've tried this cold cast brass twice.I did it once, I don't know, maybe four years ago and then I did it yesterday and both times I tried it I got horrible results, it looks green. What are we? Calling it vomit, dog poop, it doesn't look good, you know, the first time I made it I didn't use enough powder, so this time, according to the instructions for this powder, it's two parts epoxy and one part epoxy powder. brass. even more than that because the first time I made it I didn't put enough on it and the powder went all in and it looked terrible so this time I did one part epoxy and one part brass powder and it just didn't turn out right so to stop To solve this I went through a couple of different ideas, the first was to just screw it up, throw this in the trash and that's it.
I know how to just make a completely different base, but Andy actually had a really good idea and suggested we put this back on the CNC recarbco. The problem with that is that it's very difficult to get the CNC to line up with the existing carvings, but I'm going to do it. To get out to the CNC I'm going to carve into a pocket that the leg will fit into, that will give me a good working zero to start with and then I'll use a 3/16 inch bit to carve. U the new cutouts and then we'll just put black epoxy here, it's going to match the top better, probably what I should have done in the first place, but I tried to be cute and this is what happens Andy, I don't think that will ever happen I accidentally fixed something I wasn't trying to fix, but that's exactly what happened here.
You know, I was just removing the epoxy and, uh, sort of, planning more to remove the brass dust and what I think happened was kind. From what I was saying before, brass powder is heavy, so the first time I did this I didn't put enough and it sank well, even though I put much more than the recommended amount of brass powder in the epoxy. It was still sinking in me, so when I planned out probably about a quarter of an inch of what I removed from the Material, I didn't want to go that far, but I got to the actual metallic looking particles there and it looks really good and I'm going to leave it because It looks how I wanted it to look.
I wasn't trying to save it but I did. It's like someone needs to learn to trust the process if there was just a t-shirt or a firm right behind me yeah so it was a happy little accident it's not often I accidentally fix a bug but I'm going to move on next . I need to carve these shims on the CNC and I have very little, well basically no experience. cutting into deep mortises like this, so everything you see me doing, I'm doing what I've seen someone else do or I'm just improvising and the tricky part of this mortise is cutting at the right angle, which I just have to do .
Eyeball based on that line I drew on the side of the span and you'll also notice I started with my Japanese chisels but quickly realized they weren't the right tool for the job so I ran out to the store and bought a set . of mortising chisels, these now have a long, straight back to make cutting deep mortises like this easier and more precise. One more final detail on the legs. I'm going to make a two-tier plate to add to the top and bottom of the legs. Now these are just some walnut blocks that I cut into 5 and 6 squares and then added a round and then they are glued together and after I add a round to the legs I will attach them to the top and bottom. now at the bottom these will serve as extra wide feet to add some stability and then at the top these will serve as plates to hold the table.
It's been a few days since I poured the epoxy and it's cured enough to flatten. I remove the excess and this might be my favorite shot in this entire video here as I'm flattening and that part reveals the final pattern. I turn it over and flatten the bottom and this table will end up right at an inch and 3/4 thick and while it's on the CNC I'll go ahead and cut the final profile. Now this table ended up measuring 71 inches long by 28 inches wide, so it's a little small for a dining room table, but our dining room is a lot. smaller in the new house so this should fit nicely there, also 28 inches is on the narrow side for a dining table but again I think it will work for the space this table will live in, the flattened part leaves quite a rough surface and this required a lot of sanding and it's definitely time to fix my CNC, essentially to make sure the spindle is aligned with the table, but that's a problem for a future Johnny right now, I'm going to finish this table .
After flattening, there are a good number of small holes and cracks that I need to fill with epoxy. I'm going to add about 1/2 inch rounded to the top of the table and then do the final wet sanding, sand back. raised grain and then sand the bottom and finally I can add finish, which I'm going to use with the old reserve Rubio monot, so if you look at any of my recent builds, it's clear that I'm in the middle of a Japanese-inspired woodworking phase in my career as a creator and I will probably continue that for a while, as I said at the beginning.
I hold Japanese carpenters in the highest respect, so I feel like I'm learning a lot and im
proving
my skills by trying to incorporate them. his style and his techniques in my builds definitely let me know in the comments section what you think of my personal version of kamiko or maybe I should call her Koo anyway, tell me what you think, did I elevate a 1300 year old design or should I just leave it fairly good. I think it looks great, but let's find out what the boss thinks. Unfortunately, Katie couldn't make it to the store to see the table in person, so we're going to have to do this the same day. old fashioned FaceTime she's not responding there she's hello hello so I told everyone you can't come by the store so we're going to have to do this reveal on FaceTime are you ready to see your new table dining room?I'm ready, okay, here we go, let me turn you around, okay, oh wow, yeah, that's a beautiful kamiko fish, kamiko, just like I teased you at that table, uh, but then I added yeah, the koi fish to match the buffet, oh that's nice. Yeah, so there's a kamiko brass inlay on the base that's held together with these shims and there's actually no mechanical fasteners holding them together other than those shims, which is cool, that was very technical, there's your new table. dining room and I is beautiful. I'll bring it home probably in two or three months.
Every time I do it, it's not right. The wife seems to like it, but I really want to know what you think. Let me know in the comments below too if you want. You're not there yet, subscribe if you enjoy what you saw and remember, trust the process put into the representatives. I don't know what other kind of dumb motivational things I could say, wait and see you next time, hey Andy, speaking of putting in reps, what do you say? We do a couple of 12 O curls, sounds good to me, oh yeah, trust the process.
If you have any copyright issue, please Contact