People are cutting up their ugly window blinds for a brilliant new idea!
Mar 18, 2024I have a back door and a
window
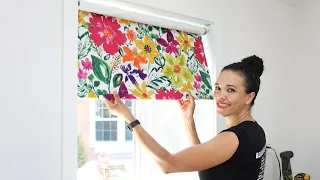
that I want to embellish, so I'm going to go ahead and take some measurements up and down and then I'm going to take the fabric of my choice and lay this fabric out. and I will measure it 27 in 3 inches wider than my door and mywindow
. I'm going to go ahead and make a line down the middle right at the mark there and then I'm going to go ahead and cut it with some scissors and then I'm going to continue down the line to make it even once I'm done.
I'm going to need some double-sided tape. This fabric tape is great because it is sticky on one end. I'm going to go ahead and put it on the side. from the fabric that I cut, I remove the paper, once I've removed it I can go ahead and just fold it and then I'll get rid of that bad edge that I got when I cut with an iron. I'm going to go ahead and make sure it sticks really well, but then I'm going to put a little more tape on it and peel it off because I want to fold it over one more time and give it a nice clean edge once I have it. all figured out, I'm going to go ahead and iron it one more time and then I'm going to grab some cordless mini
blinds
starting from the top.
More Interesting Facts About,
people are cutting up their ugly window blinds for a brilliant new idea...
I'm going to go ahead and extend them all the way down, now I have too many slats there, so what I want to do is remove the button at the bottom and I'm going to go ahead and cut this because I need that middle string once I have that cut, save that button, but pull the middle rope to the end, be careful not to lose the rope. Once I do that, I can go ahead and cut out the rest of these shadows, but I'll have to keep about five of the ones I put in. A safety pin at the bottom of that string that I saved and helps me push them all the way back in, just put about five of these slots in.

I'm going to go ahead and go back to the bottom, push the cable right there and then. I'm going to put that button back on but I need to tie some knots once I know it's not going to slide off and I'm going to use my finger and push it back in once it does I can move on. and glue the top rail of the mini blind to the fabric you can use fabric glue or in this case I use a little bit of hot glue and I used a lot once I attached it it will look great then I'm going to head over. all the way down and put it back on using a lot of hot glue, go ahead and let it down, hold it in place for about a minute, then I'm going to take those ribbons, five of them and I'm going to go.

Go ahead and place them in place evenly and spread them up and down once you do it's time to put some glue on them too again you can use hot glue or fabric glue once you put it on I'm just going to Flip it over and leave it there, it will set up in about a minute, do that on each of your leftover slats, make sure you don't touch the wire with anything once you put it in and place it there. It's time to go ahead and attach the brackets that come with the mini blind to the door right above the window, once it's attached and secure I'm going to take that mini blind and put it in place and indeed it turned out really good.
Check out this roman blind I made, you can go ahead and pull it back down, it's cordless and once you pull it all the way down it stays in place. I think it turned out amazing, it looks good down or up. I hope this inspires you. You can make your own DIY Roman shades. Thanks for today's project. I wanted to surprise my wife and get rid of this boring bathroom. I didn't want to use a traditional curtain rod so I wanted something different. She measured the window and took a 1x6. piece of board that was 4T long and I started sanding it a little.
The next step was to go ahead and put some dye on it. Many
people
use a brush when dyeing. I like to take a towel or rag and just wipe it on there, take all the dark spots and wipe it on each side of the board. The next step was to place the hardware on the board that would hold it against the wall. He wanted to make sure the board was flat. and not sticking out like normal hooks or hardware, so this hardware right here goes ahead and marks it on the back of the board and what we're going to do is drill it to allow the screws in the walls to sit flat inside the board and keep it sign once, you need to drill it, go ahead and remove the sawdust and go ahead and install the hardware using the screw that comes with it.All that is needed on a board like this is to place two on each end now. You want to see a good way to hang this and level it every time, take a level, put a piece of tape on top, lay it flat right where the hooks are and then what you're going to do is measure and mark right on each hook. Once you do that, go ahead and grab the level, set it aside and we'll use it a little bit later. Next, we need to place our hooks. I went ahead with the black decorative hook, measuring and marking the same distance between each hook dividing the board.
These marks here are where you will place the hooks and we want to make sure to pre-drill each of these holes. I'm a big fan of pre-piercing. it keeps the boards from splitting so once you've drilled those first few holes go ahead and attach the hook, use the screws provided because they are the same color as the hook and go ahead and attach it. This with each and every hole and usually these hooks have two screws, make sure you install both. Now remember the level at which we put it against the wall and mark the place where you marked on the tape and then you will continue. and put screws into the wall in those two sections, this is different, although you don't want the screw to be flush with the wall, make sure it sticks out a little bit, then take the board and you will slide it into the drill hole.
The amazing thing about this is that you won't see any screws going through the board and look how tight and secure it is, double check the level, the next step is to grab some clip rings that This way there is no seam or anything, just It hooks directly to the curtain, clips to both depending on how you want it and simply hangs over the hook. Now I moved from the boring bathroom to the curtains I put up and then the last step. is to go ahead and decorate the rest of the bathroom, doesn't it look amazing?
This took no time at all and was easy to do. I hope you like the look of this project, we had fun making it and check out what I found at the dollar store that is going to completely upgrade my builder grade
blinds
without replacing them so I have the burlap ready to go once it's out of the package , all I want to do is get rid of the wrinkles, so I'm just going to iron them on low heat. Warm up before continuing now that the burlap is nice and soft. I want to finish the edges.I don't have to worry about the two long edges because they are already finished. I just need to do the side edges to do it. I'm going to use my low heat glue gun and just put a thin bead of glue along the edge and then fold the burlap over. I only need to fold it in about an inch or two, just enough to catch all the loose edges now that it's done. To do this, I want to make a pocket for the curtain rod to go through and I'm going to use my glue gun again.
I'm going to fold the top edge about two or 2 and 1/2 inches and then glue it down. down, this will create a nice gap through which I can slide the rod. I'm going to do this along the entire length of the burlap until I reach the other end with all the edges finished, it's time to attach the burlap. on the rod, I'm going to remove the end of the rod to make it easier and then just slide the rod through the space I created at the top of the burlap. I made sure to put the seams on the back so you can't see them with the burlap on.
I will reattach the end of the curtain rod to finish the look of my faux blinds. I'm going to measure two pieces of twine. I want the string to be double. width of the burlap and then I'm going to add a little bit more because I'm going to need that to tie later, all that's left to do now with my faux blinds is scrunch them up and tie the thread that's going to create a beautiful look that I love , I'll do the same with the other piece of twine and then I'll be done. How pretty are these faux burlap blinds.
They make my Builder quality blinds look so much better and they're only $5 I hope. This has also inspired you to upgrade your blinds. Thank you very much for watching the home talk. See you next time.
If you have any copyright issue, please Contact