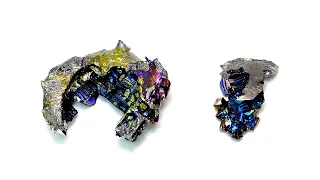
Making Prussian Blue
Mar 06, 2024For this project I will make Prussian
blue
, which was one of the first modern synthetic pigments. It is sometimes also known structurally as Berlinblue
or Parisian blue. It is made from a mixture of iron in its two oxidation states: iron two+ and iron three. -In addition, the iron two ion is coordinated with six cyanide groups and then three of these groups are associated with four iron ions three more, although it contains cyanide, it is generally not very toxic because the groups are closely bonded to the simpler iron . The use of Prussian blue is simply as a pigment in things like paint and ink.
However, its use is more complicated in a process called cyanotyping, where it can be used to develop images on paper. That's how most of the plans were made and that's why they were converted. blue, can be used to develop almost any image and I think the whole process is really cool. Another potentially surprising use is as a medicine, apparently it is quite good at sequestering certain heavy metal poisons in the digestive tract and can prevent much of this from entering the bloodstream. This video will be the first in a series of three and for this one I will focus on creating and isolating the pigment in the next two, although I will dive into everything. cyanotyping process, the most common way to make Prussian blue is to mix a ferrocyanide salt with a triple iron salt such as ferric chloride.

More Interesting Facts About,
making prussian blue...
I wanted to make the ferrocyanide myself, but as far as I know, there is no easy way to do it. do it so I ended up buying some on eBay if you have what you think is a decent method, although you should definitely let me know in the comments. I can make ferric chloride using steel wool with hydrochloric acid and hydrogen peroxide, the acid in the steel wool is easy to find at the local hardware store and the peroxide is only from the pharmacy. To start, I added two hundred and twenty-five thousandths of water followed by an equal amount of concentrated hydrochloric acid.

I mixed it for about thirty seconds and then added a few small pieces of steel wool in total. I'll add 50 grams, but I wanted to start slowly just to make sure the bubbling didn't get out of control. What is happening here is a reaction. between iron and steel wool and hydrochloric acid to convert iron into chloride, also known as ferrous chloride, and hydrogen gas, hydrogen gas is the reason for all the bubbling and poses a fire and explosion risk during this reaction , a decent amount of is going to be generated, so it's important to do it in a well-ventilated area where it can't build up.

The reaction seemed to behave quite well and didn't seem like it was going to get out of control, so I just threw it into the rest of the steel wall, my time lapse lasted the next nine hours with occasional mixing and most of it disappeared. The green color of the solution was due to the ferrous chloride, but as it progressed, as far as I know, it started to turn black. This is mainly carbon, but there are probably other impurities because steel wool is not a very high quality steel. After nine hours, I stopped the time lapse and let it sit overnight;
By the next day, the carbon and other impurities had sunk away. at the bottom but there was still a wall of undissolved steel floating at the top, in theory I could have added more acid to dissolve it and stirred it for something like a day, but from the amount that was present here I really didn't think it was So. It was worth it, the next step was to get rid of all this undissolved junk and I did this by simply running it through some coffee filters. It took a while, but I finally had this nice crystalline iron solution to chlorinate this iron ii chloride.
It was then oxidized to 3-iron chloride using hydrogen peroxide. In theory it is also possible to oxidize it by simply bubbling air through it, but as far as I know that process is somewhat slow and this method is much faster the moment you add this yellowish brown color. A color appeared that was iron chloride 3 in total. I added 550 mils of 3% peroxide, mixed it well, and then poured it into a large dish. I installed a fan outside the screen and let it evaporate for a couple of days and then started. Scraping it off the plate even though it was still a little wet was actually a big pain, but when I finally removed it all, I let the loose pieces dry for another day, so in total this whole drying process also took about three days, but that's only because I let it air dry.
I could have sped it up a bit if I had put it in my oven. The final yield was 214 grams of iron 3 chloride hexahydrate, meaning that each iron 3 chloride has 6 water molecules associated with it. I transferred everything into a nice plastic container and was ready to make the Prussian blue. The first step was to remake an iron 3 chloride solution, so in this glass I added 37 grams and then filled it with water to about 50 ml. Mark, in theory, if I were even lazier than I currently am, I could have directly used the solution from before and skipped the entire evaporation step.
However, the main reason I didn't do that was because I didn't know what the exact concentration was. of iron chloride 3 was and I also wanted to have an adequate dry reserve anyway. I let it stir for about 20 minutes, but there was still some solid stuff that didn't dissolve so I could get rid of it. I tried doing a gravity filtration. but it was too slow, so I set it up for vacuum filtration, which left me with a really nice, dark solution. I poured it all into a small glass and went on to prepare the second solution I needed this time.
I added 13.9 grams of potassium ferrocyanide and filled it back up to about the 50 mil mark. I let it serve for a few minutes and it cleared up for the most part, but there were still some things undissolved, so I added a little more water and let it stir for a while. a little more and when it was crystal clear I took it out of the stirring plate. I also took out the stir bar and at this point I was ready to make the pigment. I normally poured the iron chloride solution directly into this, but instead I added it.
I did it drop by drop because I thought it would look cool. The moment it was added, it immediately formed little greenish-blue donuts of insoluble Prussian blue. . It also produced potassium chloride as a by-product, but that simply dissolved into the solution from the top of each drop. It looked like he was
making
little jellyfish and I thought it was kind of fun. I continued to play with them for a bit, but when I finally got bored, I just poured the rest out. I stirred it for a few minutes and it became so much Prussian blue that it became quite thick to separate.I just used the coffee filter, poured and scraped as much as I could and then washed the glass with a little water when most of the water had filtered out, adding a little more just to wash it down. Because this reaction used an excess of iron chloride, the first few washes were stained with this yellow color. I kept washing it until it was a greenish blue, which I think took four rounds. I let it sit here for a few hours and then put it on. on a paper towel to dry, it was important not to let it dry completely, otherwise it would have stuck to the paper while it was still wet.
It was very easy to remove and I transferred everything to a glass dish. I put it in my Bake for several hours and finally had some nice dry Prussian blue left, then I put it all in my mortar and pestle and crushed it as best I could. My final yield of Prussian blue was 17.7 grams. I really wanted to do it. a little bit of paint, but at that time the grain size was still too big, it needed to be a very fine powder, so I put it in my coffee grinder, ground it on and off for several minutes and when I took the lid off there was already a little really nice blue powder.
I threw it all away and honestly it still wasn't as good as I would have liked, but it was more than enough. There were many different types of painting I could have done, but I thought. the easiest was just oil paint. I went to my local art supply store and this was all I bought. I bought some brushes, watercolor paper, a knife, some gesso, and some linseed oil before I started, though I just want to give a disclaimer and say. I don't really know much about art or oil painting and everything I learned was just from some random tutorials.
What I'm doing here is mostly just for fun and really shouldn't be used as a reference. I also try not to be. too hard on my technique and other things in theory for oil painting, any paper can be used, but apparently the heavy acid-free stuff works quite well regardless of paper or surface, although it's a good idea to treat it with something like gesso first, which is basically just a paint primer to do this, it's actually pretty easy. I taped the piece of paper I wanted to use and covered it with a generous amount of gesso.
When I felt like I had done a decent job, I let it dry for a few minutes. minutes later, on top of it, I quickly gave it a second coat, although the paper slowly started to warp, so when I tried it by touch, I lifted up some of the tape and did my best to press it down, then left it for the duration. night and removed it. duct tape in the morning and it was good to get off the screen. I prepared two more sheets like this for a total of three. Now to make the paint, the pigment only needed to be mixed with a small amount of linseed oil.
This is one. One of the easiest ways to do it and many oil paints are just a straight combination of oil and pigment from what I saw online. There is a whole proper technique for mixing paint by hand, but I thought it was easier to use a mortar and pestle. and mortar, seems to work pretty well on a small scale, but if you want to make more than the small amount I did here, I don't really recommend it. I added about 2 grams of Prussian blue and then poured some. linseed oil I mixed it in and it seemed like there wasn't enough oil so I added a little more unfortunately although I added too much and had to balance it with more pigment, the final consistency of the paint depends a lot on preference. of the artist and stopped when I felt it was thick enough to remove from the mortar.
I just scooped it out with my finger and scraped it into a small glass. I plan to use it all right away, so that was fine, but I did want to save it. I would have sealed it in a paint tube to test my amazing paint. I decided to draw some chemical structures. This was literally my first time doing any kind of oil painting, so it was a disaster. For fun, I think in the comments you should try to identify the molecules here. Also feel free to point out any mistakes I made because I almost definitely did.
Anyway, when I was done, I let it dry for a couple of days and that was it. the final result scanned, the certain success of my first attempt gave me false confidence that I needed to freestyle to be fair. I made it in less than a minute, but it was still extremely disappointing and felt like something from two years ago. I would clearly not have the skills to work without structure, so I knew I had to follow one tutorial to the next. A friend suggested a butterfly, so I followed a step-by-step guide on how to draw one.
I finished. I left it halfway through because it started to get too detailed and difficult for me, but it still turned out much better than I expected. I went on to paint it and this time I diluted some of the paint with a small amount of turpentine on the previous one. I tried to make it a little thick and felt like it might be easier if it was thinned out a little. However, I left the top part of the paint undiluted so I could use a mixture of both. I originally planned to try to make the butterfly. detailed but I ended up just coloring it all in when I was done, I let it dry for a couple of days and then scanned it anyway, this is basically how Prussian blue pigment is made and how it can be used in paint to make blue prints through the The process is quite different and in my opinion really interesting, instead of producing and isolating the pigment, it is formed directly on the paper.
It is also a light sensitive process that uses different chemicals. It uses potassium ferrocyanide instead of ferrocyanide and a light sensitive iron compound as with In this project I just bought the ferrocyanide, but I made the new iron chemical myself. There really wasn't much information available and I ended up just following a random old document which, luckily, to my surprise, actually worked very well and that's what we'll be covering in the next video. I really hope to have it posted within the next week, so definitely stay tuned as always. A great message to all my followers on Patreon.
Everyone who supports me can watch my videos at least 24 hours before posting them on YouTube. Also, everyone on Patreon can message me directly and if you support me with $5 or more you will receive your name at the end, as seen here,as a final announcement. My good friend just released the first album of his if you like rap you should definitely check it out and show it some love.
If you have any copyright issue, please Contact