Making A Silver Smoke Custom Pool Cue With Carbon Fiber Shaft (4k)
Jun 10, 2021Hi guys, how do you do? Today I want to show you how to make a two-color
pool
cue with acarbon
fiber
shaft
. Now, this is very similar to the redpool
cue I used before in terms of the techniques I'm using to throw the colors and everything, but with this one I'm going to use two separate colors instead of just one red color. I chose acarbon
silver
and an OEM black from KP pigments and used some boat epoxy and use the same. Old technique like the one I did on the cue rig, the big difference here is that during two color pouring, what you can't see on the other end of the mold is actually a wedge to hold the mold at an angle to make itsilver
epoxy is formed. up more on one end just so that when I poured it I could get a more differential color along the butt section.
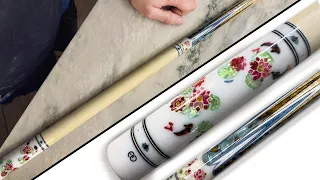
I was really hoping that where the colors met they would blend together, so I tried to blend them together as best I could. You could pour a little more of each color up and down the scene where the two colors meet. I didn't want a perfectly hard line. I wanted a really cool combined effect. I guess you would call it that after filling the mold. I put it. my pressure chamber now this is something I will make a video about later. This pressure chamber is a four inch PVC pressure chamber and I've gotten a lot of questions about it, but it does a really good job, but pressurizing and longer banks like this that something like my Harbor Freight pressure chamber can't hold.

More Interesting Facts About,
making a silver smoke custom pool cue with carbon fiber shaft 4k...
I'll let the epoxy cure overnight in the chamber just to make sure there aren't any issues as far as bubbles or anything like that inside the epoxy and then removing the mold and blank from the chamber, I was really excited to be able to rotating this just because the colors look like they're going to look really cool, but the first thing I have to do is remove the ends of the mold that I designed. These molds are virtually disposable, made from quarter-inch plywood, and are not designed to be reused. I designed them with an eye toward removing the bench as easily as possible so the circular saw and chisel will do a very good job. especially when you cover the inside of each mold piece with packing tape, releasing the bench is pretty easy, the top of the blank was a little high which is normal in this process, so I used the band saw to square the bench and then mark the center with the corner to corner technique and after that one thing I really like to do is remove the corners of the blank square, in my opinion it makes turning it into a rough cylinder a lot easier, breaks and breaks much less. especially with epoxy and if you're using carbide tools on these corners, that will cause the epoxy to chip on the lathe and this is a really easy process just using an angle with the base of the band saw and just cutting the corners.

It's not difficult at all and well worth the effort. After mounting the blank on the lathe, it was time to start turning it into a rough cylinder. Now I'll be honest, turning these epoxy benches this way, especially the longer blanks on the lathe just takes a long time, this is not a process that can be rushed and to be able to start building things like the cone and installing the bonding pen, you really need it to be a really nice cylinder and not really square. What I do is I like to use a steady wrist to hold the bench.

Why install the joint pen and then turn the joint pen as the center so it's much easier, but again you have to get to a nice smooth cylinder along the length? of the bike, I found it easier to use a square carbide tool and move sideways super slowly, just removing small amounts at a time and working my way along the blank before using fairly coarse grit sandpaper to soften it. Install the joint pen and this cue is like the red cue. I started with smaller bits and worked my way up and then tapped the hole before putting the epoxy in the pen and letting it cure overnight for this dowel.
When installing a bike lane and the color of the joints, you're not going to get a stop color or anything, so this is the only one we have to install this way, but I like to use a set of calipers and mark the length of the color and then have another caliper set to get the width or diameter you need to install the collar at the end of the dowel and just take your time and slowly cut to this depth. I like to make a smaller cut to almost the final depth and then use that as a gauge to cut the rest of the gasket collar length after that, there is a smaller secondary lip on these gasket colors so I use the gauges again to mark this distance and then I cut it to the height I need.
To install the gasket booth, I tried to get this dowel to the size where the gasket caps would be very tight, but it only has a little bit of room, since when I epoxy it in place, I don't want to put pressure on it. all epoxy. I want so much. clamping force to add a lot of strength to the tail joint after cutting the tenon to size I apply some black tinted epoxy and this is just so that once the butt cap is in place they won't show notable seams. in case there is any, but with proper installation there really shouldn't be anything visible.
I let the epoxy dry overnight before leaving the next day and start working on building the cone on the hub, this is where you will get the pool cue shape on the butt that is a little bigger on the bottom and is gently tapered to the final size at the joint section which aligns with the outer diameter of the
shaft
. I also have a set of calipers. I set the outer diameter of the shaft that will be for this dowel just to make sure I don't go too far into the joint section. I would rather have to sand a little more material to accidentally remove too much after getting the joint section cut down to a rough taper and rough diameter.I went ahead and started shaping the butt of the cue. I didn't want to completely remove this excess at the end of the tip just because it made it easier to hold. the long blank that was turning on the lathe another idea to help correct the taper is to go certain distances along the cylinder head section and mark a different depth and cut it at that depth but you have to be very careful with This is because if you mark the wrong depth further down on the cube it will affect the overall shape, take your time and slowly cut things out, epoxy and wood are not something that cuts super fast and in the center of the glue it will actually It will flex a little. and it bounces around on your lathe too if you're not watching what you're doing, so make very, very light cuts and don't rush anything once the taper has been ground into the blank.
I went ahead and removed the excess material you saw earlier. and prepared to install the white bolt and rubber bumper to the end of the cleat. Now these steps are like with the red cue. A video, if you haven't seen it, I'll link to it in the description, but it's pretty much the same as installing the joint pen, the only difference is that you're adding a much larger hole at a shallower depth to allow you to attach a bumper. of pressure rubber and this is to prevent the pool cue from hitting the floor in the pool room or wherever you touch it and damaging the end of the cue, this is also where you will prepare to install the last bolt and this goes as far as Whoever has the cue can remove some weight from the back and add a heavier weight bolt or lighten the weight bolt to adjust the weight to their liking.
My camera died during the late bolt threading process. If you're interested in that, go back and take a look at the red pool cue video. and will explain it a little more in depth with the white bolt and bumper installed. I started with one hundred and twenty grit sandpaper and worked my way up to one thousand grit before using some star bonding adhesives, fine CA glue to apply the final finish. To finish, I use a rag to spread the thin CA glue along the tail. Now what you do is you apply a super thin coat and you simply apply several coats with the activator sprayed on the CA glue between each coat once you've built up enough. layers, allows you to sand the top layers to a glass-like finish.
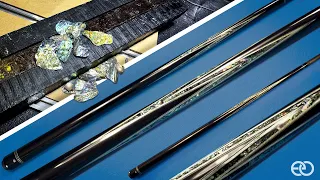
When this was finished it was absolutely beautiful and smooth, but I went through this process about four or five times with the CA glue before touching it with any sandpaper or micro mesh. One thing to keep in mind is that the more coats of segal you put on the deeper finishes, the more wet it will look once you sand and polish it with more coats, but I didn't want to do that either. I made too many because I really like this effect it has with the chatoyancy of the silver and the flicker of all the pearls in the pigments that were used for this glue after all the layers of CA glue were applied.
I started with 1500 grit and worked my way all the way to twelve thousand grit micromesh wet sanding, all glue with each pad. The reason I said this is that you don't want to add any scratches to the clear coat, so this helps remove any residue from the sanding pads one time. I finished sanding. I used some Turner Ultra Shine Wax and buffed the tail to a really high shine. Now this wax is heat activated, so turn the lathe up to a slightly higher speed and apply a decently firm texture. pressure, but be careful while you're doing this because if the rag sticks together it will either pull it out of your hand or put your hand into the lathe guys I hope you enjoyed the video and I hope you liked the glue.
I'm super happy with that. As you can see, this is a little raw just because I'm still here to cool it all down and I'm going to play some more. I love playing. This
custom
axle. This carbonfiber
shaft works great. It is not sponsored. video of them I thought people would want to see it because it was a new chef that I had never seen before, so to use one and play with it a little bit, I just opened my eyes and saw its really low deviation in place, well, that being said . the Q build was really good.I'm really happy with how the colors turned out as you hear everyone is
making
noise and in the background but here it was a lot of funmaking
this sign to cover up it was amazing the silver looks likesmoke
so I hope you enjoyed it and let me know What do you think of the construction in the comments. Let me know what colors you think should be in that XQ or if you'd like to see them in a certain style or color or something. Also, you can read the article and maybe get some more detailed ideas on how I did some of these processes on the website.I'll leave the link in the description and also make sure to follow me on Instagram and Facebook and I'll leave links in the description for that too, so guys, I'm going to play some more and practice. I'm eating it right now, so I'll see you later.
If you have any copyright issue, please Contact