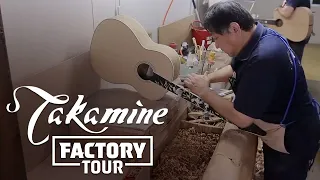
Makin Music - Taylor Guitars Factory Tour
Feb 27, 2020you are welcome to make
music
my name is Danny and I will be your host this week we are going on a road trip to southern California El Cajon to the Taylor guitarfactory
for a greattour
come with us I am here with Chris Whelan the production manager for Taylorguitars
in El Cajon, California, and we're in the milling production room right now, can you tell us a little bit about this machine? Sure what we have here to start with is a time saving sander, it's a three head sander and we're going to use a sander to sand our tops, backs and sides to a final thickness as you can see here just hand over the top , will clean one side and then we'll remove the rest of the back. from the top to the nominal thickness we are in the Fort Knox lumber room this is this room is full of things that are being prepared what we are looking at here is this shelf behind us is full of sets of different varieties of lumber that we have fabric Call a rosewood and walnut koa so pale.
All of these sets are already paired, sorted and prepared. Each of the sets has a match number at this point before it is introduced into production, so at this point everything is matched and belongs to each other. They are attached from this point on, so these are the hooks, these are the side bodies, this is the back Coran, they match, so this is the correct number three and this is Hawaiian koa, yes, it is a beautiful piece of wood, so what Look, here is another set of limited match numbers of walnut ready to go into production, as I was saying before all these sets were matched, ready to be put into production at this point and ready for the laser machine , yes sir and this is Henry and he is cutting sides for the bodies at this point the laser is profiling the sides to the correct shape once they are cut to shape he will bend them in the side bender and you will see that later in the segment now why the laser is the one that gives you the most precise cut.

More Interesting Facts About,
makin music taylor guitars factory tour...
The most precise cut and it's very fast as you can see what we're going to do is have Henry take them out and show us a profiled size as well so he's removing the picture frame or the wasted wood there and these are the profiled ones. size with laser cuffs great piece of wood very nice thank you Henry. I'm with Michelle, who is doing the rosette inlays. What Michelle is doing now is fitting each profile by hand, so she will trim the fit of that joint by hand. She'll come back, she'll add the ribbons to the inside of the rosette and then she'll close the circle and install the abalone on that rosette as well before gluing it into place, as she can see there's a lot of handwork here to start now. adding the abalone that will hold the slats in place while she circles around that rosette, once you're done installing this abalone she'll come back with a sign of acrylate glue and glue them in place, let me go here, we're inside leaning in to Look at Nick, he's going to load the set of sides into the bender placing it on the tabs to locate the points, he's going to lift the waist here, he's actually going to make this start to bend, as you can see here, we're. bend the top and bottom at the same time, what's unique about these suppliers is that they are built in-house, Taylor
guitars
are automated, as you can see, this plate here is heated, what it's doing there is loading the next set sides in and it's going to prebend the waist on that set and I feel very hot coming up very hot here we're about 280 degrees on the surface and we're bending this here we have just a sheet metal skin here on the outside and these pistons are loaded with air with pressure, so it stays tight constantly once it is folded, it will be full and it will be slightly over the container, as you can see from the shape here, it will hold it. pulse for about three minutes and then once it's done, go ahead and take this out, lower the waist down and place it on a cooling rack.
Kevin matches this cut, he's trimming the ends and actually applying glue to the back of the cut check the surface, make sure there's blue coverage on everything that's actually going to fit right on the heel block and start bending this guitar while you're holding that cutaway, you're manipulating around those curves, the top there as you're working there, you can see it's installing those cutaway clips, he's coming over there and into the waves, so again you're spitting that piece there guiding it with this hand holding it in place and he'll finish this side and then repeat the process on the other side. now I see we are adopting body bracing, we have three separate areas set up, they are bracing the top and back with jigs, as you can see there is a plexiglass jig there, Juliet is installing the stiffeners on the top of the guitar, is installing the fan braces. now when you see, you're going to pull this vacuum, pull the vacuum on top, the caps on a 35 foot radius plate for the caps, it's there and have Seaver pull the vacuum down, that's going to keep the straps in place and will actually suck them down and glue them together.

Leave them in place and they will be under pressure for 20 minutes. When it comes out, we will clean up the glue, excess glue and prepare it to build a guitar. Damn, what you see here is that we are preparing. to assemble a body you are applying glue to the surface it will come out spread the glue you will come back here to Ragman you are going to love this on the press line up the back and the sides make sure the glue joints make I made sure everything is in the center. I was going to go back and he'll install the top back
makin
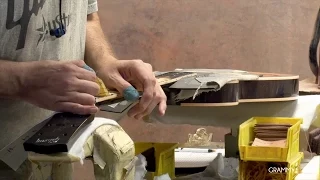
g sure it's in the center in the right place.He now he is adding a cosplay with the correct radius ready for the next body after the inspector. This has been Benavente. body department supervisor is looking for this guitar adds glue to the slot is going around the bottom edge are up to the tail strip while working his binding is pushing and squeezing all the glue is squeezing it hard is going to go back and tape it to check the fit,
makin
g sure everything is seated correctly and now we'll just continue with some tape to hold it in place and let it dry overnight. This blue we're using here in yellow aliphatic residence suits. 24 hour care time again, he's going to pull that bandage up to your waist, remove the excess glue, and tape it to you.We're in the paint booth right now, tell us what's going on here. Yes, we were lucky to have caught this. The guitar is getting ready to put the tobacco sunburst rate on it, so what you're seeing, he's going to get the guitar ready, he's going to make sure there's no dirt on it, he's actually going to start shading and spraying color tobacco on the guitar. Now I notice the blue border. around the sides is the blue tape, blue tape, yeah, and that's just protecting the bindings and it's there, right, that's the detail, it's protecting the binding, so we go back and do our cleaning job, all the details they work on the bindings, it's much easier to remove that. tape and then clean and scrape down to the detailed lines.
Now this is incredible. Sinkin sees that he is establishing an initial sunburst. This is done in several stages. He will add the first color. Now make sure it's dark enough, the right color and everything. hand made so it looks hand made each guitar is unique special color it is hand made so you won't get one that is identical to the next beautiful break up thank you so here we are Dan , we are in Robo. spray spray bot we're getting ready to spray some UV finish on this guitar. This process may seem pretty simple right now, but what we have is we have a guitar that is electrically charged and we have a finish that is electrically charged, if you've ever done that.
I've seen some powder coating on metals or something like that. This is done the same way we are adding finish. It adheres to the guitar as it moves under the head and you can see that the overspray is minimal. We don't have a lot of overspray. flows past the guitar once we're done covering the top and the back, then we'll cover the sides of the guitar, what we'll do is go around the other side of the paint booth and check the guitar comes out and goes through a Yumi oven so the finish cures in seconds. Great, it's an amazing process, so what we're looking at here is a robot.
We'll finish with the next guitar and load it. on the handle there and turn as you can see on our left here we have guitars that are already on a shelf waiting to be cured and how long does the curing take? Curing will take approximately 13 seconds for the first time. and that will give it a final attack coat, it will cure and then we will run it through another series of two or three times through the uvm and to fully cure the finish, so the next guitar is about to leave it here, so These guitars fell over we're going to take them off the rack it's just going to go to this rack and hang up which will allow some of the solvent to escape while we wait as you can see on your left we have a new car that just came out of the oven we're ready to put another Does that mean the oven cook actually cooked the finish?
Yes, oven ovens are a little tricky. What cures the finish? It's actually ultraviolet light, so it's not heat. its life is actually damaging the wood of the guitar and the finish itself, that oven, so to speak, has temperature and humidity control as well, so we keep the temperature low in there, but you can see the guitar spinning inside of there . it's spinning in front of the UV light just curing the finish, so that finish is cured. Now we try to make the time longer than playing the guitars so they dry and we will continue this process with the other guitars that come out of the robot and also go into the oven I see we have a container in e5 bodies with some amazing pieces of wood, yeah , these are beautiful covers.
We're doing a lot of custom order type things here. Here we have a t5 quilted maple top with amber tint. really beautiful deep quilt amazing piece of wood cute lid this isn't even polished yet so it's just rubbed off yeah it's shiny it's going to be beautiful another awesome lid here's this cocobolo lid with SAP wood SAP wood on the board SAP wood in the outer corners also just a beautiful wooden set that definitely has a wow factor that matches the tin, more varieties of cocobolo. Looks like we're polishing a batch of t5 bodies at the moment, yes we have two loaded here. the paddle is getting ready to be polished and we have one that's being polished right now, as you can see, the automated buffer actually goes in there, does its job, improves around the horn that cuts and inside the cut Smurf back there.
So the computer puts a sequence that this thing goes through to polish it a certain correct way, so each model, each body size, has its own program built into the monitor, so right now it's in a t5 polishing program. When you switch to acoustic bodies, we will load the correct program for the body shape, whether it's a GA or a GC or jumbo like that, as easy as flipping a little switch and going to t5 or dreadnought or active or 48 or program for you to pull open the program you want to run and enter that program start it and you can do it quickly oh that's great we are in the ES system pickup complaint area where they are actually complaining about pickup on the premise of what it was . what she's doing here is, uh, she's winding the neck there, she's actually going to solder the wires, add some flux, you're soldering those wires to the actual pickup, what you see in front of the truth right now is a pickup that she's actually winding in front of What you can see is that she's now wound all the copper wire here around the coil, we've glued the magnets in place and she's gone back and run the copper wire through these contacts of lead, the eyelets and soldered them in place. looking at the body sensors is what they use for their electronic pills, okay, what you see Leo doing here is he's loading these sensors into jigs that we've made here at home and he's illuminating them getting them ready to install ferrofluid in there, it's loading . in the ferrofluid now you can see it filling up there and what does this fluid do?
The fluids that actually suspend the magnet inside the sensor allow it to vibrate and move inside the sensor. What you see Leo doing now is adding the adhesive there. which is an adhesive cured with ultraviolet light. He is now ready to install the foot or cap on these sensors. He is now installing them in the UV oven. They will be subjected to ultraviolet light and that will cure the glue on the cap that we are on the neck. room and it is very noisy, tell us about this Chris,what we have here is the first process of the neck scale, the next joint, we have the peg head stuck on the heel, ready to be glued.
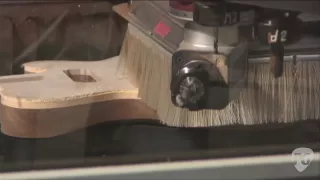
We're going to follow these below through some processes here. and I'm going to show you the fingerboards that are being made, the pigs head veneers that are being made will also take you through the final stages of neck threading, neck carving and sanding, so let's take a look, Alright. Go right now Chris you could tell me what the name of this machine is probably ten times and I won't remember it so tell me again about this manufacturer this machine suits everyone and it is a computer numerical controlled machine that is easy for you . It's easy for me to say that basically what we are doing is passing lines of information through the machine telling it where to cut and what to cut right now.
Through the process of putting the guitar in the pocket and trimming the neck blade ready for the assembly. I can see this almost done right here yeah this one is almost done and I'll walk you through the next one in the next oh cool let's take a look at that let's go to this point we load the guitar into a CNC machine into a handheld now we'll start looking at how the pocket is cut now we'll start cutting out the heel area of the guitar This point will go in and cut out the headstock area and then do the final detail with a smaller more detailed cutter.
At this point we are cutting out an area to fit the wedge allowing us to set the angle of the neck which concludes this process at At this stage and we are with Lindsay of the final assembly, here we have Lindsay, she is preparing to add the collar to the body, you just installed the collar in the pocket that will tighten the heel and now you will come and install the paddle bolt. so she is quoting the angle of the neck making sure it is at the correct height against the bridge, so there are quite a few steps at this point, a lot of steps as you watch you place the saddle on the bridge, now she is cutting the height of the string on your capo here.
In many competitions, who strings the guitar the fastest, hardest, but not least, before the guitar is shipped, she will install the truss rod cover on the guitar and it will be inspected finally for Lindsay to do the final details of this guitar by touching it up. and inspecting it. let's take a look at a rack of guitars, it's ready to go to shipping, okay and here we are at the final inspection, we've come all the way, what's happening here, what's happening here is that all the guitars They have achieved everything. Now we're in final assembly and Eric is putting the last touch on the guitar before it leaves here, so he's inspecting the guitar again, making sure it passes all the quality control, inspecting the guitar one last time, double checking times the electronics, etc, etc., on the guitar, this is just before they arrive at shipping, they will be loaded onto these carts and taken to shipping after this process.
Great, here we are at shipping, getting the last step of the process from start to finish and tell us what's finally happening. in this last process, well, we got here, we took the guitars from final assembly, they were QC inspected, now they are in shipping and these guys are reviewing them to make sure the options are correct. Right, they are boxing up the guitars and getting ready to pack and ship them. Now, how many guitars a day are you trying to get out of the
factory
right now? We are making approximately 200 guitars per day from this fact.Incredible and what a process it has been. I mean, I really want to thank you for allowing me to join you today and giving me this great
tour
. Taylor Guitar is not a precedent. It's a pleasure. It has been a pleasure. Thank you so much and this is Dan for makingmusic
. Thank you for joining us today and I hope we can do it again very soon.If you have any copyright issue, please Contact