Makeup Tips for Happy Lips!
Jun 01, 2021Hello everyone, today I'm going to make a tutorial that addresses a problem that I think a lot of people have. I have had a lot of lip related questions recently and this one comes up time and time again and that is I have been asked if I would like to wear strong lip colors or would I like to wear
lips
tick but I feel like mylips
droop naturally when I wear lipstick, It really emphasizes the shape of the lip down, so obviously we feel veryhappy
. and we put on lipstick and it makes us look like we're sad, that's not cool, so I'm going to show you different ways that you can address that and make it go away so that a naturally droopy mouth can be something that's just genetically. that's what your mouth is like or it can obviously be a sign of gravity or gravity is taking its toll which can start to lower your mouth a little bit.
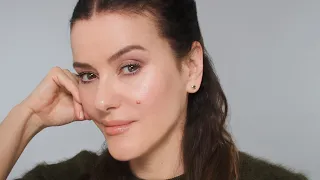
I'll show you about me. I'll show you what I have. I don't have a very downturned mouth, but I have the potential if I painted my lips a certain way to have a very downturned mouth because it's hard to say this and keep talking, but when I relax my lips you'll see. um on the edges where the lip ends, then I have some lines, it's almost the sides of my mouth actually go down quite a bit, although the lips start a little bit further in, if that makes sense, here you can see the line ends like here I'm going to do this quite a bit over the top to start, so that's where my lines end where my mouth ends, so if I were to go all the way down the top lip and bottom lip to that point I would end up with a very droopy mouth, so I just I'll show if I did that what it would look like if I respected the natural edges of my lip.

More Interesting Facts About,
makeup tips for happy lips...
Okay, let's just clean that up. okay, so the bottom of my mouth is kind of there, if I were to go there, I'm not drawing too much, obviously, I know you know I usually overdraw my lips, but that's bringing the lip line to the genuine. The actual edge corners of my lips are another thing that can do it. I'm going to complete this and then you'll see the shape. Another thing it can really emphasize is if you fill out the outer corners of your upper lip too much. like that 1940's shape, you know, this kind of davis bet where they used to draw those edges too much, which can make the lip very heavy, so if you were to start at the genuine corners as well if you were to take a shape rounder, you know?

It's not that far from the natural shape of my lips, it's just a little movement, but you can start to see that when I complete this, I'm just going to fill it in with pencil so you can see the shape in those corners and then. I just finished painting those outside corners, so that's me tracing exactly the shape of my real lip, my bottom lip, so the shape of my mouth from corner to corner on the bottom lip and going a little heavier on the outside corners of my upper lip and You can see that these two things combined when I stop talking results in a more droopy mouth, so I think if you have a more pronounced and naturally drooping mouth, doing both or one of these things doesn't really help, so I'm going to take this off from time to time to show how I can address both, how to not look sad wearing lipstick and these
tips
apply even if you don't have a centric mouth because you can actually have a low mouth just with lipstick, like this which here we show you how to avoid it, so what I'm going to do is where my lip naturally goes up there, which is the descending part at the end.
I'm going to use concealer. I'm going to cut it. those edges make them out of bounds, which means my lips will go up and end before that crease. There's a crease like this at the end of my lip, so I'm going to cancel that and do that. this concealer is a little bit brighter than what I would normally choose to make it look, so I'm going to draw a line, actually, just for the purpose of communication, so we're going to cut those corners on both sides, so that's the part that I'm going to go out of bounds now.
I'm going to put on lipstick following the natural line of my lips to start, but I'm also going to be very careful when changing the shape the way I like. To give my lips the look I like, I'm not going to draw too much on the top of the outer edge of the lipstick, so starting with my bottom lip, I'm going to go in, but I'll be on the inside. I'm not going to follow the edge of the lip, so I'm tricking those corners out of involving them. I'll blend all this concealer out later, I just want to show you what I'm trying to overemphasize. almost one.
I'm going to draw a little bit more on my bottom lip as usual, but I'm going to start by following the natural line of my lips apart from those corners and then at the top, I'm going to start on the inside, so all the way to the edge of the lip, so we're still doing the edge of the lips, but we're not good on the outside, so I'm going to look in the mirror now, from the front, I can already see that I went. a little too far on this side in the inside corner. I'm just slimming down a little bit, so what we have now is I haven't done my shape yet, but we have my bottom lip filled in with lipstick, but it's finishing before I go down, twist things there, my creases, I'm going to blend this concealer, then I'm going to make my shape so I can overdraw my mouth and I can still do all the things that I like, but I'm just being very conscious of those corners, so now on my bottom lip, like I like to do, I'm going to smile and I'm going to draw too much in the center.
This is one of the reasons why when I do a very strong mouth a red mouth a dark blackcurrant mouth whether on clients or myself I always put lipstick on first just a thin layer all over that way I can look back at the lip shape and actually think about what I want to make this adjustment or that adjustment or when I see the natural lip shape painted on, I'm much more aware of any imbalances, so I can step back and then create from zero, so I'm not going to do anything. more towards the corner and then for the upper lip again, I'm not going to go straight to that bottom corner and then go up immediately, I'm lifting up to make it a little bit more smiley, a little bit friendlier still about the drawing, but that's it.
My shape is made so you can see the inner corners of my mouth. Now I just have concealer or nothing else here and there's the crease down that we haven't entertained, so lipstick, I'm just going to put on a little bit of blush as well. I'm going to use my lipstick. Someone is also asking me about this usage. Yes, you can use it as blush. Sometimes I like to use it with a little bit of liquid highlighter, so I put a little bit of liquid highlighter on the brush, that too. I had the remains of a little bit of foundation too and I'm going to use that just to blend on my cheeks just because sometimes with darker colors, red, it's nice to have a matching red blush, etc., so I didn't finish my sentence.
So that's the final look. They're pretty simple steps that can help you, whether if you don't have a naturally low mouth, avoid creating that or if you naturally have a pretty low mouth, almost cutting into the corners of the bottom. lip and not being too heavy from the top corners inwards so not creating that extra weight and that extra heaviness on the lip, just those two simple things can really help as an added touch as I have my lip color in a great place. Nice shape, I'm just going to add a little bit of glitter once again, although I'm not going to take it to the inner corner because especially with glitter, it can bleed through and you can end up emphasizing those descending corners and we don't want to do that, so I hope.
That was helpful and see you soon, bye.
If you have any copyright issue, please Contact