IS IT DEAD?! - RB25 Engine Teardown
Jun 03, 2021So we recently did an inspection on my s14 with an
rb25
engine
and discovered that the connecting rod bearing on the number six cylinder had rotated, so today we are going to take theengine
out of my 240 and once it is out we are going to completely disassemble it to try to figure out what went wrong and come up with a game plan to rebuild it what we can reuse what needs fixing what needs replacing it's going to be a great day I'm so excited thanks to kates for sponsoring the video today it's April which means it's officially tax season and if there's one thing I love more than paws it's a big refund from uncle sam, whoever that is, mister uncle jerry um, we can't write off bird food as a business expense, but I'm training Dave to be a show bird, okay, the bird show business is booming right now, if you haven't noticed, there's also um, there's nothing we can do about it, this road trip to Cabo, so it looks like you'll only get a little refund this year, a little refund, I said, give it.
Wait a second, oh, would I have liked to have had my hair removed if I wasn't one of the two out of three men who experienced some form of male pattern baldness by the time I was 35? I should have used the keys they do. It's easy by having online hair loss consultations with real doctors and then they will send your hair loss medication straight to your door every three months when you are ready to start your treatment. Visit Keeps.com moneypet to get 50 off your first order mr uncle jerry hi it looks like there was actually a mistake you will actually have to pay taxes this year mr uncle jerry get in the car dave we have to get out of here are you there mr uncle Jerry? how to pull an engine in this show, but in case you missed it, we'll recap it real quick.

More Interesting Facts About,
is it dead rb25 engine teardown...
It's really not that difficult and is pretty similar for all engines. The first thing I'm going to do is drain all my fluids. The oil is now drained. we have coolant, transmission fluid, fuel, power steering fluid, that kind of stuff, then I'll start disconnecting the big things, like the exhaust from the driveshaft, to anything else that connects the engine to the car and then once Once everything is done, it's time to hook up the crane. to the engine, remove the engine and transmission mounts and get this out of here. Now it's a pretty long engine and transmission setup and I'm going to try to get them out together.

The engine compartment is not that long, there is a possibility. We may struggle with this a little bit, but that's okay, that's how these things go and there's really only one way to find out and that's to get into it, so I say let's get to work. I forgot to mention that I'm also taking off the hood. to give me a little more room to get this in and out and I'm going to remove at least the front bumper just to give me a little more access to some of this front stuff so I don't damage it.

I kind of want to keep it in as good shape as it is, I could make a mess in here, but you know you have to break some eggs to make an omelet. Now I'm going to do the best I can, I'm not going to spill a drop. I thought that might happen, I probably should have pulled that crossbar, but hey, my goodness, it's still banging, it didn't spill a drop the way it's going, guys, now it's time to drain the transmission fluid, uh, and I think we are. You'll have a little more luck keeping this clean than the coolant, so it's always a good idea when you break a drain plug like on a transmission to also break the fill plug before draining the fluid, but that just goes to show that you can open it up and Actually fill it clean, yeah boy, wow, okay, now with the driveshaft out and the transmission drained. uh, we'll disconnect the downpipe from the rest of the exhaust.
Okay, we disconnect our downpipe and rest the exhaust back on top. I guess I should have known that was coming and a downpipe, now we have most of the spaghetti disconnected from the engine while you do just a couple of last details like removing the shifter and then it's time to pull this thing. The ball and Allens are really useful a lot of times, it can be difficult to get to the Allens, which is necessary with an Allen, but not with a ball end, you can go as crooked as that, which is pretty cool the way which is supposed. to get everything right, I thought we'd get it out of the way just to give me a little more room in the front of the engine because you know this is pretty long and I'm a little worried about my harmonic balancer hitting the radiator it was fine, everything It's out of the way and the engine is ready to go, so we've got the tow truck hooked up, Eddie's there driving the jack and while this isn't a big deal and it's definitely something you can do it's a little dangerous, I mean we're working with probably six or seven hundred pounds here, so you don't want that to fall on your face, so Eddie, watch your face right now, what we have to do is take some things from this thing I have to remove the whole turbo remove the intake all accessories alternator power steering okay now we're about to remove the clutch and flywheel and I think I'm going to reuse the clutch and flywheel like this It's very important how to remove this.
You want to make sure you remove the pressure plate evenly, so I'm going to loosen all of these bolts in a star shape and then continue until they're completely loose. a pressure plate and clutch disc look decent, no hot spots, looks like something reusable, here it's time to remove the flywheel, uh, it's only six bolts, I'll remove them in a star shape like you do, yeah, flywheel , good nismo, nice what you have. there oh we have a pulley puller these arms grab the back of the pulley and this goes into the bolt once these arms are behind the back of the pulley and I put this in it will pull the pulley out it's Pretty simple, there goes harmonica.
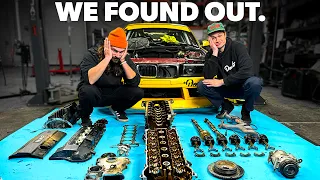
The balancer is fine, put some spark plugs back in to keep some water out of the holes and now this thing is pretty much ready to be cleaned without further ado, let's light this thing up. That's a lot cleaner, a lot more manageable, drag this thing back inside and get a workspace set up to take it apart before we actually take it apart, we need to talk about some things because I want to figure out what went wrong in the first place that caused my bearing would spin and in my mind there are basically two incorrect bearing clearance options so we'll check the bearing clearance on the other cylinders just to get an idea of what approximate cylinder type six would have been.
The other option is inadequate lubrication, so the biggest problem with the Arby's lubrication system is that if you are driving hard at sustained high revs. These can pump basically all the oil from the sump into the head and then it gets stuck there because it doesn't drain well enough into the sump and then you basically have no oil in your sump, the oil pump doesn't pick up any and the bearings don't get any. the lubricant they need and things happen like the bearings spin so it's a known issue on the rb and there are a few things you need to do to fix that filling issue. the head with oil and starving your bearings, so while I disassemble this we will look for solutions to that problem.
I guess I haven't mentioned this enough, but especially at this point, once you start taking all this stuff apart and I intend to put it back together eventually. You have to be organized. I've been packing everything in ziploc bags and just labeling each bag so it should be pretty easy so I wasn't having any problems with the valve train so for now. I'm going to remove the loaded head and leave it alone, which is actually quite convenient. I can put a wrench on my cam and turn this thing and it will allow me to access all the head bolts and remove the head. the cams inside so it's pretty convenient but it has harp head bolts which is cool they're really strong and good for making power but the nuts on them are bigger than the stock head bolts so they don't I can place the bushing passage correctly. just past these two points on the ends of the cams that means I have to remove the cams now that we have both cams out of the way we can get to the head bolts or rather the head bolts and nuts head, there is a head. a long one, well, you know, at first glance, looking at what I can see, it doesn't look as bad as it looked on camera.
I mean, I see some streaks here, but it doesn't look as bad as it really is. I was waiting to see what's more, if we have to bore these cylinders due to the wear they have, I think we're going to have to do it, that means I'll have to increase the piston size, so currently the plate is 86.5 millimeters , so I would have to go to the next server size, which is 87 millimeters, so this head gasket has an 87 millimeter hole, which is the standard head gasket, so if I have to drill the piston , I'll have to do it too. get a larger bore head gasket, 88 millimeters, so we're about to remove the oil pump.
This is an upgraded oil pump and one of the other lubrication problems that the rbs have is that the oil pump drive engages the crankshaft in a way that's not very good yeah so this here is an spline drive where normally it would be all round with just two floors that are made up of two floors here which is not so good these splines are much stronger and much better to move on now that we have the water pump, the oil pump and the main rear cover removed. I'm going to take the bolts out and then I'm going to turn this thing over.
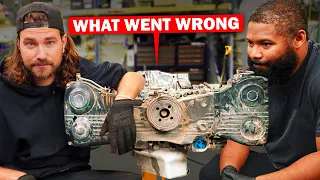
We will remove the connection screws. and release the pistons and connecting rods so this is the one that turned the bearing. You can see how much wear there is where there shouldn't be any and the crankshaft journal also looks pretty beat up which is a problem because like I said before. I'm pretty sure this crank has been machined before. I don't think we can reuse the crank, which is sad, so this is our piston, our connecting rod, and our wrist pin here that connects the two. we have our rings the top ring is our compression ring the second ring is to scrape the oil and direct it through the oil control ring so the scraper ring directs it down through these grooves and then allows it to enter the piston through these holes and dump into the sump, but when I get to cylinder number five, what I'm going to do is take the cap off and I'm going to put some of this useful stuff in there, this is a plastic gauge and it's a pretty rudimentary way of check the bearing clearance and I just want to know what kind of bearing clearance this engine is running so I know if that was potentially the issue on number six, it's not really necessary I'm just curious so the idea is that you put this little piece of plastic gauge between the bearing and the crank journal and then you install the connecting rod cap and bearing as usual and when you do that and torque it to your standard torque values, this little piece of wax will squish it and then you take the cap it comes off once it's squished and you compare it to these markings that are included in the package and depending on how much it's squished that correlates to the amount of bearing clearance okay let's see what we have Here, what would you look at? that's crazy in 20 thousandths, so the bearing clearance in cylinder 5 is good, which makes me feel better about the bearing clearance in cylinder 6 before it turns, which tells me the direction of a lubrication problem causing the number 6 to spin, so one of the things to do is add a series of restrictors to the head to restrict oil flow to the head.
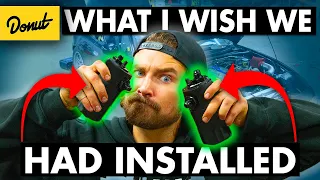
Now these have factory restrictors, but the aftermarket measure to prevent these problems from happening is actually blocking. Disconnect one of these feeds and use an even smaller restrictor in one of the other positions. These appear to be the factory restrictors, so it's a small issue that tells me the head has filled with oil and starved. Cylinder number six has a bearing, so I'll have to get some new restrictors. Fortunately, that's not a big deal, it's not the worst. I mean, these are racing bearings that wear out faster than standard OEM bearings, so it's definitely not uncommon to see that kind of thing. but, as far as I know, this engine was only built about two or three thousand miles ago, so it's not great now that we can see a little heat coming out of this crankshaft journal.
You can see a little bit of blue on both sides of the stump, so something like that. I'm interested to see what this bearing looks like or if it's from the past, so I'm guessing it doesn't look any worse than the rest. I'm guessing this heat, whatever happens to this crank, is probably another rotating bearing that forced the previous owner. to mechanize the journals, which again is why I'm not going tobe able to reuse this crank. I guess the heat was from its past life pretty much the same as the rest, the last one, the first, oh well, you're always going to drop one, okay, we have all our pistons and connecting rods, which is great, now let's go Let's turn this thing around and we'll just take a look at our cylinder bores and be honest with ourselves so that cylinder wear doesn't show.
Well, I'll have to measure it to be sure, but I'm pretty sure these cylinders will need boards, so now it's time to remove our main caps, which is this big pig here and this is what holds the crank in place and it keeps it spinning nice and true so there will be bearings under these caps very similar to our cranks here and then there's also a thrust bearing to keep it from spinning too much back and forth so I'm going to do that. Get these puppies out, here's our main guy with the cap on and then you can see our thrust bearing here which uh this determines the end play of the crank or how much it can hit back and forth, you don't want too much, but there should be a touch , let's take a look at some of these main bearings, that doesn't look Hot, I mean, it looks like it got hot, doesn't look good, Jesus, I mean, it looks like a problem waiting to happen, so I guess it's a good thing that the cylinder six has fired and, oh, man, when you look at that. this bearing just has a straight slot cut into it, I don't think it should be there, okay, that's all the caps, now we can take out the crank, so I'm going to take out the oil jets from here and then.
That's going to be pretty much an empty block and then from there to verify that this block is going to be usable measure these bearing journals well so we're ready to measure our crank journals now to do that we need to take a few steps very specific and precise measurements, so I have a few things set up and let's talk a little bit about that now first. The first most important thing you need for this is like the factory service manual so you know what measurements you need. I'm looking, so I found it online, that's cool, so I have my specs written down here, so basically the upper limit of what's acceptable in terms of our measurement on the crank journals is 2.3098 inches, i.e. until the end. 10 mils, so what we need to do is basically set this micrometer up to 2.3098 and then we'll take this diameter gauge and set it from this, then once we have the diameter gauge set to this measurement, we can take the diameter gauge over to our holes, fit them tight, so we're going to start at this end because this is where I am, this is the back of the engine, this is position number seven, I've got all my stuff written down. below, so I'm ready to write down my measurements.
I guess I could bring that notepad here, that would be cool. But let's see what number one looks like. Basically, what we're doing here is looking for the lowest number we've ever found. blow before we start coming back in a big way, so we're two ten grand below our max spec, that's good, it's in spec, not by much, but it's in spec position seven minus point zero zero zero two, okay, so that's from this number 2.3098 so we have a bore of 2.3096 right there, which is close to being out of spec, but it's in spec, so that's okay for me, let's move on Seeing if we can find one that doesn't look so good ooh six ten, okay, so we'll call. those six ten thousand under our specs two ten thousand smaller than spec okay so I just measured six of my seven main cap journals and they all came within spec so that's great but the problem is that my main caps are obviously one big piece. here and I can't get to the center with my board meter from either end, it would be one thing if they were singles, but as one I can't really measure that center, so I'm going to assume based on the rest of them, that the from the center is probably fine too, so I'm going to proceed as if this is a usable block, but when I end up at a machine shop I'll ask them to check it out just to make sure I'm going now. to turn this thing over and we're going to check the top of the block to see if there's any warping real quick ghost what a boat anchor these things are heavy so basically what we're talking about here is if there's any warping on the top top of this surface, this is the top of the block, so we want it to be super straight and flat, so in terms of flatness at the top of the platform there is a specification for that, so the limit is the point one millimeter, that is, one tenth of a millimeter in total.
Well, to do this you want to make sure the top of your block is very clean and free of any gasket material or debris, so I'm just going to place my ruler on top of this unit in a few different ways and try to set my feeler gauge to four thousandths. of an inch or 0.102 of a millimeter, if I can slide it under anywhere, then we might warp, well, it doesn't look like we have much warp and well, gee, that's cool, so I think the block is I'm going to be reusable, still I have to find a mechanic shop, but that's my top priority now, so I'll send this to him.
I will order a lot of pieces as heartbreaking as it has been. I felt like breaking this thing. for a long time, so I hope you learned something today from being with us, uh, and if you liked what you saw, make sure to subscribe to the channel and you can follow me on Instagram, Zack Job, and you can follow me on Donut Media. I'll see you next Wednesday Hey guys, what's up? I have big news and it's here on my mind, introducing the first official donut hat, only available at donutmedia.com. It comes in two incredible colors, vibrant orange, for those who want to stand out during the day and navy blue for those who want to go unnoticed at night and the best thing about a hat, no matter who you are, it can help you highlight your personality, whether whether you're intimidating at first but once you get to know you, you're a really nice person or you're someone who always has that band on that your friends have never heard of and you surprise yourself and make them listen to them right away like some kind of soul ancient poetics, like an actor and a writer. slash director slash musician I have an acoustic guitar the donut hat is the perfect hat for any occasion or any type of person get yours at donutmedia.com today
If you have any copyright issue, please Contact