How To Tin A Soldering Iron Tip
Apr 09, 2020We're talking about how to maintain and care for your
soldering
tips so they last a long time on Ron's Trains and Stuff right now Hi, I'm Ron from Ron's Trains and Stuff and if you want to see more model railroad tip tools and techniques , then be sure to subscribe below and click the little bell icon so you can watch future videos. Anyone who makes a lot of model railroading will eventually have to do somesoldering
and those of you who may be new to soldering and not as experienced have probably dealt with the frustration of a soldering tip that simply doesn't get hot enough to melt. welding and making a quality joint.
The best way to alleviate the problem of a poor-performing soldering tip is to properly prepare and maintain it today. I'll show you how to prepare, care for, and maintain a soldering tip, whether it's new or if you've had it on your soldering
iron
for a while. Have you had problems with your welder performing as well as you would like? Tell me your experiences in the comments section below, now let's get to the workbench. I'm going to show you a new welder that I just got for Christmas, as well as one that I've had for years and We're going to talk about how to maintain them both today, we're going to talk about how to prepare and how to maintain a welder to keep it in excellent working condition and so that Not only youriron
but especially your tips last for a long time.
More Interesting Facts About,
how to tin a soldering iron tip...
I've been working with a couple of welders for a long time today for Christmas. I received this new Weller soldering station. This is a variable temperature ranging from I think it's 5 to 40 watts, which means it's going to be good for soldering everything. from the rails, if you know, soldering some rail sections together before putting them into the design to the electronic circuits, so we'll open this up and get the soldering iron ready to use and do it in a way that will last a long time. I'm also going to work on cleaning and reconditioning my old welder.

This is also a Weller. This is a 30 watt soldering iron with only one heat. and my plan is to keep the soldering station here on the workbench and use it here and use it as a soldering iron that I use in the design. The one thing I really like about this particular soldering iron is that it has three LEDs. It lights up here at the front, so it gives you a good light if you're working in some dark corners. The tip of this welder is that it's not horrible, but it could use some cleaning, so we're going to clean it up and the tenants. and let's just do a little maintenance today, so to start, we're going to open up our Weller station here and the station that you can see has an on/off switch here it has a variable heat knob and then here a place to plug in a soldering iron Of course this soldering iron can be used apart from the station, you can plug it in and use it as a single heat and it will work as a 40 watt soldering iron whose full temperature if you do that, you will also notice that on the station itself we have this little sponge and we'll talk a little more about that in a moment as we prepare this new soldering iron and then also as I work on cleaning and maintaining my old one I want to tell you the things that we are going to need now that we have this station open and open to maintain and prepare a soldering iron tip that we need, so first of all, are you using any flux? a paste type flux.

I prefer it to be a rosin paste flux and this is a flux that contains acid. The acid. I know some people prefer an acid-free flux for certain applications, but the acid works to clean the surface you are soldering. and in this case, the tips we're dyeing, so we need some pure flux, we need some solder. The size of the 60/40 rosin core solder doesn't matter, but I need some solder. I'm going to use a piece of steel wool, you can also use or you know it's an alternative or you can use both. I'm going to use both.
I also have a brass sponge in this little hako holder and a cleaner. These are great for cleaning soldering tips. I'm going to show you something about how to use these. in a few moments and I highly recommend them and if you don't have one I recommend you get one and you can find a link to this and my Pick of the Week in this description below this video and then of course the It's important to have the sponge which I showed you as sponges and then if you notice this little round cup on my old soldering stand, it's actually a tinning and cleaning solution, now you can tinning and cleaning your tips without this solution.
I have something, I call it a solution, it's the cold that is actually difficult, but this helps clean and soften the ends. I don't use this alone, I use it in conjunction with other processes and I'll show you more about that in just a moment, but I just have a little piece of cardboard here that I'm going to use to work with so that I don't get hot solder on my cutting mat to prepare a new welder or a new solder. Iron tip, what we want to do is decimate it and the reason why that is important is because the number one enemy of the welding process is oxidation and as you know, the heat of the metal promotes oxidation in any type of metal. and the tips we use as they heat up, while they stay hot, they will tend to oxidize, tinn or help protect them from oxidation and help keep them shiny and in good working order.
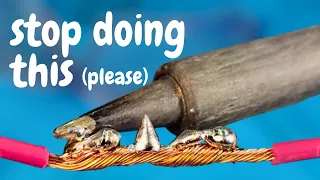
If a tip rusts, if it starts to turn black, then that's it. part of the tip is not going to transfer heat properly and you won't be able to use it to get good solder joints, so you need to keep the working part of the tip shiny so it continues to transfer heat now. I know a temptation and I just want to address this right now. There is a temptation we have when we see a soldering tip starting to turn black and start to rust a little. You might be tempted to grab some sandpaper or a steel brush or something and just aggressively clean those things.
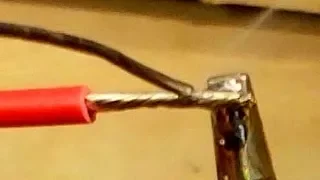
I'm going to tell you not to do that, it will destroy your soldering iron tips. Most tips we buy these days are a metal alloy covered with a coating and if the coating comes off and the alloy metal is exposed, they will not transfer heat properly and will rust much faster, so don't use paper of sandpaper or those scraping methods keep the tip of your soldering iron tinned, keep the tip tinned and then you can clean it the way I'll show you in a moment. Okay, the first step for this new soldering iron again, it's not on, it's cold iron and 210, we're going to use some. solder itself and literally what I'm going to do is take a piece of solder and this may be more than I need, but I'm going to cut a piece of solder here and let's get started. right on the tip of my soldering iron and I'm just going to wrap this around the tip and I'm going to try to keep it here where you can see what I'm doing, but I'm going to wrap it really tight and I'm also going to make sure the wraps are very close together so that completely cover that tip, make sure it goes all the way again, obviously, I'm doing this.
Walt's soldering iron is cold, otherwise I would be seriously hurting my fingers right now. and you don't have to go down to the top, but I try to go at least halfway. This is a pretty short tip, so let me go a little further. I'm about a half inch from the tip. you know, make sure it goes all the way and it will cut off the excess, don't throw it away, it's a good solder, you can use it, I'll save it with my other solder, in fact, use it before we finish today, okay, you can see I have my tip wrapped up nicely for the process of tinning my soldering tip and now that I've got it wrapped up nice and tight, I'm going to go ahead and turn on my soldering iron and I'm going to wait for it to come up to temperature and as it comes up to temperature, it will melt that solder and melt it on that tip and that solder will actually seal that tip and protect it from oxidation, not sure if you can see but on the ends the flux started bubbling out of the solder before the solder started to melt and of course that flux helps the solder stick to the surface by the way and You see, that smoke, it's a good idea to do this in a well ventilated area and then I can literally come down here and just dip my soldering iron in a little bit of that solder that's down here on this cardboard and you'll see, I've got a nice bubble of solder there and I just want to cover it really, really well and you always want to put your soldering iron down when you're done with it for a session when you're done for the day that you want to leave it covered. with solder because that will protect it from rusting while not in use and just sitting in the air and drawing out moisture and access to oxygen will allow the soldering tip to rust so you want to leave miss otter coded and there you go.
I've got a really good layer of solder on that centering tip and that's ten and it's ready to be used, so now I'm going to turn off my soldering iron and we're going to put it in its holder here and allow it to cool naturally and that will protect it. Now we're going to shift gears here and then we'll look at my old soldering iron and the tip we're going to reach for. but I will also show you some things you can do and should do to help your soldering iron tips last a long time and prevent them from rusting.
The first thing I'm going to do now again if you look at this tip, you'll see that it's not in bad shape, it's pretty black down here, but the tip is pretty shiny, it's got a nice layer of solder on it, but we're going to treat this like it's getting quite black. and it really wasn't transferring heat well and we needed to retain it and recondition it, so to start we're going to do the same process that we did with the new soldering iron. I'm going to wrap this up. with a little bit of solder and that will be it and we'll start the process, but we're going to do a little bit more with this tip than we did with the new one, just to recondition it now again.
I didn't say but obviously I did this while the soldering iron was cold, it hasn't been plugged in yet, but now that I have it wrapped I can do the same thing I did with the soldering station, I'm just going to plug this soldering iron in and If you're going to let the solder melt , you can see the lights on this welder which I really like because they help a lot when you are working in dark or shady areas which on a model railroad layout can be really very useful and there the solder is starting to melt notice how it is melting more quickly along the tip where the tip already showed up again, that's because the heat transfers much better through that shiny part of the tip that is not oxidized and is now starting to melt even down. on the rusty part and there we go and once again you can make a sort of solder group here that we can use to recondition that, but now that I understood that this is the part that will help us recondition this tip.
I'm going to take this steel wool and this is just a piece of clean, thin steel wool. I don't want it too thick because I don't want to burn my fingers and I'm just going to rub it along the tip quickly and that will help remove some of that oxidation and then I'm going to take my tip and I'm going to dip it right into this solder, said a new tub and new flux, but I'm going to just dip my tip in there and let it spin a lot there and we'll make a little bit of smoke and then I'm going to take a little bit more solder and I'm just going to apply a little bit more solder to this tip and especially I'm going to try to apply it on the areas that have rusted, so yes, it applies very easily to that shiny part.
It doesn't need that much reconditioning, but I'm still working on getting it applied here in this part. You know, let it burn off all that flux and see if we can solder a little bit, but it's not melting there, so yeah, now that I have some flux, I'm just going to take our steel wool and clean it up. Do it again a little more, do this carefully, make sure you have a thick layer of steel wool and do it quickly, you don't want to burn your fingers doing that, and then each time you do it, put it back in the flux for a second and then apply a little bit more solder and I'm still having a hard time adding solder here to this top.
You don't really need to do it because actually the tip is what you use when you're soldering, just try to get a little bit of it applied there so you can see how this is done there, how this is done on a tip that had rusted. pretty much, okay, and we'll continue to do that until we get the solder to stick to all the parts of the soldering iron that we need in this case I have a good quarter of an inch, 5/16 of an inch, then it's nice and shiny and then it's very shiny, it's well coated so it's in good shape for mess at this point, now you could go a little higher.
Look, it's really not completely necessary. The important thing is that you want to try to keep your tip in this shape and there are a few things you can do every time you use your soldering iron. That will help maintain the life of your soldering iron tip, so let's talk about that for a moment before we wrap up here every time I turn on a soldering iron for the first time when I'm going to do a soldering job. The first thing I do when my soldering iron comes up to temperature is clean it, so when I do that, when I'm doing actual soldering work,is when I use this brass sponge. and this is literally just a big ball of brass shavings that comes from the machine shop and again you can buy these holders and the brass sponges and replacements in various places, but I will include a link to them in my Amazon selection. the week below where you can buy one so the first thing I do is literally ten clean my soldering iron when I first turn it on so I clean it first once it gets up to temperature by just running it through the sponge. brass several times and then for maintenance purposes while I'm working on soldering, that's when I use this tip tinning and cleaning solution and again the tip has to be hot to melt this, but see, you put this. here and just melt a little bit of that solution and it does the same thing that we were doing only in a pretty quick way it's a little bit loose or some flux and some solder and some other cleaner in there and just like I'm working on it it helps me keep my nib in good condition and after I do that, I clean it some more.
That's the first thing I do when I turn on my soldering iron before soldering: clean and rent another. The way to clean the tip of your soldering iron if you don't have a brass sponge is to just use a damp sponge, that's why this sponge comes with the Weller soldering station and you saw how to take it out of the box it was very very flat and thin I put a little bit of water and as you see it really took some life, you know it's a big, big, thick sponge, your sponge, there can be any sponge, but you don't want it to get soaked.
I just want it to be wet and when you're done soldering you can just go in with your hot soldering tip and run it over the sponge a couple of times and you can see it went from dull to shiny very very quickly and take it out, know any excess of solder, but also oxidation outside the tip, so this is an alternative way to clean your tips while you're soldering, while I'm soldering, let's say I'm working on the rail. Designing or working on some project here at the workbench, every time I make a solder joint, I will run the soldering tip through the brass sponge again just to clean it, which will clean any Asian rust, clean any excess of flux that you know. or other debris that you may have collected in the process of soldering each joint.
I clean it and put it through the soldering process again. The tinning solution and cleaning solution clean it again. I do it every time. That may seem excessive, you may think. Oh, that takes a lot of time and a lot of effort, but my ends last a long time. If you don't do this, I promise your tips will rust in no time and won't work. You're going to be replacing the tips frequently, but if you do these things, keep the tip tinned while you work, this will really extend the life of the tip and when you're done soldering, when I'm getting ready to unplug it. the solder and I save it for the day I come back after my last solder joint, I run it through the cleaning and dye solution, clean it with the brass sponge and then before I put it away I'll take some real solder and just Melt some solder right on the tip and leave it like that and I'll unplug it right there and it'll be ready to put away so those are some things you can do to get a new soldering iron ready to use make it last a long time it'll help you recondition a tip that may have gotten a little old and a little rusty and that will help you keep your tips working well for a long time with just a little maintenance and care while you use them.
Keeping your soldering tips properly tinned Cleaning them before use and after each solder joint Making sure you keep them tinned every time you put away your soldering iron after a job will help your tip last a long time and continue to work reliably. I hope you incorporate these tips into your welding process as you use welding in your model railroad projects. If you enjoyed this video, here is a link to more model railroad videos. I know you will enjoy it too. I hope you check it out. That's also check out the description below, where you'll find links to my Amazon page and my Amazon Pick of the Week, where you'll find that brass sponge, as well as my Patreon page and places where you can connect with me. on social media, be sure to join me every Tuesday as I bring you more fantastic model railroad videos and I hope to see you then, ten Lizzie.
If you have any copyright issue, please Contact