How To Restore Headlights PERMANENTLY ( Better Than a BRAND NEW Headlight )
Jun 08, 2021Hey guys, today I'm going to show you how to
, quick and easy. Yellowed
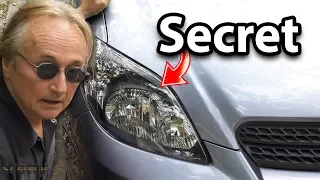
are a very common thing on models and not only do they look bad but they also have very poor light output on the road. At night what happens is this lens on the headlight is made of polycarbonate plastic and even though you can't see it it comes with the factory UV protective coating over time the decoding wears out and then as you drive you let the car outside. The bright sunlight, the ultraviolet rays that come from the sun break there and the cop Kevin instructs the lens, so the color of the lens goes from transparent yellow over time, this gets even worse and it starts to look like this.
permanently
restore
yellowedheadlight
s
, quick and easy. Yellowed headlight
s
are a very common thing on models and not only do they look bad but they also have very poor light output on the road. At night what happens is this lens on the headlight is made of polycarbonate plastic and even though you can't see it it comes with the factory UV protective coating over time the decoding wears out and then as you drive you let the car outside. The bright sunlight, the ultraviolet rays that come from the sun break there and the cop Kevin instructs the lens, so the color of the lens goes from transparent yellow over time, this gets even worse and it starts to look like this.
The headlights are visible. This bed can be
restore
d like this. but it must be done quickly because over time the damage can extend deep into the lens and create small cracks known as weeping scenes, like the ones you see on this lighthouse here all the time, these cracks get larger and destroy the lens, so you may have to do it. buy a new headlight that could be expensive and that is why you need to restore your headlights before it is too late and the restoration process that I am going to show you only has three steps, starting with the first step, even organize the headlight and the surrounding area using a microfiber towel to remove any dirt and then dry the headlight so we can move on to step 2 which is removing the top layer of yellow plastic from the lens with some abrasives so I have some polishing cutting compound to cars and metal polish, which is a liquid abrasive and some sandpapers which are dry abrasives all of these products contain aluminum oxide as an abrasive agent in different amounts up to 5% in college up to 10% in compound up to 25 % in metal polish and up to 100% in sandpaper but with different grid higher sizes, the number is to find the best option, the reason why I showed you all this is because to keep your headlights like new it is about choosing the right polish and sandpaper, so for headlights like this it is best to use 600 grit followed by 1500 grit followed by 3000 grit.
More Interesting Facts About,
how to restore headlights permanently better than a brand new headlight...
It is also best to wrap the sandpaper around the foam backing pad so that can put even pressure on the last sanding and if he held the girl then he can go headlight polishing kit like this so you get a backing plate for the drill, a wool pad, a foam pad and you have your 243 2600 800 1200 1500 2000 and 3000 sandpapers, so if you want, first, mask off the surrounding body panels using a little masking tape so that you wouldn't damage the paint on those panels while sanding, then spray some water on the lens and sandpaper and start sanding. It's best to do this finishing in one direction, like here I do it horizontally with overlapping strokes to cover the entire area. of the lens spray water as needed and continue sanding with light to medium pressure on the sandpaper when the water carriage running through the lens changes from yellow to a kind of milky white, clean the lens, anyone can see that the yellow on the plastic has disappeared, but there is now a uniform white haze on the lens.

These are sanding scratches from the 600 grit sandpaper I had remotely so now with the 1500 grit and start sanding again this time, instead of going horizontal you can go vertical so you can remove some of the horizontal scratches. It's easier once you get through the whole lens, clean the lens again and now you have a uniform fire haze because of the 1500 grit, it's a little hard to see so now get the cool 3000 and do this one more time with horizontal strokes to eliminate the vertical. scratches like that and you're ready for the compound for this, you can use a microfiber towel if you're doing it by hand or the wool pad if you're using the drill.

I'm going to use the drill because it's a lot faster, so get some compound on the pad and then remove the tape and start polishing, you know, keep a steady paddle with even pressure on the pad while keeping the pad flat. against the headlight and keeps the pad moving to prevent heat buildup and burning the plastic cover throughout the process. area with overlapping horizontal passes and then switch to vertical passes and cover the entire area again after compounding, you can clean the lens and start from there, but I'm going to go one step further. I'm going to switch to the foam pad and it's a little polish to get the factory shine back.
This is completely optional, but this brings that mirror shine that you see in a new headlight. Okay, I'm going to clean the lens and this is exactly what I'm talking about. I mean, here it is. the before and here is the after, the clarity is back like in a new headlight, this is how you restore headlights with a very bad yellow beam using sandpapers, but for headlights like this with only minor yellowing, you can skip all the sanding work and start with the compound so I'm going to do this real quick no sanding just compound although any good plastic buffer will do so just put some compound on the pad and start buffing and buffing and polish until the headlight starts to look really clean and then clean the headlight also i'm going to need some isopropyl alcohol to remove any leftover compound and that's a new looking headlight so now you can move on to step three which is to apply a protective coating on the headlight to prevent it from turning yellow again and I'll show you five counting options so you can first choose the one that makes the most sense for you.
You can use UV code. This is the most commonly used product on factory headlights, but only comes in commercial quantities. You need to have a professional quality spray gun and compressor set up to use this. You also need a UV heat lamp which has been in this headlamp so as you can see this is too expensive for most people at home and this only lasts. about five years, so this option is not the option for me. Second, you could use an aftermarket headlight coating. These coatings are achieved by comparing the OM style coating and come in aerosol cans.
Simply spray a thin coat, let the coating dry, and then apply a second coat. and voila, this is actually a good option, but these coatings only last about a year, so this option is not the option for me either. Ted, you could use a clear coat. Clickers come in cheap rattle tails like this acrylic, they were produced and only last a few years before they start to peel, that's why the common factor is taking liquor in the molds, which is assumed in clicker mixed hard because it doesn't They provide chip and scratch resistance, then acrylic discs come in rattle cans, but the manufacturers do not recommend this.
They use them on headlights and make a special clay code for the headlights with special primers to go with them, although these turkey clickers can last a long time. Car manufacturers never use clicker in headlights and one of the reasons is that the refraction of light changes its speed and direction when it passes through different media, that is why a pencil in the world looks like its explosion or a Image behind a glass of water looks realistic or images look larger through a magnifying glass. Normal vehicles have a higher refractive index than the headlight coating, so I'm I'm going to spray some clicker on this headlight lens like this and now I'm going to put a light behind the lens, as you can see, the Light passes through the bay lens without any distortion pressure and I will move the light to the side with a clear coat. how we lose the sharpness of the light due to refraction, this can reduce the visibility range of the headlamp, so this is by far the best option and definitely not the option for me.
The fourth option you have is to use headlight covers that fit into these chambers. right above the headlight and they provide good protection from UV light and stones but they leave a gap around the headlight for cooling purposes and I often see these edges turn yellow over time because of that and I personally don't like the look of these. So this option is also not the option for me and that brings us to my fifth option, which is to install a headlight protective film. These films generally last about five years and the best thing is that they don't get stuck under the lens like a coating.
When this goes wrong, remove the bad film and install a new one, you don't have to register the lens and that makes this the old permanent way to restore your headlights, so now it's starting to make sense why this is a pretty expensive option. . at car dealerships so this is by far the best option for me and here is what you need to install the film: You need a razor blade, a small squeegee, a heat gun or a hair dryer. hair, a spray bottle with a little distilled water and a little dishwashing liquid or isopropyl alcohol.
Depending on the film you are using, you first clean the lens to remove any enamel residue, soapy water is good for this, but isopropyl alcohol is
better
. You should also wash your hands, otherwise you will leave fingerprints on the film. spray the lens and fill it with water, place the film over the lens and then start going from one corner to the other along the center of the headlight that way you can push all the wrinkles to the edges and then you can start squeezing out the water. with short strokes, if the film builds up around the curves, you are not trying to flatten it with the squeegee, but instead you lift the film and loosen it with a little water, you use the heat gun to heat the film very slightly and then you stretch the film around the curves and then use short strokes until you get rid of all the wrinkles.This may be a little difficult but totally doable at home and if you see some moisture under the film that you can't remove, don't worry as it will evaporate. the film in a few days because it is a breathable material and also very thin, so this would not affect the necessary heat dissipation of the headlamp, so once you are done, take your razor blade and trim the excess film on the edge and then exercise. all the holes one last time and look at this, it looks amazing. I mean, here's the before and here's the after. This lighthouse is predicted to fade yellow and also have sheets of rock in the years to come and that concludes my final step in the restoration.
Headlights turn yellow
permanently
so leave a comment below let me know what you think and if you are wondering where to buy all of these products are used they are in the description as always if you liked the video hit the button Like to see more DIY videos. Like this one, click on the Junky DIY guy logo to subscribe to my channel and I'll see you in the next one.If you have any copyright issue, please Contact