How to PROPERLY Install Acoustic Clouds | ADAM Audio & Music City Acoustics
Jun 05, 2021Hey guys, I'm Anders with Atom Audio and today we're going to talk about
acoustic
clouds
, what they are, what they're used for and how toinstall
them, so today we're joined once again by Graham from Music City Acoustics. I've done a couple of videos with them before, so if you're interested, check it out in the description below, but for those who haven't seen it, do you want to give a little backstory about what Music City Acoustics is and how did it really start? I started like out of necessity, one for anacoustic
treatment and then two to find acoustic solutions and things that would work in my studio in a house, so I started building things, researching and spending a lot of time trying different things and so thecity
ofmusic
.
Acoustics is kind of a culmination of all of that and our products, consulting and design work that we do really focuses on how to find the best and simplest solutions for home studios and the acoustic problems they typically face. In fact, we have a surprise giveaway. Graham will be giving away the acoustic
clouds
we'll be using today, so if you're a US resident, be sure to stick around until the end of the video to find out how to win them. We'll start with the most basic question: why are they important in a study? Clouds are very important for several reasons, especially in a home studio where you have an eight-foot ceiling or a nine-foot ceiling, if you're lucky.
More Interesting Facts About,
how to properly install acoustic clouds adam audio music city acoustics...
Sometimes that's the wall or boundary that's actually closest to you at the listening position, so you have a lot of reflections coming from that, which will distort the frequency response of what you're listening to and cause problems. with your stereo. image, so things won't be as accurate from left to right as you would like and then one of the most important things you can achieve with the cloud is to improve your low frequency response in the room and the ceiling is typically not the area . that people think about fixing that thing that you hear a lot about the corners and putting bass wraps and all the corners in your rooms and on the ceilings and that type of thing, but the cloud is what will really give you the ability to control your floor . -in ceiling mode and in an eight foot room it will be like 140 hertz and in the nine foot tall room it will be 125 hertz and it creates this huge increase in the frequency response of those frequencies and that's right where the acoustic guitars live at the lower end of the vocal range kick drums bass electric guitars pianos if you're trying to mix all that together you just have this huge push of amplitude at those frequencies it's really hard to tell hey is this a resonance on my guitar or is this the room that distorts things and makes me think that there is a resonance there and you are going to do too much EQ, so the cloud helps you visualize all the more common things that you would think of, but when I add a deeper cloud , something like six and a half inches, that can run lower in the frequency response, will also solve a lot of bass problems, as well as with any acoustic treatment, leave an air space between the treatment itself and the wall it is the same with clouds and how much air space needs to be left for that to really apply to any acoustic treatment and the reason is that as you move away from the wall there is more velo
city
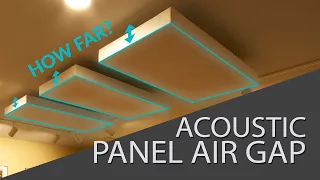
in the air particles and the way they How most acoustic panels work is by absorbing energy as it moves through the air, so the most important thing you do is simply place the panel in a better place to work, so with the ceiling you generally want match the depth of the panel, so if you have a six inch panel you'll want a six inch air gap, if you have a four inch panel you'll want a four inch air gap.
There are a few reasons for that, but the main one is that it increases air. If you make a gap too big relative to the depth of your panel, you're going to start to cause some negative effects and how well it absorbs higher up in the frequency response, so that's an area where you really optimize the improvement you get or the improvement in performance without causing any new problems, so let's say someone is in an apartment or something where they can't hang heavy acoustic panels on the ceilings, what would you suggest in that scenario that someone could do to alleviate it? some of the problems that can arise from not having an additional cloud, yes, not being able to
install
the cloud will always leave you with some challenges, but you know that each room will have its own unique challenges and problems and we are pretty good.
To accommodate those options, one possible option is to apply the treatment to the floor, it is not the most common, but both the floor and the ceiling contribute to those problems, so what a cloud does could also be done mostly in floor. Well, but obviously that presents some limitations, it's like you're not going to walk during your treatment and where you can put it and move around, but if your desk is there and you have the space, it's a very good option when you can't. Put anything on the ceiling if you have the ability and know that if you are looking for a new apartment, it is good to keep in mind that the higher the ceiling, the less safe things will be inside a cloud. it's an issue at least and so you know if you can get a vaulted ceiling or something higher to where it's not as critical or it won't be the first thing you want to do, those kinds of things that can be addressed, but not everyone has the option to do it , so today we will not only talk about the benefits of acoustic clouds, but we will also show you how to hang them
properly
and safely and how to get them. the best performance of them, so to start, what tools will we need for today's installation, so you don't need too many tools, tape measure, pencil, marker, stud finder, if you don't have a stud finder, you can drill some holes in the ceiling or feel around it to locate all the studs and find where a few different eighth inch and quarter inch drill bits are along with a drill and then a flathead screwdriver, a stool or ladder and a friend to that I have also put together an installation guide that you can follow and that you can also find in the description below so you can watch the video and read the guidelines for installing your own panels so that we have the space pretty well cleared and we are ready to Get started: The first thing you want to do before you start installing anything is going to be figuring out where it's going to go, you know, typically, like in a control room, your cloud is going to be centered in the room because your listening position is going to be centered in the room and then Your distance from the front wall will be based on where your listening position is and where your monitors are, so we'll use this room as an example, although it's not exactly set up like a studio or mixing situation.We're going to have the cloud centered in the room and then we're going to set it up as if our listening position is about five feet from the front wall and then you have to calculate the length and width of your room so that you can figure out where the center is. of your room from there, the second step is going to be figuring out where the studs are in the ceiling and that's always the mystery going into this, it's like they're going to run, you know, perpendicular to your cloud. or parallel and that will affect where our hardware goes and how it all comes together, so this ceiling is a little unique because it's plaster, so we're in an older house, the stud finders don't work, you can't touch it.
Because it's like concrete and wood, in this case we're going to drill holes in the ceiling when we hit a stud and then we can base it off of that, knowing that they're probably about 16 inches away, a typical type of stud. spacing and from there we should be able to measure and then not have to drill too many holes but basically using a small drill bit and a lot of patience we will drill some holes and figure out where they are, it took a few tries but we ended up finding a stud and now Once we find one, we can go ahead and drill a hole.
I will usually move 16 inches away from the hole where we find a stud to follow the typical stud spacing and that will help us figure it out. If the studs are oriented front to back like we were talking about or left or right after you find the second stud, make sure you have both marked on the ceiling and then you can go ahead and use that measurement to try to find a third stud. which will help you confirm which direction your poles are running and then also give you a pretty good idea of where your cloud is going to go and where those poles will intersect with it, so with the three poles we found, let's go ahead and measure their distance from one of the side walls as they go from front to back so we can add them to our drawing which will allow us to see where they are in the room and then where they are. we're going to cross with our cloud so we can install all the hardware on both the cloud and the ceiling and make sure everything lines up definitely when you're working on a cloud installation make sure you measure multiple times so that when you go to hang it and you're lifting that heavy thing with your friend that you don't have to do it a couple of times, so I'm going to take the measurements that we got from the stud locations and just draw them on our sketch. very roughly so we can see where the studs are in the room and where they are going to intersect with the listening position that we already have here and then as we draw in the cloud, we can see where everything is.
It somehow comes together with the cloud and all of our studs are placed in our sketch. We're ready to go ahead and assemble the cloud so we can figure out where all the hardware is going to go. Let's go ahead and go to bed. These panels on the ground so we can put the cloud together before we jump, you might want to put some plastic or something clean on the ground to make sure nothing happens to the fabric, so let's put this thing together that we're building. this cloud of our four foot by two foot base trap panels that are six and a half inches deep come in a ton of different colors this is the guilford asteroid gray color from maine all of our panels this year are now made with guilford from Tela Maine that we're really excited about, so when we put the clouds together, we'll either compose them normally, like we'll usually use three panels, it's a good size for most studios, or like smaller home studios, we'll lay them out.
They are all screwed to these one-by-four backer boards, and there is usually a two-inch gap between the panels, which is how you get the six-foot-four-inch width; You don't have to be too careful when you're lining them up at first, when we screw them in, you're going to screw the outside panels to the boards first so you can get the right spacing on the center panel and make sure everything lines up really well in this room, the studs they are running. perpendicular to the boards that we are placing on our cloud, so our studs run this way in the room and our boards, these 1x4s, run perpendicular to that if you are in a room where your studs run parallel to these boards where your Which boards go to your cloud or to your panels will depend on the studs, so you can make sure they line up.
It's all pretty well covered in the attached pdf that you can download and follow along in this case because the studs are perpendicular, the placement of these boards is not very critical so we'll place these boards six inches from the edge of the panel on the front and rear, if you don't want to see the hardware at all, you might want to take your boards and place them a little further into the panel, just make sure you don't get too close to the center so your weight is fairly evenly distributed to align the board . Let's make a mark on the back. of each panel using that six inch mark that we talked about on the panels and then when we lay out the board, we'll be able to line it up with the mark on all of our panels.
We will do this on both the front and back of all the panels, now that you have all the panels marked you can go ahead and line up the board with your markings on each panel and start pre-drilling the holes for the screws that will go into the boards to secure them. to the panels, so if you follow the installation guide, this is where you're going to use the eighth inch bit and as you align this board here, make sure it lines up on both marks on your first panel and then what we recommend doing is to put a screw on the outside edge, so the reason for starting with just one screw is going to let you rotate that board a little bit, so we'll jump to the other side of our cloud will secure the outside edge and then we'll go back and put all the screws in. internals on the inside sides of our panels so we can make sure everything stays nice and straight and consistent throughout this process after having both outside edges of the panel screwed in with a screw, we'll go back and do the outside panels but this time in heinside edge so we're going to do the same thing with the other outside panel here and if you see it's off this mark a little bit now and this is our six inch mark where we want the edge of this board to line up with our panel and that's the reason why when you start on the outside sides of the panel you just want to put one screw in because this way we can come here and turn it back and make sure it's lined up on our sea with our mark on both the outside edge of the panel and the inside edge of the panel and from here as Now that we're moving on, we can start driving two screws in all the places where our 1x4 board was pre-cut to a length of six feet four inches.
It's kind of a regular 1x4 that will leave you a two inch gap between each of your panels, so Before you go ahead and screw the center panel to the cloud, make sure you have the proper gap, so with the first side done, we'll move on. Go ahead and we'll repeat the process for the second side and then we'll be ready to place. the hardware in the cloud, connecting the second board to the cloud is exactly the same process, only now it's a little easier because everything should be aligned pretty well with the assembled cloud, we are ready to figure out where our screws are going to go. eye. go to do that we need to know where the center of the cloud will be in the room and where those studs will be that will tell us where the intersection of the cloud and the studs is in this case our The cloud will be 72 inches from the side wall because the room is 12 feet wide, our first stud that we will use is one hundred inches from that wall, so if we know that this stud is 100 inches from that wall and we want the center of our cloud to be 72 inches from the wall right, we're going to subtract those two numbers and that's going to give us the space from the center of the cloud to where the eye screw is going to go, so in this case we're going to take 100 and subtract 72 and that's going to give us 28 inches, so now We can mark from the center of the cloud more than 28 inches, at this point is where the stud that goes through the roof will intersect with the cloud. then we will simply repeat the process for the second sub that we are going to use, in this case that stud is 52 and a half inches from the right wall, so we will subtract the center position which is 72 inches, so take 72 minus 52 and a half , which gives us 19 and a half inches and again that will be the distance from the center of the cloud, so we will mark it so that those two locations are where we are going to place the eye screws on our cloud the eye screws are going to go in the center of our 1x4 board here, so I'm going to go ahead and mark the center position which in this case is about an inch and three quarters from the edge of this board, so now we know exactly where to pre-drill our holes and then we'll repeat Exactly the same process for the second table, but this time you don't have to do any calculations because we've already done it now that we have all of them. of our eye screw locations marked we're going to go ahead and pre-drill those holes and then screw them in so we can determine where our hardware is going to go on the ceiling from there so you're putting the eye screws in start them by hand and then you can It may be helpful to finish tightening them with a screwdriver so you can make sure they go completely in there, they give you an extra push.
Another helpful tip when doing this is to make sure the eye screws are installed parallel to the boards you placed when you are hanging the cloud, which will make it much easier to attach the hardware that we will have on the ceiling to the eye screws. on the panel. With the cloud fully assembled and ready to go, the last step before we can start working on the roof is to determine where the roof hardware actually needs to go and that's me, based on where these eye screws are here on the cloud, to calculate For that we need to know the distance from the front wall to the front edge of our cloud, which in this example is one foot and then we're going to take that foot and add it to the distance from the front edge of the panel.
For our eye screws, this first eye screw is seven and three quarters inches from the front edge of the panel, so we'll take one foot plus seven and three quarters and that will give us the distance from the front wall that we're on. We'll want to drill through the stud and attach our hardware and then we'll repeat the process for the second eye screw here so this one is 40 and a quarter inches from the front edge of the panel, so again we'll take one foot the distance from the front wall to the front edge of our panel and then add the distance from the front edge of the panel to our eye screw and that will tell us where to drill for the second set of hardware on our ceiling studs with the square measurements for our ceiling hardware , we're going to go ahead and mark all of your locations and drill the holes, so before we drill any of the holes now that we have the ceiling marked for all of the hardware locations.
I'm going to measure them from brand to brand to make sure they align with what we actually have in the cloud, so that if there are any mistakes we've made in this process so far, we can catch them before we start. When putting holes in the ceiling with everything marked and double checked, we will go ahead and drill the holes in the ceiling, so if the studs are not kept perfectly straight or parallel to the walls of your room, sometimes you may miss them just by a hair like we just went through if you are very close to where the stud is it won't be the end of the world the hardware gives a little and when we start to level it you can adjust it with the turnbuckles so in this case we won't have to move nothing on the cloud we're just going to adjust here with the turnbuckles and make sure everything is level once we get the cloud up with all the holes drilled in the studs that We're ready to go ahead and attach the hooks the same way we did when we attached those eye bolts in the real cloud, once this starts threading pretty tightly into the stud, it's going to be very difficult to turn it, so use a screwdriver. or something that gives you a little extra leverage to turn it and place it on the studs, it will be very useful when we are installing clouds.
We use these tensioners. They make it very easy to level the cloud once it's been set up and if you want it at an angle or if you want it flat you can really achieve all of that once it's already in place and the best way to use them is to open them up a little bit to that they are not that way and you can tighten them. or you can let them down and that will give you the most control over how your cloud will hang once it's up, so the last step before lifting the cloud will be to attach the turnbuckles to our hooks and when you do this, you want to make sure that The hook is facing outward, which will make it much easier to put the cloud in and secure everything in place, so when you pick up that big, heavy cloud, these things will slide right in.
Instead of having to really fight and search for it with all of our hardware in place, we're going to go ahead and pick up the cloud and place it on the first set of hooks and then we'll move it up. the second hooks and when you do this just make sure you have your space well laid out where you don't have anything in your way if you have your monitors or anything that's in the room, it's probably a good option Good time, if you haven't already, To take them out, place them in a safer place, move the desk if necessary, the cloud is going to be heavy, so make sure you have everything laid out so that once you pick it up you are ready. to go and you can install it without having to reconfigure it and get it back up again, so once you have your cloud installed and installed, the hard part will definitely be over, so the last step here would be to just level it right now.
Looking at it, we have a little bit of a sag here on the right side that we're going to be able to fix by just using those turnbuckles to adjust things a little bit here and there, like I was doing. saying that if you wanted to tilt it, you know where the back of the cloud is a little bit higher, you can use those turnbuckles, pull the rear ones up and release the front ones, you can really do whatever you want with them, so thanks to all. for watching uh graham, thanks again for doing this video with us man we hope you find it really insightful when setting up clouds in your studio and again if you want to win this exact set of clouds you can do so by entering the link.
Next you just have to sign up for the Music City Acoustics Newsletter as well as the Atom Audio Newsletter if people want to learn more about the products that we use and everything else, where can they go? You can visit our website, it has all of our products there, we also have hardware kits like a cloud hardware kit like the one we use today available in our accessories store and then we have a ton of information and we like the installation guides if you have any questions about how to do it. Just contact us and send us an email and if you enjoyed this video, please like and subscribe and we'll see you next time.
I just want the good news from the bad news, bad news, well I didn't do this. correctly with all our hard spotting looking so it took us a few tries but we found our first stud here holy that's hot don't do that yeah I just want to reiterate don't drop don't drop the zinc. in your head and blame us
If you have any copyright issue, please Contact