How To Paper Mache - FLOUR VS GLUE
Jun 05, 2021Hey guys, I'm Kristin, so in today's video I'm not only going to show you how to make
paper
mache
, but I'm also going to show you two different recipes that you can use. I have seen many different variations of recipes online and I have tried a few of them and the two that I am going to show you are the best that I found. Make sure you stay until the end because I'm going to show you a couple of things not to do and I'm also going to show you projects that you can make withpaper
mache
because you might be wondering who does that unless you're in kindergarten, but actually There are a lot of fun things you can do with this, so wait until the end to check it out.
For this first recipe, we will be using
flour
, so what you will need is a cup offlour
, a cup of warm water, 1/2 tablespoon of salt and then a fork or spoon or maybe a mixer, anything to mix the ingredients, then you'll also need a plate, a pan, just something to put it on. I recommend something you can throw away later, so we'll start adding the flour now. I recommend that you try breaking up a little bit of These lumps before you add the water will help a little bit and now I'm going to add the warm water so I'm just going to do a little bit, maybe 1/2 mix it in and then we'll add the other one. half makes it a little bit easier to mix and don't worry about splashing everywhere so it should be very thick and doughy at first and I'm already spreading flour everywhere so now we'll add the other half.
More Interesting Facts About,
how to paper mache flour vs glue...
Alright, so I'm going to mix this up and let you know because this is going to take a minute or two until it's completely mixed. Okay, so I have this mixture pretty good, there are some lumps. here, so do your best to remove any clumps. Now we're going to take the salt and just sprinkle this on top. Here now you might be wondering why salt actually helps preserve your project and prevent it from getting moldy, so this is the consistency. it should be like this it should run off the fork if you hold the fork or spoon up and it just gets stuck you don't have enough water make sure before you start this project that you have the newspaper strips cut and ready to use because sometimes the
glue
mixes and flour mixture can start to harden and thicken very quickly, so having it ready will be much better for everyone, so now that I have all my things ready, I recommend getting some type of bowl. because it's going to be easier to put the balloon inside to keep it in place, so I'm just going to take my strip of paper and I'm going to put it in there, not too much, and you can see it's going to be very thick, so what I'm going to do is I'm going to run my finger to remove a little bit and then use that same finger to wipe it on the back, just making sure both sides are completely covered with the mixture now when you first do it. place this here the balloon will have weight so it will want to fall like this so you will have to hold it with one or let it fall there we have a perfect balance so now I'm going to Dip the next one there and it's just because it's falling because the right weight balloons are practically weightless and then we're going to put this heavy, thick material on it, so I'm going to put another one on this side to even it out. weight and then what I like to do is smooth it out so I don't know if you can see there are some bumps there just make sure it's smooth like this so now I'm going to go ahead and we're going to cover everything while you apply the newspaper after you do that, maybe you know, I don't know, five ten strips, you might want to rinse your hands because what's going to start happening is the board that you use the flour mixture or theglue
on.
A buildup will start to build up on your hands and your hands will become very sticky, making it harder to grip the newspaper and continue applying it. It's just your hands and everything will start to stick together, so it helps if you can rinse your hands a few times while you apply the newspaper, so I have everything covered. You definitely want to check it and make sure you don't see any of the color so the leads appear bright green. I see anything, even if it is covered, but I can still see the green. It's most likely not thick enough, so place another piece of paper over it now for our second option and we'll use glue, so what are you going to want to do?

It's having a cup of glue or two of these bottles, half a cup of warm water and then a teaspoon of salt and then again a fork or a spoon or a mixture or something like that and then we'll also need some type of bowl or plate. to mix it up to make the glue mixture we're going to start by adding 1 cup of glue or two of these containers now we're going to add our warm and now we're going to start mixing this so again this is going to take a few minutes so I'm going to mix all of this together and then I'm going to show you What is the next step.
Okay, I've got this all mixed together and it should be a creamy consistency so you can see it. it still looks like glue but it's like watery glue so if this looks more translucent where it looks more like water you don't have enough glue here so it should look like very thick glue and now we're going to add salt and we'll mix it right now like I mentioned earlier in the video. You may see a lot of recipes online where the ratio of glue to water is equal, like one cup of each or two cups of each when I tried this.
It didn't work for me, it was too watery, so I don't recommend that particular recipe, we'll do the same thing with that, we'll just stick the paper on there and then I'll wipe it off a little bit make sure it's on both sides you won't notice this is going to be much longer. watery that when you make the flour mixture the mixture with the flour is going to be very thick it's like if you've ever made dough like this it's going to be much more watery, so it's a little, some people prefer it because it applies a little more easily.
Your hands will get sticky, though just as they did with the flour, so you'll probably need to rinse a little. here and there, but we're going to cover the entire balloon and then I'll be back to you, you're going to want to make sure you apply two or three layers of newspaper when you use the glue mixture, so I've done several layers. I did a total of three coats on this balloon, so now all we have to do is set it aside somewhere and let it dry for at least 24 hours. Now, when you let them dry, you can let them rest.
On a plate like this, the only drawback is that you will have to rotate it probably once every hour because what will happen is all the glue will start to go to the bottom and it could get stuck and it can also leave a circular indentation at the bottom of your project. of paper mache, so you'll want to keep turning them if you're leaving them on a plate. The other option you have is to take some string and then we'll tie it around the balloon and hang it somewhere. So here I've hung them in our garage right next to this table and that way I don't have to worry about them sitting on a plate and turning them around.
I can leave them here for 24 to 48 hours and then come back and check them now you're going to want to put some newspaper down and more specifically the balloon with the glue mixture because it will fall to the bottom and start dripping so this will be about an hour or two hours later and you can see. there's a puddle of glue, so this is exactly why you're going to want to make sure you have newspaper down, so I have both of my balloons completely dry. It's been almost 48 hours, so let's try it and see how they turned out.
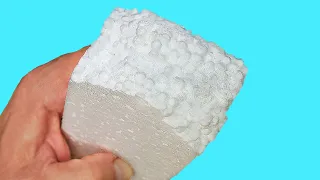
I notice from the beginning that this one with the flower seems a little firmer, you can't really press it too hard, there's a little bit of slack, but on this one it's a little more flexible, I guess that's the word, but let's open it up and see what we have, first we'll do flower one, then I'm going to start with flower 1, we'll just cut the balloon so it's like I can feel it deflate inside if you can. Listen to it so you can cut. Look in there, the balloon completely deflated and it's like sitting there, as far as the mache goes.
I feel like it held up very well. I feel like this is pretty firm, it's not really collapsing or anything. I think it turned out very well. Let's do the other one. We will do the same. I'm just going to cut the side here and then try to cut some of this back a little bit. I can hear it. It comes out well, so with this one I don't know if you can see it with the same coloration. See how the inside looks green? That's because the balloon was not removed. You can't see what I am.
I'm trying to get the balloon out that came out okay now as far as this goes it actually feels pretty firm if you know whatever project you were doing this would definitely work with the inside being very soft so I think as far as the part of the paper mache says they both turned out very good so just a couple of pros and cons regarding each recipe so I noticed that the flour mixture was a little thicker, stickier and a little trickier to apply, but I only had When applying a layer of newspaper, it has a bit of a rough texture, so it could affect when painting it and such, but on the other hand it is much firmer, so it will probably now be more durable with The glue recipe It was much easier to mix and apply, it was much more watery and it didn't stain my hands as much and it was much easier to use.
The downside is that I had to apply three coats. so it took a lot longer, it has a much smoother surface, there aren't a lot of rough edges or anything like that and I don't know if this is an advantage or a disadvantage, but it is a little more flexible, so if you are looking for something so You may be a professional, but if you are not, then it could be a scam. They both had exactly the same dry time so that's not really a factor at all and you can see that the one with the flower is much lighter so it could also work as a base so it will all depend on you knowing what type of project you are doing and what will be best for you, but I recommend the two recipes that I have included in the video description, guys, that's it for today's video.
I hope you liked it and if you liked it please give me a thumbs up and if you are new to my channel don't forget to subscribe and then hit this bell. so you can be notified when I upload a video, I'll talk to you later
If you have any copyright issue, please Contact