HOW TO MAKE BUTTER - THREE DIFFERENT WAYS!
Jun 07, 2021Hi guys, I'm Carolyn from a farming family and today I'm so excited to share with you how to
make
homemadebutter
from your raw cream. Look at the color of this homemadebutter
, it almost looks like cheese, it's incredible, but if you have Have you ever worked with raw cream? You will know that there are many nuances to obtaining butter that turns out perfectly and stores well in the refrigerator while still having a great flavor, so today I will show you all the tips and tricks. Right now, when you're making homemade butter from raw cream or even if you're using store-bought heavy cream, there are a few things you need to keep in mind to get the perfect butter and it doesn't take long. to become butter now butter making changes throughout the season especially if it is raw milk coming directly from your own farm dairy animal or a local farmer the reason for this is that as the seasons change , the food changes the cow is eating the milk and the cream changes too, that means at one time in the season making butter can take five minutes and at another part of the season you can really struggle to get the cream to turn in butter, it is very important to remember. that when you work with these living things taken directly from the animal you really need to work with the seasons and it's verydifferent
than just buying a homogenized, you know, highly produced and carefully created product that comes from a box in the supermarket. store, so you'll have to have a little patience and a little flexibility when making butter from raw cream.
The important thing to know is that there are
three
aspects to successfully turning your raw cream into butter. and quickly, that's right, these things canmake
a real difference. You can take a short period of time to make butter or you can take a long time to make butter from the same cream, depending on your technique. Now, the first of those things is. Ideally, the temperature of your cream should be between 62 and 63 degrees when you start trying to turn it into butter. This is super important because if it's off, if it's too cold, it can take a lot longer if it's too hot.
More Interesting Facts About,
how to make butter three different ways...
What you're going to produce will have a sort of slimy, melty quality that's hard to recover from and you really don't want that, so you want to aim for around 62 degrees, which means your cream needs to come out of the refrigerator and come up to temperature, this takes several hours if you have a cold kitchen, the best way to do it is to just take it out the night before and let it sit to come up to temperature overnight, now you have to be careful because again you don't want it to rise too much and anything above 65 is really too high to make good quality butter.

Now, the second thing you need to think about for your cream is growing it. Sweet cream does not produce butter as easily as a little. cultured cream, so there are a few
ways
to do it: you can leave the cream longer and let it start to ferment naturally for a day or two and get a slightly sour cream or the easiest way to do it while controlling the flavors is to put a little bit of starting liquid, live buttermilk is ideal, about a teaspoon of live buttermilk put into your cream, even why it's cold the night before as you take it out of the refrigerator or just a few. hours before I can give it enough culture to not change the flavor much, but to help the butter cream much better.
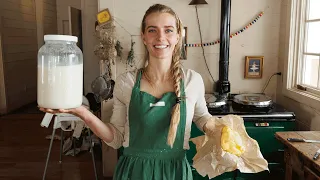
That's exactly what I've done with this creamer here, it's reached a temperature of about 62 degrees and it's had a bit of a whey culture over the last four hours. The third thing that really affects whether butter turns or cream turns into butter is the volume in the container you're going to use to turn it into. cream your butter. Today I will show you
three
different
ways
to make butter. We'll just use the old method of shaking it in a jar. I'll show you how to do it in the kitchen. help that would work for any kitchen appliance.You can do the same in a blender. You can do it in a food processor. I have made it in a Bosch blender. The same thing actually applies, so I'll show you, but. Then I'll also show you a special electric butter churn that I use because I can make a lot of butter very quickly, so I'll show you all of them, but for each type of machine or method. Whatever you use, it is very important that you never fill the container more than half with cream, this is so that it has room to expand but also to splash.
The sloshing motion of that cream is what will turn it into butter. It is very important that you never fill any container more than half. Once you have those things, you're ready to start making butter, so we'll start here with the jar that I have now, you can see. I forgot it was there. I have the plastic lid but I also have the metal lid on the inside because these plastic lids are not airtight so you can use the two part ring on this. Today we have the plastic lid with the metal lid. inside it's okay and I'm going to take my butter which has reached temperature sorry I'm going to take my cream which has reached temperature and this is very full so I'm going to try not to spill you can see how thick it's already starting to thicken a little if you leave this cream long enough it would start to thicken even more on top so the longer you can leave the cream while it's still sweet the better it will be ok now that I have my jar half full and I have a nice lid on, so Otherwise this will spread everywhere and all you have to do to do this is just shake it now it's great to get your kids involved.
In fact, mine love making butter this way even though we make butter every week. in our other methods of doing it, they still enjoy this. A great way to do this is to start a jar and simply pass it around the table during meal time, let everyone take 30 seconds to shake and then pass it to someone else if you have your temperature and culture correct, this can take as long as just five minutes, maybe as winter comes and the cow's diet changes, it may be 15 to maybe even 20 minutes, but you know it will always be that way. the shorter end of the spectrum if you've got your temperature, your volume and your culture right, okay, I'm going to hand this over to a kid to continue here now let's look at the Kitchenaid.
Now the Kitchenaid is excellent. Way to go in the kitchen Most people have some type of stand mixer and it can be very easy to use. I like to start with the whisk until I get to the point of whipped cream and then I go ahead and change it up. to a paddle because those wire beaters are a little hard to clean when they get clumps of butter built up in them, so same thing on this, you're just going to fill the bowl no more than half full and actually for something like a stand mixer I would go to about the third mark instead of even halfway so you don't end up with cream all over the counter.
Now you see that that's not going to contain much cream. What if you know less than two quarters? about a quart and a half I just used here so it's not going to hold a lot of cream, that's great if you only apply a small amount each week but if you put in gallons like us you're going to If we want a larger option we'll talk about that in a moment, so we want to start low, bring it to the whipped cream stage and then we'll change those paddles, this is going to be a little noisy, okay?
So Justin is an example, you can see how he starts. I'll finish it in a moment, but I want to introduce you to this handy little machine before we get started further. I'll put the link where you can find this. thanks, got caught in the court, here we go, I'll put the link where you can find this in the description. I am absolutely in love with this and this is an electric butter churn it's nice and quiet and I can make a gallon and a half of cream at a time so when you fill this up it hits the gallon and a half mark and this really simplifies making butter because I don't need to make several batches like I do with the kitchen utensil.
I can make a big batch once or twice a week to use up all my cream and turn it into butter, but the process is exactly the same as everything else, you just take your cream and you're going to put it in this, it's got the nice stirrer here down below we're going to go ahead and place it right of course we're working with raw cream here so if you watch my video on raw milk you'll know the importance of working very cleanly so that all of these appliances All of these utensils were washed immediately before use them, although they were clean when they were on the counter, we gave them another good wash because you always want to work cleaner when you work with this good raw milk.
Remember raw milk and raw milk. Cream is very healthy right out of the cow, but if you're not working cleanly you can introduce contaminants that can cause problems, so like everything else you're working with in your kitchen, you want to work really clean. Look! how thick is this cream here, this is amazing, okay, the thickest cream always rises to the top, so there is almost a layer of this super thick cream on the top, of course, if you want, you can scoop it out to put it on the berries and the strawberries and cream right there, oh, how delicious, okay, this is only about a gallon that I just put in here now, but it can hold up to about a gallon and a half and then all you have to do is go back to Screw on the cap and then cover it.
Continue to start and you can see that it really spins and splashes. I love this machine, it is much quieter than having a mixer running in your kitchen for any amount of time and again you can see how well it handles this full gallon of cream. does the same thing for that gallon and a half, okay, I'm going to turn these machines on, let them run for a while and we'll come back when we start forming butter, okay, so this has been running for a couple of minutes. I've also been working on the jar by hand and you can see at this point we are at the fine whipped cream stage, here you know, another minute or two and you could add a little powdered sugar and vanilla and I have delicious whipped cream right there, but of course, we're going to move on from the whipped cream, we're going to use butter, so now I'm going to go ahead and change this and put the paddle.
You can see that the jar itself I've been shaking that and it's actually moving a little bit faster, it's very close to turning into butter, it's like thick, grainy whipped cream, so you can see making the jar can actually go a little faster, but of course you have much less. In this now, this right here is in that stage two of heavy whipping cream, so it's just humming from having finished a gallon, but I don't need to do anything different, I don't need to change anything, so I'm just going to let it keep going. , okay, turn it back on, so this has been whipping for a few more minutes here and you can see we're past the nice light whipped cream stage and now we're at a really heavy stage.
This is almost like a really melted ice cream stage, but it's a little grainy, you can see it's lost that smooth quality, so we're just a few minutes away from the cream breaking up or the butter coming out, is the term. old for this and This is where, all of a sudden, you'll go from something that looks like a product, a homogenized cream that's a little spongy, to a thick, yellow grain of butter floating in buttermilk, which will be quite clear or somewhat whitish. , maybe with a little bit of a bluish touch as we remove all the cream from the buttermilk, we remove all the fats from that cream and we are going to leave a fat-free product that will look like light blueish maybe a little greenish and that's going to be real buttermilk now you can see in this jar that we've been shaking it's just one stage further along it's very grainy now it's about to break up completely and it only has buttermilk and butter in there This one is still moving forward, it's a little hard to tell seeing how far along it is, but it's very close to the same stage as this one right now.
Well, again, we have our three different methods of making butter. here and the first thing to do is the jar that we've been shaking and you can see that as the cream breaks up the buttermilk separates and you end up with a piece of butter. Now it's one of the biggest mistakes beginner butter makers make. It's not about continuing to stir long enough when the butter starts to turn into butter and starts to separate it's a little disorganized and all in little clumps so you have to keep stirring until you end up with a big clump or if it's in a mixer you have to Continue until it starts to group into larger groups.
Now you can see we're very close in this mixer, so I'm going to turn it back on, but you want to make sure when we're trying with something like a stand mixer to keep stopping and scraping the sides, otherwise you'll end up with a bunch of whipped cream. in thetop of the bowl and you'll end up with butter and buttermilk in the bowl and this one. over here it's a little bit further on, I'll bring this up so you can see how we're starting to get little pieces of butter in there, it's getting really close, but it's not still in a container like this or even in the jar, it may be very difficult to know what's going on inside the jar without stopping, opening and looking, but you can be sure that when you actually turn the butter into a liquid, the liquid will evaporate. changes substantially, you will go from something that you can't see and that is very creamy to something where suddenly the jar is completely clean and you can see the inside of the jar.
It will also sound very different because you have a big solid lump with a thin liquid instead of having that thick cream now, one thing that is important to note is that while one mistake people can make is not continuing to stir or whisk it long enough , another is keep whisking it too long, that often happens if you're using something like a mixer and you walk away and forget about it and what can happen is that the buttermilk can actually split back into the buttermilk. and you may end up getting past the pretty chunk stage and you get to a place where you have a hard time getting the butter out of the buttermilk, so you need to watch it closely when you start getting to any of these stages here and now while these other machines will have to keep running.
I'm going to show you how to handle butter and butter milk. Now, the first step to get usable butter is to separate the milk with butter. This is really important for the sake of your butter, we'll talk about that in a moment, but first let's talk about this buttermilk. This buttermilk is not what you would go to the store and buy listed as buttermilk, which is a cultured dairy product and often has whole milk fat. in that means it's much thicker and is usually made from whole milk, not actual butter milk that comes as the byproduct of the butter-making process, so it will taste different than what you'd be used to if you drink buttermilk. from the store that said that this is a very, very useful product.
Some people like to drink it neat. Some of my kids like buttermilk like this, but it's wonderful for baking. It is a wonderful product for baking, so be sure to save your buttermilk if your children. I don't want to drink it, if you don't want to drink it, put it in some baking and if you don't have any baking, you're good to go, so in general, animals will love getting a little bit of buttermilk, okay? So, now. We have butter that has bits of buttermilk in it. I want to point out now that that pint of cream has made us probably about a cup of butter, which will be half a pound of butter that we just made and you know, that's a pretty good yield, it's very difficult to calculate how much butter you're going to get from one cream. because that will change seasonally along with the cow's feed, just like cream changes, so sometimes it will be a very high percentage, sometimes it won't.
So far, this is a pretty good percentage here right now, although this buttermilk is all mixed in with the butter and the thing about buttermilk is that as soon as you take the butter out of it and it turns into buttermilk , it goes bad pretty quickly, it gets really sour. quickly and will make the entire butter sour as well, so for the longevity of the butter it is really very important that you wash this butter. The best way I've found to do this is to go ahead and run it under the sink with running water. Water and let you wash it while you work the butter.
I usually do this with my hands until the water runs completely clear. If you don't take out the buttermilk, your butter will go bad very quickly now if you plan on consuming this. you know, in the next few hours you don't need to be too meticulous, meticulous about it, you can just drain that buttermilk and go ahead and eat the butter like this, but we're going to go to the sink and take the next step okay, now we have our butter and it still has a little bit of that butter milk in it so it's very important to get that buttermilk out of the butter otherwise your butter is going to go bad real quick now if you go.
To use this butter within the next 24 hours or so, you don't need to worry too much about this step, you can simply drain the buttermilk, but if you want to store it in your refrigerator or freezer for longer, you really need to wash it. This is very important so that the butter doesn't spoil, so we want to use room temperature water. This is very important if you use cold water, the butter will harden so much that it will be very difficult to wash away all the buttermilk. of it and if you use hot water it will start to melt so you really want to use room temperature butter somewhere, water somewhere, you know, high 60 degrees is what you're looking for, mid to high 60 degrees and you're going to want to wash it until it's completely clear as you work with it now historically they used wooden butter paddles, something like this, a couple of them and this still has a little bit of cream in it and they would work it without their hands so their hands wouldn't heat up the butter, this was often because they didn't have a way to cool things very efficiently, especially water, but make sure your hands are clean and I recommend going ahead and using your hands now.
You can see that when you start working with it, it starts to get cloudy, that's because you're just going to knead in all the buttermilk. Now this takes a minute or two to do correctly and clear it completely, but this. One of the most important steps in making butter here is to properly wash the butter. Now in the old days they would wash the butter very carefully and put salt on it to preserve it a little bit and then they could store it in a cool cellar or cellar of some kind they didn't even refrigerate it and this washing process was one of the keys to making sure the butter would last very well without refrigeration, okay now you fill the water with buttermilk like you want? to dump it in and add some clean water, this usually takes about three changes of water, sometimes more to achieve this, if you're working with a large amount of butter it can take quite a bit, you can see we're getting pretty close.
It's no longer clear here, so I'm going to do a little bit with this dump and do a final rinse to make sure it's really clear and keep working with it if the butter starts to soften a little from your hands. You can always lower the water temperature a little to help maintain freshness. Well, we have nice, clear water, very clean, so we're going to drain it very well. Now the next step is to add salt. Now we have our butter and it's nice and clean but there's still a little bit of water coming out so this is the next stage for the butter to last well which is going to be salting it and then draining it now when we're salting the butter we're not just giving it flavor, we're putting that salt in there because it will help draw out the extra liquid, it's those pockets of liquid that really keep it from being good in the refrigerator, even if it's not spoiling from the buttermilk, you don't want to get the butter out and put it on the counter so that it softens and a lot of liquid comes out, that's not a good way to do it, so we need to salt it to reduce the salt. our butter and salt, the standard salt to butter ratio has to do with how much cream you started with, for a gallon of cream you would use a teaspoon of salt, so for a half gallon of cream you would use a half teaspoon of salt. for a quart you would use a quarter teaspoon.
This was a pint that we started with, if you remember, in that hand-shake jar, so we're only going to use an eighth of a teaspoon, so I'm just going to give it a little bit of salt for that eighth teaspoon. Now you don't want butter that tastes salty, but you want it to taste good and have enough salt to extract that liquid. You can use any salt you normally use. In your kitchen you don't need to use expensive or fancy cheese salts or anything like that. Now we're just going to knead this really well and make sure it's mixed really well as I do it, so that it comes out liquid.
I'm trying to keep the butter out of that liquid, the quicker we can drain the butter, the sooner we can put it in the refrigerator or the freezer or wherever we keep it good, so I have a little bit of liquid, I'm just going to pour and right now I'm going to go ahead and dilute it for a few minutes, fine it out and let it sit here for a few. minutes to let the liquid come out. I'm going to go ahead and put a towel under one edge so I can keep it tilted a little to let the liquid drain.
About five minutes is really all you need for this. process and then you'll have a little puddle of water on one side that we're going to drain, okay, so the salt has brought out a little bit more liquid here, so I'm going to go ahead and pour it in and we're ready to package our butter now, obviously. , if you're going to use it right away, you can go ahead and put it in your refrigerator and you know, use it as is if you're going to use it in a few days. I'll want to package it up so it's not exposed to all the air in your refrigerator for an extended period of time, so the best way I've found to do it is with just a little bit of plastic wrap, generally, if I'm doing it.
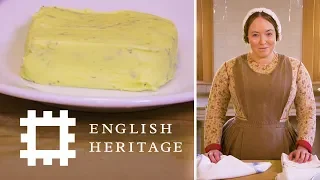
I weigh this in large quantities and weigh half a pound of butter in each package. Half a pound of butter is equivalent to one cup of butter, so it's very easy to know exactly how much you have in a package if you've weighed it like this. you just want to wrap it nice and tight and it stacks better if it's in some kind of rectangular disk. It also thaws faster if you have it in the freezer, if it's in a thin disk, so I like to aim for a similar shape. that now look at that beautiful butter look at that color that's all those vitamins that you don't get from store bought butter turning it white this is the color that butter should really be this or even more yellow in some cases now let's Speaking of storing it, it will last well in your refrigerator for several weeks, but if you want to store it longer, the best place to put it is in your freezer as it can be stored there for quite a long time. a year I tend to make large quantities of butter and put it in the refrigerator, what I'm going to use for a week, put the rest in the freezer and then we store it in the freezer for the winter, when the cow is dry, no we use it. of that and then come back to fresh butter in the spring, guys, if you haven't made fresh butter, I really recommend you try it, it's so delicious, it's something so different, it's like a luxury in your refrigerator instead of having it. store bought things that aren't exactly the same, try making your own, even if you just have to go to the supermarket and buy some heavy cream and do it that way, but if you can get your hands on some fresh raw cream, This Everything is amazing, take care guys.
If you have any copyright issue, please Contact