How To Make A Wedding Cake
Feb 25, 2020Hello sugar lovers Liz, here today I will show you a very special tutorial. I'm making a new version of my first
wedding
cake
and I'm going to show you everything I wish I'd known when I made my firstwedding
cake
. So when? I started decorating cakes. There was no Facebook, there was no social media, there were only books and there were many things that the books did not tell me. I didn't understand how to cool my cakes. I didn't understand how to stack them. to get those super sharp edges, but did that stop me? No, my first wedding cake was just a mess, just sagging corners, it actually vibrated to crumbs on the way to delivery.
Luckily, it was just for a friend, so she forgave me, but that's how it was. literally a nightmare. My first tear cracked so I had to rebake it and then tried stacking it warm so it would crack again. I was using a box mix, I mean I was using Wilton fondant. I just didn't know what I was doing recently. I posted a picture of this cake on my social media and said: Hey guys, if you're feeling bad about yourself, this is where I started to show you that everyone starts from somewhere and it's usually not very pretty, especially my things and something else.

More Interesting Facts About,
how to make a wedding cake...
People were joking about maybe redoing it and I thought it was a great idea, so that's what I did. I redid my first wedding cake and I'm going to show you exactly how I did all those steps for this square wedding. cake, I'm going to
make
a 10 inch, 8 inch and 6 inch layer, so I have two sizes of each cake pan, but if you only have one size, you canmake
that work too. In total, I had to bake three batches of my white cake recipe to have enough batter for all my layers. For square layers I always put parchment paper in the bottom of my pans to make them release easier.
You don't have to do this with round pans and I'm using my homemade pan. Release molds because it's cheap, it's easy and it works great. I fill the pans about three-quarters full, since my largest cake is only 10 inches. I'm not even using a baking core because it's not going to make a difference, but if you're making 12 inch or larger cakes, you may want to use a baking core to help them bake evenly. I like to weigh each pan once the batter is in there to make sure each layer has the same amount of batter as the last so they bake evenly and are all the same height.

My large 10 inch cakes took about 40-45 minutes to cook completely at 335 degrees and then of course the smaller cakes took about 30-35 minutes once they are done. baked, go ahead and let them cool in the pan for about 10 minutes and then you can turn them over to cool completely. I like to put mine in the freezer so they cool faster so I can coat them with crumbs the same day I bake them. Baking Wedding Cakes I usually start baking on Wednesday and then cover and frost everything on Thursday and that will leave me all day Friday to decorate.
I always cut the brown out of my white cakes because it makes the slices look really beautiful. a little secret to those perfect slices, it's not mandatory but especially for wedding cakes you might consider doing it and it just takes a little time. I like my layers to be two inches tall and then I usually split them in half lengthwise so I get more buttercream per cake tier because who doesn't want more buttercream? For more information on how to trim and squeeze your cakes you can see my tutorial at the link above or on the blog, so I have all my cakes cut out and ready to go, I have all my cake boards cut out and my cream butter, so now I'm going to frost all my cakes.
I don't use simple syrup with my cakes because they are already quite wet, but you can if you want. If I'm not making the filling I do about a quarter inch of buttercream between each layer of my cake, sometimes I do three layers of cake, sometimes I do four, it just depends on how much cake I have to bake and how much. space that I have in my freezer I'm going to go ahead and make my first layer of buttercream on my six inch cake and this is called a crumb coat, this seals in all the crumbs so you can get a nice clean layer of frosting. the outside, especially if you are not going to cover it with fondant.
Square cakes and round cakes are very different from frosting, so while for a round cake you would only have to do a crumb coat and a final coat for square cakes it takes a while. little more effort, that's why I'm using acrylics so I can get super sharp edges and corners, but you can use the reverse method, you can use ganache, whatever your client wants, you have that option open, I definitely don't recommend you use anything like cream cheese frosting or whipped cream, especially the cake will be on the outside and the cream cheese frosting under the fondant will end up causing the fondant to melt, so keep that in mind.
I know you guys are probably wondering how much buttercream I used for this and this was approximately. about four batches of my easy buttercream on square cakes, you want to focus on the corners. The best advice is to start at the edge of the corner and work your way to the center of the cake and then stop if you pull all the way to the end. on the side of the cake, you're going to ruin your sharp corners. For more information on how to cover a square buttercream cake using acrylics, check out my tutorial. I decided to panel my cakes with fondant because I want the edges to be super sharp.
It is not necessary to use the panel method, you can do a traditional coverage. You can check out my other tutorials on how to cover a square cake with fondant, so the panels take a little longer than the traditional way of covering your cake and fondant, but results in super sharp clean edges. The trick for the panels is to start with a very cold cake and roll out the fondant into panels, then we'll cut them out to a size that's a little bigger than each side so my top measures eight by eight. I'm going to cut a square of fondant, you know, nine by nine.
Then I'll put it on a cake board. I'll put it in the freezer for about 10 minutes and this will actually freeze the fondant, so when we place it on the cake and trim the edges with a new x-acto blade or a very sharp razor blade, the fondant keeps its shape and It doesn't wear out. The disadvantage of panels, other than that it takes a little longer. that you end up with seams now I know it seems very obvious to you but when you decorate the cake you won't even notice these seams but I like to make them as invisible as possible by taking my fondant smoothers and just pushing them on. join the seam and make it as invisible as possible.
I really like to use my lmf or pluck recipe for almost all of my high end wedding cakes because it tastes great and is easy to work with if you are having trouble with your fondant and it is cracking or breaking, you might consider using a different brand or you can check my lmf recipe. It's really great for beginners. You would only need two batches of fondant, really like a batch and a half of Customers will complain that they don't like fondant or they know they don't like the texture of it and that it's like chocolate.
Explain to them that there are different types of fondant, that there is gourmet fondant and then there is cheap fondant, so you know gourmet chocolate. It tastes much better than cheap chocolate, so a good way to convince your client to put fondant on their cake is to put a little piece of fondant during the wedding cake tasting so they can taste how it really tastes. I have sold many. a wedding cake using this technique, so go ahead and cover the rest of your cakes and fondant and then put them in the refrigerator to chill until it's time to stack them.
Many people think that you can't put your cakes in the refrigerator. if they have fondant because when you take them out they start to sweat, this is normal, it is completely normal, it will not damage the fondant, it may be a little sticky, especially if you are in a very humid area, but eventually the cake will come to room temperature and this It's good because cakes taste better at room temperature, you don't want to eat cold butter inside your cake that doesn't taste good and when it gets to room temperature, it will. stop sweating you can reduce the amount of sweating by doing a couple of things if you live in a humid area you can put the cake inside a cardboard box and then put it in the refrigerator so that when you take it out the condensation is like it rests on the cardboard and not on the cake.
The other thing you can do is just have a fan blowing on the surface of the cake and this will help the water that is on the surface of the cake evaporate faster, but don't do it. touch the fondant, don't you know, mess with it or anything and everything will be fine. Delivering a cold cake is much safer and much easier to stack than an unchilled cake and will look cleaner and nicer. Most professionals work with ganache to make the cakes nice and stable or work well with cold cakes, so I'm going to go ahead and stack my first cake on my cake board.
This is a 12 inch cake board made from air cake boards or you can use a cake drum. Just don't lay the cake out like it's very thin cardboard or something because it just won't be strong enough to support the weight of all these cakes. I really like air cake boards because they are pre-coated with this food. safe material they have feet so you can stick your fingers underneath to lift the cake very important things you don't think about so I'm going to stack this cake here but sometimes I'll wait to stack my cakes when the place comes and I'll take them right to the edge of the table like this, I take my offset spatula to lift it up so I can put my hand in there and since they've cooled down, they're easy to handle, so I'm just going to put a little bit of buttercream or ganache just to keep it in place, try Center it as best as possible when you lower it, you want to use an offset just below the edge, get your fingers out of the way. and then you can carefully lower it down and then slide the spatula out, so if you have a gap around the edges, you just want to take the buttercream and fill that gap, you'll always have buttercream, ganache, fondant or whatever. you have used extra. your cake when you hand it over just to touch up any mistakes and you just take your finger and smooth it out to get that flawless edge if you ever need to cover a sink that's exactly how you do it so I have my three cakes that have Just come out of the refrigerator , they have been cooled and covered, they are ready to use, you may be wondering, but Liz, why do we have cake pans here?
We will use them as templates to know how big the next cake will be. That's literally what all of these are for. I'm stacking my cakes with straws. These aren't just regular drinking straws or something called smoothie straws, they are a little wider and a little stronger than typical drinking straws. Some people use boba. tea straws or you can use wooden dowels as there are many different options for stacking but these are the least expensive, are very easy to put on and take off and are very strong. I have used straws to stack cakes up to five tiers, I have my straw guide so I know how many straws to put in each layer.
You can get it in the blog post and download it. This is an eight inch cake and it goes on top of a four inch cake, so I need eight. straws to hold up this cake so one straw per inch don't use three straws to hold up a 10 inch cake that's how problems happen so how many straws do you need for a six inch cake? That's right, six, the first thing I'm going to do is Take my eight inch cake pan and if you're not good at centering, use a ruler. There should be an inch of space on each side.
I'm just going to mark a line as a guide, so now we know where our cake is supposed to be located. Being there and making sure we're focused. The first thing I do is make a hole in the middle of the cake. Go ahead and mark where the top of the cake is with your thumbnail or you can use a pen if you feel more like it. comfortable, like I'm going, you know, a little small towards the fondant, hold on tight because there's a vacuum cleaner and that's the height all my straws should be. I know I said we only need eight, but I'd rather be careful because I have all these straws around the outside edges, but I don't have anything in the middle and I don't want to put them right in this hole because that's our vent, so I'm going to put them right at the side.
What I should have done was take these and put them a little further away, but I was trying to teach. I'm not thinking now we're going to do the next level and since my cakes are cold, I can move them. around just a little bit if necessary, then I'm just going to seal the gap that's at the bottom. Another thing I didn't know with my first wedding cake is how to hide that space so that all my cakes would have ribbons around them. the partbottom, like if you're curious about the tools and things that I carry when I deliver a wedding cake, you can check out that tutorial on my website.
It's about the supplies I carry. I call it my oh shoot kit, it's an emergency kit. all the tools, you know, my recommendations for things to take with you to take care of any kind of emergency and put the finishing touches on a wedding cake when you deliver, oh, that's heavy, okay, it's time to decorate, so I'm redoing the design I had. on my original cake I had some scroll work on the center tier so I used buttercream the first time and this time I will also use buttercream just because I feel it is easier than using royal icing and at that time All I I knew how to do it was like that.
You're just like this kind of thing, oops, that's called pop, that's not very pretty, it's very old-fashioned looking, so I'll show you the kind of scrolls that I make now, so I What I do is try to create a flow coming from any focal point, so we'll have flowers that will come all the way to the front, so I'll create a scroll work that flows from that and accentuate it to create movement, so I'm going to take my piping bag and I'm going to create a swirl like the wind, like imagine the right wind and this is a number four piping tip.
I feel like I should have one a little bigger, but I don't. one like this and then I'm going to do another turn but I'm going to go in the opposite direction and um, if you need to practice a couple of times on parchment paper, which you probably should have, you can do that and then I'll go in with some little lines that go like this and basically we're going to recreate that same whirlpool over and over again. I think one of the hardest things about learning to swirl is understanding how hard it is to push, so if you're pushing, it really comes out. wavy, you're simply pressing too hard, and if it's breaking, you may be pressing hard enough but you're moving too fast, so it may take you a couple of minutes to figure out a good flow, basically anywhere you there is something like that. in one hole you can put little dots, three little dots and that fills any empty space, so now we can add some flowers to our cake.
We have our buttercream flowers that have been frozen so we can remove them easily. paper, my hands are hot so they will have to work quickly and if they start to get too soft they may have to put them back in the freezer. I didn't want this video to be too long for you guys, so if you're interested in how to make these easy buttercream flowers, go ahead and check out my tutorial at sugary show.com. I just have a little bit of my white buttercream and I'm going to start adding some flowers. I thought about it.
Making this in fondant again, but since it's like an updated version, I wanted to use something that's a little more modern and right now the buttercream flowers are very spicy, but not too spicy because it's like buttercream. Sorry, I'm getting cheesy. I started with my dark purple ones first when I first made this design with the fondant. I had never used a fondant flower cutter before and I was absolutely amazed that there was something like that that you could cut flower shapes in fondant so that they were like super thick and they weren't smoothed out or refined at all, there were just these super thick flowers, not very delicate, I have a leaf tip that has a little v cut in the center and you just have the little v on the side so you don't see the hole from above and when you pipe, squeeze and pull, just blend these cute little leaves with a vein in the middle and you can add them to some of your scrolls.
It's like the texture, so I'm going to take a little bit of my purple buttercream and add a little bit more purple to it and make a really dark purple to use in the centers of my flowers. I will apply my next color very quickly. While they're still cold, I'm trying to group them together, though you know, around the center, along this line, and then they spread out and I've only been using three colors, you know well, actually, one color that I started with. my dark purple and then I lightened it and lightened it a little more so that way you can get variations in color and depth and it looks elegant but everything goes together, everything matches, everything has the same undertone, lastly we have our white flowers of buttercream and you I know you won't be able to really see the white as if it were a white on white texture, but it just adds more depth to the overall design.
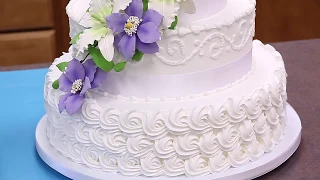
I'm going to place these around the outside edges, so now I'm going to go in. with a few more dots to fill in the centers where I feel like it needs them, it just feels like emptiness and maybe a few more like pipe leaves and I think I'll actually do that, although my original design just had swirls here, I think that works. It makes sense to have some coming out of some of these like flowers down here, it's our finished wedding cake, I remade my first wedding cake, it's a little bit better, that's it guys, that's how I remade my first wedding cake.
I hope this has motivated you and given you some confidence if you feel like you are struggling and you are never going to get better trust me you will get better don't give up I will see you next time.
If you have any copyright issue, please Contact