How To Install Epoxy Floors In A 2000 sq ft Home | Step By step Explained | PART 2
Jun 02, 2021Welcome back to Ligari Nation in today's video we show you an epic
epoxy
transformation on this2000
square foothome
. We resurfaced an existingepoxy
surface because the previous epoxy did not meet industrial grade standards. Now with Ligari these owners. They can rest easy knowing that this epoxy will hold up over time giving theirhome
the look they have been wanting. All our kits have a lifetime warranty. Please see the description below for more information and enjoy this video. Well guys, now it's time to start with the floor we all have. of our groups separated and measured with the metallics mixed in them, all the bpart
s are sitting next to them, same with the highlights, all of our apart
is separated, the metallic metals mixed in the b parts, right next to them side of them, I mean, it's ready to go first thing in the morning. what we want to do is take our first bucket and again we need a gallon and a half of part b so what we're going to do is use one of these five quart containers and I'm just going to dedicate it.
That's measuring half a gallon because for each one of these buckets, remember we have to divide one of these gallons, so that's the first thing I'm going to do. I'm going to take one of these. This goes here and then I'm going to use half of this. I like to divide this first and I'm going to measure two quarters of this b, so now it's really all separated. I'm going to do this every time I mix, so now I have a full gallon here. I can feel it and I have a half gallon here. I can feel it good, one heavy and one light because if I poured two quarts obviously I have two quarts left in this and now I'm just going to take this and set that. two quarts next to my next batch so I have my first two batches pretty much ready and all I needed to do is just pour two quarts out of one of those gallon containers so remember you always want to have a lot of checks and balances. so I feel like this is my light, which is half, two quarts and this is a full gallon, so I have a gallon and a half of b, now that's what I'm going to do nonstop while I'm going through this.

More Interesting Facts About,
how to install epoxy floors in a 2000 sq ft home step by step explained part 2...
As soon as I pour this hardener, the clock is ticking, we're going to roll at a two to one ratio. I started with three gallons of part a and then added a gallon and a half of part b. It's a two to one ratio, these are four and half gallon batches now what I'm going to do and this is the most vital part. I'm only going to explain this once and then you'll see me make each batch like this. I'm going to mix this up. for about a minute and a half, moving the drill up and down, scraping the bottom, scraping the sides with the head of the drill, then I'm going to pour this whole bucket into a new bucket, a whole new bucket, I'm going to scrape this into this , the reason we want to have a secondary mixing bucket is to make sure we don't have soft spots on the floor, so what I'm doing is scraping the sides of the bucket and then what I'm doing.

What I'm going to do is mix again for probably about a minute and I'm going to move this drill up and down a couple of times throughout the entire mix. Okay, let's pour this for Tyler. I will come. Now I'm going to start doing my second batch because remember for every two of these batches we're going to do a spiked Tyler highlight, but it's because he'll be walking on the floor, so now remember I've already recorded it. outside of this section, so it's my job when I'm spilling this, I just want to go around the perimeter of this and maybe throw it down the middle and then Tyler will be careful not to spread it beyond this thing, don't do it.

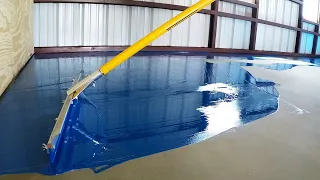
I'm afraid to keep this upside down because you've used the secondary mixing container. I'm going to mix up another batch. Tyler will start to spread this out and then we'll take you and show you the highlights now that Tim's got it. spilled I'm going to use a magic, we call it magic test. The artisan tool makes them. You can get them on Amazon. They are just a squeegee. Everything I'm trying to do again. I'm not going to go beyond the lines. He put this blue line. I'm just imagining a line here. I don't want to push the product past it and when I move these things I want to keep my test off the squeegee at a low angle if I move the product with this up and down it will pull too much and won't really leave any product behind , as long as I have it at an angle, I can apply a little pressure and it will always leave product. behind so the first thing I like to do is go around and finish all of my edges once the edges are done I can start going back and forth and flattening these beads to cover everything once we do that. 18 inch roller and I'll just do a cross roller over the floor real quick, that will help level it out if you have any sticky spots that sound really sticky, it's too thin there so we need to get the product in there if you're rolling.
I'm just pressing in a lot of product, it's probably too thick, so while we're doing it, I'll show you what to look for when we do it, but we'll start right away because again, once I have that hardener, I want to get this stuff out of the bucket on the floor, spread it out. , do your sections and just walk out of the room, so there we go, now you can see it's level, all my edges are done, I've got my line right, so I know I shouldn't go past that, now all I have to do is do is extend this section in the middle, do the same in the next section and then add my highlights and if you're not familiar with how to lay things out the best way.
The way is to do the edges like we did here and then go back and forth to see how we have a big pile here, which is fine, I know where there are some thin spots, like here the concrete slopes up a little bit, I just want to do "I'm sure we have a decent amount, although it will want to flow down and then here it's a little thin, so all I'm going to do is start putting a little bit of this product in the places where I know it's thin and then we've wrapped it around." this with painter's tape to remove it all we have to do is remove it to remove any loose fibers or hairs that are on the roller so what I'm going to do is start with my roller since it's drying in the middle where I know which is nice and thick.
I don't want to start at an edge where it could be thin. I know we have a decent amount of product here in the middle and I just want to hit some random spots. Until I get this absorbed, I don't want to just sit on it. a spot and we'll use a half inch nap since this is such a big floor that's going to make it a lot easier so once you're done crossing. As I roll this, I'll immediately start rolling out the next batch, so now that I've absorbed a decent amount of it, we'll just roll it really quickly and the roller will start to sound not so sticky once it goes on. like it's soaked all the way through so I can tell it's a lot thinner here so this sounds constantly sticky so I can take that squeegee and move a little bit of product around or I can push it with the roller okay, guys, so everything.
What I'm doing, I know it's thin over here, so I'm just taking my squeegee and bringing in a little bit of product this way, so that's it guys, that's basically a section now, if you're doing a section at a time adding highlights, they would add their highlights. now we're doing two sections at once and then we're going to add highlights, so I'm going to do the same thing in this section that I just did here. I'm going to take the squeegee and spread it all out. I'm going to make sure I don't go over these lines of tape, we'll roll it up and then he'll take out the lights and then I'll do the lights.
That's why you want to have everything set up beforehand. Just like in the base coat, we already have our two batches, only they are prepared the same with the highlights, so again every two base coats we will give it a highlight, it is already pre-measured, everything I need. What I do is I take part b, the hardener, and pour it into part a that has my premixed metals, so one of the reasons you want to make sure you mix it in here like on the floor, like on the base coat and Pour it in. in another bucket because you will never be able to scrape the sides or bottom of the container well enough.
If you don't pour this into another container, you will eventually have soft spots on the floor, even people who hear it all the time. They've been doing it for 30 years and they don't know why they have soft spots on the floor and it's the materials fault but it's not about how it's mixed so I'm going to mix this and pour it again. into a new mixing container and then I'm going to give it to Tyler to have in a new bucket, but now I've scraped the sides so I have unmixed product that I scraped off the side and now it's in the middle. so we want to mix that up right now I have the highlights it's ready we're going to take this to Tyler he's going to spread it on the ground so now what I'm going to do is be like me.
I'm going to go off Tyler's lead if he feels like I need to slow down then I will, but I know he's already got it level, he's already got it crossed, he's already got the highlights, I know it's probably going to take him about five minutes to extend. these highlights and then start working with it, so I could wait about five minutes before I start mixing my next batch. You'll probably want it when you start doing the layout on the floor. I'll watch it, that's when I'll start mixing my next batch. I'm going to mix two more batches and then one batch of highlights and we're going to go all the way through this house and you'll see how smooth. everything is fine so I'm going to finish implementing this and then we're going to add the highlights and we're going to blend them together and then we're going to continue this process until we're done so there are a few ways you can apply the highlights in a lot of different ways I'm just going to throw it on top of the silver and then we will mix it with the squeegee.
Really cool technique, it's fast, it's simple, but I want to make sure this is all I have for this section. so I don't want to just start throwing a bunch, get halfway there and then run out. I want to have my stacks, my veins, whatever, all over the floor, make sure I have enough left and then I can add more to each place, so all we're going to do is start small, randomly all over the floor, so if I run out now at least I have color everywhere. Well, I still have a long way to go before I can add more directly to each place, but Before doing that, I always like to go around.
The most important thing you want to do is make sure there is color on all the edges of the walls. If we turn around and just blend this, we're not going to have black in much of this. we want this floor to look like it goes under the wall, so I'm going to go around it, just use a paint stick and apply color up to that edge randomly all over the floor in the corners. This is the best way because it is much easier. instead of trying to throw it right next to a wall and that's it, now I'm sure I have color everywhere, I don't have to worry about running out of anything now and all I'm going to do is add more randomly.
For just random black beads, we don't have to hit each one of them randomly on the entire floor. I just want to make sure I can repeat this process on the entire floor. This is a pretty simple technique to do in terms of recreating it on a large scale and then if we have points that maybe look a little open, maybe right here we could add a little bit and there you go, so now we have our aspects highlights for Tim to start mixing the next batch when it arrives. he finishes mixing these um he should have it ready to go so we'll use the squeegee for this.
There are a few simple ways to mix this up. You can roll it with the rolling pin when we're rolling, we use a nine inch rolling pin. and you just spin the whole floor and then you mix the colors that you want to mix just enough so that it doesn't look like they're spilled in bunches, so all I'm doing is not necessarily trying to move the product. a lot, I want to just swipe the surface, move it in random directions until you can't tell it's a spilled puddle and I'll show you that process so we get started, you can't really tell that we spilled it. place the stacks nice and if you have something like for example here a little spot you can just work that spot a little bit to the right maybe right here we want to work that in a little bit it doesn't take much to mix it up and form Marbling it , you can see how much ground you can cover, it's a relatively quick technique and once it's marbled and we spray it with the liquid diamonds, it's going to look absolutely beautiful, but notice how that color goes right to that edge. there is no empty spot on our edges, notice how my talk, my pattern, is all random, that's what we're looking for, we don't want to keep doing the same pattern over and over again until we have a matching overlapping pattern all over the floor that's why I'm constantly moving in different directions so the nice thing about this process is we could do 10,000 square feet and if we do this process we'll have fluid material in every batch so it's not like we're trying to cover all this floor andthen add highlights which it would be a nightmare to never achieve, that's why we split it into batches, so when I get to the next batch and this floor is done, I have fresh liquid, right? or fresh epoxy, new material, it's not getting setting, it's not getting sticky on me, the process is key to breaking this down into sections and still getting that new material and I always notice that I have a lot of black in there if I wanted to.
Put that in there, it would even have more black, so I'm going to bring it out here where there's not necessarily a lot of black, so I'm constantly looking for where I have color and where there's no color, so this is perfect, guys. I'm about to finish Tim is pouring my next batch, the last thing you want to do is have the product sitting there waiting so we timed this almost perfectly because all I have to do now once I'm done is spray the floor with the isopropyl and the liquid diamonds and then we'll spray it with denatured alcohol to help level anything on the floor okay guys so it's basically spread out.
I want to go around and make sure it doesn't have round spots that just look like a spilled pile, so I'm going to quickly look at the floor if I notice something or whoever's helping you if you notice something, point it out, mix it up a little bit better, but this looks very okay, everything looks nice and mixed. So what we're going to do now is add our liquid diamonds to add a lot of sparkle to the floor and just mix our liquid diamond metallic powder with 91 isopropyl alcohol, so you want to use 91 or higher and we want to shake it up while I spray and always it's good to try it so that's what I want to pour the medium drops and you'll see what it does so I'm going to shake it constantly as I spray. floor, this will add a lot of shine to the floor and it's not like a cheap pepper looking gloss, just a speck of black pepper, it's like it's actually a metallic shine, it's really cool, notice how I'm shaking it constantly.
When you pull the trigger, small to medium blobs are fine guys, so now we just repeat that exact process once I roll this out and roll up the next two sections, I'm going to spray the floor with denatured alcohol and show you. guys, that process will help this floor just lay the glass smooth, so this is basically ready for reflections. Tim is mixing them now, so now what I want to do, we're going to set this up in the next section and then I'm going to just take denatured alcohol. I'm going to put on a mask.
Obviously, spraying chemicals inside starts to make the epoxy smell a lot. It doesn't actually have a zero VOC smell but this does so I'm just going to wear mascara while I spray it and depending on how bad it gets in here I might start wearing my mask so all I'm going to do now is what which we call spraying, spraying the floor with isopropyl alcohol and liquid diamonds now. What I'm going to do is spray it to help level the surface, help let air out of the resin, and again, we're not going to burn it, so we don't have to do that. our products um this is just the process of doing it and helping to ensure that we don't have bubbles and things like that, there you go so the sex is pretty much over.
I can add my highlights here. and we're basically repeating this process until we're done with the work, so the first thing I want to do is blend right into this line where it goes to our first section, so every time you make a new section don't just start working from one of the rooms, mix that line in first all the way down so it's inside the new resin, it doesn't really have to touch that network, that previous batch of resin, so that's what I'm going to start first on one end of the room and I'll work my way down so my edge is all mixed in resin and it's still nice and fluid so I'm not worried about seeing a hard line or the section. that we did before, this will all blend and marbleize beautifully, so I'm going to continue with this, we'll spray the liquid diamonds, we'll do the next section, we'll spread the denatured alcohol mist, we'll add our highlights and again, guys, we just want to do the exact same thing .
We don't want to do anything different throughout the house. We are going to continue doing the same process that we did in the first section. Okay, we're getting ready to mix the top layer for this floor. Now it's like the primer we're just going to mix up a couple of kits we want to see how far it goes these will go from 500 to sometimes 7 8 900 depending on how flat the floor is how much will need to be sanded if sanding is necessary so let's go to start with two, just remember that you never want to run out of top coat mix and then you'll have to stop and then mix some more top coat.
Always have someone ready to mix another top coat if necessary. So once you start the floor, it's time to rock and roll because you want the entire floor to be set up as one layer, you don't want to, you want to minimize the roller lines, as many roller lines as possible, so you want to be rolling. and roll back and it sets up as you put the new top layer on so if you need more people to roll that's great there are always more people than less people helping so Tyler and I are going to be rolling and we could Have Alex help you with some of the edges later when we have to break into the kitchen and the hallways and then try to make sure there's a wet edge on everything and you'll hear Tyler explain that, but I'm coming. to show you how to mix the top layers and just like it says mix with part b once mixed mix in 13 ounces of clean water now I'm mixing two kits at a time so I have 26 ounces of clean water so the first thing we do What we're going to do is pour the parts a into the bucket and just like with the epoxy, we're waiting for it to drip, we want that stream to become a drip and you can leave this upside down. for five ten minutes if you want I just want to get most of it out okay so it's starting to drip now it's probably okay now just like the primer this is a water based product so as long as it stays in a dough, it will stay liquid once you spread it, it starts to set very quickly as the water starts to evaporate, so it's the opposite of epoxy, so we tell you to take it out of the bucket, get out of the bucket very quickly and that gives you tons of It's time to work with these water-based products like primer and top coat.
We want to keep it in mass until we're ready to use it until we're ready to roll it out, that's why we keep it in a bucket pour it into a, you know, a rolling tray and then it starts to set after we roll it out. I'm going to pour our b part like the epoxy, if you pour it too quickly it could get caught in this handle. here, so just tilt it for about five seconds, scoop out as much of the handle as you can, and then pour it back over this top layer in a three to one ratio, so three parts a to one part b.
I'm going to mix this for about A minute and a half scraping the sides at the bottom with the paddle wheel and then once it's mixed well I'll slowly add the water as I'm mixing it. Now we have the top layer mixed. Now we're going to get in there and Tyler will show you how to apply it, we'll all be working on the floor, okay it's time to apply the top coat, we ended up waiting two days because it's cold where we are, you usually want to. do it within 24 hours, but obviously the colder temperatures will take longer for the resin to set, so we do like a test with the nail or if you say you go out and put a little weight on it and see a print, you might want to wait a while.
A little more time to apply the top coat, that print will usually recover and become smooth, so that's not a problem, so you're all set. We showed them how to fill in any imperfections, degas bubbles, things like that, so we mixed the top layer. To make glossy urethane, we will use a half inch nap roller that we have already removed. I'm going to use an 18 inch rolling pin. Tim will use a nine inch and hit our edges. That way I don't have to get right to the wall and then all I'm going to do is focus on the main parts of the floor and then obviously when we get to the kitchen we'll split up and jump like this.
We want to keep a wet edge basically at all times until we finish a process similar to applying the epoxy, so we'll do it in
s of the correct roller width basically across the entire floor until we finish in the garage when you start with your roller, you want take a second, let it really soak in, if you just dip it in there real quick and you're going to roll the floor, you're not going to have much product in there, you're going to have to end up dipping it in again, so take a second, we soak the roller for a minute and we're using an 18-inch rolling tray.
step
s of the correct roller width basically across the entire floor until we finish in the garage when you start with your roller, you want take a second, let it really soak in, if you just dip it in there real quick and you're going to roll the floor, you're not going to have much product in there, you're going to have to end up dipping it in again, so take a second, we soak the roller for a minute and we're using an 18-inch rolling tray.Put a garbage bag here so we don't have to clean the tray when we're done. Notice how I didn't fill it all the way, so we don't want to fill it all the way, which makes it harder to move and also when you dip the roller in there, it's going to build up a product here and then. When you're rolling the floor, it's going to start dripping and there will be drips all over the floor, so I want to try not to stick this completely on the top layer, enough to soak this roller. up so Tim starts hitting my edges.
I'm going to wait until he has both sides and then all I'll do is work wall to wall and we'll head to the garage where we'll finish up while he does it. that I'm just going to soak this roller to saturate it and all I'm trying to do is basically one pass the width of the roller. I'm not trying to start covering the floor randomly, we want to make nice even strokes and you'll see once I start doing that what it looks like, so all your work is to not get too far ahead of me that way I can stay on track.
Wet edges, nothing dries out, so on my first bath I'm just going to go. To start in the middle and see where this takes me, I could do a full pass with a dip of the roller, so the idea is to just spread it out well and thin out a couple of passes before doing my final back roll. Okay, I did it right and I spread it nice and evenly and I'm going to show you a little tip from agari on how to minimize the edges of the roller, so I'm going to take and squeeze out a little bit of that excess product just by tilting the roller and now.
I'm going to do my last backspin now I want to go to the wall as straight as possible and then pick it up on the other wall so that's a pass so we'll continue that process now I know. A roller bath will take me from wall to wall, so I can always start right in the middle, roll a little in one direction, roll a little in the other direction, and then just go from edge to edge and notice that I'm looking at it, I'm just rolling on each wall right now and I've only gotten like one and a half rollers past him, so I'm only about eight to nine inches past where his roller goes.
I always want to help keep that edge moist if I'm just going. in front of him and I start doing the whole perimeter so when he gets there it'll be dry so it's like having two layers and we don't want we're trying to make it as fluid as possible and when I
back to be more obvious if I just need to spread out a couple of feet, I'm not going to get into the mix anymore. I'm really just rolling on this wet stuff in the pan, I'm not even going to get into the mix. Everywhere you place this bucket, place it on a rag or be sure to wipe the side with a roller because the drips will harden and you will notice them on the floor, so don't let the bucket drip. all over the floor when I do my last backspin, I want to make sure it's overlapping a little bit from the line I left when I extended it.
step
back to be more obvious if I just need to spread out a couple of feet, I'm not going to get into the mix anymore. I'm really just rolling on this wet stuff in the pan, I'm not even going to get into the mix. Everywhere you place this bucket, place it on a rag or be sure to wipe the side with a roller because the drips will harden and you will notice them on the floor, so don't let the bucket drip. all over the floor when I do my last backspin, I want to make sure it's overlapping a little bit from the line I left when I extended it.I'll give you guys a close-up of the next one. one, so now I'm overlapping the last pass I made by about an inch or two and again I'm trying to keep it nice and straight, so here's my line from the pass I just made when I made my last row. I want to overlap that just a little bit, so I'm going to squeeze out my edge a little bit, extend it and then we'll just overlap it, see how it overlaps, that caught that drip that was there, it got another drip, so come back, we'll start that backtrack again, look , I'm knocking down that hard edge that's all so continue that process if I ever need to try to pick something up maybe Tyler doesn't see it I see it as a we drip on an edge a lot of times we take those things off so I'll start and then I'll raise the roller when I see something good, so you know, if it's like a couple feet away, we'll shoot. we should really take care of that line we should take care of that drip this is the only way to do it is to just take the nine inch roller and just lift it off the ground while you roll it a little bit be very light so guys when I'm rolling, I'm just looking at that edge.
I'm trying to keep it in the same place, so I'm watching the edge of this roller go by the whole time, making sure it's not going crooked or at an angle and the same thing when I do that back roll I'm just watching the edge making surestay a little overlapping now on this next walk you can see we only have about one width left so when I finish His final turn back I'll do it along this wall and the last part of that wall over there so I can get out of his way , so I'm going to wait for his final turn back and I'm going to get ready and I hit that wall real quick, so guys, when I'm going to stop, I have to stop here, I'm going to feather my I don't want to just stop and pick it up, push it like it's a plane taking off. and slowly lift it up, so now we're getting ready to go to the kitchen area, so Tyler is laying out this big area.
We're about to go into the kitchen, but again we want the entire kitchen area to be perfect on the top layer with the rest of the floor, so what I'm going to do is as he moves into the kitchen area, he'll probably I'm going to go into the kitchen, I'm going to start rolling it out with this nine inch rolling pin. It's a little more manageable here. If I need help, I could call him and say, can you do a back end roll with that big 18-inch roller, but that's the goal. I can work in the kitchen while he works there and while he works on the floor, maybe I can grab the other 18 inch roller, focus on the dining area and then go back to the middle together so you know something.
Things are hard to do and they're better in concept than reality, so let's see what happens, so I'm going to soak up the roller a little more than I have because now I want to move on. My edges and I hit them quickly obviously being careful with the cabinets. Note that we have the cabinets taped together in a couple of rows. Now I'm not going to do all the cooking. I'm just trying to get to where Tyler can still get into this. long part of the kitchen now notice that I'm still extending this area that will be under the stove, you're not really going to notice that, but we still want the durability under there, you guys notice how I turn my rolling pin, I can't get in there, normally you you turn around and you really get under it, your toe kicks his cabinets, so I'm still making sure I'm a width ahead of him, but I'm going to go into the kitchen and start rolling the edges. outside and possibly in the middle, so again if you need help from the big roller, feel free to call them and ask them to do one last back roll many times with the 18 inch rollers, it's much easier to get.
On that final clean roll, we've done a lot of things over the years with 18-inch and nine-inch rollers that were pretty proficient at both, so, okay, now really the areas that are left are, you know, a room of medium size. a decent sized room and this room here which is a decent sized room, so now we're back in action. I bought the bathroom from him because it was quite small and was manageable with a nine inch roller. Now I'm going to be doing the same thing, I'm going to be in the hallway, I'm just going to try to stay in front of him until we move on to the next room and then the same thing, I'm going to try to stay in front of him with a nine inch roller, keeping a wet edge for him, okay guys, so I went out a little bit, obviously, I wet my roller in the hallway.
I don't want to use too much out there, so I rolled a little here. I'm going to jump here in the hallway. Roll up the hallway a bit for rooms as small as this one. I'll roll a strip in half, a foot or two, and then I'll roll it crosswise and just work one roll width at a time so I can lean over without stepping and do my last turn back, so I'll just go back to this quarter of a service, it's not one of the most important rooms, but we still want to be very careful and make the last few turns back, so I'm getting the material. fall to the ground quickly and then be very light with the roller, so this will look absolutely beautiful.
I'm getting back into these really awkward areas, so I'm always going to keep Tyler moving, so I'm going to get this. Take this to the door and then I'll return to this room. Start making the border of this room again. You know, one thing that's worth mentioning is that we don't have any cross airflow. We even closed the garage and this door is open. We don't have windows in the house, if there is a breeze or a cross air flow this material will
install
much faster than you can work with it, so if you roll it out and it gets sticky immediately it is because it is too fast toinstall
. because it's too hot, too humid, too much airflow, so you never want to install this in direct sunlight, like if you were doing an epoxy floor in a garage and the garage door is open and the sun is in the floor, you really want to cool that concrete down a little bit because when it gets to that sun spot on the garage floor where the sun is shining, it will set almost immediately and become sticky, so you want to give yourself the best chance to have a successful installation, just make sure you don't have a lot of cross airflow or anything so we're going to show you how to remove the tape in the place where we wanted to stop the resin so let's just peel it off and start bending it back and forth and just that seam will break and then what we're going to do since we're going to apply the top layer is we're going to put on a new piece of tape.That way, when we're done, we just come and take it off and it's very easy.
If you have any copyright issue, please Contact